
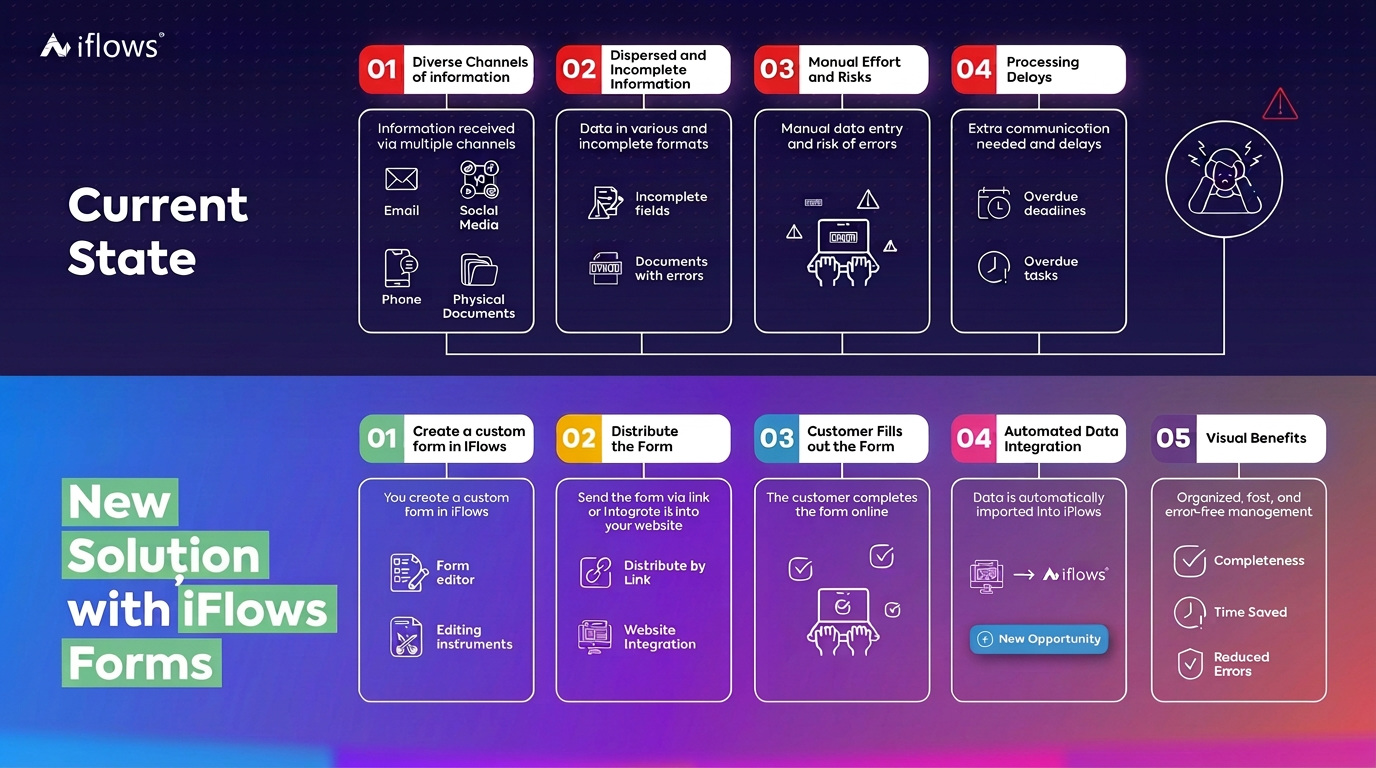
In managing customer relationships and orders, companies often face challenges related to collecting and standardizing information received from clients. Frequently, orders or requests arrive with insufficient details, requiring additional communication and delaying the process. Furthermore, staff must manually enter data received from various sources, which is time-consuming and increases the risk of errors.
The iFlows platform addresses these needs through the Forms Functionality. This allows for the creation of customized forms, ensuring that all necessary information is collected in a uniform format. Moreover, the collected data is integrated directly into the platform, reducing the need for manual entry.
iFlows forms can be used for various purposes, such as: Taking Orders, Requests for Quotation, Support Requests, Satisfaction Surveys, Webinar Registration, and more.
The process is simple: create a custom form in iFlows, send the form to customers via a link or integrate it into your website, the customer completes the form online, and the data is automatically imported into the iFlows platform, generating a new opportunity in the system.
How does a customer see the form?
The form created in iFlows can be accessed by the customer in two ways:
- Via a unique link, sent directly via email, message, or another communication channel.
- Integrated into your website, using the embed code.
What does the customer experience look like?
Let's take a questionnaire for the furniture retail sector as an example:
The customer starts by filling in general information about the company. If it is a legal entity, they can enter their data quickly using the automatic import based on CUI (unique registration code).
If you have enabled the document upload option, the customer can attach files such as sketches, technical specifications, or other documents relevant to their request.
Customer Information Section
This section is intended for collecting specific details. In the case of furniture production, the customer can answer questions such as:
- Preferred style: e.g., Classic, Modern, Rustic.
- Desired finish types: e.g., Glossy, Matte, Satin.
- Preferred materials: e.g., Solid wood, MDF, Chipboard (Pal).
- Assembly required: e.g., Yes/No.
- Color preferences for materials: e.g., Natural shades, vibrant colors.
- Custom message engraved or printed on the furniture
All fields are configured according to your requirements, and the customer fills them in quickly, either by selecting predefined options or by entering open-ended responses.
Products Section
This section allows the customer to clearly express interest in certain products. In the case of furniture production:
- Choose Product: The customer selects from a predefined list of products such as tables, chairs, cabinets.
- Description: The customer can add additional specifications for each product, such as dimensions, colors, or other technical features.
- Quantity: The customer specifies the number of pieces required for each product.
What happens after the form is completed?
- Data is integrated into the iFlows platform:
All entered information is automatically imported and centralized in the system. If the Opportunity section is enabled, an opportunity is generated directly in the section. - Efficiency and clarity:
This process reduces additional communications and eliminates the risk of errors. Your team has immediate access to all necessary details, optimizing response time and quote preparation.
Step-by-Step Configuration Guide
Step 1: Creating a New Template
- Navigate to the Forms Section:
- Access the section.
- Adding a New Template:
- Click on the + New Form Template button located on the right side of the page.
- Filling in Basic Information:
- Name: Enter the name displayed internally to identify the form.
- Alias: Fill in the alias that will be used as the title within the form. If not filled, the title will be taken from the Name field.
- Notification: Enter the employees who will receive notifications when someone completes the form.
- Activating the Form:
- Check the Active option to make the form available to customers.
Step 2: Customizing the Form
The created form is structured into three main categories: Client, Customer Information, and Opportunity.
Category 1: Client
- The Upload Documents option gives the customer the possibility to attach documents directly to the form. If this option is enabled, the uploaded documents will be automatically stored in the platform, in the section: .
- Collecting Basic Information:
- Add fields for essential customer information.
Note: After the customer completes the form, if their data is not already in the platform, the system will automatically create a new client and assign them the Prospect status.
Configuring Fields in the Form:
-
- Name the columns as you want them to appear in the form (example: "Company Name").
- Associate each column with the corresponding field in the platform (example: "Company Name" → Name).
- Check the fields that must be mandatory. Note: The Name field must be mandatory for correct integration into the database.
Note: When filling out this section, similar to the process of adding a client in iFlows, your customer has the possibility to automatically import their data. This is done by simply entering the CIF (fiscal identification code) and using the Import button.
Category 2: Customer Information
This section allows you to add custom lines to collect relevant customer information. Here you have the flexibility to define both questions (e.g., "How satisfied are you with our services?") and static information or specific details (e.g., "Company size" or "Delivery deadline").
- Add a New Line
- Click on the "+ Add Line" button to create a new row.
- In the Name field, enter the text describing the information you want to collect.
- Select or Create a Field
- If a suitable field already exists for the line you are adding, select it from the Field drop-down list.
- If no suitable field exists, create a new one using the + Add Field button. In this case:
- Associate a descriptive Name with the field for future identification.
-
- Specify the Field Type. Text: For open-ended answers. Number: For numerical values. Select: For predefined selections (example: Very Satisfied, Satisfied, Dissatisfied). Date: For selecting a specific date.
Note: If you choose the Select option, you will have the possibility to enter several predefined variants. Enter each desired option in the Value column. These variants will later be displayed to the end user as a drop-down menu to choose from.
- Configuring Additional Options:
- Default Value: Pre-fill the answer if you want it to be more intuitive.
- Mark fields as Mandatory or Optional.
Category 3: Opportunity
This section allows you to transform the information collected via the form into a sales opportunity, which will be imported directly into the platform in the , you will use this option if the form aims to identify the products or services that the potential customer is interested in.
- Complete the following:
-
- Workflow: Choose the workflow associated with the opportunity.
- Validity: Set the validity period of the opportunity.
-
- Adding Products to the Form:
- In the Name column, enter the product name as you want it to appear in the form.
- In the Product column, associate it from the iFlows product catalog.
Note: The person filling out the form will have, for each product line, a field called Description, where they can enter additional specifications (e.g., dimensions, technical features). They will also have a field to specify the number of pieces desired for each product. This information will be visible in the platform so that the person processing the opportunity can take it into account when creating the offer.
Next step: Distributing the Form
- Generating the Form Link:
- In the page, click the Copy Link button next to the targeted form.
- Sending the Form to Customers:
- Insert the generated link into a conversation, email, or other communication channel.
Option for Integrating the Form into a Website:
- Obtaining the Embed Code:
- Click on the View button for the created form.
- At the top of the page, you will find an embed code.
- Inserting the Code into the Website:
- Copy the code and insert it into the desired page of your website.
- Form Completion by Customers:
- Once the code is inserted into the site, the form will be visible and fillable directly on the site.
- All information filled out by customers will be automatically imported into the iFlows platform, generating a new opportunity.
Viewing Submissions
- Accessing Completed Data:
- Click the View Data button on the page.
- Viewing Information:
- A page will open displaying:
- Documents uploaded by the customer.
- Created opportunities.
- Details of the information entered in the Customer Information and Products categories.
- A page will open displaying:
- Viewing Additional Details:
- Use the Expand button to see detailed information from the respective categories.
This functionality allows you to access and analyze all completions of a form centralized in the platform. If the Opportunity section was activated, completed forms will also appear in the section.