
In short
The Vehicles module is the company's fleet register. For each vehicle you keep in one place its identification, technical and administrative data (including the leasing contract), documents with a validity period (ITP, RCA, CASCO, Vignette, Tachograph, ADR and your own types), the service plan, service interventions, notes with reminders, files and standard documents. The platform shows you in advance which documents are expiring and which services are coming up, for each vehicle and for the whole fleet, in the Compliance panel.
The module is useful for whoever manages the fleet: the fleet manager, the administrator, the purchasing team or accounting (for costs).
Where to find it
- → Vehicle list tab — the vehicle register.
- → Compliance panel tab — documents and services for the whole fleet.
- Vehicle file (click the registration number) → the Details, Documents, Service & Maintenance, Standard Documents, Notes, Files tabs.
- → Vehicles tab — categories, document types, tags and custom fields.
- — the rights for the module.
Before you start
- Grant the permissions. After the update, the module is visible only to administrators. For other users, grant the rights in the Vehicles group (see “Permissions”).
- Financial values (purchase value, leasing instalment and residual value, document value, intervention cost) are visible and editable only with the Vehicle Costs permission.
- The categories (Car, Van, Truck, Minibus, Motorcycle, Other) and document types (ITP, RCA, CASCO, Vignette, Tachograph, ADR) already exist. Your own are added with the Vehicle Settings permission.
- The default driver is chosen from active employees with login rights who are not administrators. The vehicle supplier and the service provider are chosen from the supplier list.
The vehicle list
Step 1. Open , Vehicle list tab.
Step 2. Read the badge in the Compliance column: Expired (red), Expiring (orange), Compliant (green) or Not applicable (vehicle without documents). Vehicles with expired documents are listed first.
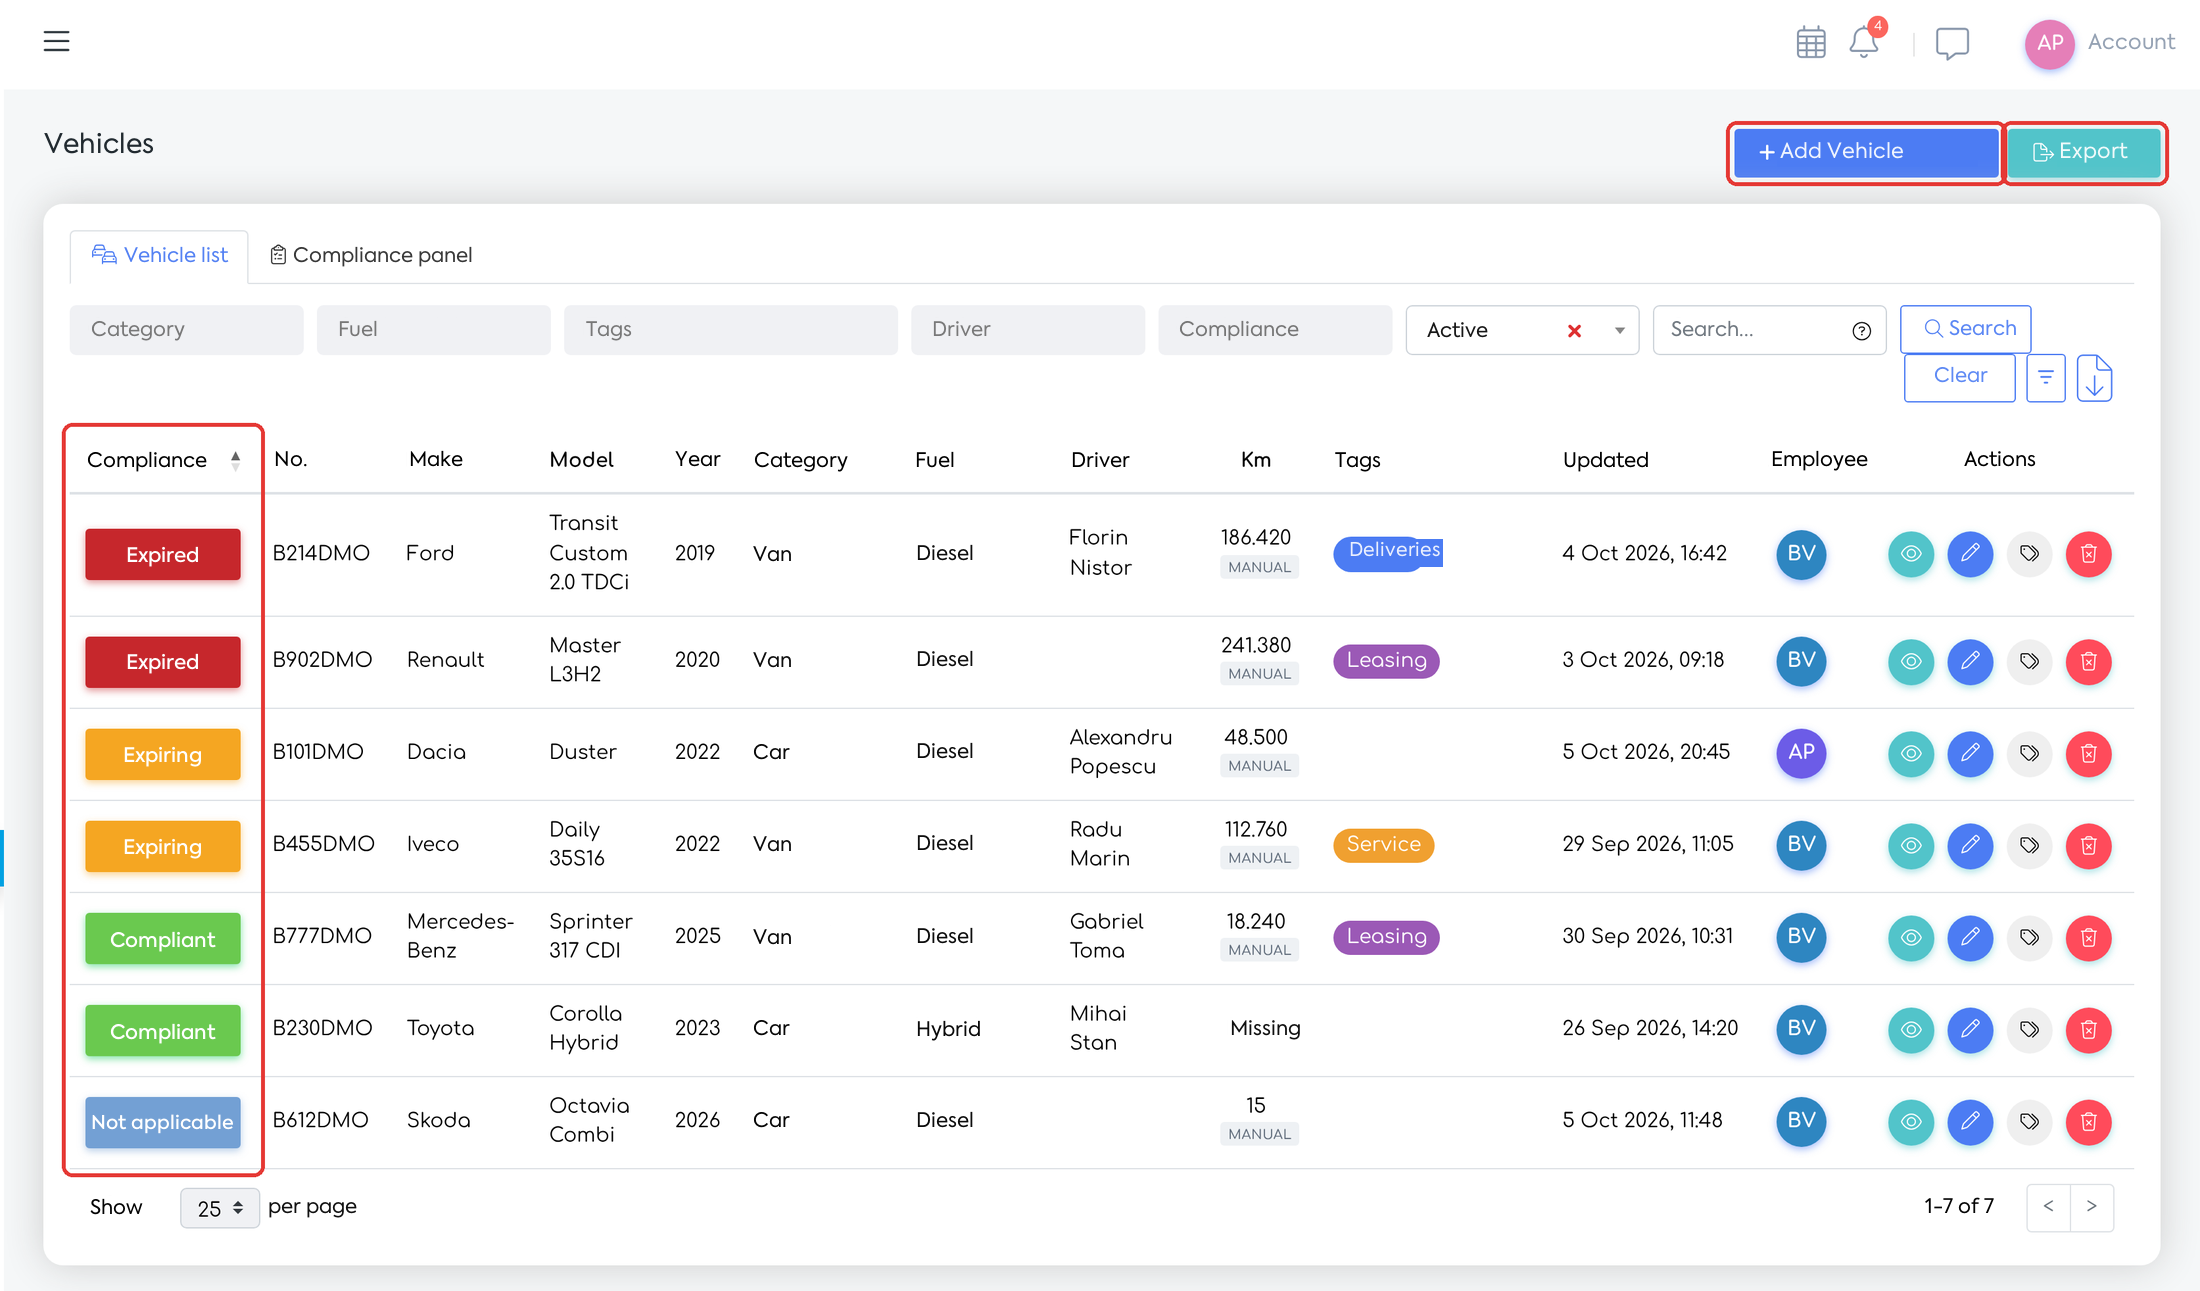
Vehicle list: the compliance badge on each vehicle and the Add Vehicle and Export buttons.
Step 3. Use the Category, Fuel, Tags, Driver (including “No Driver”), Compliance and Status (Active by default) filters or the Search... field (number, make, model, chassis number, driver). From Filter Options you can add the Ownership type, Supplier and Year of manufacture filters.
Step 4. For Excel, click Export (the whole fleet register, including archived vehicles) or the Export selection icon next to the filters (only the displayed list). Exports require the Export Lists permission.
Adding a vehicle
Step 1. Click Add Vehicle.
Step 2. Fill in the Identification and Technical sections. Registration number, Category and Fuel are required.
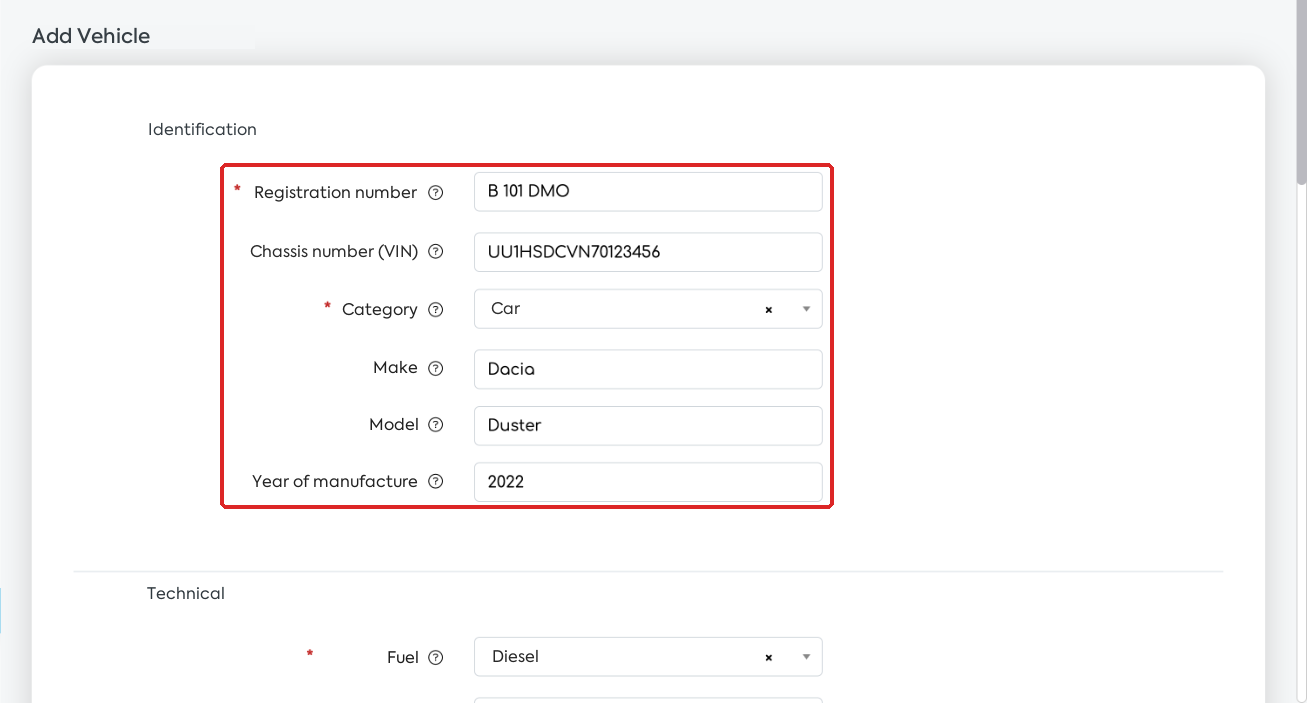
The Identification section of the form.
| Field | What to fill in |
|---|---|
| Registration number | For example “B 101 DMO”. On save, spaces are removed and letters become uppercase. The number must be unique, including among archived vehicles. |
| Chassis number (VIN) | 17 characters, letters and digits, without I, O and Q. |
| Category | From the list; with the Vehicle Settings permission you can add a new category directly from the form. |
| Year of manufacture | Between 1886 and the current year. |
| Fuel | Petrol, Diesel, LPG, Electric or Hybrid. |
| Engine capacity, Power, Rated consumption, Tank capacity | cm3, kW (the file also shows the HP equivalent), l/100 km, litres. |
Step 3. Fill in the Administrative section. Ownership type is required: Owned, Leasing, Rented or Loan for use. Purchase date cannot be in the future. Initial odometer (km) becomes the vehicle's current odometer.
Step 4. If you choose Leasing, the Leasing section appears. Fill in Contract number, Monthly instalment (excl. VAT), First instalment, Total number of instalments, Residual value (excl. VAT) and At the end (Ownership transfer, Return or Extension).
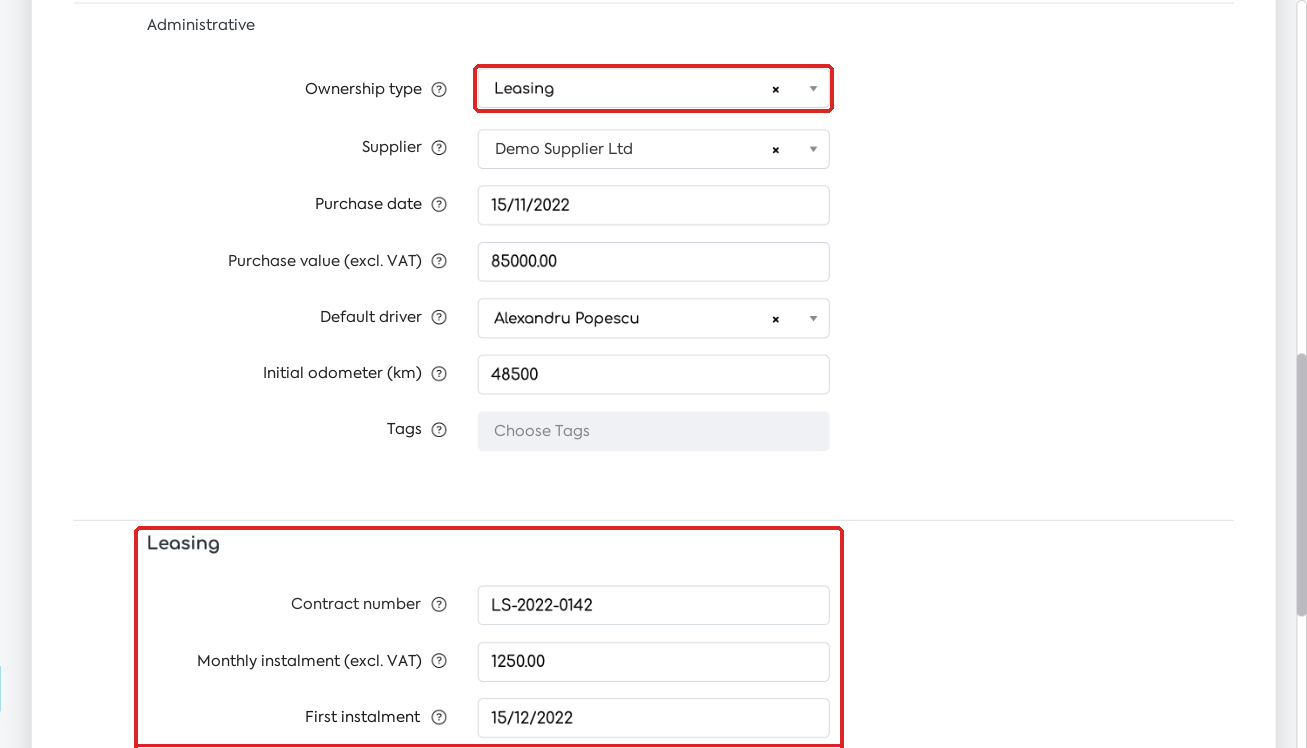
Ownership type Leasing: the section with the contract data appears.
Step 5. Fill in the Custom fields, if they were defined in Settings.
Step 6. Click Save (you return to the list) or Save and Continue (you stay in the form).
Warning: if you change Ownership type from Leasing to another type and save, the leasing contract data is deleted.
The vehicle file
Step 1. Click the registration number or the eye icon. The header shows the number, make, model and who created the vehicle. The data is organised in tabs.
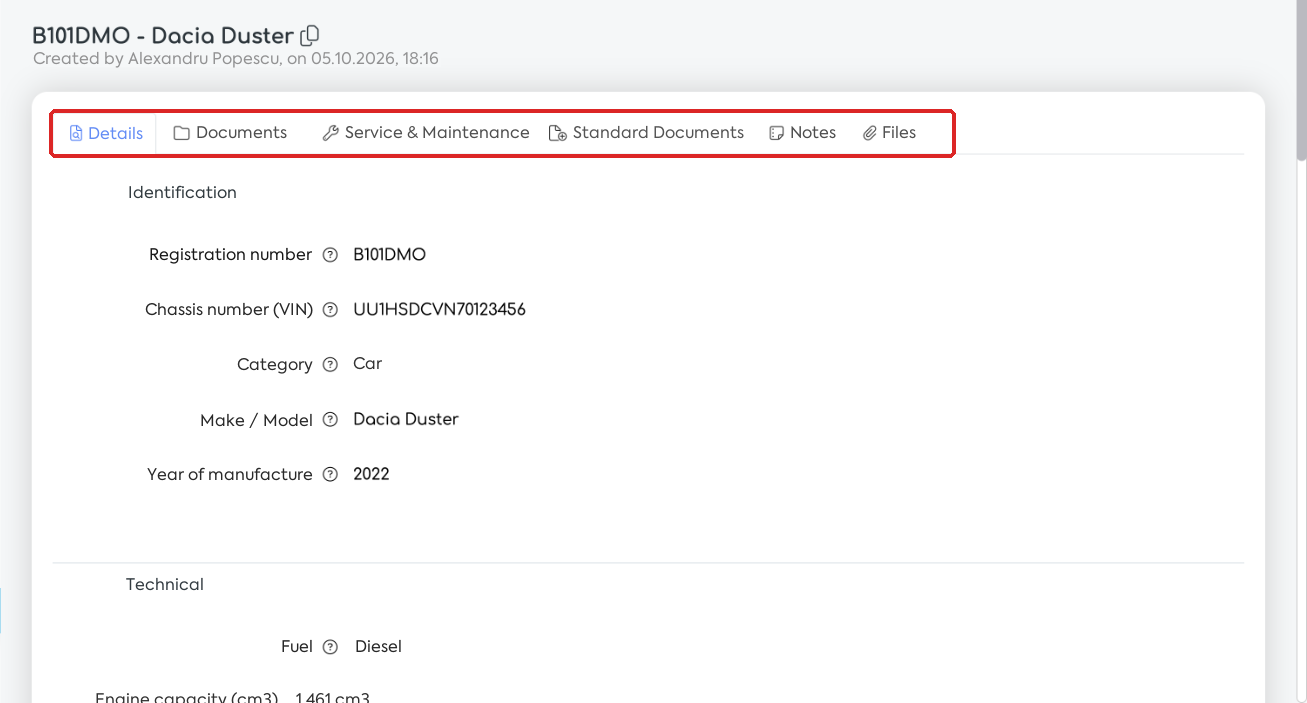
The vehicle file and its tabs.
Step 2. For a leased vehicle, in the Details tab, Leasing section, the platform automatically calculates Remaining instalments and Contract end (the date of the last instalment). In the last 60 days of the contract, the alert “The leasing contract ends on …” appears.
Step 3. If At the end is set to Ownership transfer, the Take ownership button appears in the same period. Click it and confirm: the ownership type becomes Owned. If they were empty, the purchase date becomes the current date and the purchase value becomes the residual value.
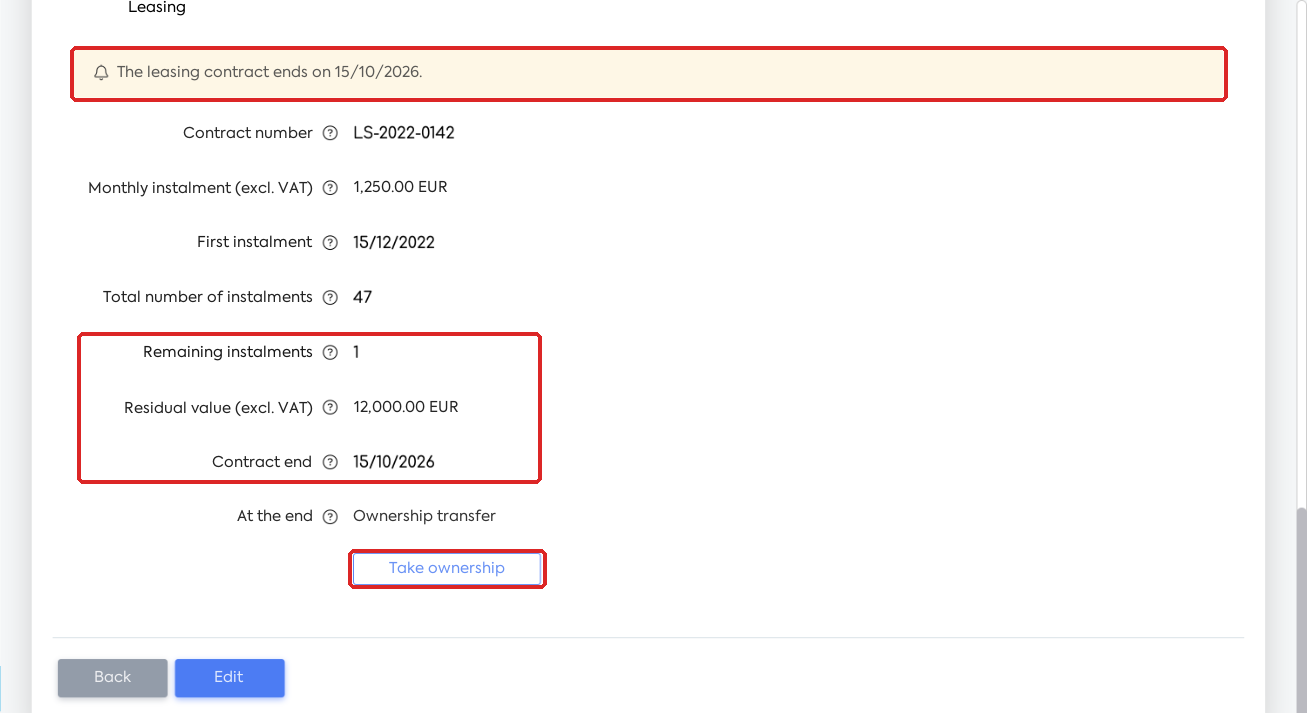
The end-of-leasing alert, the remaining instalments and the Take ownership button.
Note: during the 60-day period, the platform also sends a warning e-mail, once per contract. Recipients are chosen in , Company tab, the Leasing contract end notification. Make sure it has at least one recipient.
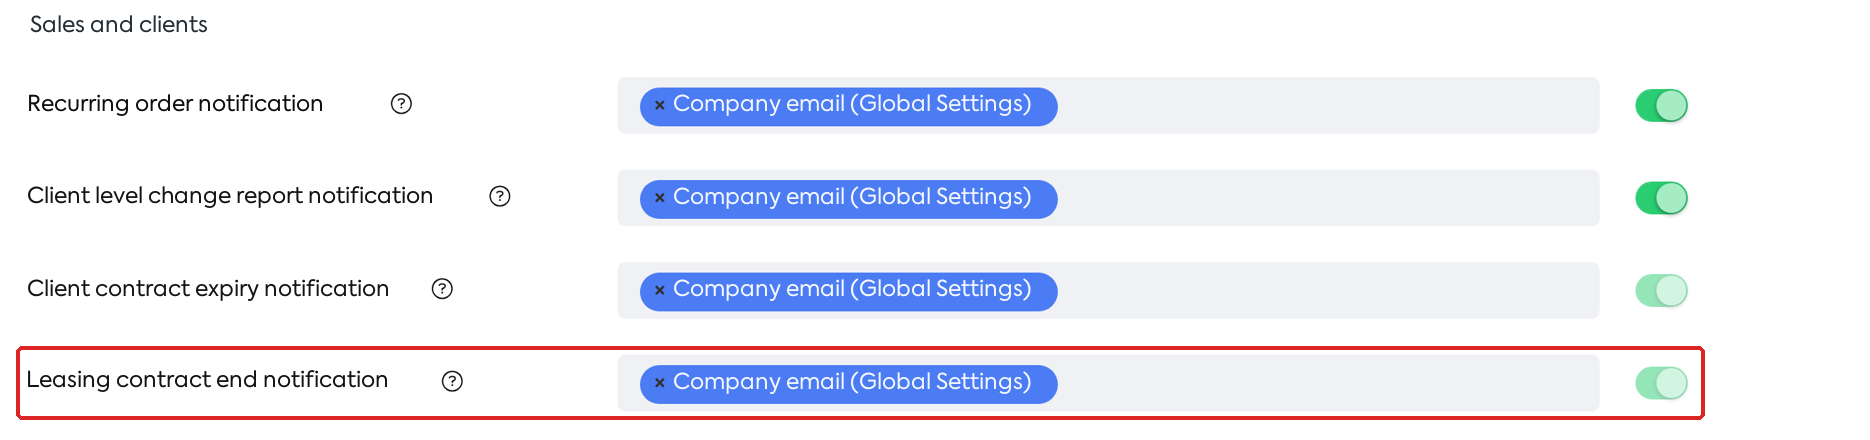
Recipients of the end-of-leasing warning, in .
Documents with a validity period
Step 1. In the vehicle file, open the Documents tab. For each type, the current document is shown, with Days left coloured by status (negative if it has expired).
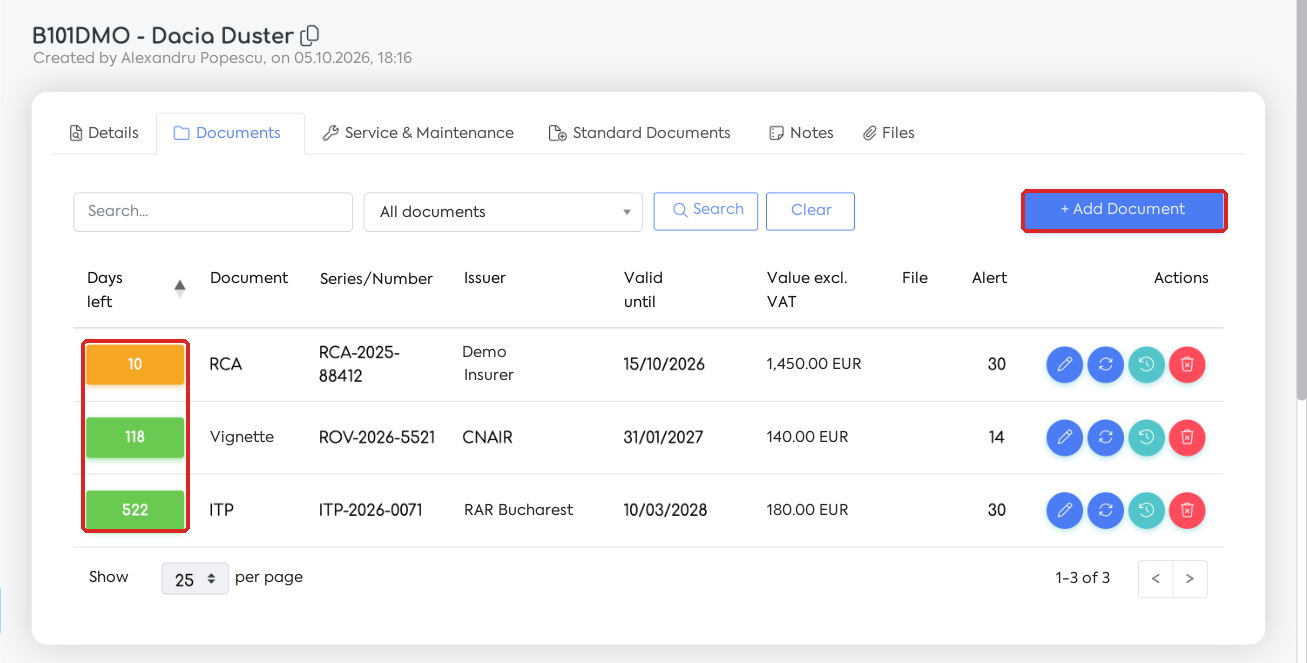
The Documents tab: RCA close to expiry (orange), Vignette and ITP valid.
Step 2. Click Add Document. Choose the Document type and fill in Valid from and Valid until (required). Optional: the series, the issuer, the value (with currency) and the scanned file (PDF, DOC, DOCX, JPG, JPEG, PNG, TIFF).
Step 3. In Alert (days before), set how many days before expiry the document switches to the “Expiring” status. The field is pre-filled with the document type's threshold and can be changed for each document.
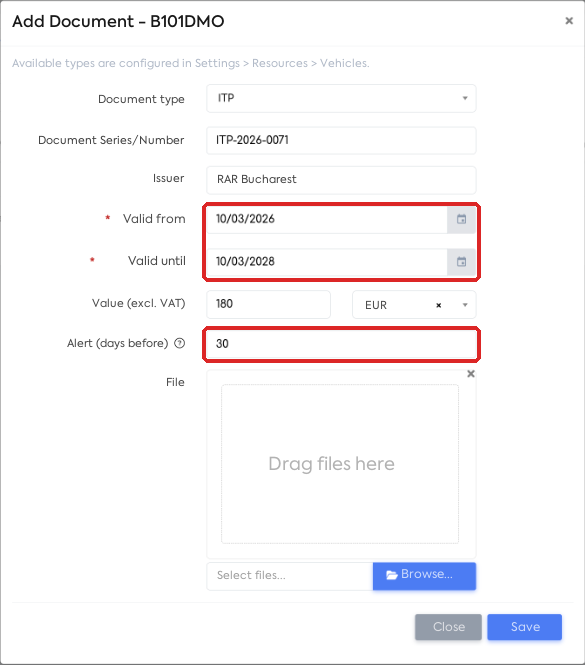
Adding the ITP: the validity period and the alert threshold.
Step 4. Click Save. The document appears in the list and the vehicle's compliance badge is updated.
On a document's row you have the actions Download (if it has a file), Edit, Renew, History and Delete. When editing, the document type cannot be changed.
Renewing a document and the history
Step 1. On the document's row (for example RCA), click Renew. The window carries over the type, issuer, alert threshold and currency from the previous document.
Step 2. Fill in the series, the new period, the value and the file, then click Save.
Step 3. If the new period does not start immediately after the old one expires, the Warning! message appears, with the number of days without coverage (or of overlap). Click Confirm to keep the period or Close to correct it.
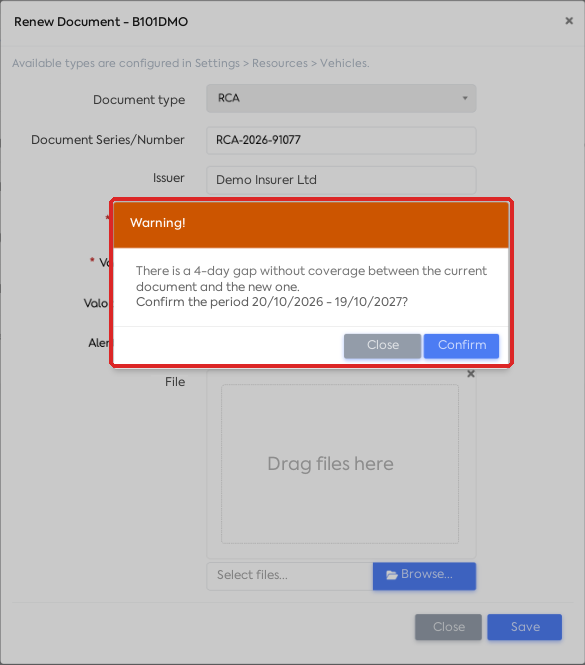
Renewing the RCA: 4 days without coverage between the current document and the new one.
Step 4. Click History on the document's row. The window shows all periods of that type — Active, Scheduled or Expired — and the total of the values.
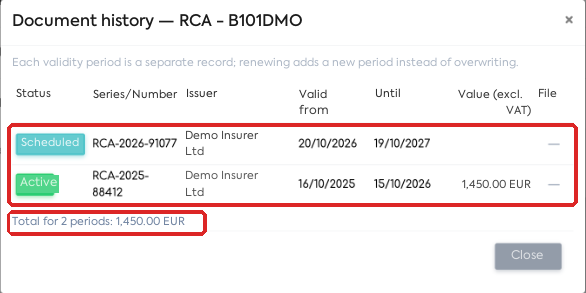
The RCA history: the active period and the scheduled renewal.
- The old document is not overwritten: renewing adds a new period. After the renewal, the Documents tab shows the new document (blue “Scheduled” badge), and the vehicle stays “Expiring” in the list until the old document expires.
- If you delete the current document, the previous document of the same type becomes current again.
The service plan
Step 1. In the vehicle file, open the Service & Maintenance tab and click Add Operation.
Step 2. Fill in Operation (for example “Oil and filter change”) and at least one interval: Interval (km) and/or Interval (months). Leave the interval that does not apply empty.
Step 3. Fill in the last time it was performed: the date and, if you chose a km interval, the mileage (required in this case). Optionally, fill in Alert km and Alert days (1,000 km and 30 days by default).
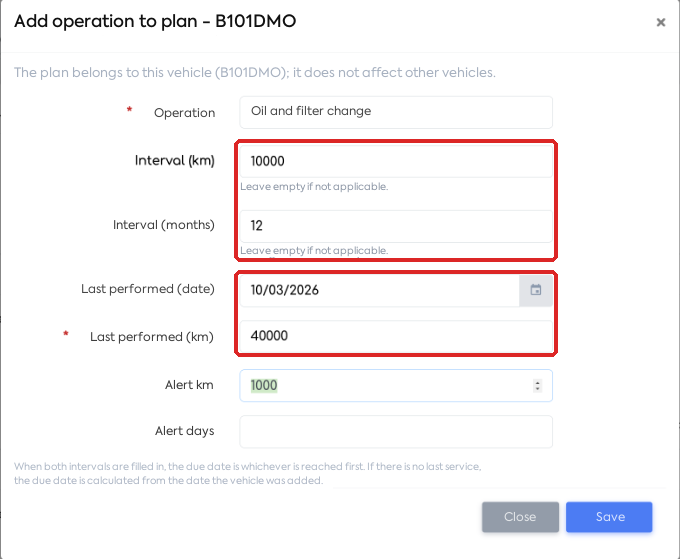
New operation in the plan: oil change every 10,000 km or 12 months.
Step 4. Click Save. The Due column shows the status: green — OK, orange — close to the due date, red — overdue. For the km interval the remaining kilometres are shown (for example “~1,500 km”); for the months interval, the due date (once overdue, the number of days, with a minus sign).
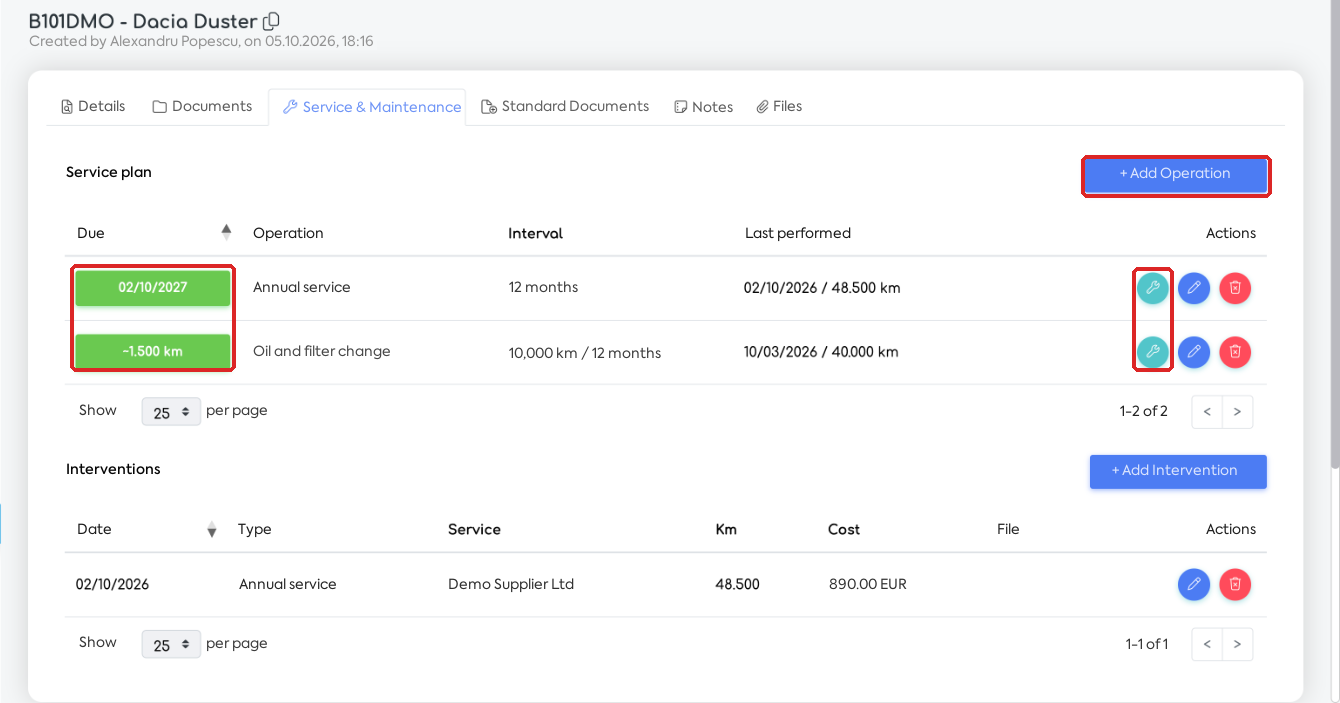
The service plan with the due dates, the Record intervention icon and the list of interventions.
- When both intervals are filled in, the most urgent criterion is shown, relative to the alert thresholds.
- If there is no previous service, the due date is calculated from the vehicle's purchase date (or from the date it was added to the platform). The plan belongs to each vehicle.
Recording an intervention
Step 1. On the operation's row in the plan, click Record intervention (the wrench icon). For an intervention outside the plan (for example a repair), click Add Intervention.
Step 2. Check Date performed (today by default) and Km when performed (the current odometer by default). Fill them in correctly for operations with a km interval.
Step 3. Optionally, fill in Service / Supplier, Cost (excl. VAT) with the currency, the invoice or estimate in Attached document and Notes.
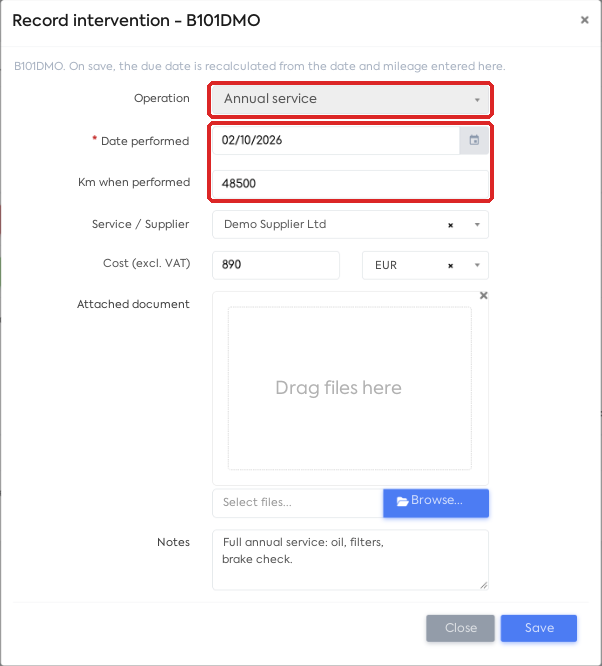
The intervention opened from the plan: the operation is pre-filled.
Step 4. Click Save. The intervention appears in the Interventions list. The last service in the plan is updated with its date and mileage, and the due date is recalculated. If the mileage is at least equal to the vehicle's odometer, the odometer is updated.
Notes, files and standard documents
Step 1. In the Notes tab, click Add Note and fill in Subject, Content and, optionally, files (up to 10).
Step 2. For a reminder, turn on Memento and fill in Notification Date and Employee (one or more). Click Save.
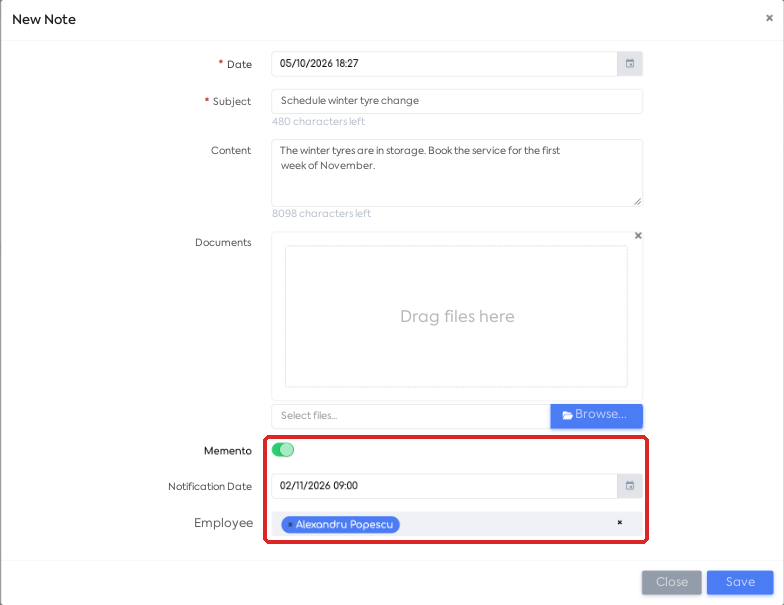
Note with a reminder for the tyre change.
On the reminder date, the selected employees receive an e-mail with a link to the vehicle's Notes tab and a notification in the platform. The reminder also appears in the Calendar, with the title “Vehicle … – …”.
Step 3. In the Files tab, click Upload File, fill in Name and choose the file — for documents without a validity period, for example the scanned registration certificate.
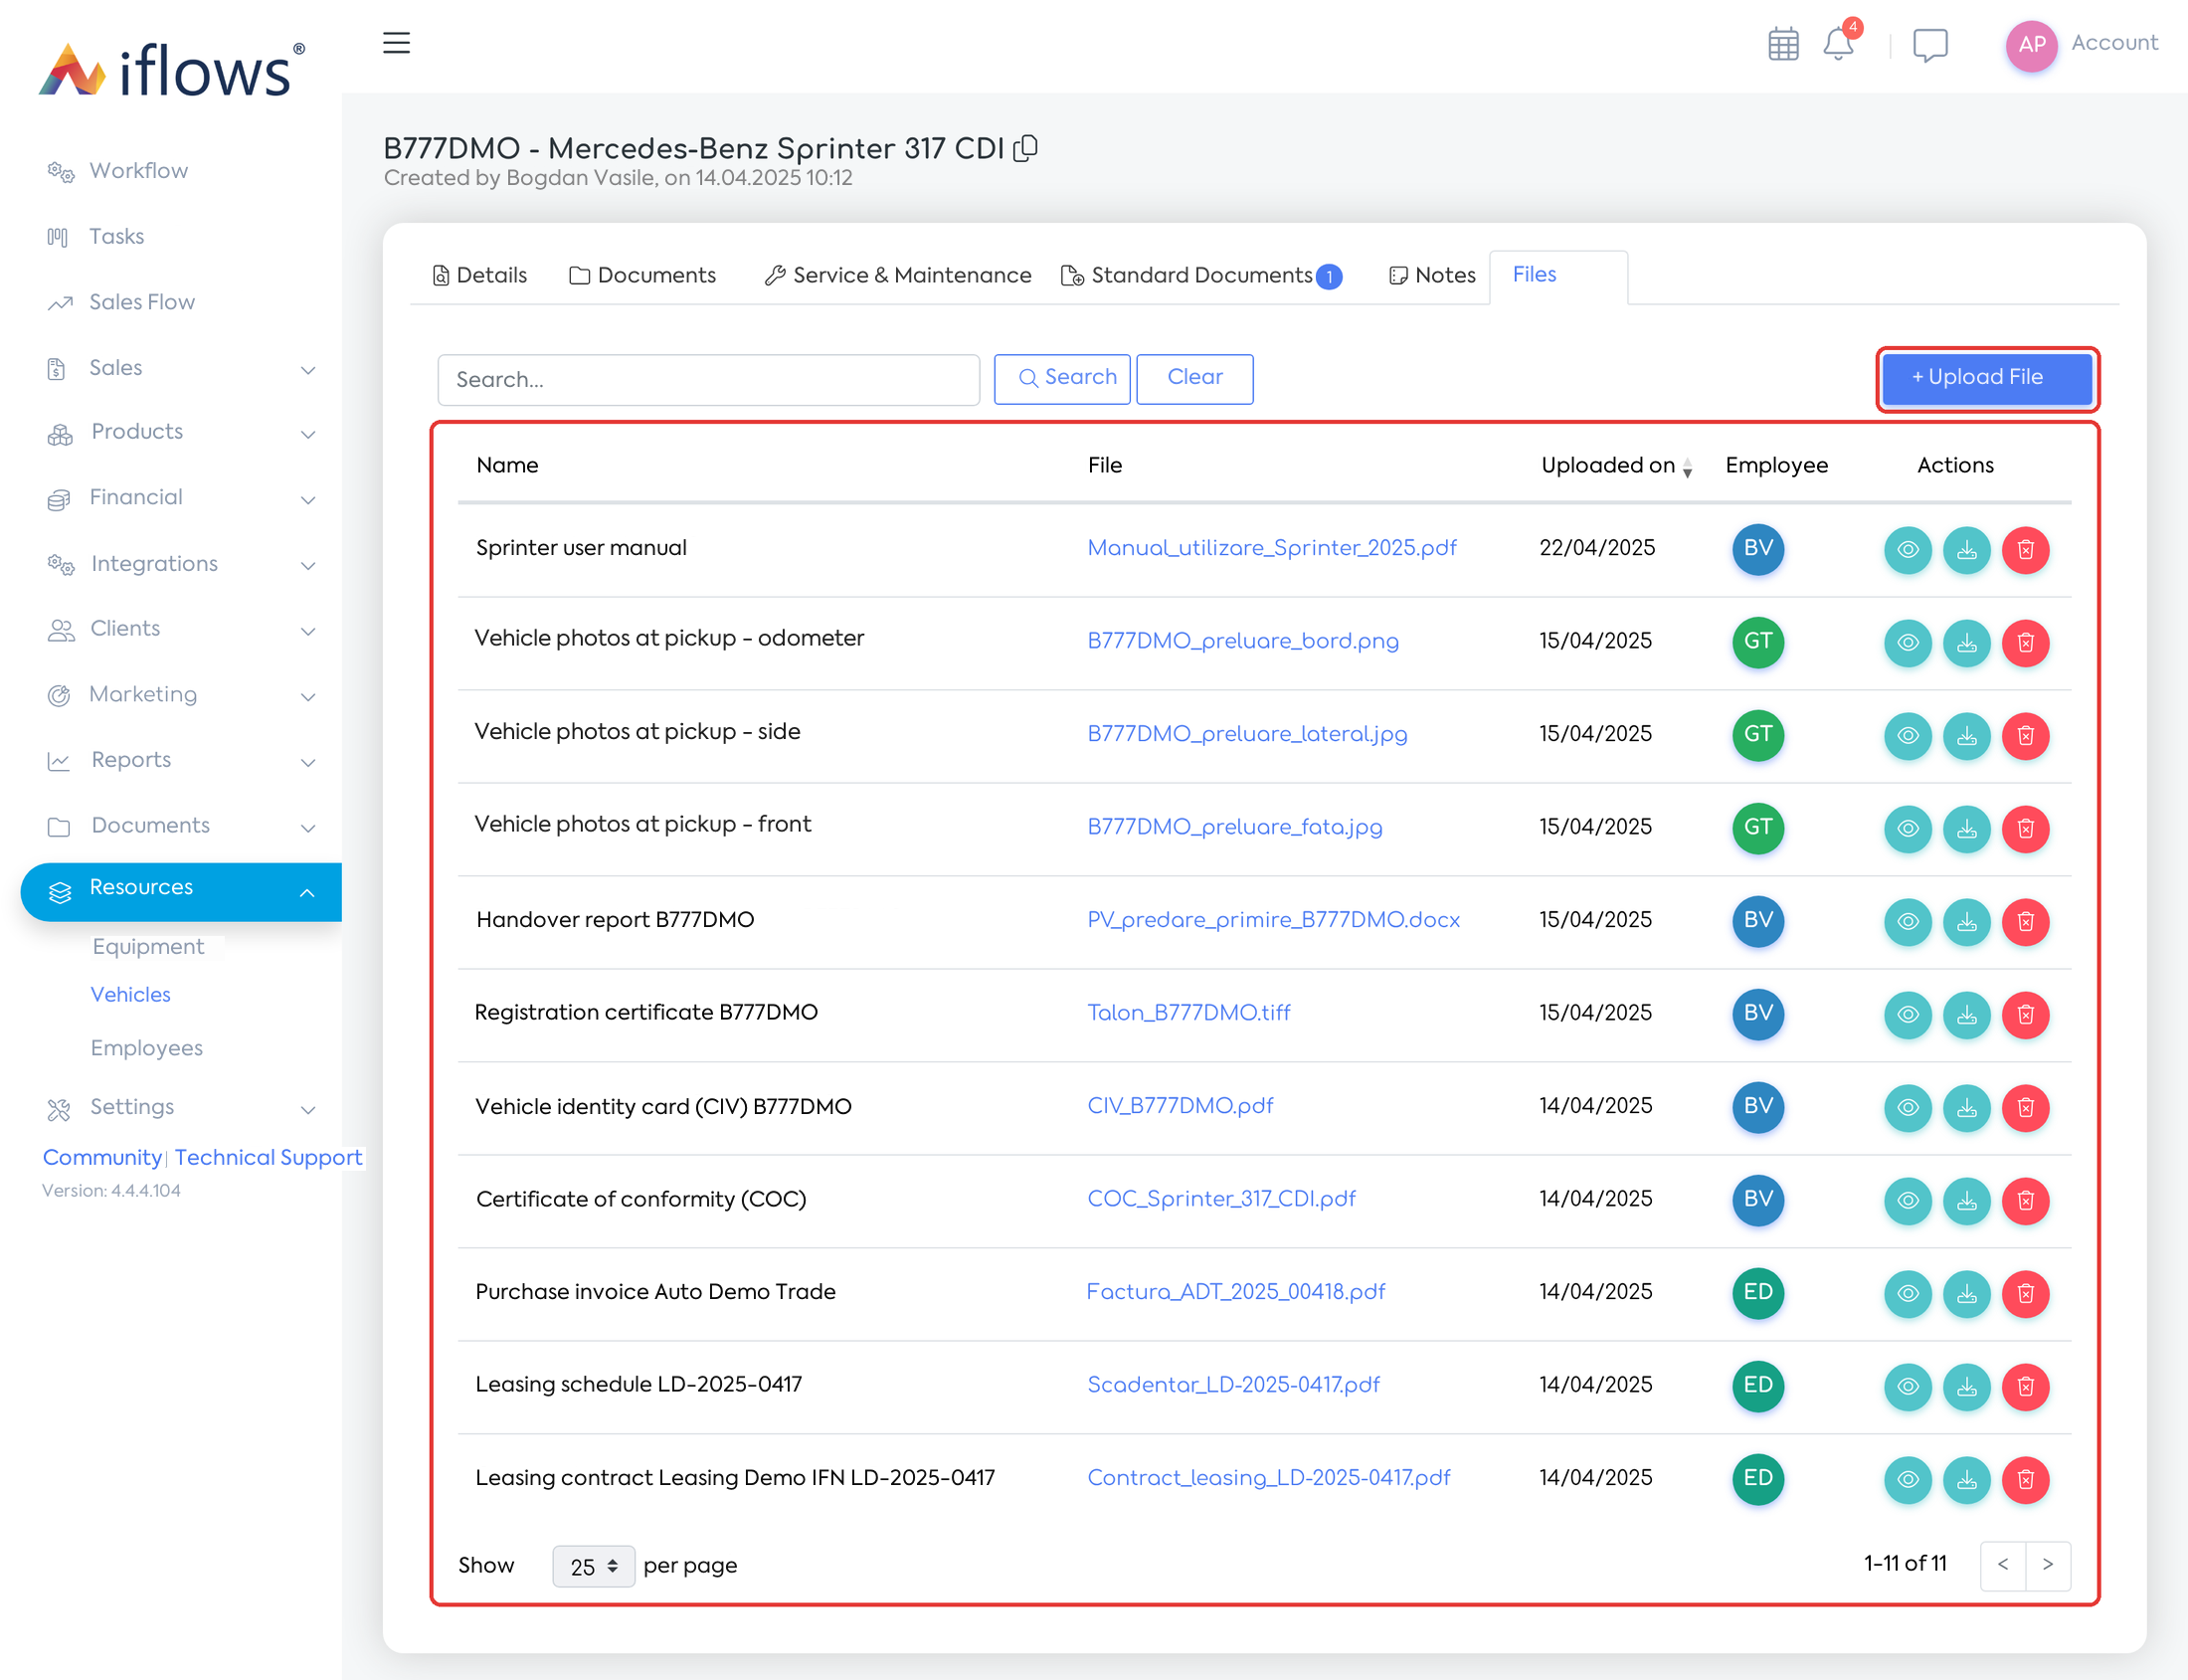
The Files tab: the registration certificate, the vehicle identity card, contracts, invoices, pickup photos and other documents without expiry.
Step 4. In the Standard Documents tab, click Add Standard Document to generate a document (for example a handover report) from a template with the associated section “Vehicles”. Templates can use the registration number, chassis number, make, model, year of manufacture and fuel.
Compliance panel
Step 1. Open , Compliance panel tab. For each active vehicle you see one row per document type and one per operation in the plan, with the period, the time remaining and the status. Under a renewed document, the scheduled period and any gap without coverage are shown.
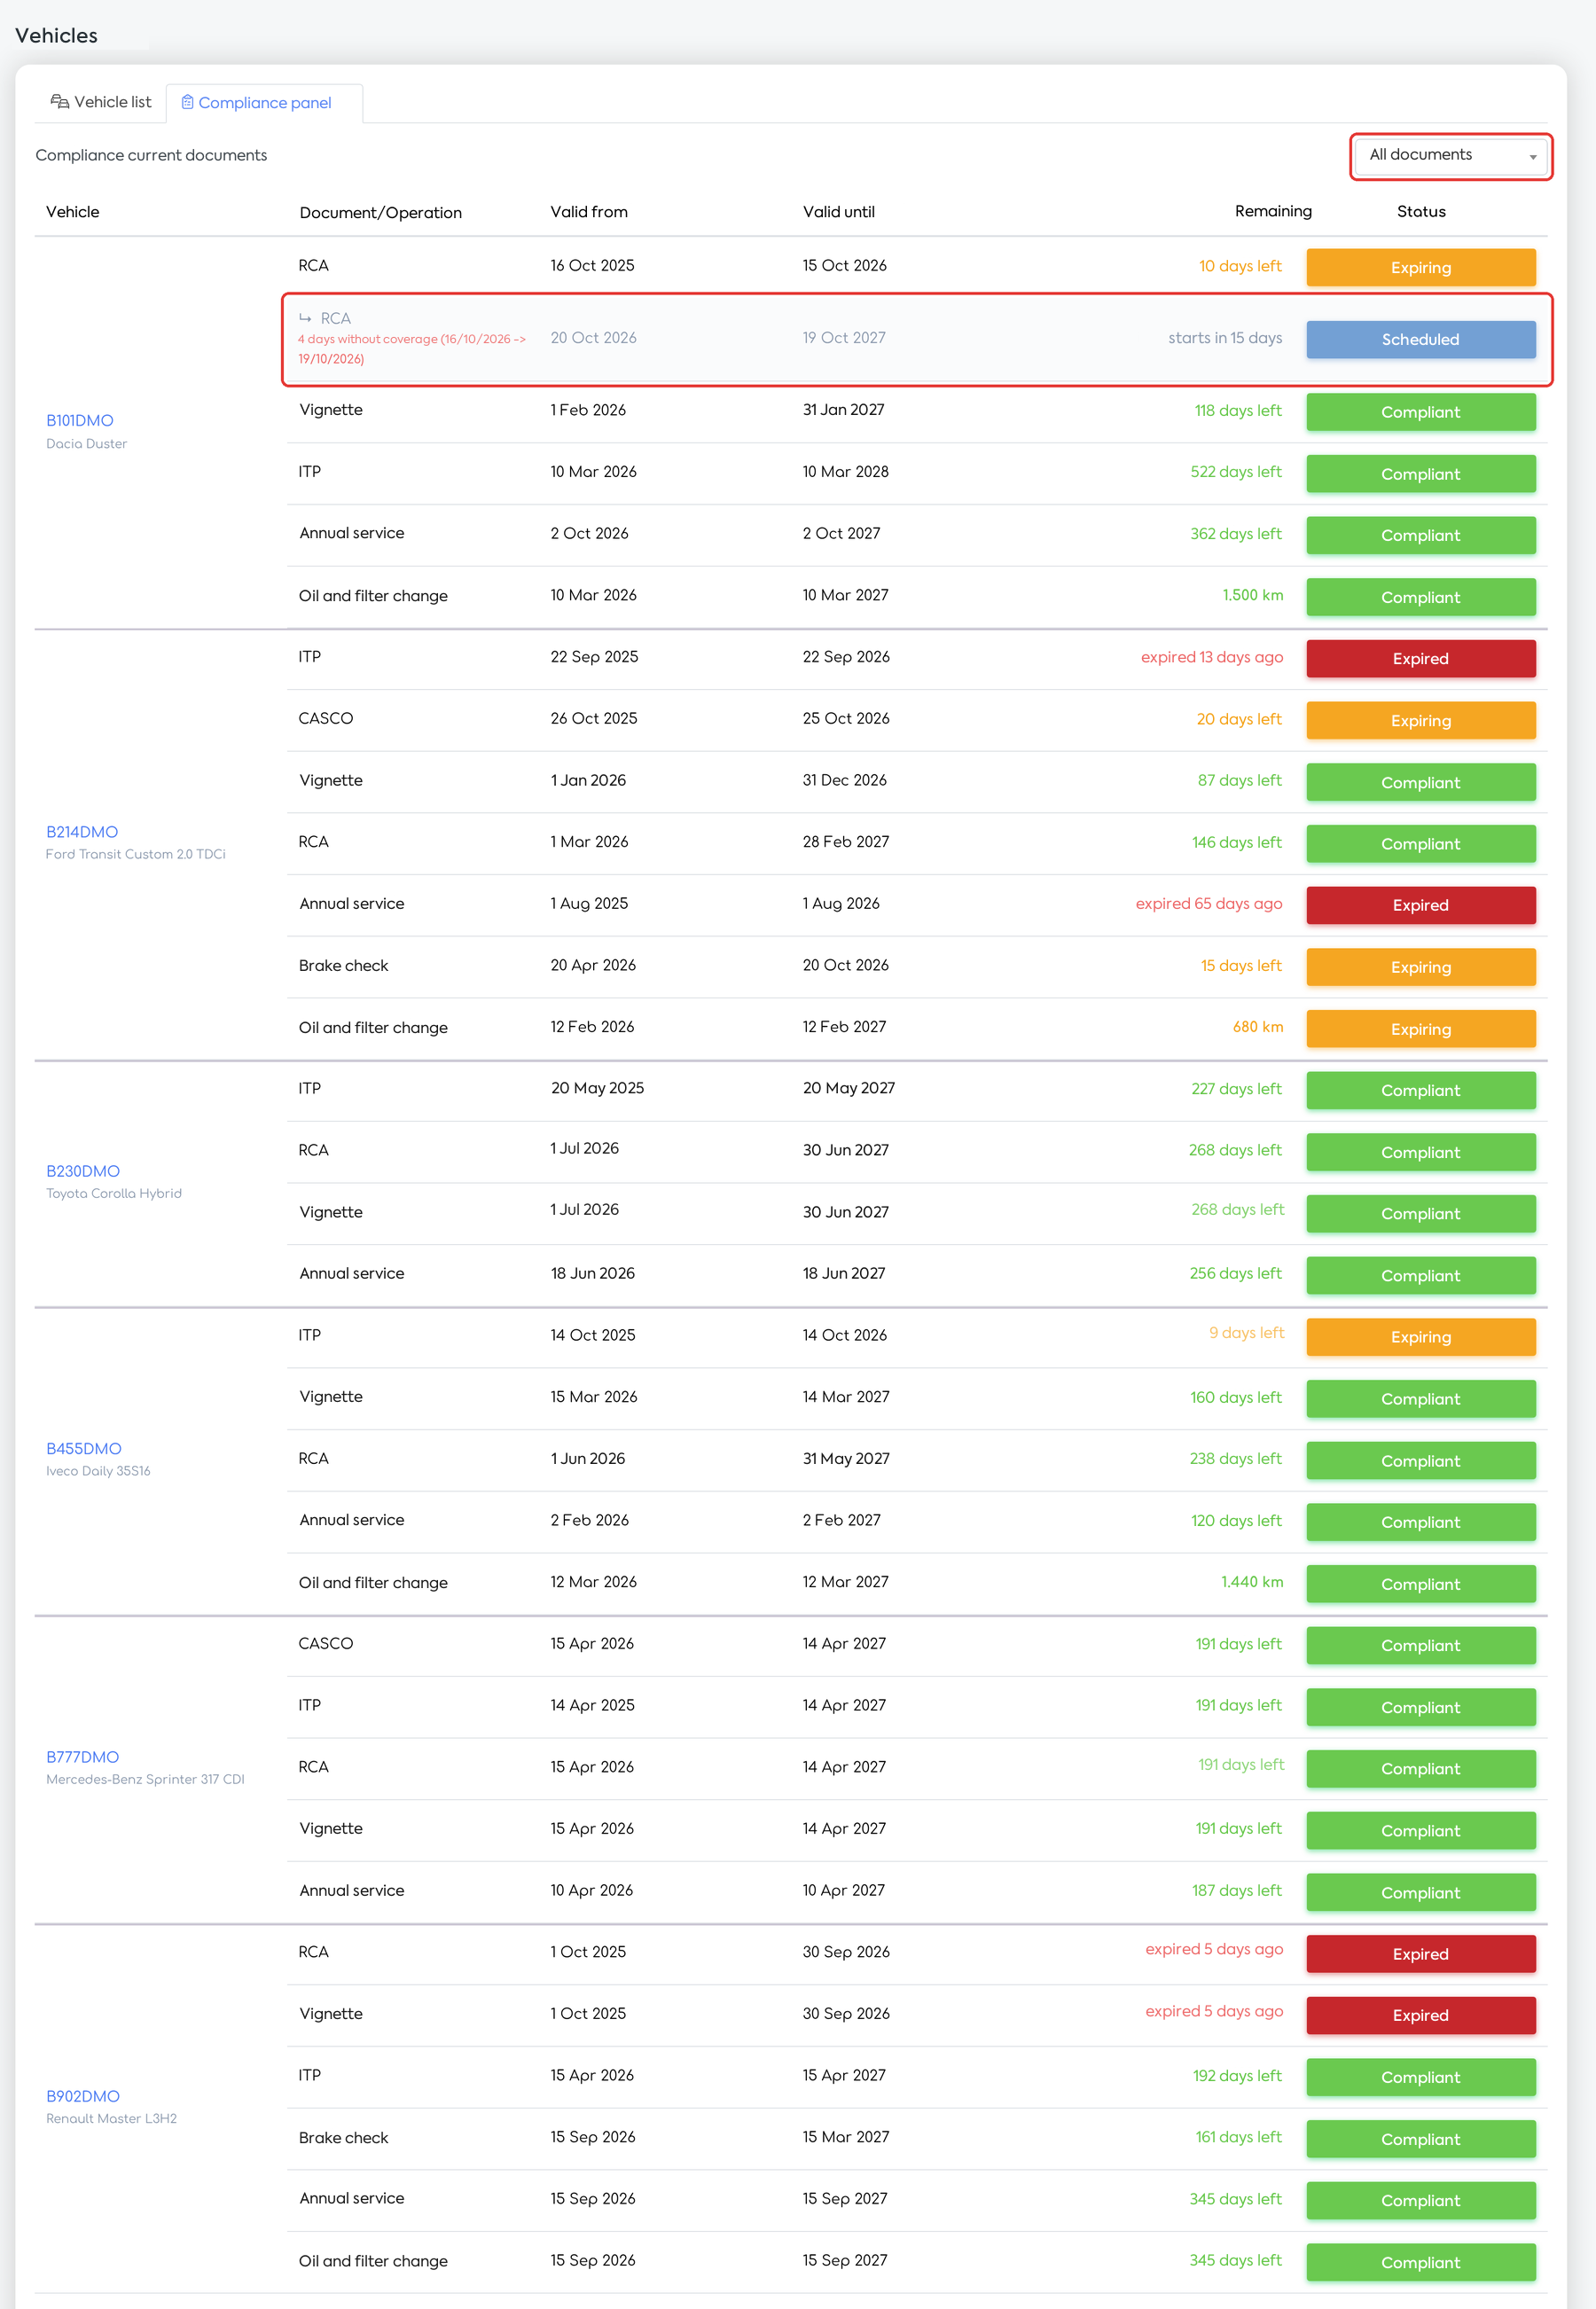
Compliance panel: documents and services for the whole fleet; for B101DMO, under RCA, the scheduled renewal and the gap without coverage.
Step 2. For a single document type, choose it from the list at the top right (“All documents” by default); the service rows are then no longer shown.
Step 3. Below the table, under Suggested actions, you see what needs to be done, with the “Urgent”, “N days” or “N km” badge. Click Renew or Record intervention to open the vehicle file on the right tab.
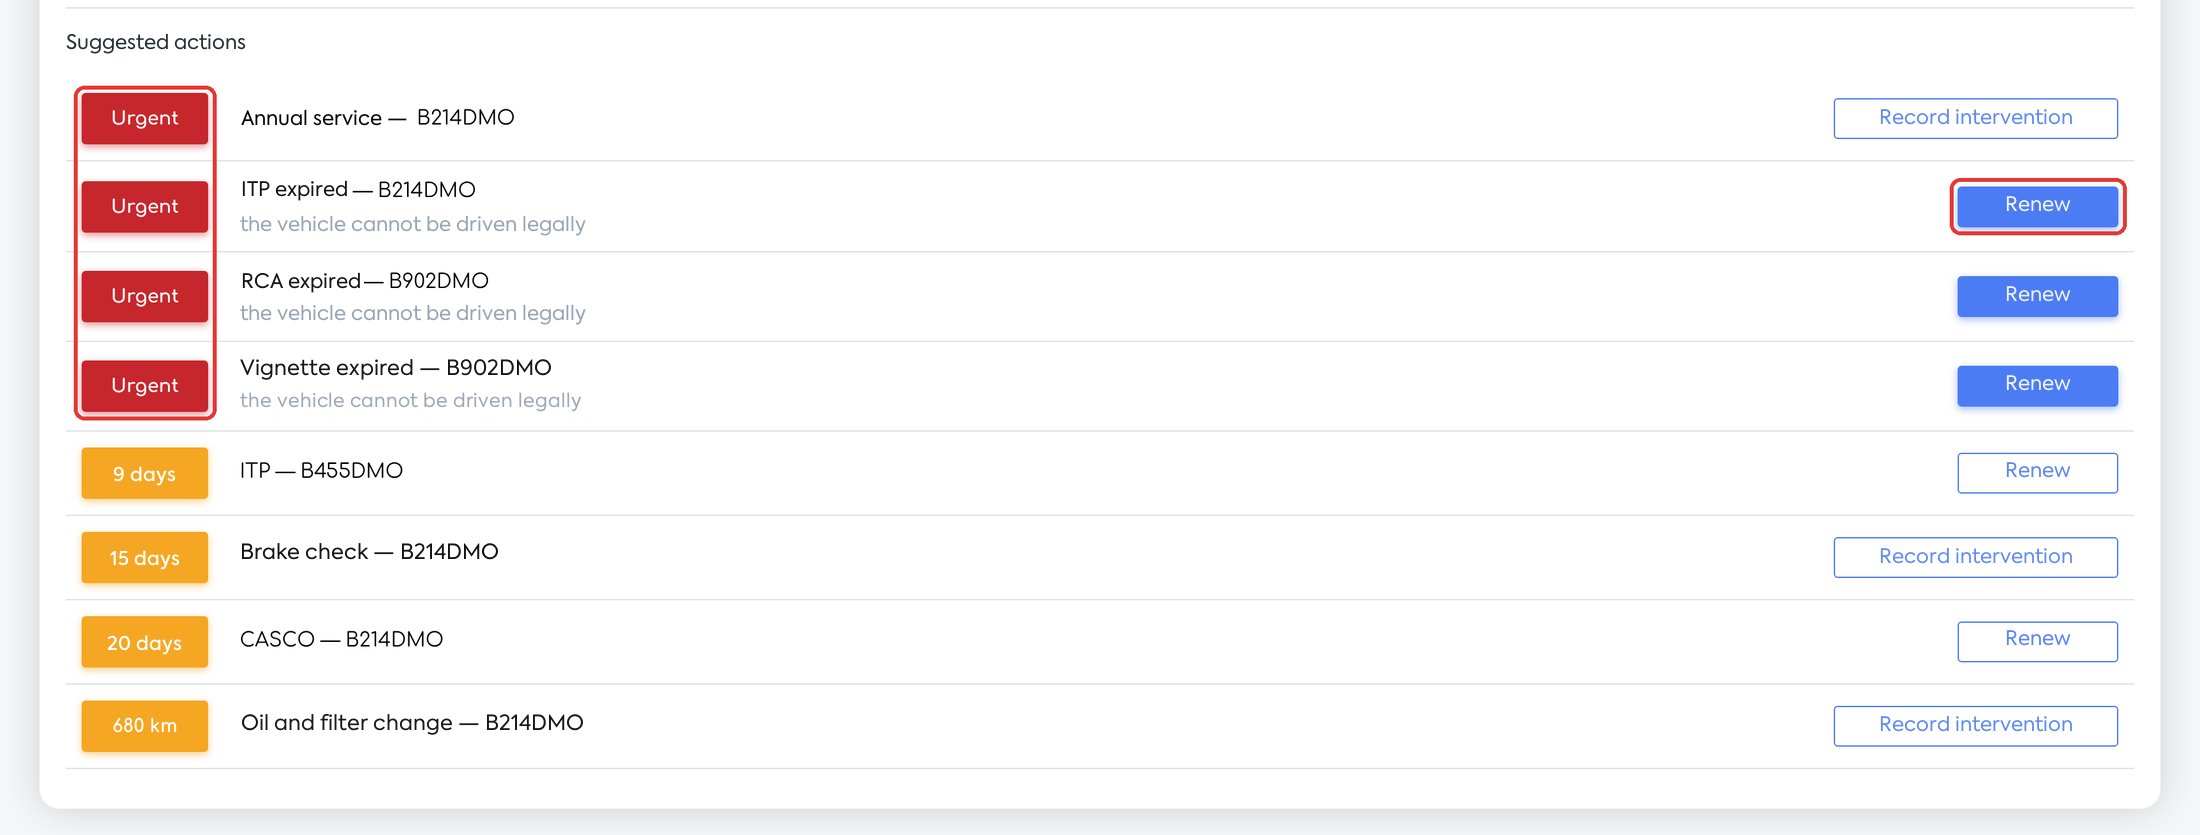
Suggested actions: urgent items first (expired documents, overdue services), then what is expiring soon, in days or in km.
Warning: the platform does not send e-mails when documents expire or services fall due. Track them in the list, in the vehicle file and in the Compliance panel.
Archiving and deleting
Step 1. On the vehicle's row in the list, click Delete Vehicle.
Step 2. If the vehicle has no associated data, confirm the deletion. Otherwise, the window lists the data that blocks deletion (documents, service plans, interventions, odometer readings, notes, leasing etc.).
Step 3. Click Archive. The vehicle disappears from the active list, without losing any data.
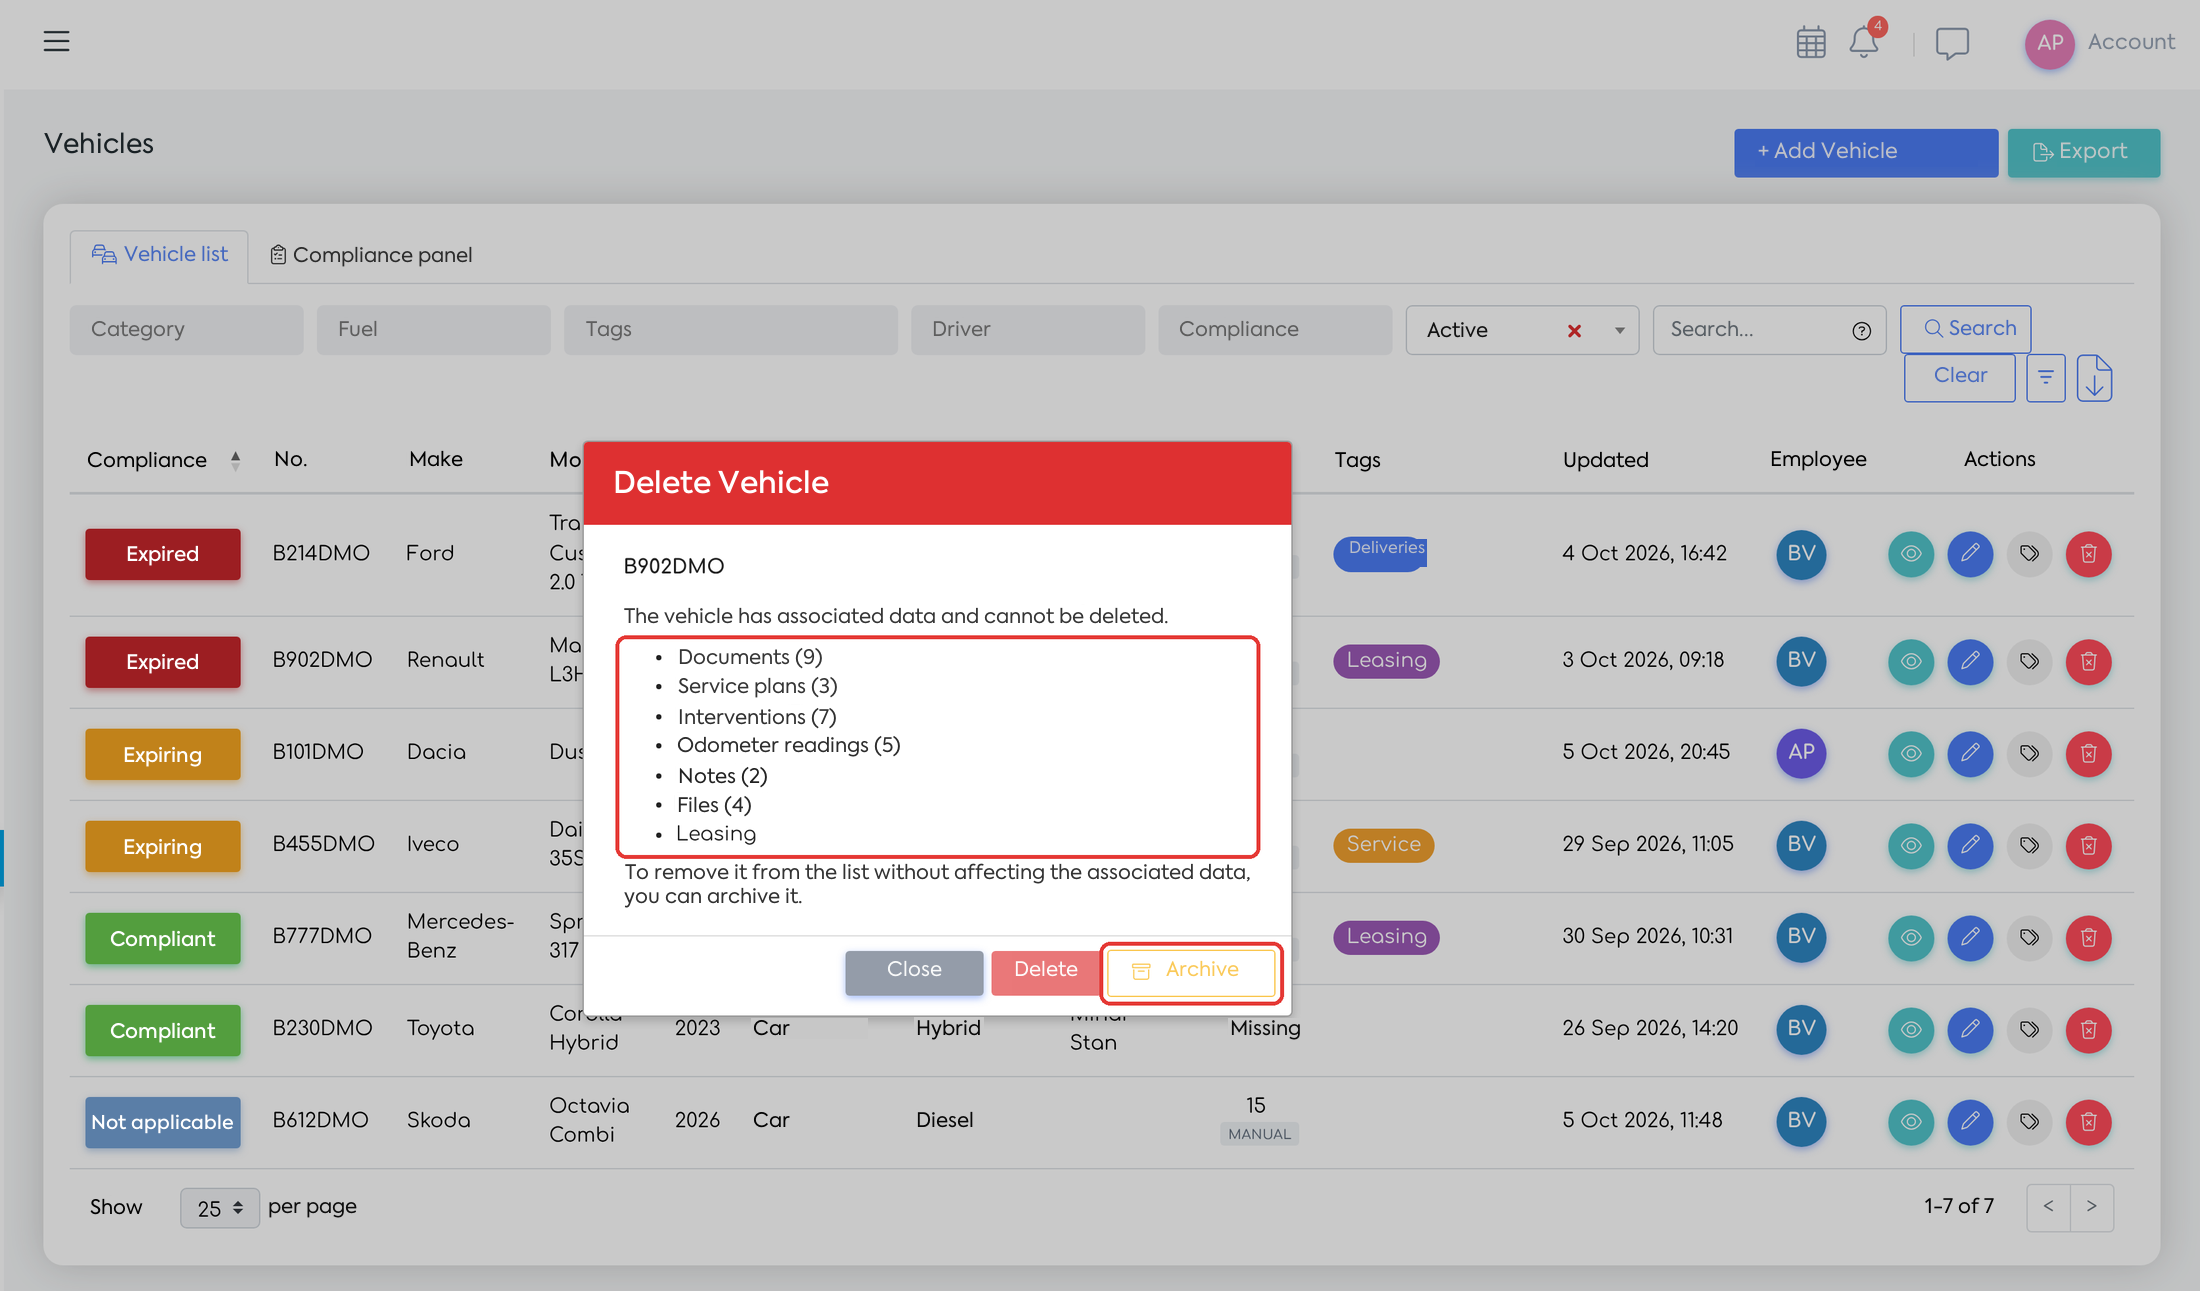
Vehicle with associated data: it can only be archived.
Step 4. To find an archived vehicle, choose Status = Archived in the filters. To bring it back to the active list, click Unarchive on its row and confirm. Archiving and unarchiving require the Vehicles — Delete permission.
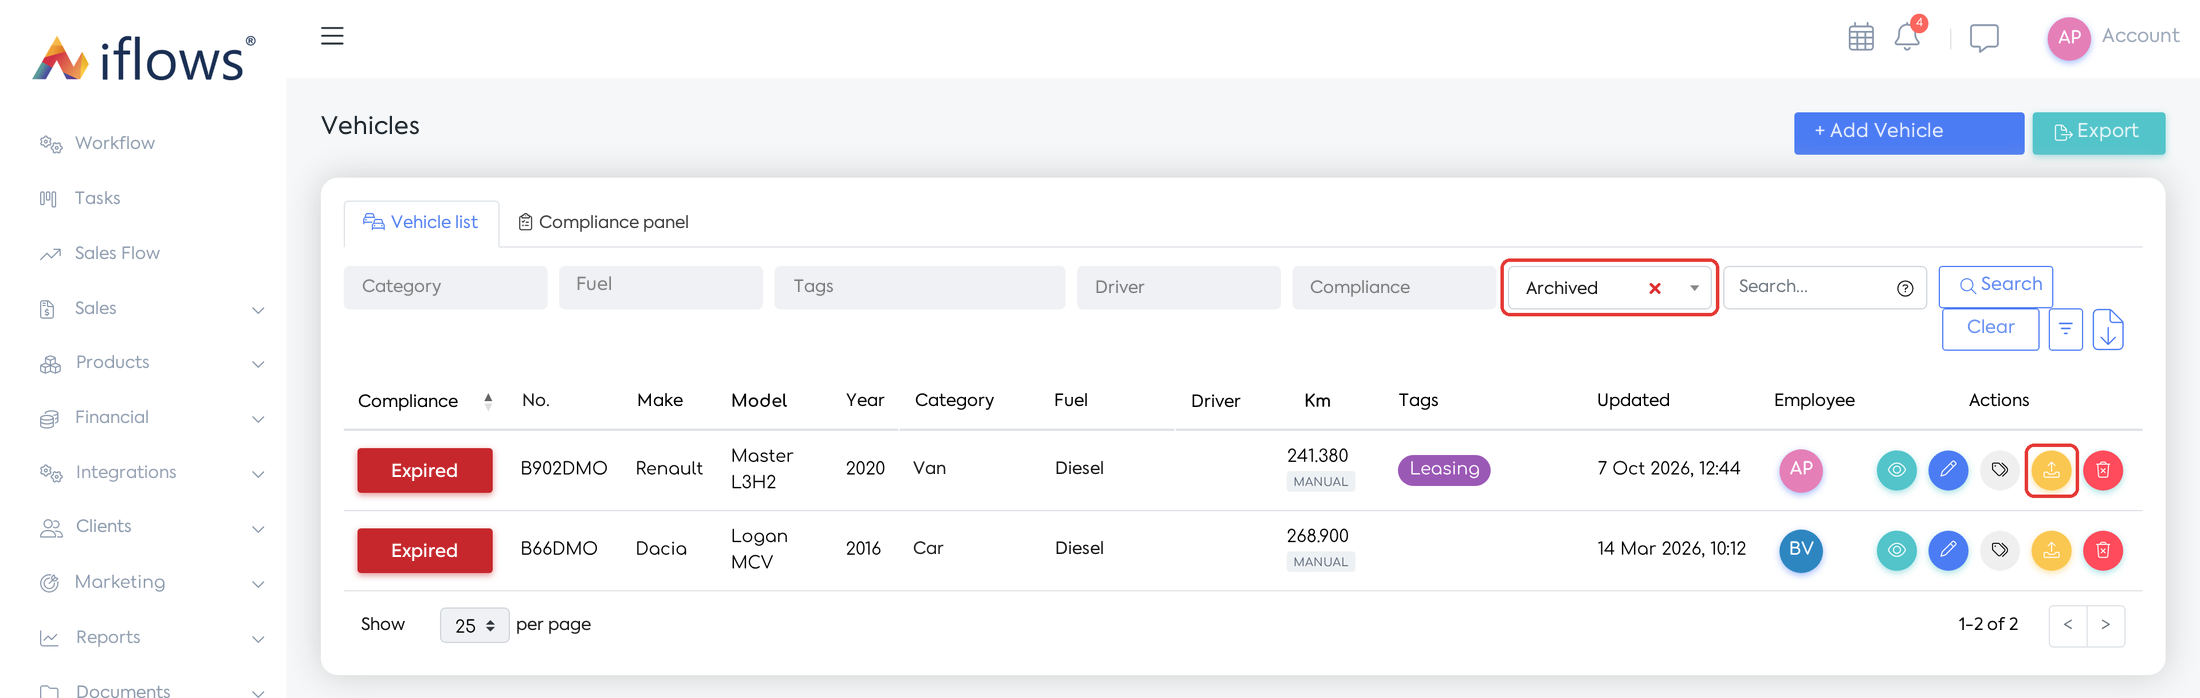
The Status = Archived filter and the Unarchive action on the vehicle's row.
Customising the lists
Step 1. Open , Vehicles tab, with the Categories, Document types, Tags and Custom fields sub-tabs.
Step 2. Fill in the form at the top and click Add: a category; a document type with Alert threshold (days) (30 by default); a tag with a colour; a custom field with Field name and Type (Text, Number, Date, Select, Yes/No).
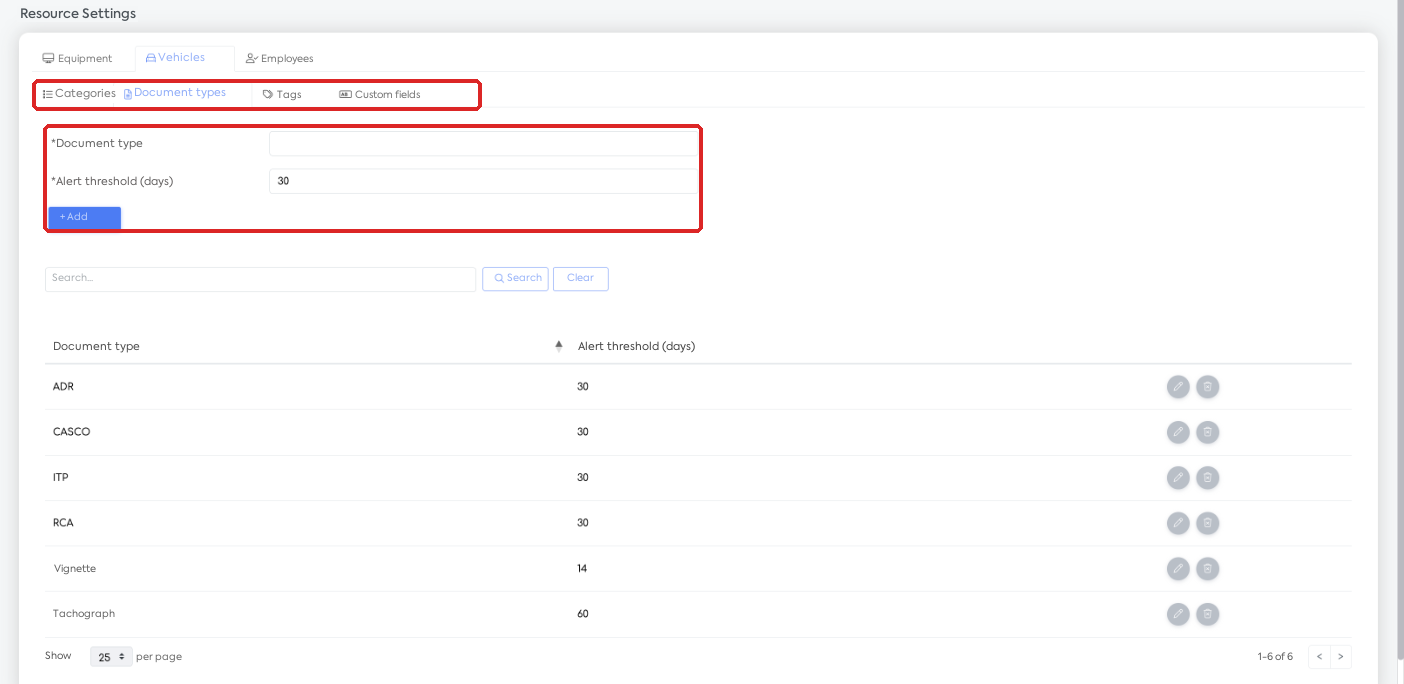
Document types and their alert thresholds.
The default categories and document types cannot be edited or deleted (their thresholds: ITP, RCA, CASCO and ADR — 30 days, Vignette — 14 days, Tachograph — 60 days). If a particular document needs a different threshold, change the Alert (days before) field on that document.
Rules and limits
- Compliance in the list takes only documents into account, not services: Expired — for at least one type, no document covers today; Expiring — a document has at most as many days left as its threshold; Compliant — all documents are valid; Not applicable — the vehicle has no documents.
- Statuses update automatically based on the current date: Scheduled (starts in the future), Expired, Expiring, Compliant.
- A document type that is no longer needed keeps the vehicle in the Expired status until you delete all documents of that type.
- A vehicle can be deleted only if it has no associated data (documents, services, interventions, odometer readings, notes, files, standard documents, leasing or trip sheets). Otherwise it can only be archived.
- Archived vehicles remain viewable and editable, appear in the full export and in the end-of-leasing warning, but not in the Compliance panel.
- Vehicles without documents and without a service plan do not appear in the Compliance panel. Suggested actions do not include documents that already have a renewal.
- The new threshold of a custom type applies to documents added after the change. The type of a custom field cannot be changed after creation. A category, type or tag in use cannot be deleted.
- The list has no bulk actions.
Permissions
Permissions are granted in , in the access level, Vehicles group:
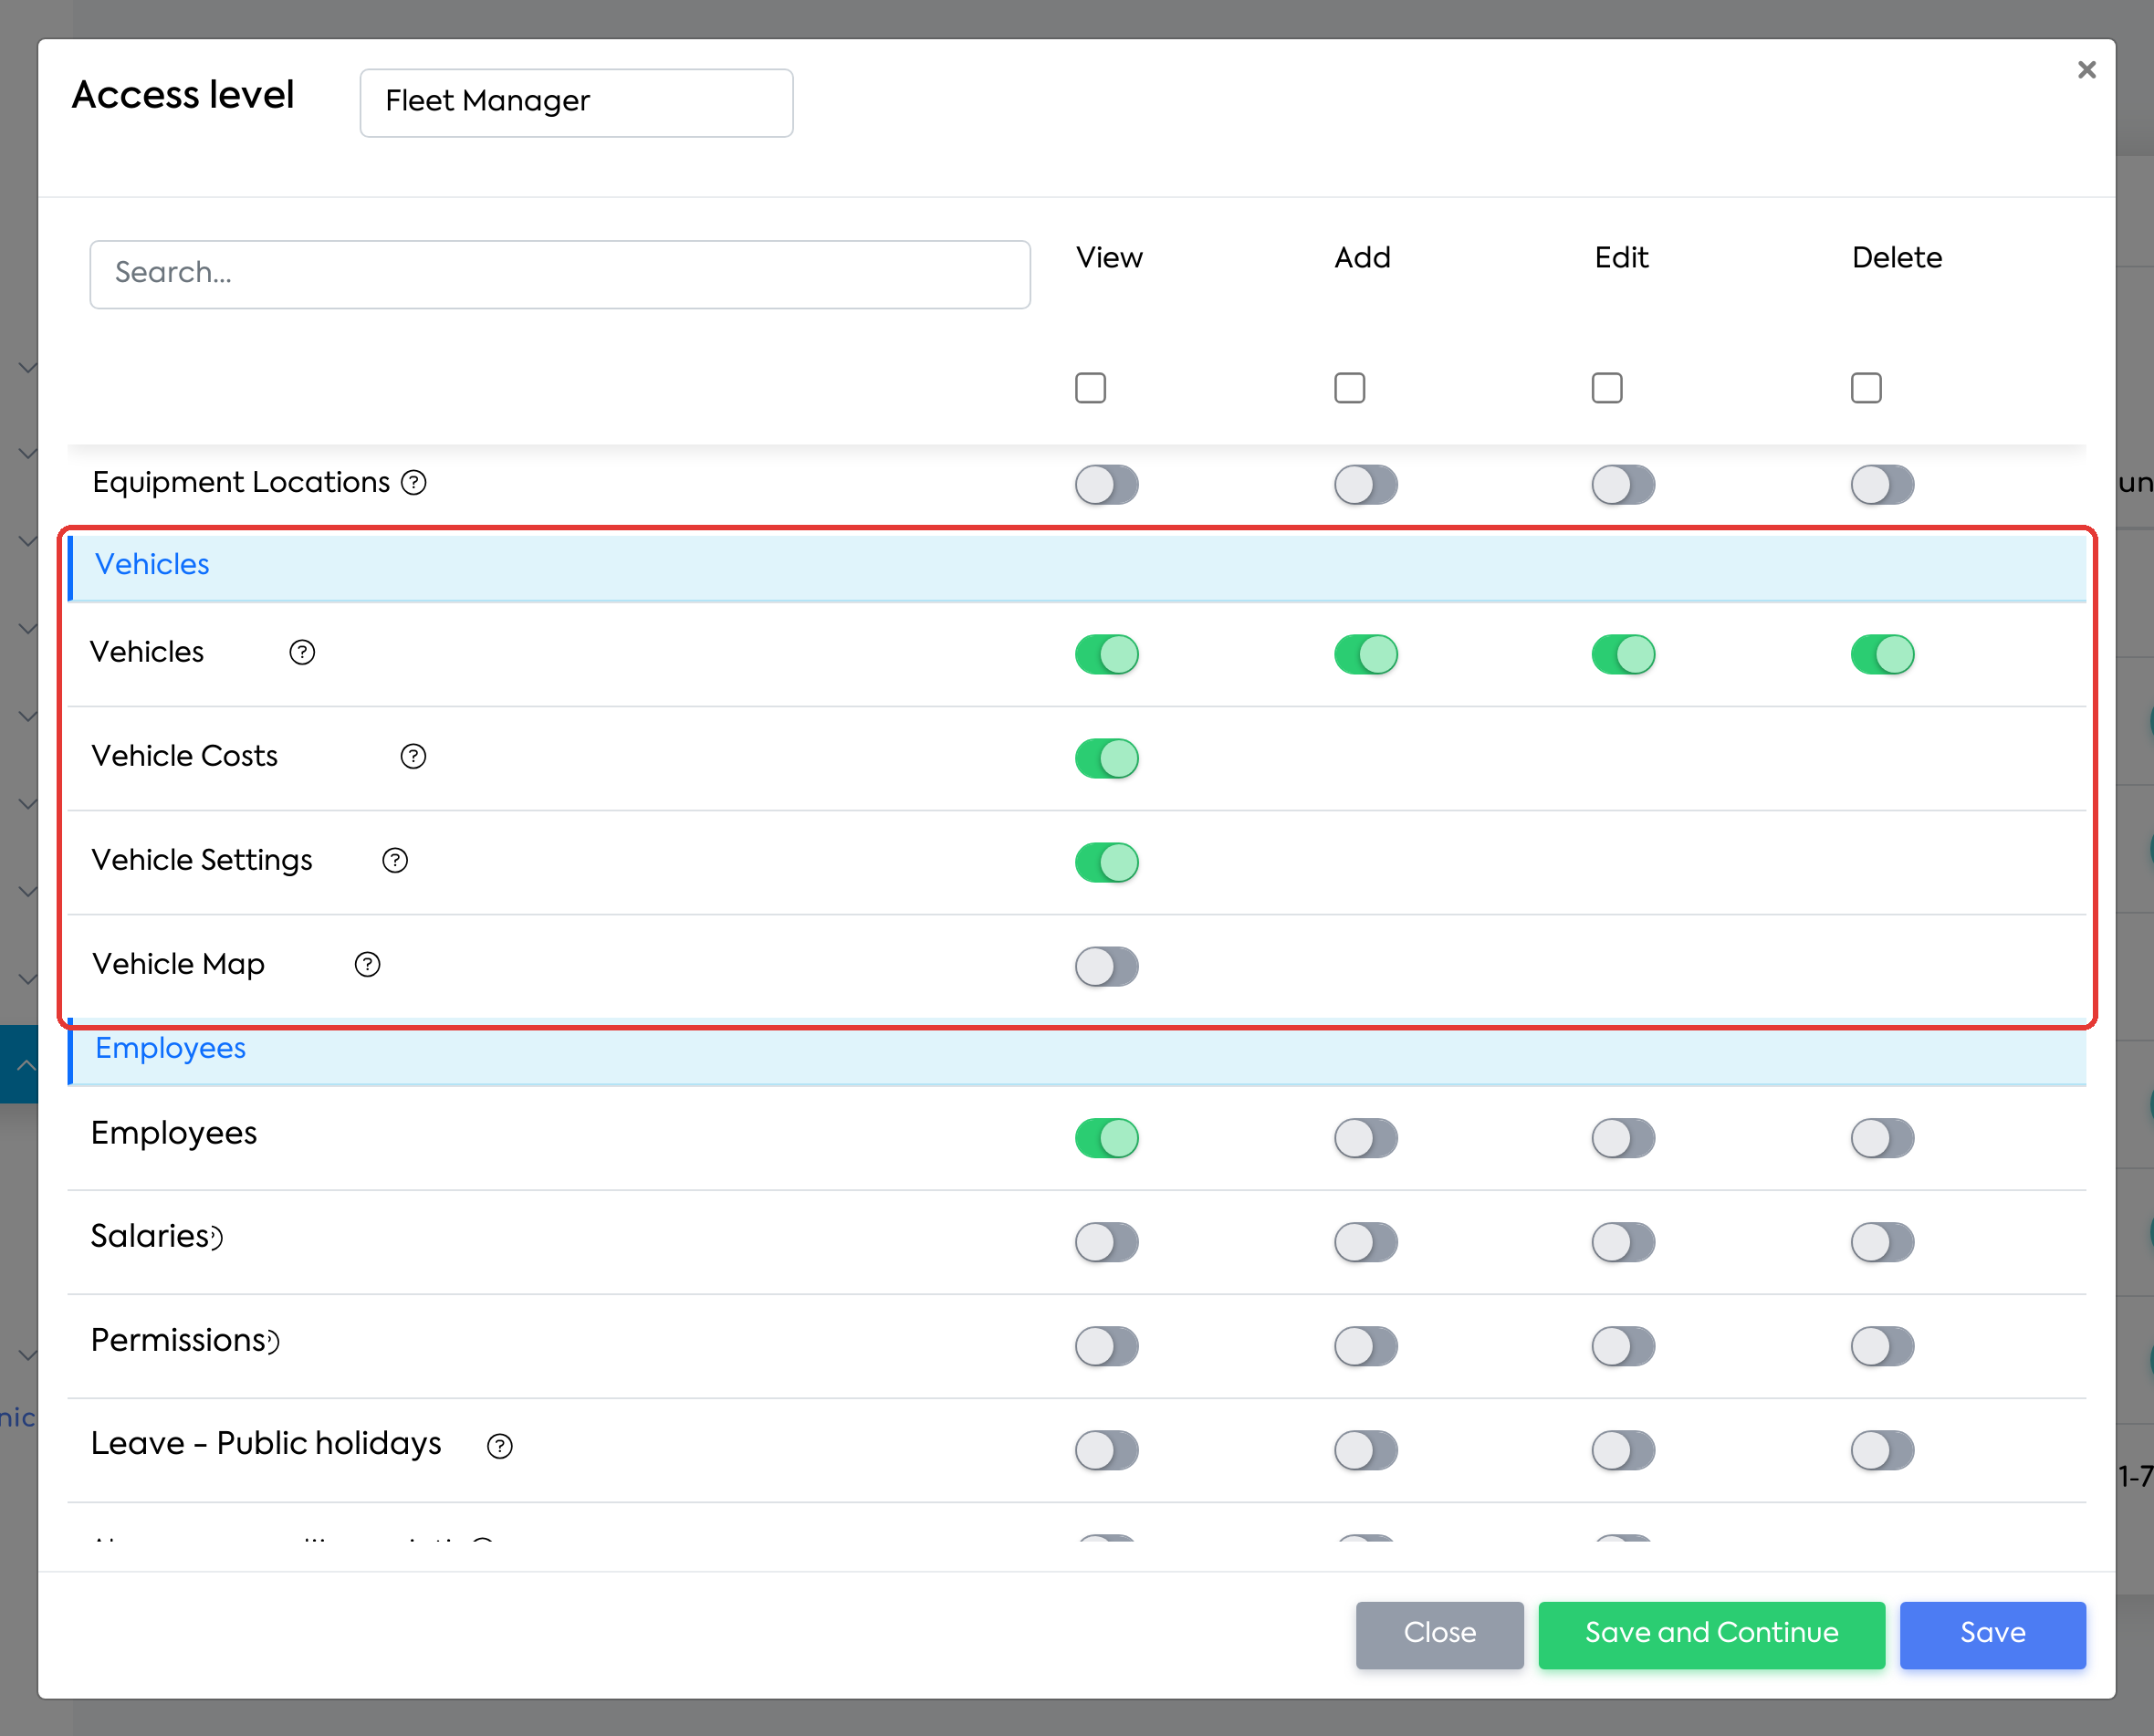
The Vehicles group in the “Fleet Manager” access level.
| Permission | What it allows |
|---|---|
| Vehicles — View | The list, the files, the Compliance panel, the history and downloads |
| Vehicles — Add | Adding vehicles |
| Vehicles — Edit | Editing the vehicle and all actions in the file (documents, services, interventions, notes, files, taking ownership) |
| Vehicles — Delete | Deleting, archiving and unarchiving |
| Vehicle Costs | Viewing and filling in the financial values |
| Vehicle Settings | The lists in Settings and adding categories, types and tags directly from the forms |
The Standard Documents tab also requires the rights on Documents - Standard Documents, and exports require the Export Lists permission.