
The iflows platform is regularly updated with improvements and new functionalities.
Order Tags
The order tagging function allows users to efficiently organize and manage orders by adding custom tags. These tags facilitate the quick identification of specific order characteristics, such as details or the need for additional actions.
Utility of the Function:
- Improved organization: Tags allow for the classification of orders based on specific criteria.
- Efficient monitoring: By tagging, priorities and order characteristics can be quickly visualized.
- Flexibility: Users can add, modify, or delete tags at any time, thus adapting to dynamic business needs.
How to use:
- Navigate to the Sales section and select Orders. You will see the full list of existing orders.
- In the Actions column, look for the symbol titled ”Edit Tags” (the tag icon).
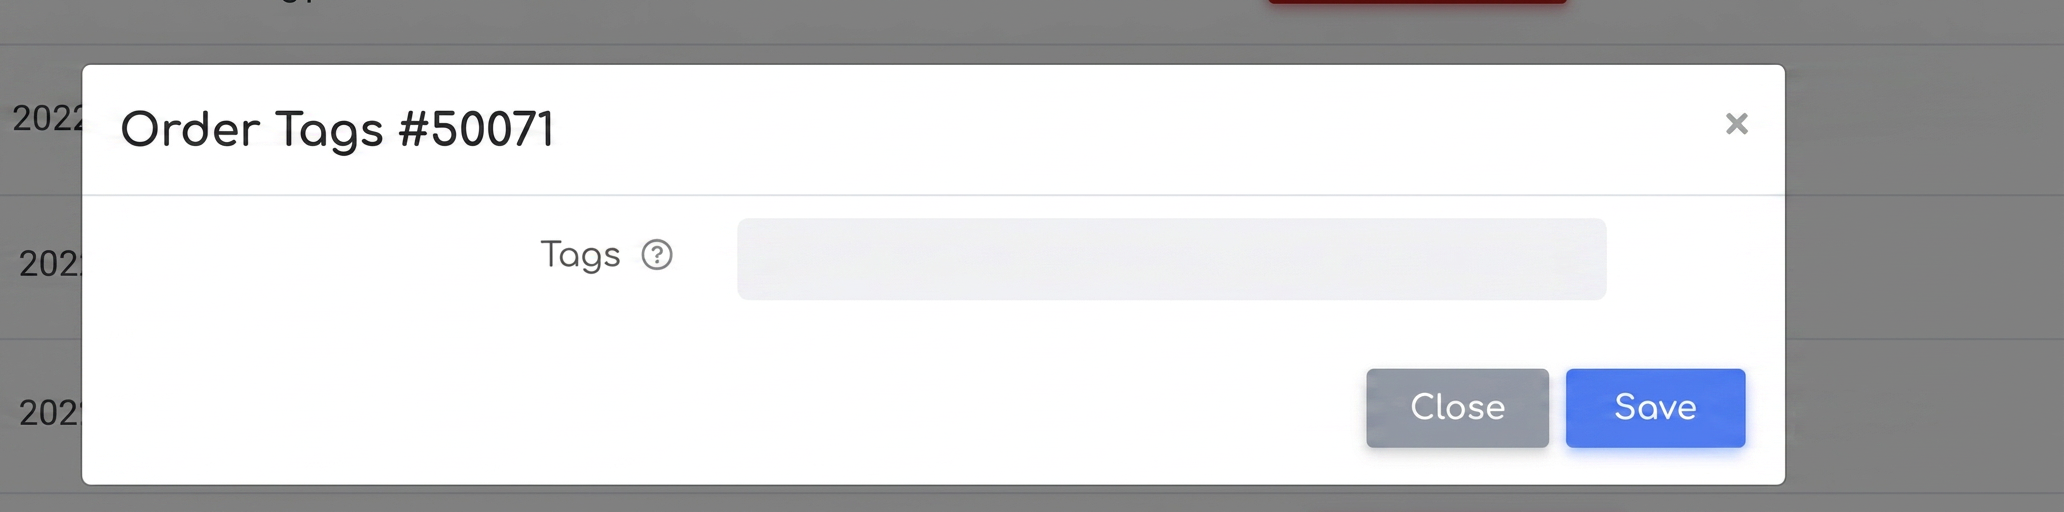
- Click on this symbol to open the tag editing window. In the newly opened window, you have the option to choose from the list of existing tags or to enter a new tag.
- If you want to enter a new tag, start typing the desired word. If it does not match an existing tag, an ”Add” button will appear to confirm the creation of the new tag.
Managing Tags:
- You can add one or more tags to an order.
- To delete a tag, click on the ”x” symbol next to the tag you wish to remove in the tag editing window.
- To add an additional tag, click in the tag window and choose from the existing list or enter a new tag.
Permanent Deletion of Tags:
- To permanently delete a tag or to add new tags, navigate to Settings -> Sales -> Orders -> Tags. Here you can manage the complete list of available tags.
*Tags set in this section will also be visible in the workflow

Filtering Orders by Tags in the Workflow
The new function for filtering orders by tags in the workflow allows users to view and manage orders based on assigned tags.
How to Use:
- Accessing the Function:
- Navigate to the Workflow section in iflows.
- Activating Filtering by Tags:
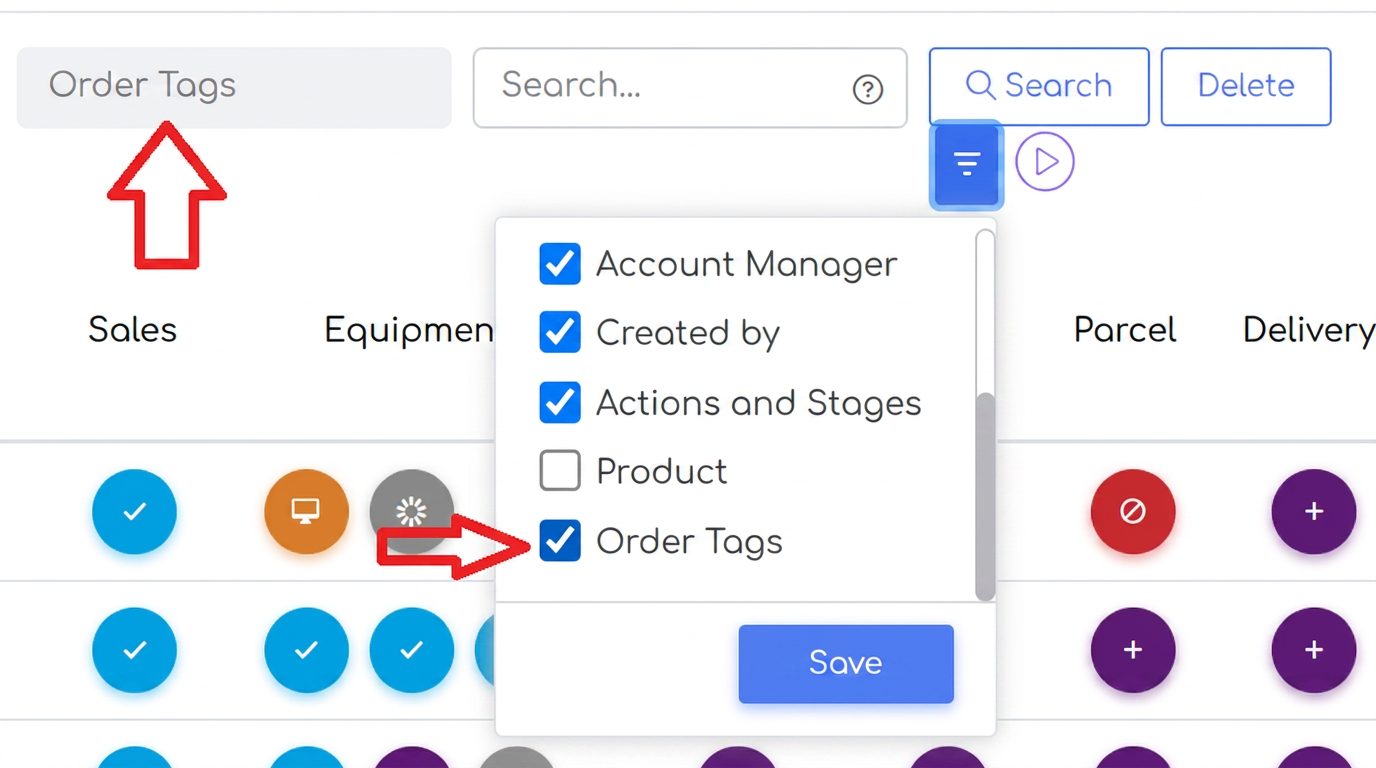
- On the right side of the screen, look for the 3-line symbol representing the available filters.
- Click on this symbol to open the filters menu.
- Scroll through the filter list until you find the option ”Order Tags” and check this option to activate the filter.
- Using the Filter:
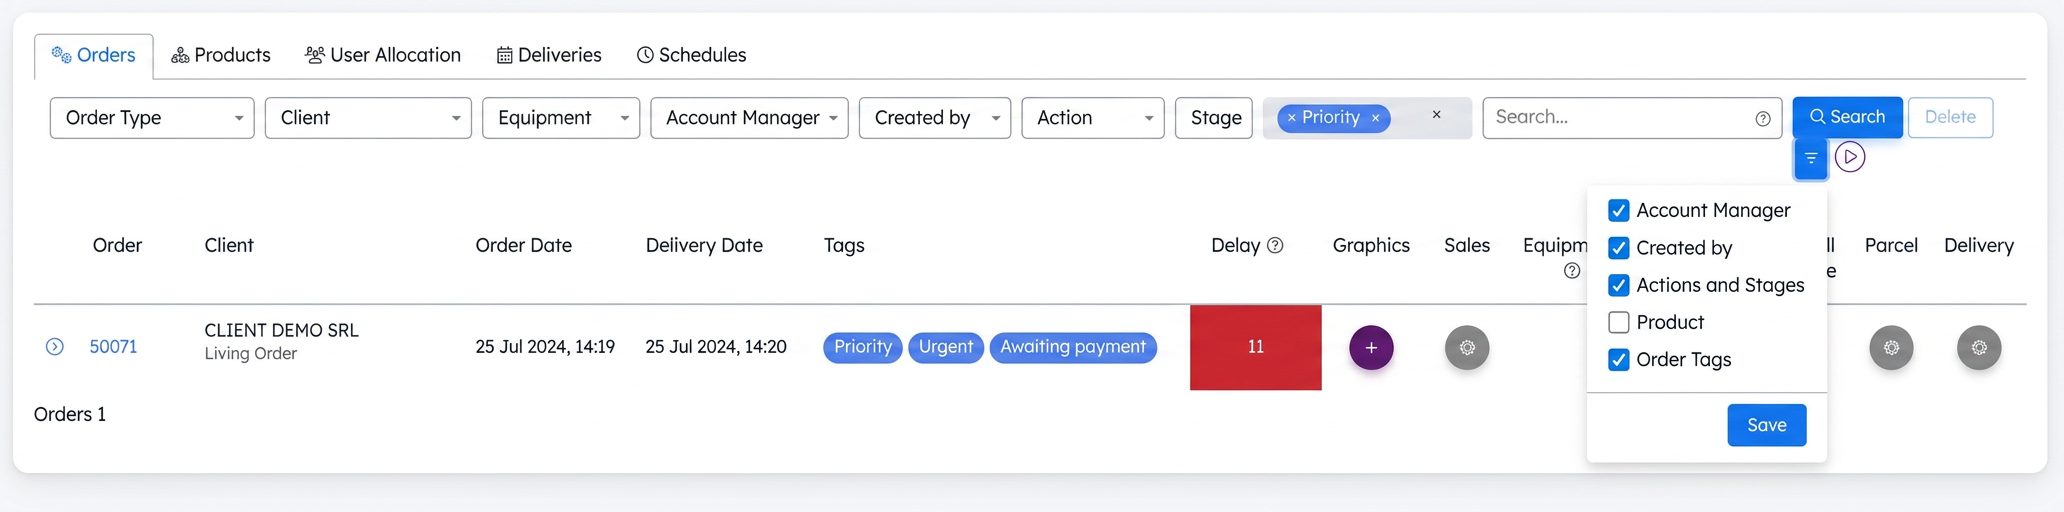
- Once the filter is activated, a new column will appear where you can enter the tags you want to filter orders by.
- You can choose from the list of existing tags or enter new tags.
- It is possible to filter by one or more tags simultaneously by entering each tag in the filtering field.
- Saving Filter Settings:
- After selecting the desired tags, press the ”Search” button to apply the filter and view relevant orders.
This functionality brings an additional level of customization and efficiency to workflow management, contributing to better organization and monitoring of orders in iflows.
Adding Default Details to PDF Invoice Templates
The function for adding default details to PDF invoice templates allows users to include standardized information that will appear on all invoices generated using a specific template. This functionality ensures consistency and efficiency in communicating with clients, eliminating the need to manually add the same details to every invoice.
How to Use:
- Accessing and Creating the Template:
- Navigate to the Settings section and select Invoices. You can choose to edit an existing template or create a new one.
- Inserting Details:
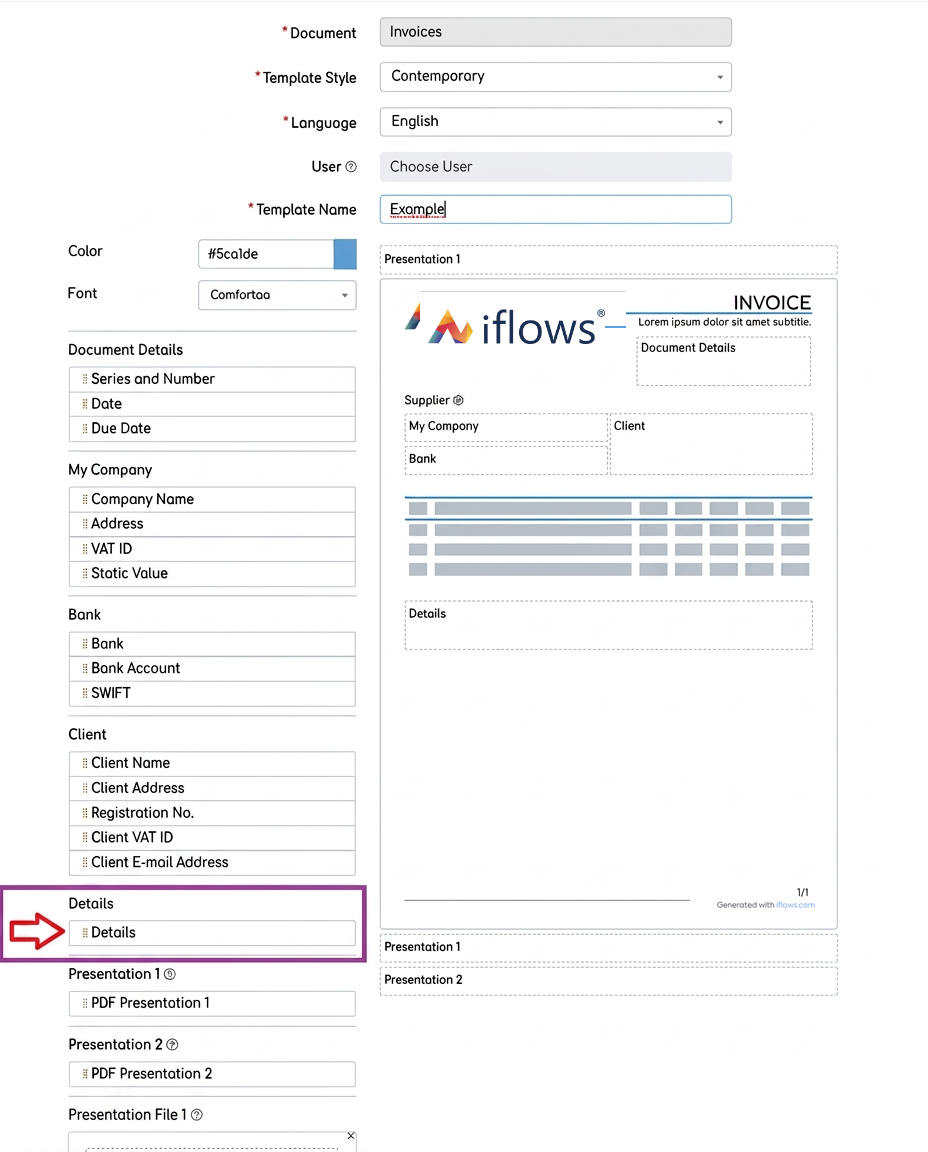
- On the left side of the editing screen, you will see a list of functions that can be inserted into the invoice template.
- Find the ”Details” option and drag it into the desired section of the template. When you start dragging the option, the area where it can be placed will turn green.
- Editing Details:
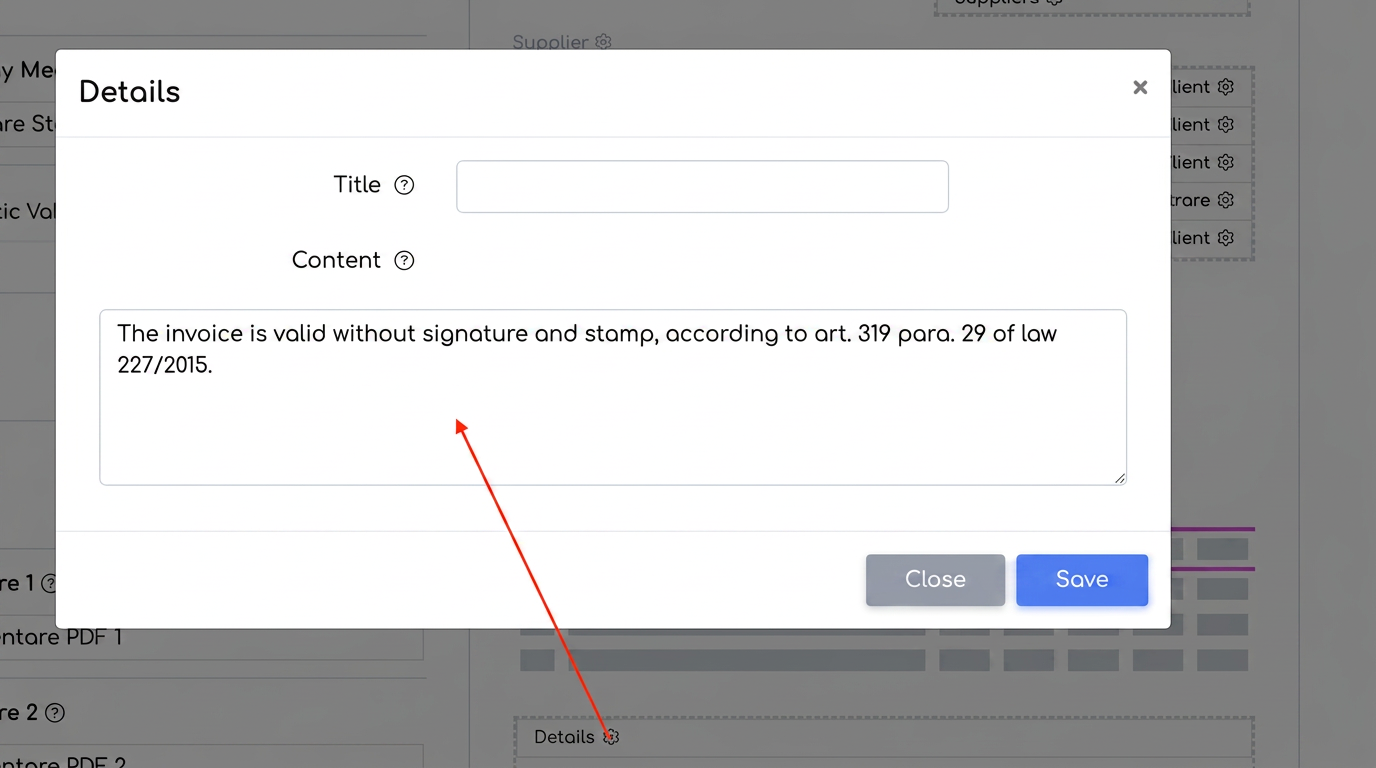
- After placing the ”Details” option in the template, click on the settings gear (edit icon) to open the configuration window.
- In this window, fill in the Title and Content fields:
- Title: This is optional. If filled in, the title will be visible on the invoice. If not filled in, only the content will appear.
- Content: Enter the standard information you want each invoice to include, such as legal clauses, payment terms, or other relevant details.
After configuring the desired details, press the ”Save” button to finalize and register the changes in the invoice template.
Now, all invoices generated using this template will automatically include the predefined information.
First Name and Last Name Contact Person Variables in Email Templates
We are introducing two new variables, Contact Person First Name and Contact Person Last Name, to improve the personalization of email communication with clients. These variables allow users to include the first and last names of contact persons directly in email templates, addressing the contact person directly with specific information.
How to Use:
- Navigate to the Settings section and select Templates. You can edit an existing template or create a new one. Choose the template you want to customize.
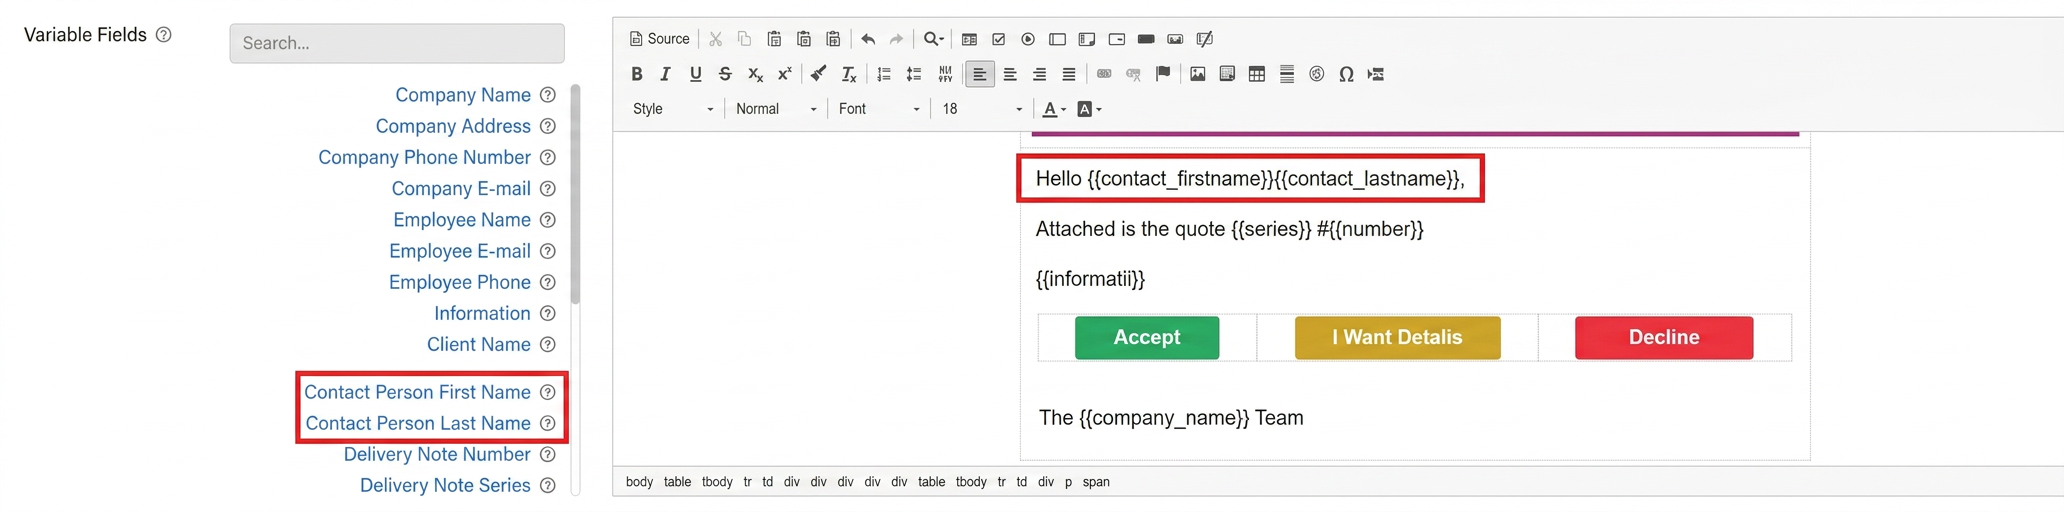
- On the left side of the editing screen, you will see a list of available Variable Fields.
- Find and select the new variables Contact Person First Name and Contact Person Last Name.
- Place the cursor inside the template where you want to insert the variable field and click to fix the cursor position.
- Once the cursor is fixed in the desired position, click on the desired variable from the list. The variable field will be automatically inserted into the template at the cursor position.
- For example, to create a personalized greeting, write "Hello" followed by the Contact Person First Name variable field.
- The text in the template might look like this: "Hello {{contact_firstname}},"
- After configuring the template with the new variables, it will be used automatically when you send emails. For example, if you edit the predefined template "Send Offer", it will include the personalized greeting.
- In the Sales -> Offers section, select the offer you want to send and click on the send email symbol.
- The system will automatically pull the "Send Offer" template, replacing the variable fields with the existing values in the system for the selected contact person.
If you have suggestions or ideas that could bring improvements to the iflows platform, we encourage you to send us feedback. We are dedicated to continuous improvement and assure you that all suggestions will be carefully evaluated.