
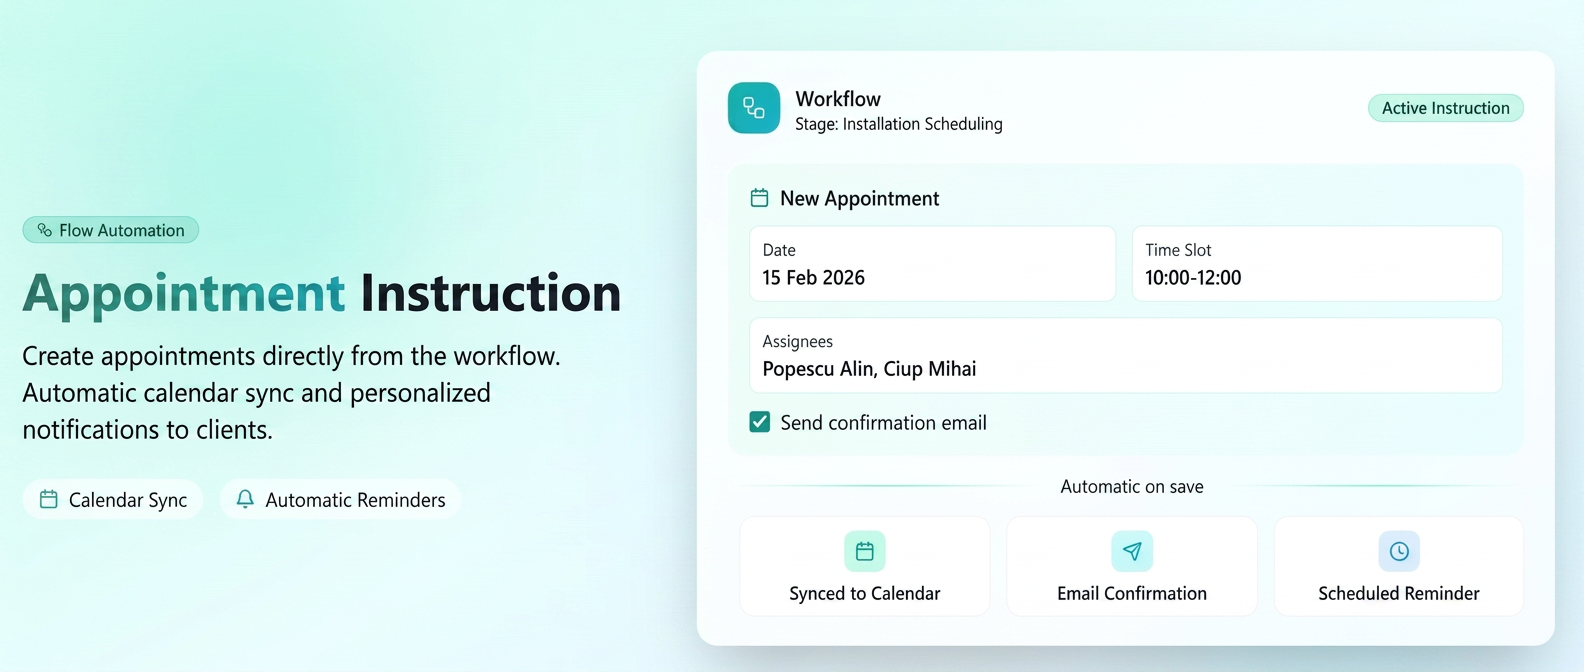
You can create appointments directly from the workflow; they sync instantly with the calendar and send personalized automated notifications to clients.
What this feature does, in short:
- Total Integration: Create the appointment directly from the workflow without navigating to other modules.
- Sync and Visibility: Data automatically appears in the appointment calendar, with full details available on mouse hover.
- Smart Communication: Sends immediate confirmations and scheduled reminders, automatically pulling client data.
🌟 What can you use this module for? (Practical examples)
Whether you are in production, services, or trade, you can schedule any field activity:
- Assembly and Installations: Scheduling the team to install finished products at the client's site.
- Service / Warranty Interventions: Managing repairs or technical inspections.
- Measurement Visits: Site visits to take dimensions before starting production.
- Maintenance: Scheduled visits for equipment maintenance.
- Special Handling Deliveries: Scheduling offloads that require additional equipment or personnel.
- Client Training: Scheduled sessions to teach the client how to use the delivered products.
- Work Acceptance: Official meetings for signing completion certificates.
- Technical Audit / Consulting: On-site evaluation visits for complex projects.
Step 1: Configuring Templates
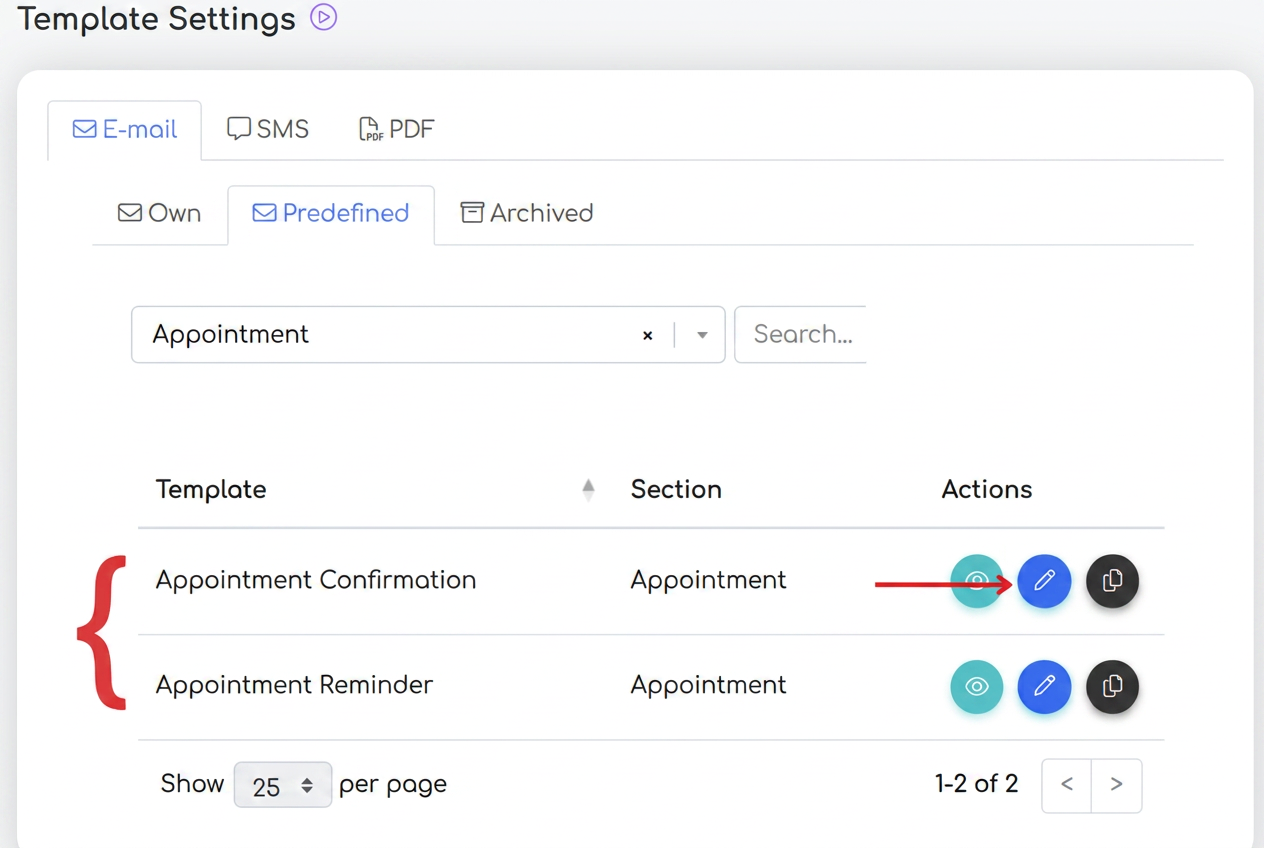
The system comes equipped with 2 predefined templates so you don't have to start from scratch. You can find them in Settings -> Templates -> Predefined, "Appointments" category. All you need to do is check and edit them as you like:
- Appointment Confirmation: Sent automatically to the client when you save the appointment, if the "send email" option is selected.
- Appointment Reminder: Used for automated reminders sent before the appointment.
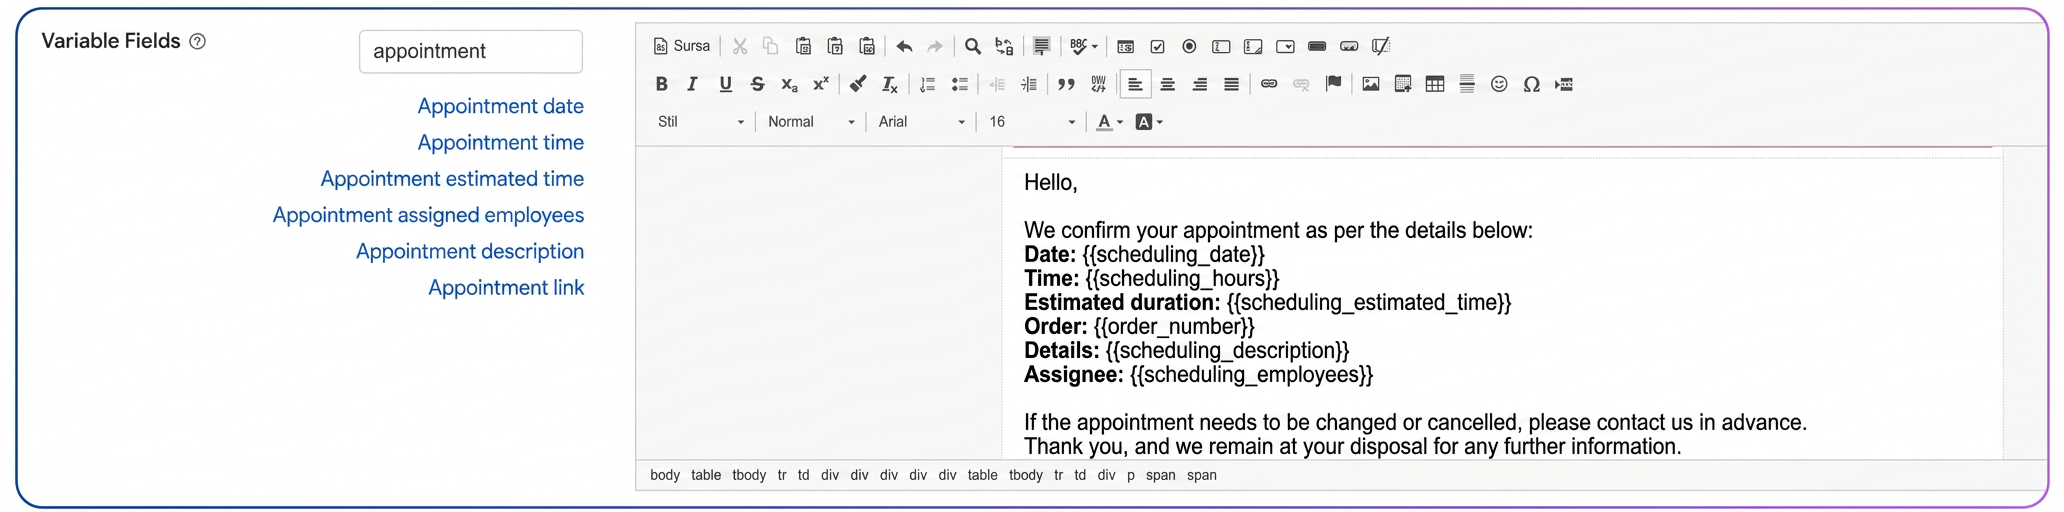
Personalization variables: Inside these templates, you can edit the text and use dynamic fields so the system fills in the data automatically:
- {Appointment Date}, {Appointment Time}, {Estimated Duration}, {Order Number}, {Responsible/Team}.
Step 2: Activating the instruction in the Workflow
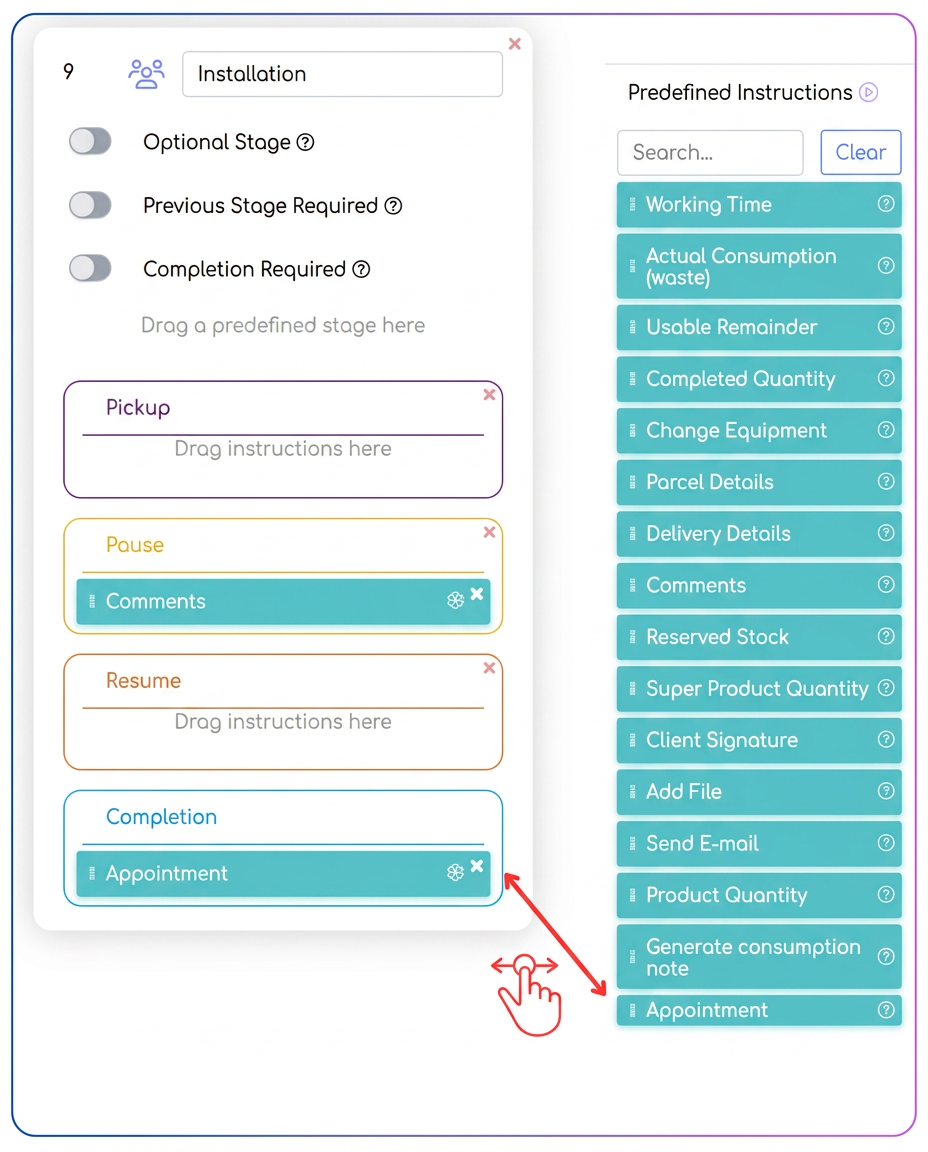
- Go to Settings -> Workflow -> Edit your workflow.
- Drag the "Appointment" instruction from the Predefined Instructions list into the desired stage (e.g., in the "Finalization" phase of the "Installation Scheduling" stage).
Step 3: Operation - How to create an appointment from the Workflow
When the order reaches that step, the interface opens and automatically pulls the Client and Order.
- Resources: Select the employee/team.
- Time: Choose the date (start/end) and exact times in the selector at the bottom of the calendar.
- Automation Options (Toggles):
- Send E-mail (Confirmation): Enable this to send details to the client on the spot using the "Appointment Confirmation" template.
- Automatic Reminder: Set how long before the appointment a reminder notification should be sent (e.g., 24 hours before). It will use the "Appointment Reminder" template.
- Recipients: The client's email is automatically retrieved. You can manually add other internal addresses (e.g., a project manager or another contact person).
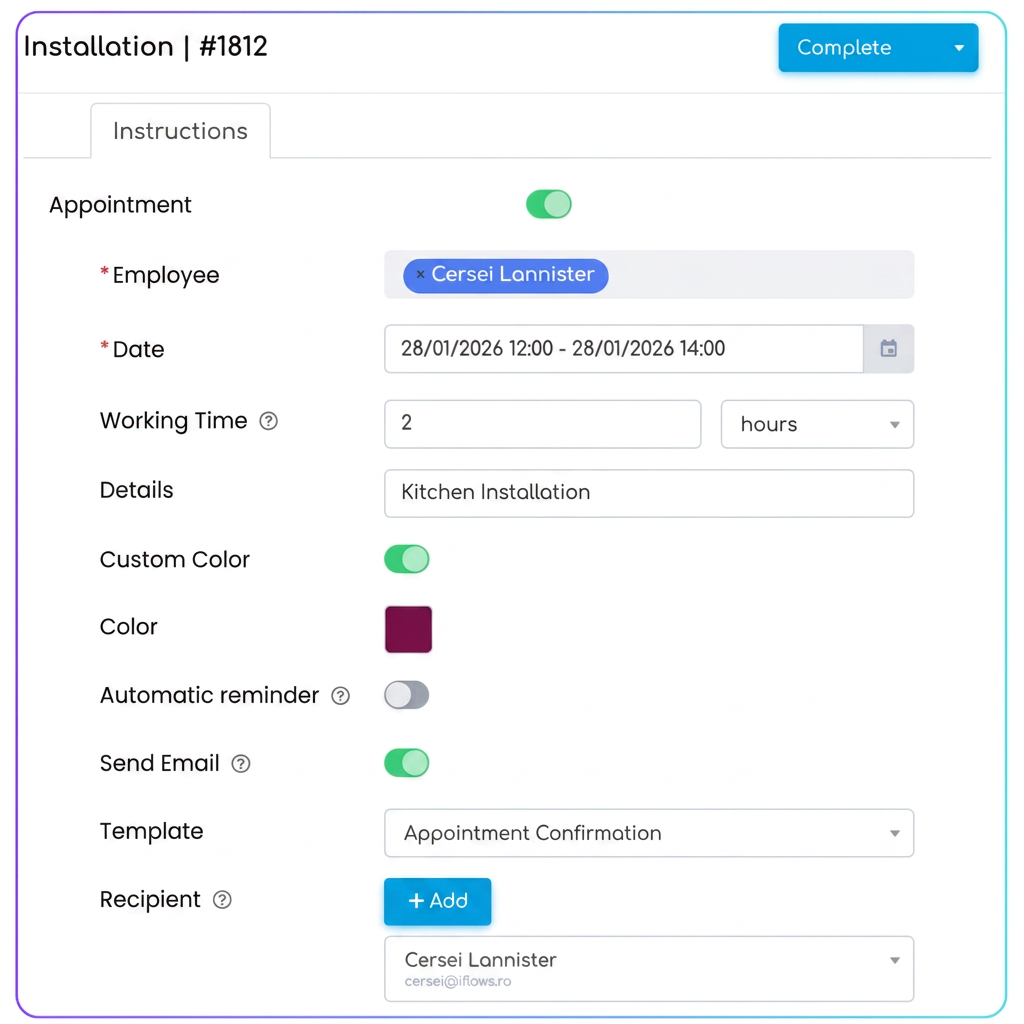
Step 4: Monitoring and the New Calendar Design
After saving, the appointment appears in the Appointments module, which benefits from a modernized interface:
- Organized Cards: Clean design that highlights essential information.
- Detailed Tooltip (Hover): Without clicking, just hover your mouse over an appointment and instantly see:
- The ID and Client.
- Time slot and Duration.
- The responsible employee.
- The Products/Services from the order that are the subject of the appointment.
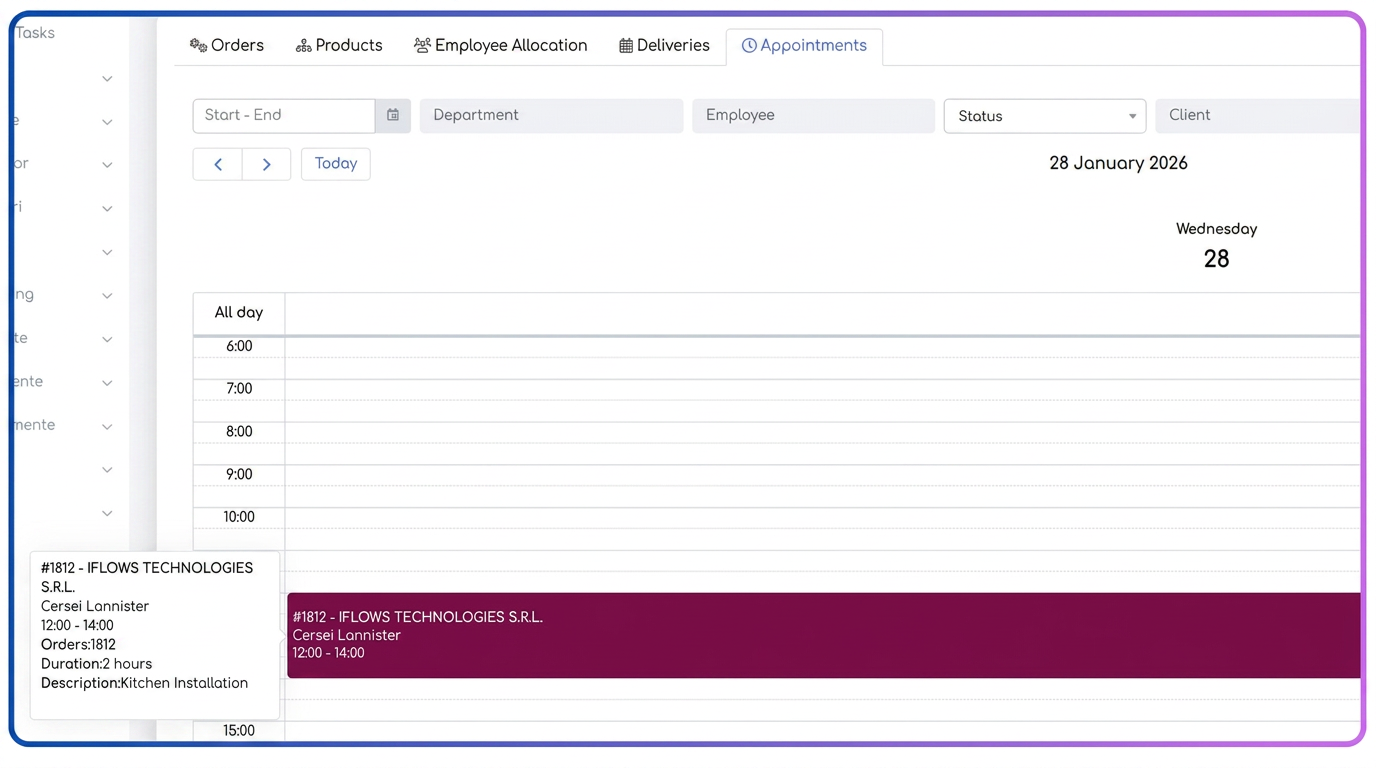
Traceability in Processing History
A major advantage of this instruction is that all details remain archived in the order history. Thus, anyone with access to the order can check:
- Who and when made the appointment.
- The time slot and set working duration.
- Notification status: You can clearly see if the confirmation email was sent, if the reminder is active, and the recipient's email address.
- Notes: Any additional details entered in the appointment form appear directly in the history.

By using the Appointment instruction, you ensure that no intervention is omitted. Clients receive professional confirmations, the team has the agenda updated in real-time, and you have total control over your field resources.
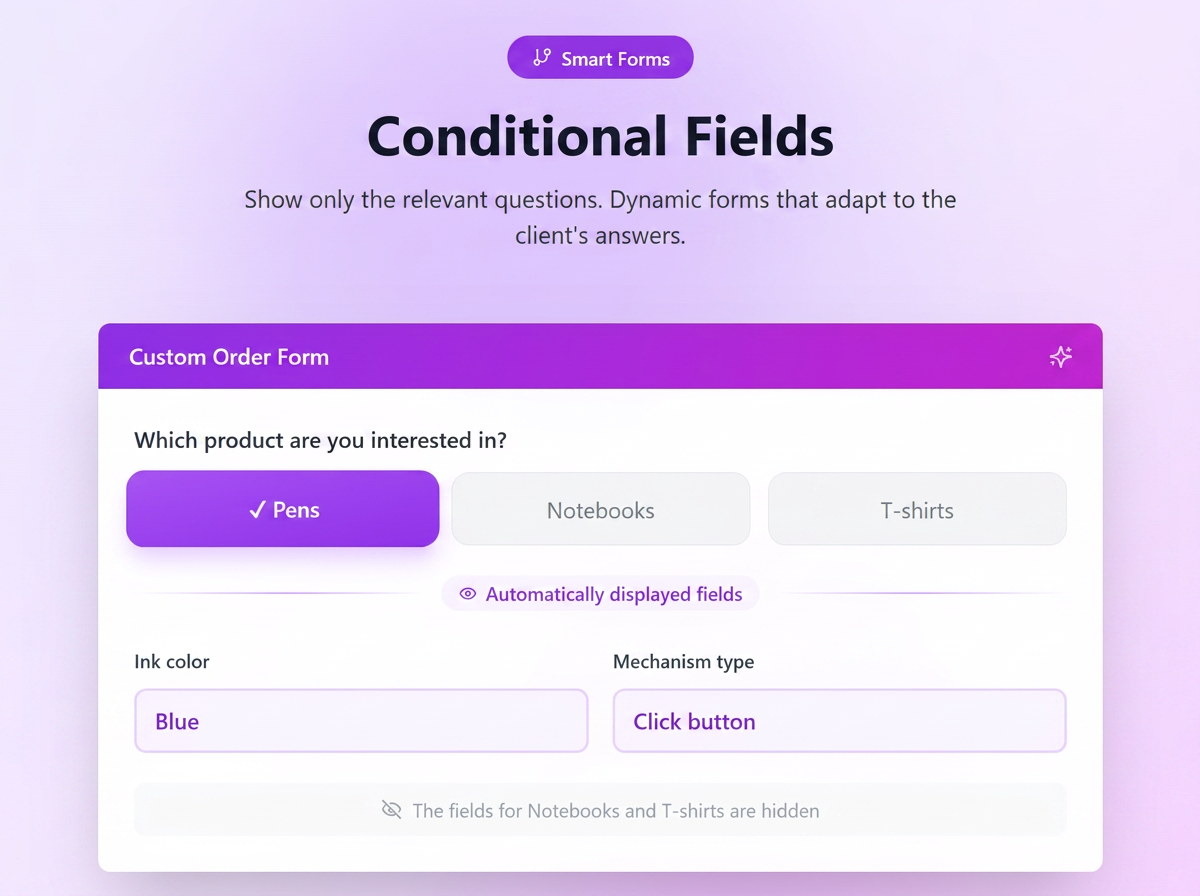
🌟 What are Conditional Fields and why use them?
Imagine you go to a restaurant and the waiter asks: "Would you like coffee or tea?". If you answer "Coffee", the next natural question is "With milk or without?". It makes no sense to ask you about the type of tea if you chose coffee.
That is exactly what Conditional Fields do: hide irrelevant questions and display only those that matter based on the client's previous answers.
💡 Usage examples:
- Promotional Sales: If they choose "Pens", show the "Ink color" field. If they choose "Agendas", show the "Format (A4/A5)" field.
- Auto Services: If they choose "Oil change", show the "Engine type" field. If they choose "Tire service", show the "Rim size" field.
- Advertising Production: If they choose the product "Business cards", fields for finishes appear: "Lamination (Matte/Glossy)" or "Rounded corners". If they choose "Flyers", these finish options disappear.
- Furniture Production: If to the question "Do you want assembly?" the client checks "Yes", then two new fields appear: "The floor you live on" and "Is there a freight elevator?". If they check "No", these logistical details no longer appear, simplifying the form.
🛠️ Step 1: Creating all necessary fields
Before setting up the logic, you must have all the "puzzle pieces" created.
- Go to Marketing -> Forms -> Custom Fields. *Note: you can also create fields while creating the form - so you can choose to go directly to step 2.
- Create both the "Parent" field (the one that triggers the action) and the "Child" fields (those that will be initially hidden).
- Example: Create the field "What product are you interested in?" (Parent - Select or Multiple Options type) and the field "Pen color" (Child)
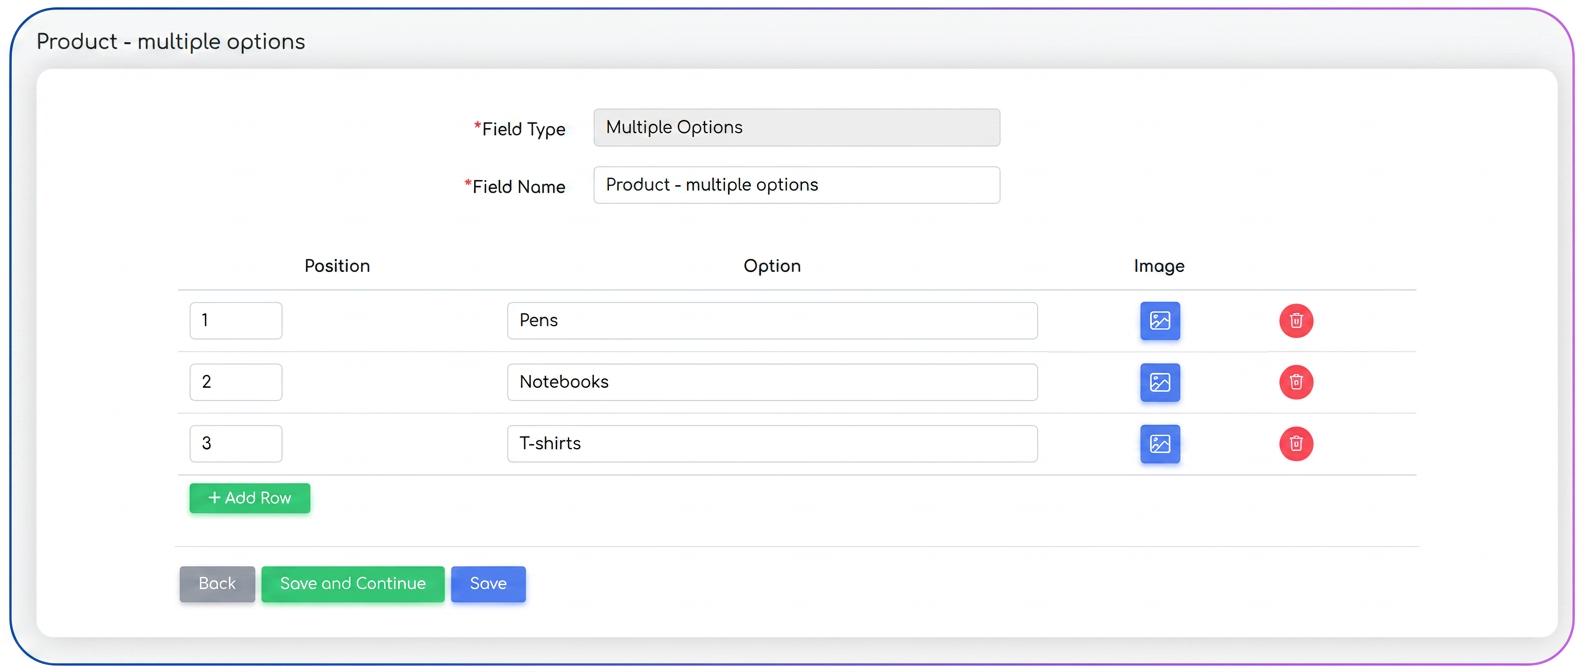
🏗️ Step 2: Building the Form
Now you need to put all these fields into a form.
- Go to Marketing -> Forms -> Add New Form (or edit an existing one).
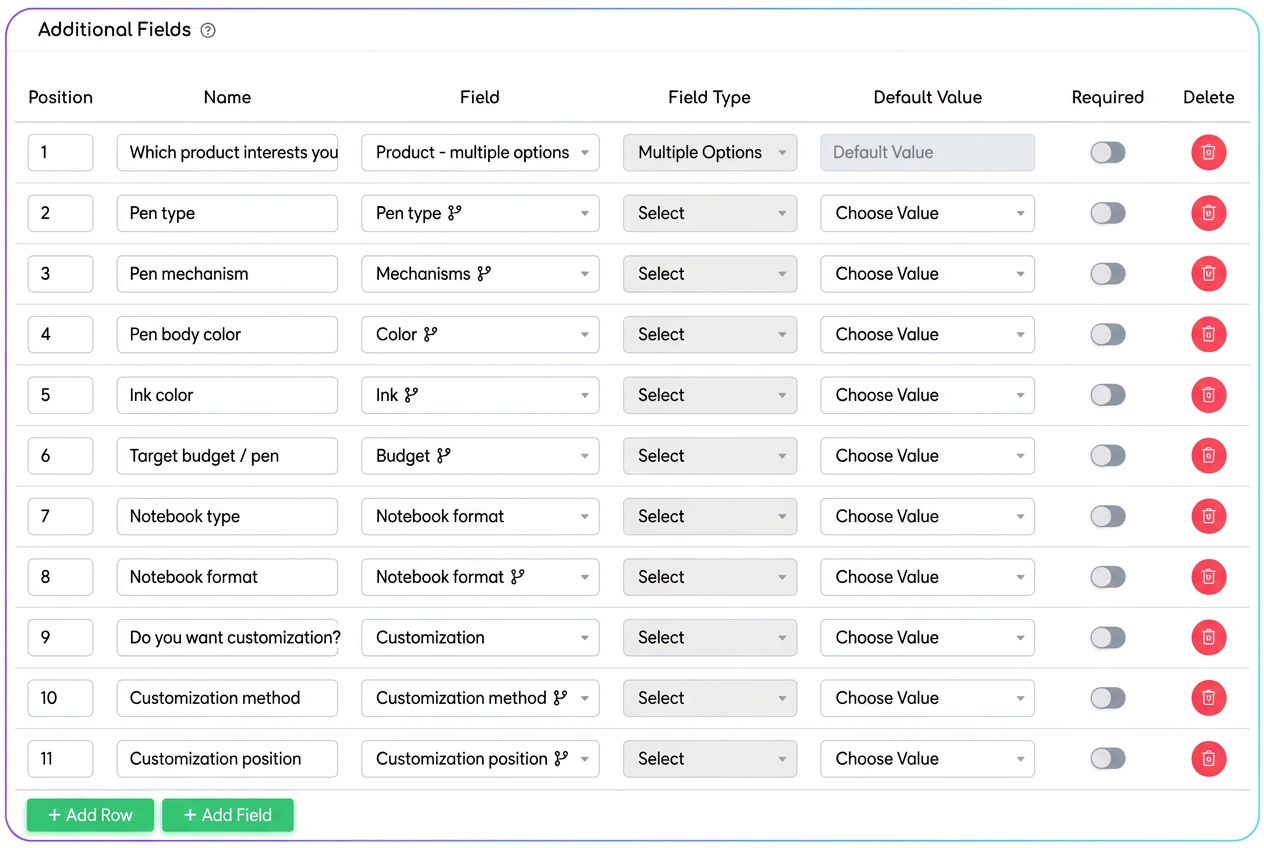
- In the Additional Fields section, add all the fields created in Step 1, regardless of whether they are parent or child fields.
- Save the form. At this point, if you view the form, you will see all fields one below the other (it looks cluttered, but that is normal for now).
🧠 Step 3: Defining the Logic (The Magic)
Now we will tell the system: "Hide field X and show it only if option Z is chosen in field Y".
- Return to the Custom Fields list.
- Find the Child Field in the list (the one you want to be initially hidden).
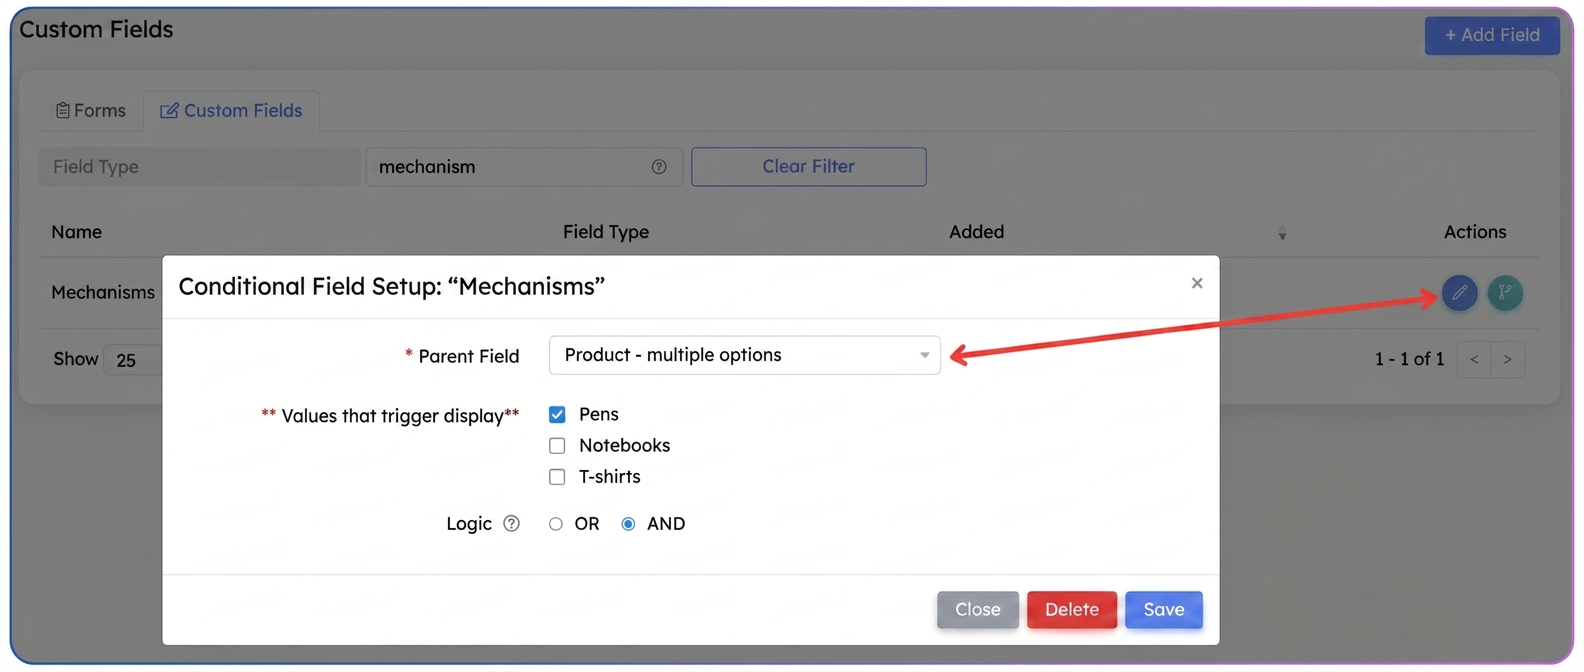
- Example: The "Pen Mechanism" field.
- In the Actions column, click on the blue "Set Condition" icon (it looks like a branch sign 🔀).
- A pop-up titled "Configure Conditional Field" will open:
- Parent Field: Choose the main question from the list (e.g., "Which product are you interested in?").
- Trigger Values: Check the box corresponding to the option that should activate this field (e.g., check "Pens").
- Logic (OR / AND): If you choose multiple trigger values, select OR (if they choose any of them) or AND (if they must choose all of them - applies to multiple checkboxes).
🧠 Understanding the Logic: OR vs. AND
This setting tells your system exactly which combination of answers should "show" the hidden field.
🔵 Case 1: "OR" Logic (Either one or the other)
The child field appears if the client checks any of the options you selected. This is the most commonly used setting.
- Concrete example: You sell promotional materials. You have a parent field: "Which products would you like?" with options: [Pens], [Diaries], [T-shirts], [USB Sticks].
- You want to display the field "Which personalization method would you like?" only for rigid objects.
- Setting: You choose OR and check: [✓] Pens, [✓] Diaries, [✓] USB Sticks.
- Result: If the client checks only Pens, the field appears. If they check Pens and Diaries, the field appears. If they check only USB Sticks, the field appears. It is enough to check one of them.
🔴 Case 2: "AND" Logic (Both one and the other - Must be both)
The child field appears only if the client checks all the options you selected at the same time. If they check only one, the field remains hidden.
- Concrete example: You have a custom clothing store. The parent field is: "What would you like us to print?" with options: [Front], [Back], [Sleeve].
- You have a special offer: a field called "Full Package Discount Code" that you want to show only to those who personalize the t-shirt everywhere.
- Setting: You choose AND and check: [✓] Front, [✓] Back, [✓] Sleeve.
- Result:
- If the client checks only [Front] and [Back] -> The discount field DOES NOT appear.
- If the client checks [Front], [Back] AND [Sleeve] -> Only then does the "Discount Code" field appear.
💡 Summary:
| Logic | Rule in short | When to use it? |
| OR | "I want it to appear if any of these options are chosen." | When several different products need the same information (e.g., clothing size). |
| AND | "I want it to appear only if all are checked at once." | When you want to offer something special (a discount, a gift, an extra service) only for a certain combination of products. |
- Click on Save.
👀 Step 4: Checking the Indicators
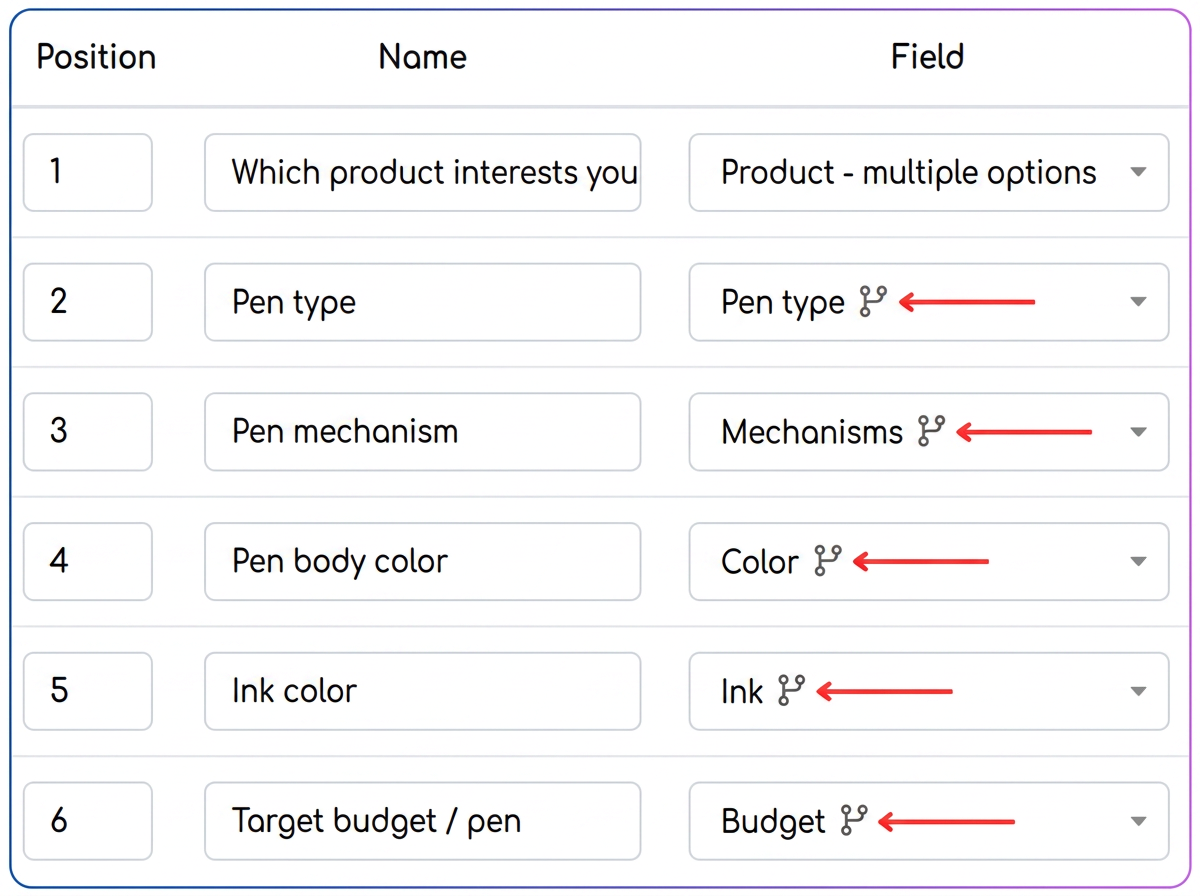
After you have saved the condition, you will notice, if you navigate in the form editing mode, a small icon (a branching sign) next to the field name. If you hover your mouse over it (mouse-over), the system will confirm: "Parent field: [Field Name]".
Step 5: Testing the Form (Final Result)
The last step is to see how it works for the client
- Open your public form link or press view on the form.
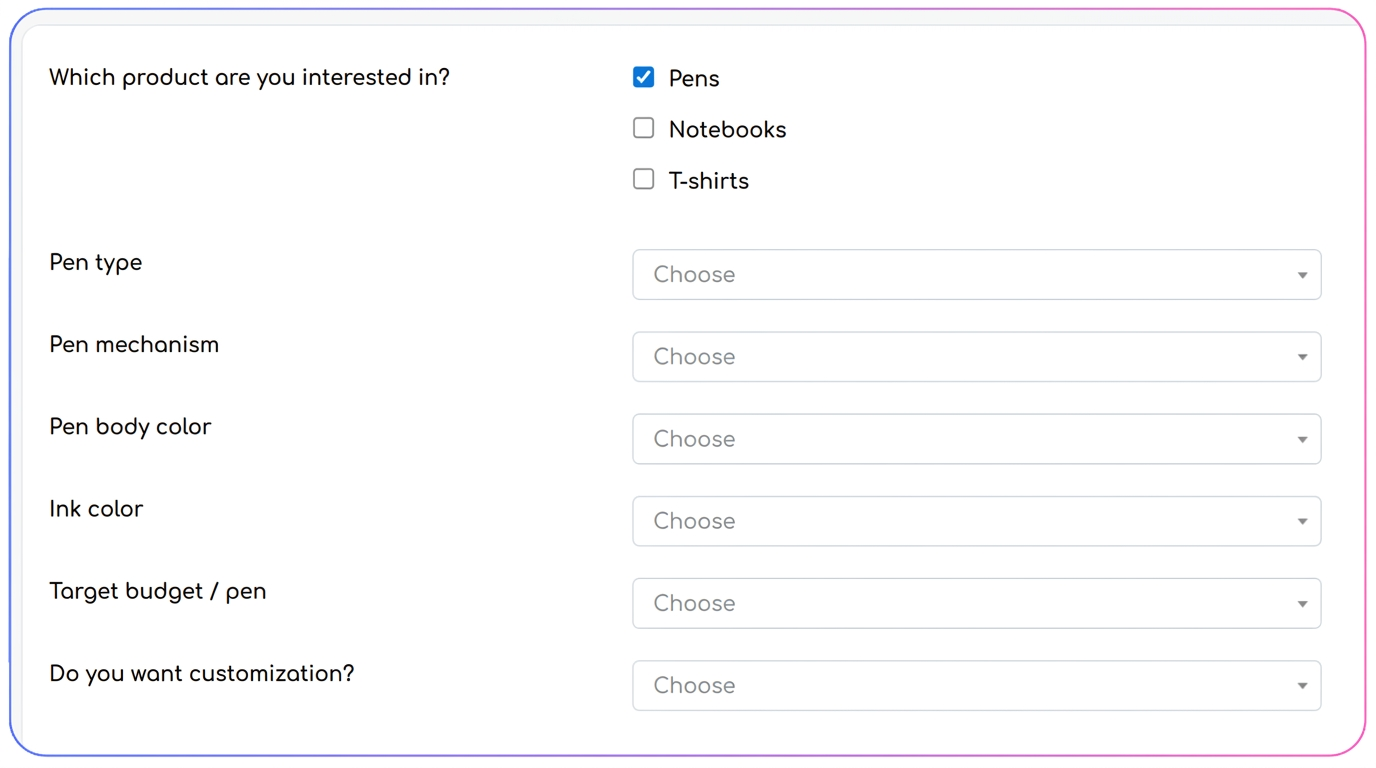
- Observe: The fields set as "child" (e.g.: Pen color, Mechanism) have disappeared from the page. The form looks clean.
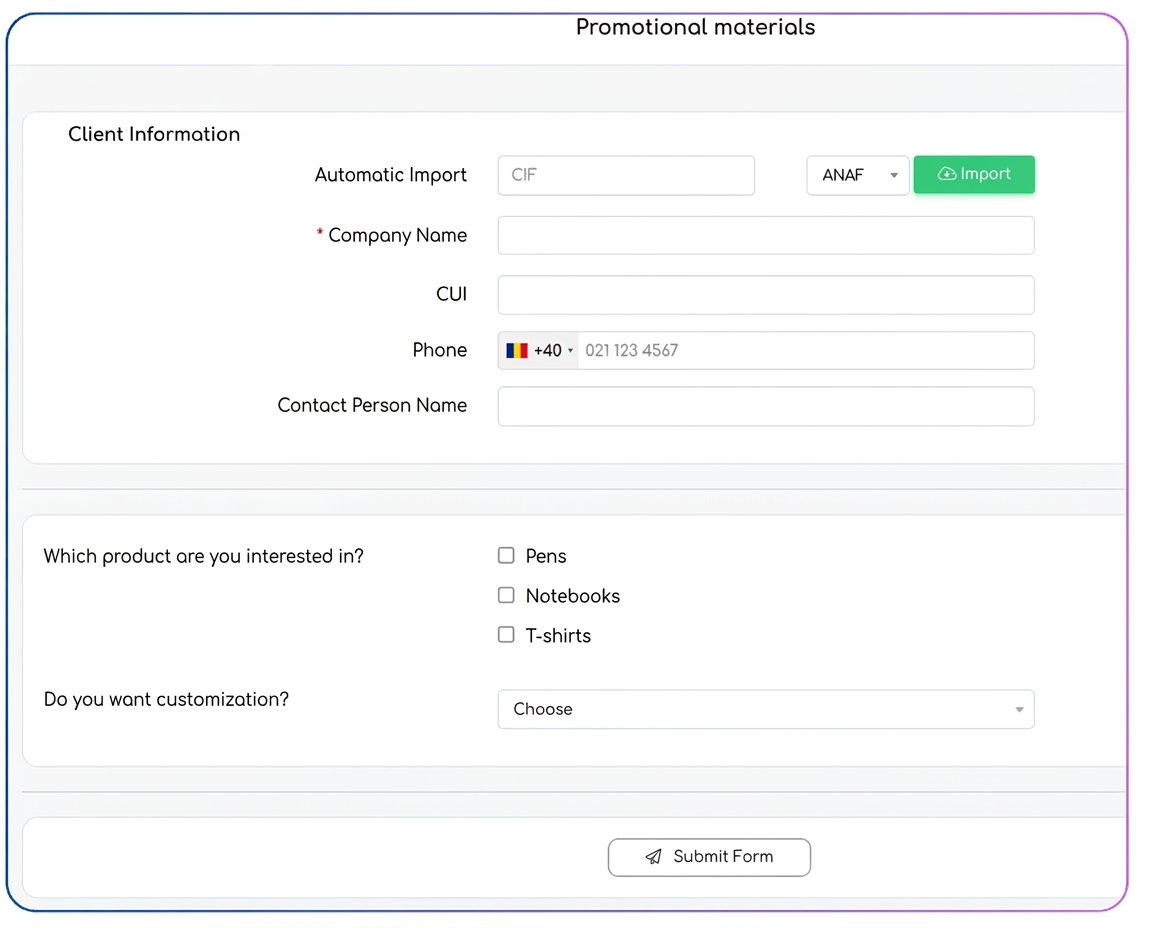
- Take Action: Select the "Pens" option for the main question.
- Result: Instantly, below the question, the specific fields for pens will appear. If you uncheck "Pens" and check "Agendas", the pen fields disappear and the agenda fields appear.
⚠️ Useful tips for success:
- Order matters: In the form, make sure the "Parent" question is placed above the "Child" questions. You cannot ask about the pen color before asking if they want pens.
- Required Fields: If a field is set as required (Required) BUT is hidden by a condition, it WILL NOT block the form submission. It only becomes mandatory to fill out when it becomes visible.
- Always test: After setting up complicated logic (with many branches), fill out the form as if you were a client to ensure the flow is logical.
📋 Difference between "Name" and "Field" (Data Source)
1. Name (or the Question)
This is the text your client sees. It is specific to that form and that moment.
- Purpose: To tell the client what they need to fill in.
- Example: "What color would you like the agenda cover to be?" or "Choose the body color for the pen".
2. Field (The Reusable Component)
This is the "engine" behind it, which contains the response options (e.g., Red, Blue, Green). It is a component you create once and can use in 10 different forms.
- Purpose: To store data and options, saving time.
- Example: You create a single field named "Standard Colors" containing [White, Black, Red, Blue].
🔥 Why use them this way? (The Power of Reusability)
Let's take the color example, it's the clearest:
- Situation A (Agendas): In the form, for Name you write: "Agenda Color". But for Field you choose the "Standard Colors" component.
- Situation B (Pens): In the same form (or another), for Name you write: "Pen Color". But for Field you choose the same component: "Standard Colors".
If next month you no longer have Red in stock, you don't have to modify every question in every form. You go to "Custom Fields", delete "Red" from the "Standard Colors" component and it will automatically update everywhere you used that field (both for agendas and pens).
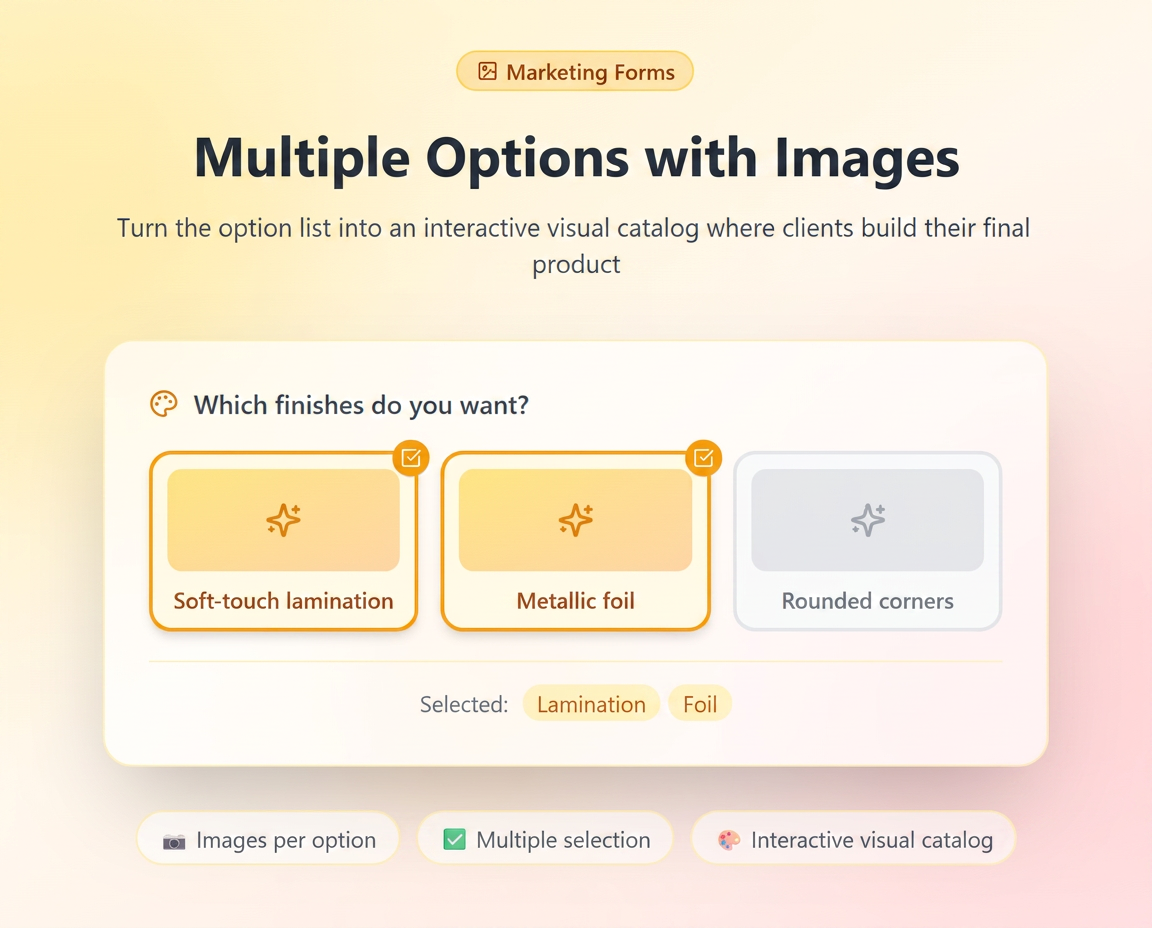
🌟 What does "Multiple Options" with Images mean?
Unlike a simple list where you choose a single item, the Multiple Options field allows clients to check one or more variants at the same time. Adding images transforms this list into an interactive catalog where the client "builds" the final product by adding features or finishes.
🛠️ Step 1: Field Configuration
- Go to Marketing -> Forms -> Custom Fields.
- Create a new field or edit an existing one.
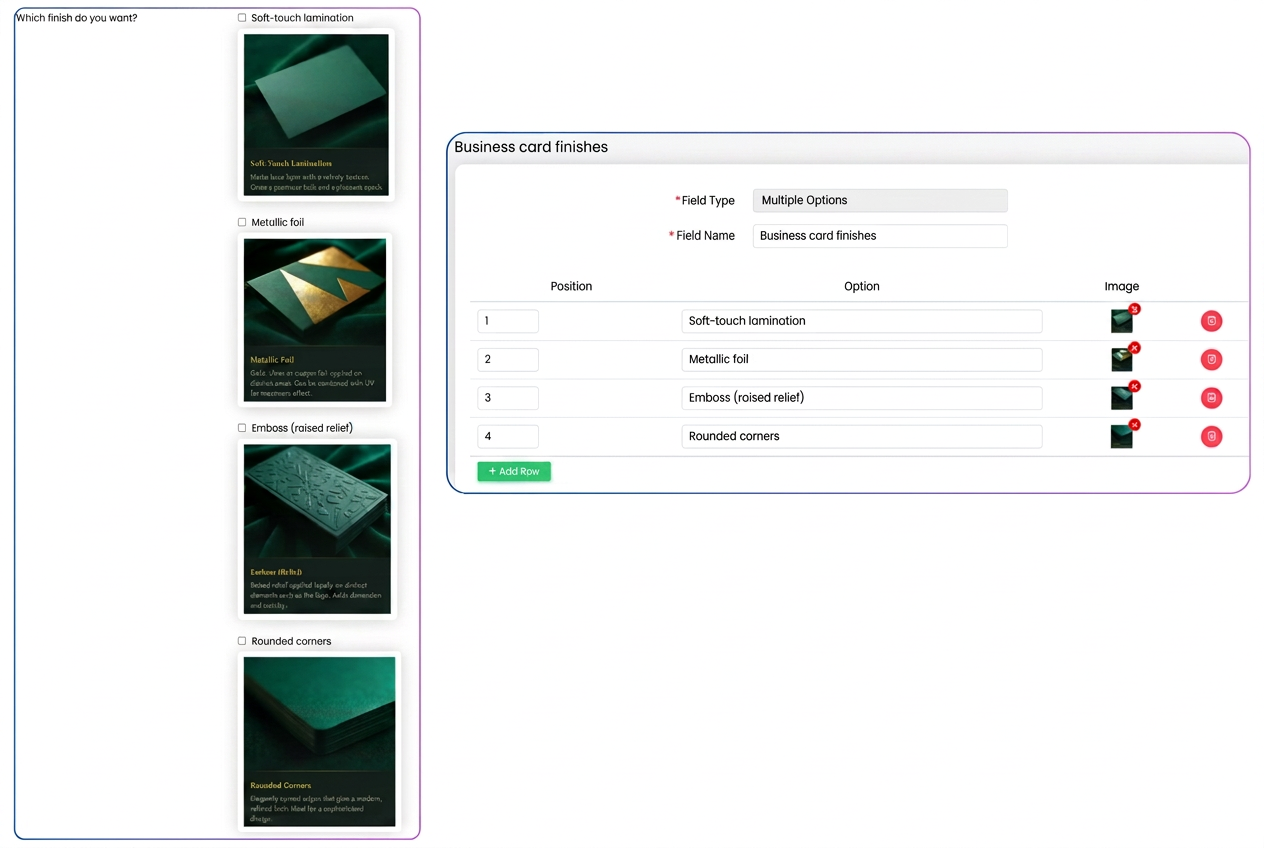
- For Field Type, you must choose "Multiple Options".
- Add Values: Type the names of the options (e.g., Lamination, Foil, Corners).
- Upload Images: Next to each option, click the blue button (gallery 🖼️) to upload a representative photo.
- Save.
🏗️ Step 2: Adding to the Form
- In your Form editor, add this field.
- When the client opens the form, the options will not be just checkboxes, but elegant visual cards.
- The client can check, for example, both "Lamination" and "Metallic Foil" and "Rounded Corners". All will appear as selected.
💡 Usage examples (Options that work together):
🪑 Furniture Production: Optional Features
If you sell a cabinet, the client can choose multiple accessories to be installed inside:
- Option 1: [✓] LED Lighting System (Image with the lit interior).
- Option 2: [✓] Drawer Organizer (Image with the partitioning).
- Option 3: [✓] Interior Mirror (Image with the door mounting).
3. 👕 Textiles: Customization Services
For a hoodie, the client can choose multiple zones and types of branding:
- Option 1: [✓] Chest Embroidery (Image with stitch detail).
- Option 2: [✓] Sleeve Print (Image with arm positioning).
- Option 3: [✓] Custom Neck Label (Image with brand detail).
- 👉 Result: The client sees exactly where the elements will be placed and checks all desired ones.
Note: Images must be complementary.
When configuring this field, make sure the options offered can coexist on the same product. If the options are mutually exclusive (e.g., Wood Material vs. Metal Material), it is better to use a Select field type (where you can choose only one).
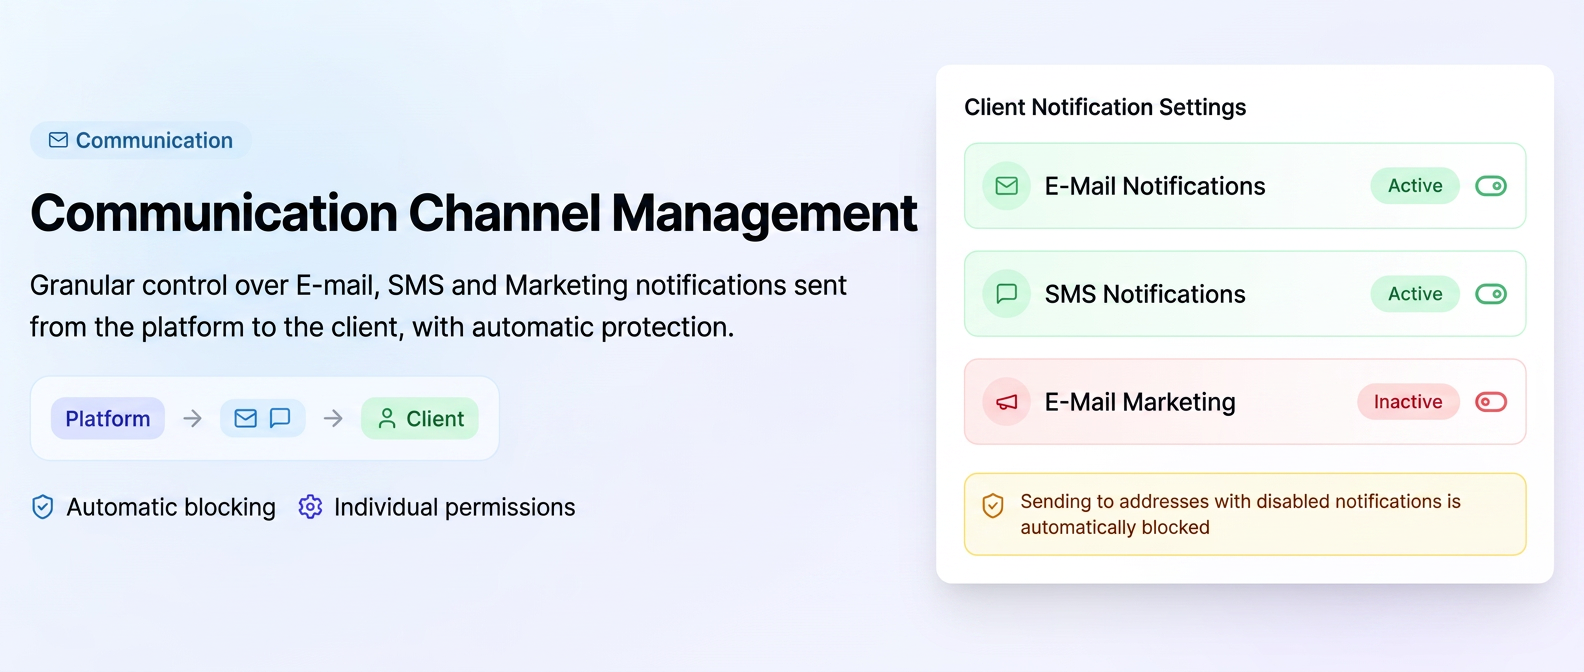
The iflows system allows granular control over how the platform interacts digitally with your clients. It ensures compliance with message reception preferences and prevents sending communications to restricted addresses, providing a clear hierarchy of permissions.
🎯 Operating Logic
All reception settings are managed individually, at the contact address or phone number level.
1. Configuring Permissions (Access Hierarchy)
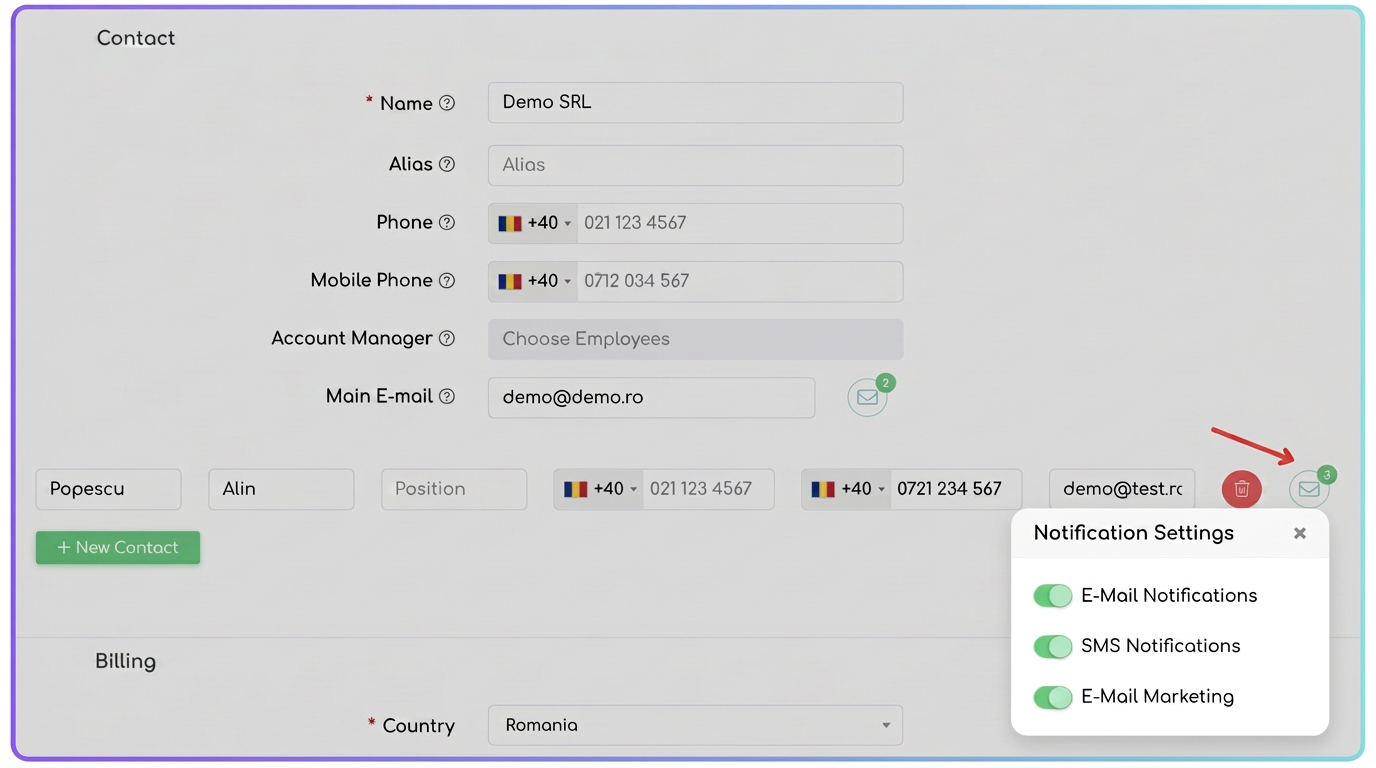
Managing how a client receives documents is done by accessing the envelope icon ✉️ next to each email address in the client profile. The configuration menu includes the following rules:
- A. Client Email Notifications (Main Control):
- Status ACTIVE: Allows sending transactional documents (Quotes, Orders, Invoices, Overdue payments, Workflow emails, etc).
- Status INACTIVE: The address is completely restricted. The system will block any email flow to this destination.
- B. SMS Notifications: Enables or disables permission to send text messages to the associated phone number.
- C. Email Marketing:
- Strictly manages the inclusion of the address in funnel campaigns and newsletters.
2. Protection for Manual Document Sending
The platform includes a safety mechanism that intervenes when a user attempts to manually send a document (e.g., an Invoice/ Quote/ Order/ Notice):
- System Intervention: If an attempt is made to send an email to a recipient who has the Email Notifications option disabled, the platform will automatically block the action.
- Error Message: The user will receive a red notification:
"For the address [email], the Email Notification option is disabled. Enable the option in the client profile to be able to send the email."
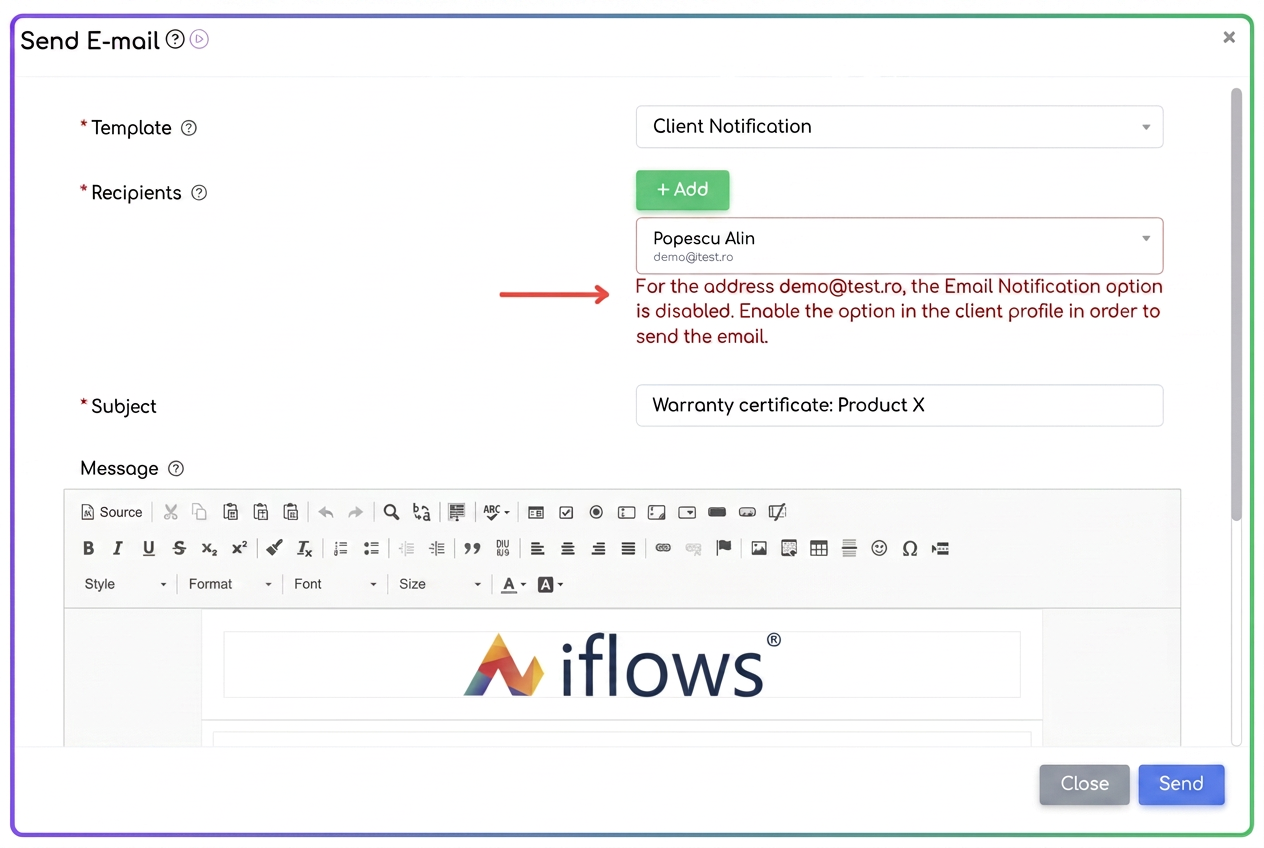
- Correction: To allow sending, it is necessary to access the client profile and reactivate explicit permission for that contact address.
3. Status Monitoring (View Badges)
To quickly check the availability of communication channels without entering edit mode, the View Client page includes color-coded labels (badges) with real-time status:
- Email: 🟩 Green (Reception Active) / 🟥 Red (Communication Restricted)
- SMS: 🟩 Green / 🟥 Red
- Marketing: 🟩 Green / 🟥 Red
These indicators allow the sales or support team to instantly identify if a client can be contacted digitally, ensuring total transparency over communication workflows.

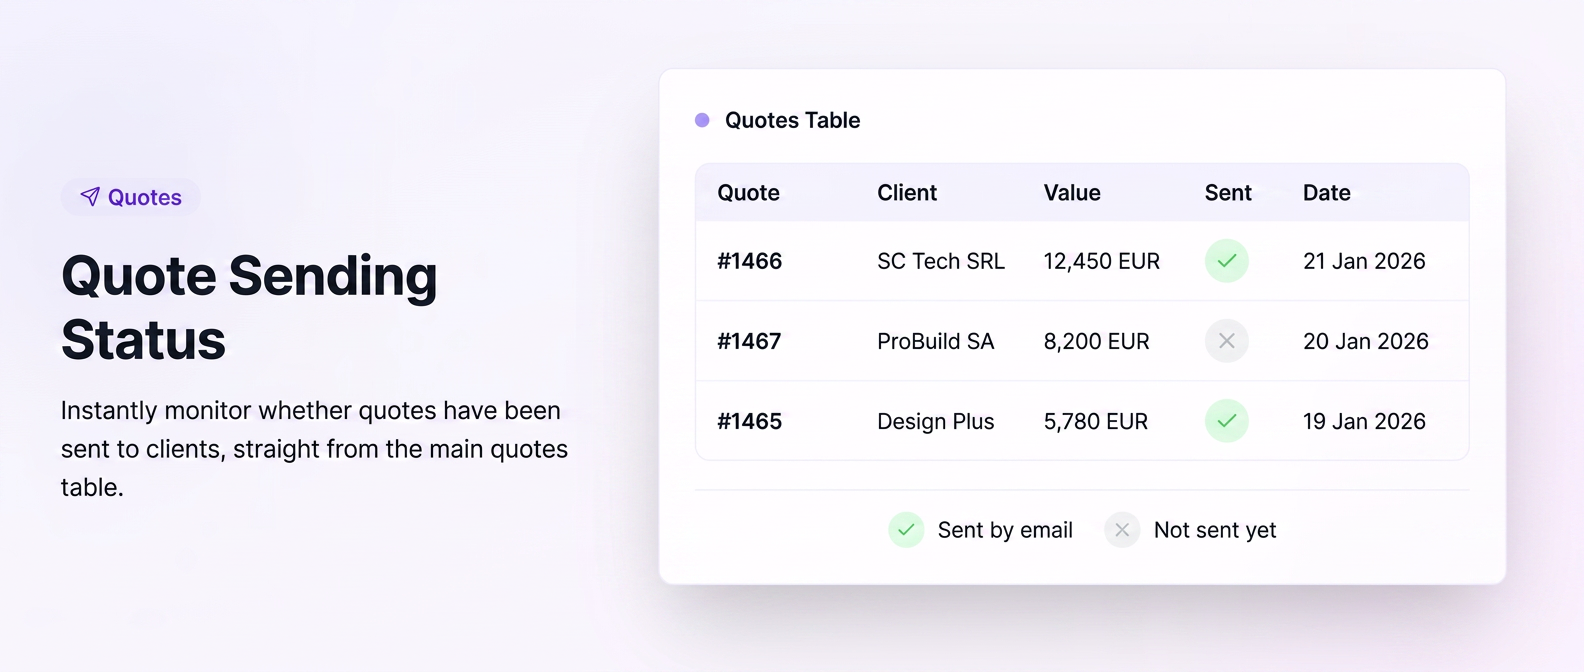
To eliminate the risk of missing out on sending quotes to clients, iFlows features a shipment monitoring system directly in the Quotes table. This functionality allows you to instantly identify the status of communication with the client without leaving the main workspace.
1. Meaning of Visual Indicators
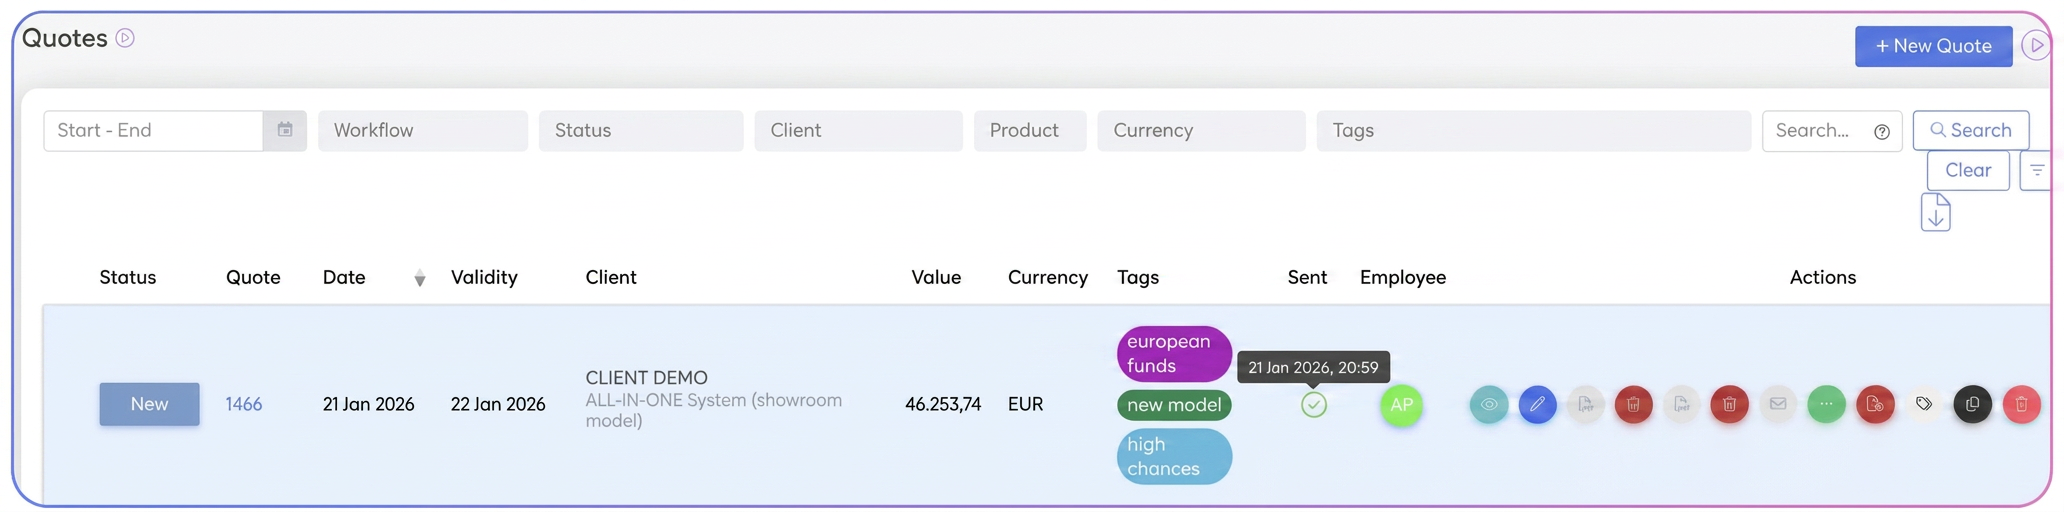
In the dedicated "Sent" column, the system displays the shipment status using two distinct symbols:
- ✅ Green Checkmark: Confirms that the quote was successfully sent via email to the client using the integrated shipping function in the platform.
- Tip: Hovering your cursor over the checkmark will display the exact date and time the sending was performed.
- ❎ "X" Symbol (Grey): Indicates that the quote has been generated but has not yet been sent via the iFlows email system.
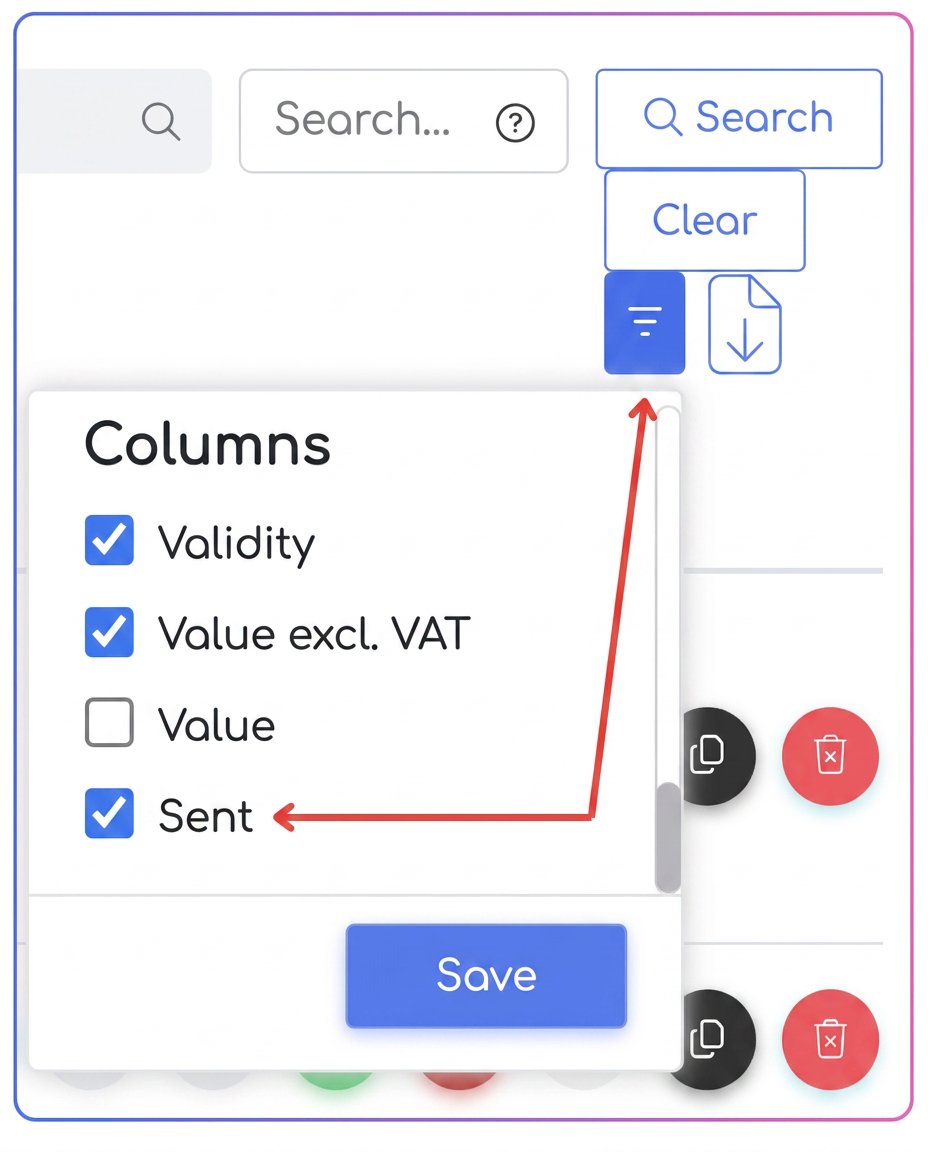
2. Activating and Customizing the Table
If you want to view this column in your quotes panel, follow these configuration steps:
- Navigate to the Sales -> Quotes section.
- In the top-right part of the table, access the Column Configuration button (the icon with horizontal lines/filters).
- In the contextual menu, identify and check the "Sent" option.
- Press the Save button. The preference will be remembered for your account, keeping the table organized according to your monitoring needs.
🔍 Alternative Verification Methods (Extended Traceability)
In addition to the quick indicator in the table, the platform offers two more ways to confirm interaction with the client:
- Quote View Mode: When accessing a specific quote, the sending status and its history are visible in the document details.
- Client File (Communications Section): Any email sent from the system (quote, invoice, notification) is automatically archived in the Communications section of that specific client. This provides an overview of the entire correspondence history held with your business partner.
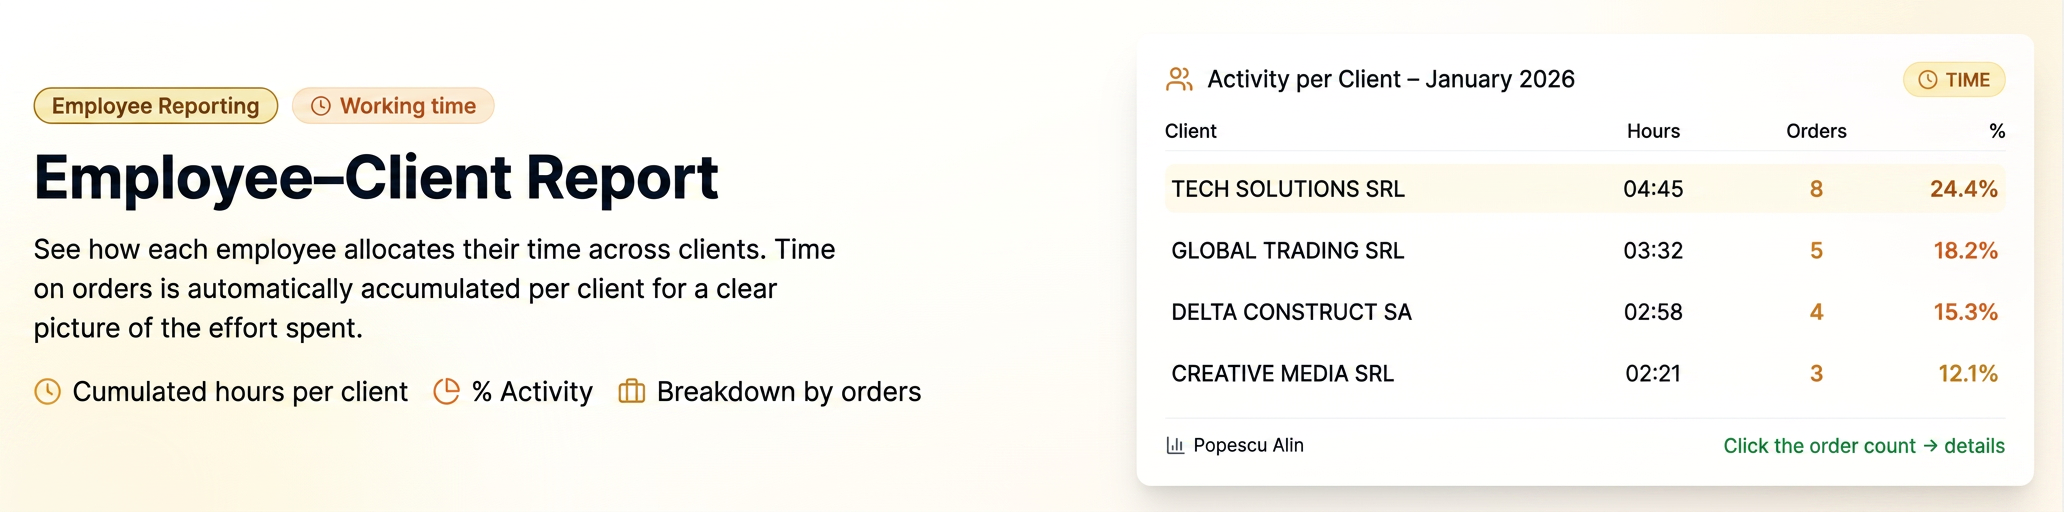
This report provides a clear view of how each employee allocates their effort and time among the clients in their portfolio. It is the ideal tool for understanding which partners request the team's resources the most.
🎯 Calculation Logic: Summing times per client
The system analyzes all interventions of an employee within a calendar month. If an employee worked on several different orders for the same client, working times are automatically added up, providing you with a cumulative total per client, not just per order.
1. Viewing the Report
To generate this analysis, the following criteria must be met in the reporting module:
- Access Reports -> Employees.
- Use the top filters to select a specific Employee or an entire Department.
- Mandatorily select the "Monthly" report type.
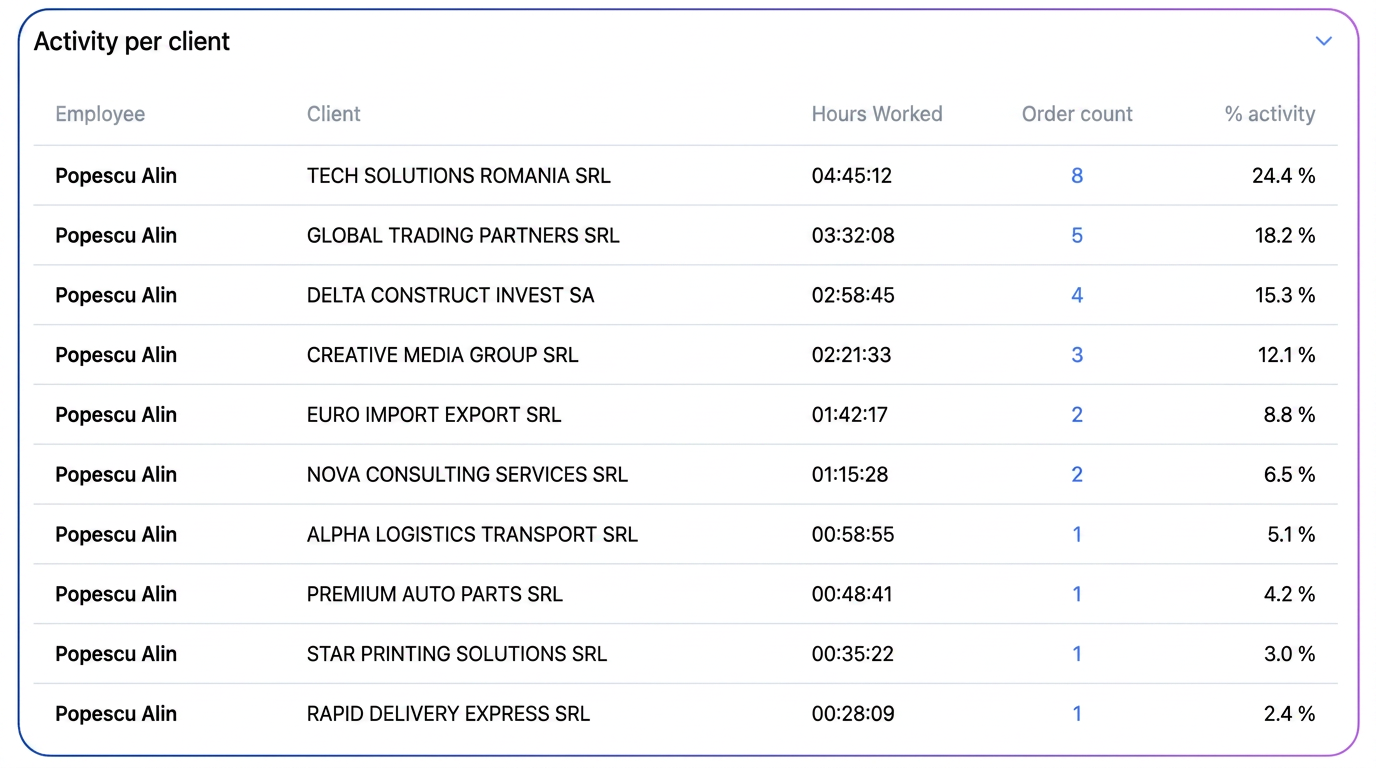
- The "Activity per client" table will be displayed at the bottom of the page.
2. Data Structure and Performance Indicators
The table centralizes employee efficiency using the following parameters:
- Employee: The name of the person whose activity is analyzed.
- Client: The name of the beneficiary.
- Hours worked (hh:mm:ss): The total cumulative time the employee spent working for this client (sum of all hours from all their orders in that month).
- No. of orders: The total number of different orders for the client on which the employee recorded activity.
- % Activity: The share of time allocated to this client out of the total hours worked by the employee in the selected month.
3. Project Detailing
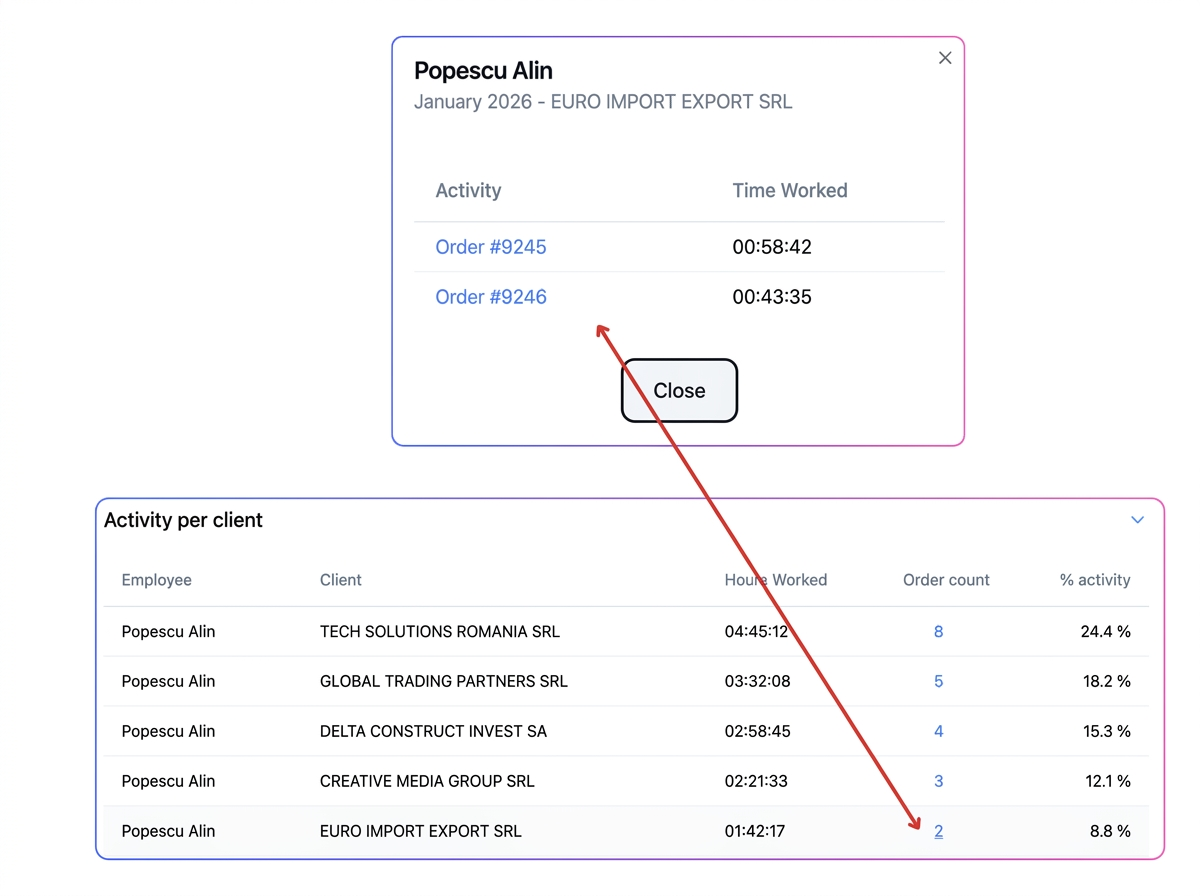
If you want to see exactly which orders make up the total time displayed for a client:
- Interaction: Click on the blue figure in the "No. of orders" column.
- Result: A pop-up window will open listing each individual order and the working time allocated to it by the employee (e.g.: Order #9245 - 00:58:42).
- Navigation: You can click on the order number in the pop-up to directly open that order's technical sheet.
4. Managing the Workspace (Collapsible Tables)
Since detailed reports can generate long lists, the interface allows for the visual organization of the page:
- Both the "Activity per client" table and the "Activity per orders" table are equipped with the collapse function (Collapse).
- By pressing the control arrow in the top-right corner of each table, you can "fold" the sections you do not need at that moment, keeping the screen clean and focused on relevant data.
💡 Practical analysis example
If you notice that an employee has an % Activity of 50% on a single client, even though they worked on 10 different orders for them, the report confirms that this client represents half of the employee's monthly effort. This helps you make informed decisions or redistribute tasks within the team.
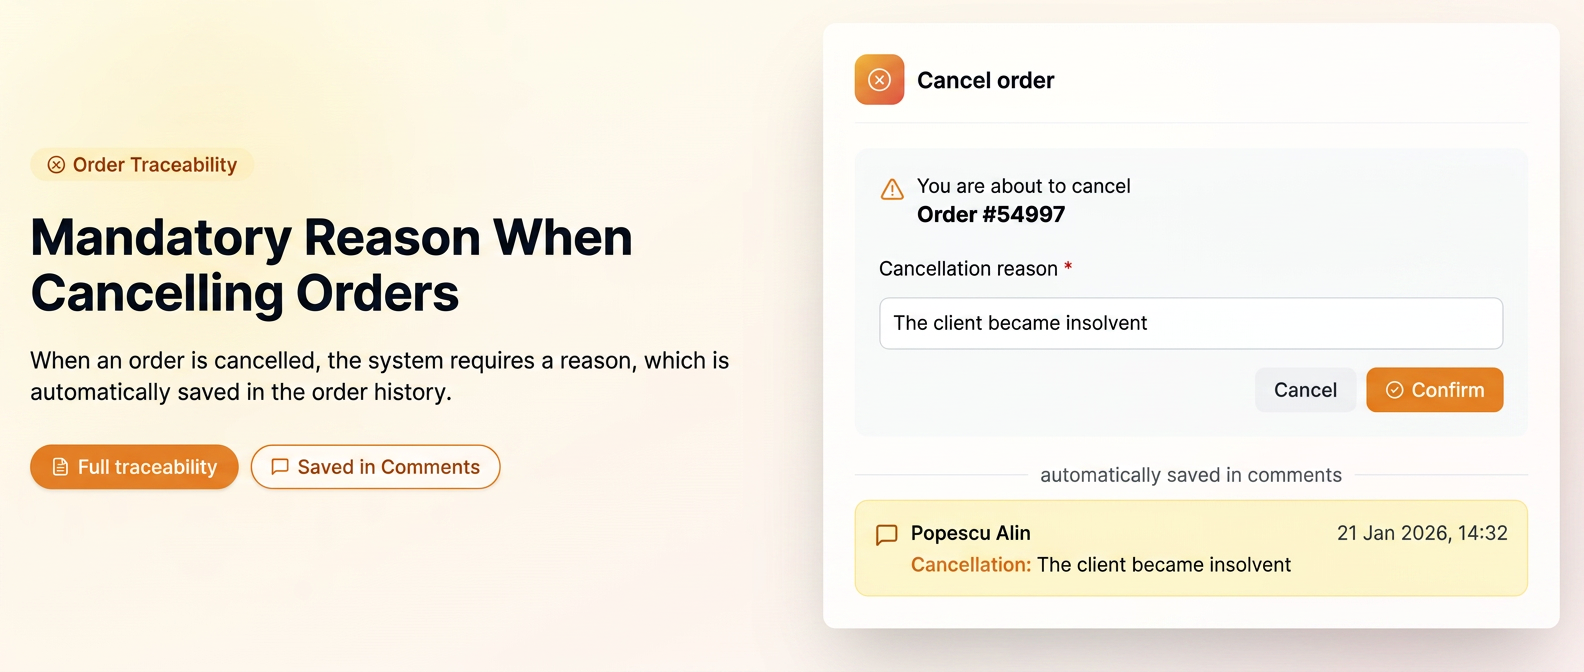
To ensure superior traceability and to allow for a correct analysis of the causes leading to uncompleted transactions, iFlows has optimized the order cancellation process. This update introduces the requirement to document each cancellation, providing valuable historical context for the entire team.
🎯 Why is this step necessary?
- Traceability: Precise identification of the user who performed the cancellation and the reason cited.
- Business Analysis: Understanding patterns (e.g., stock issues, price, client change of mind) to improve internal processes.
- Historical Clarity: Eliminating doubts when an old order is later consulted by other colleagues or by management.
🛠️ How It Works (Step by Step)
1. Initiating Cancellation
The process begins by pressing the Cancel button (red trash can icon) next to any active order.
2. Requesting the Reason (Pop-up Window)
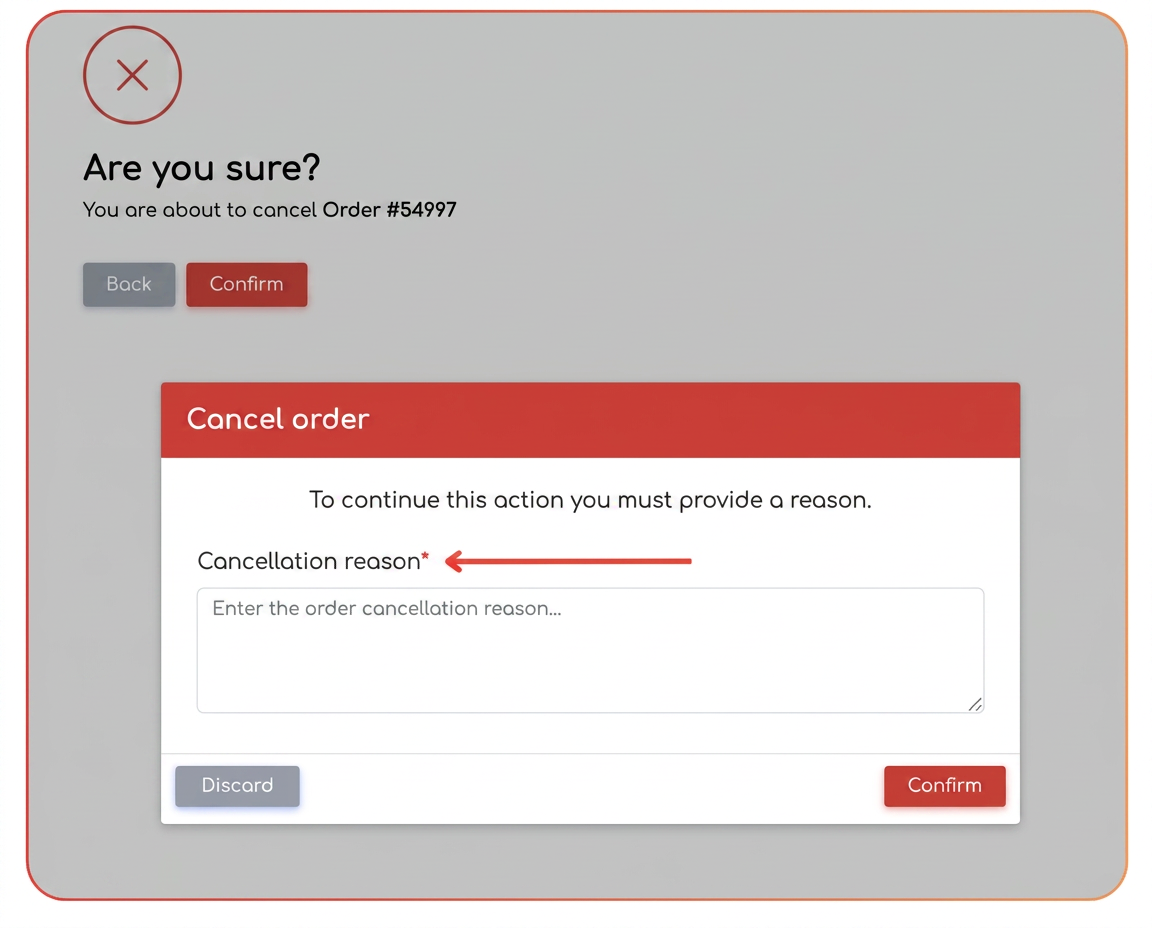
Immediately after initiation, the system will display a dedicated window titled "Cancel order". This is a safety step to prevent accidental cancellations and to collect the necessary data.
3. Completing the Required Field
In the "Cancellation reason" field, you must enter a short explanation of the cause (e.g., "Client entered insolvency", "Product unavailable long-term").
- Note: The confirmation button becomes active only after entering the text.
4. Finalization and Saving to History
After pressing the Confirm button:
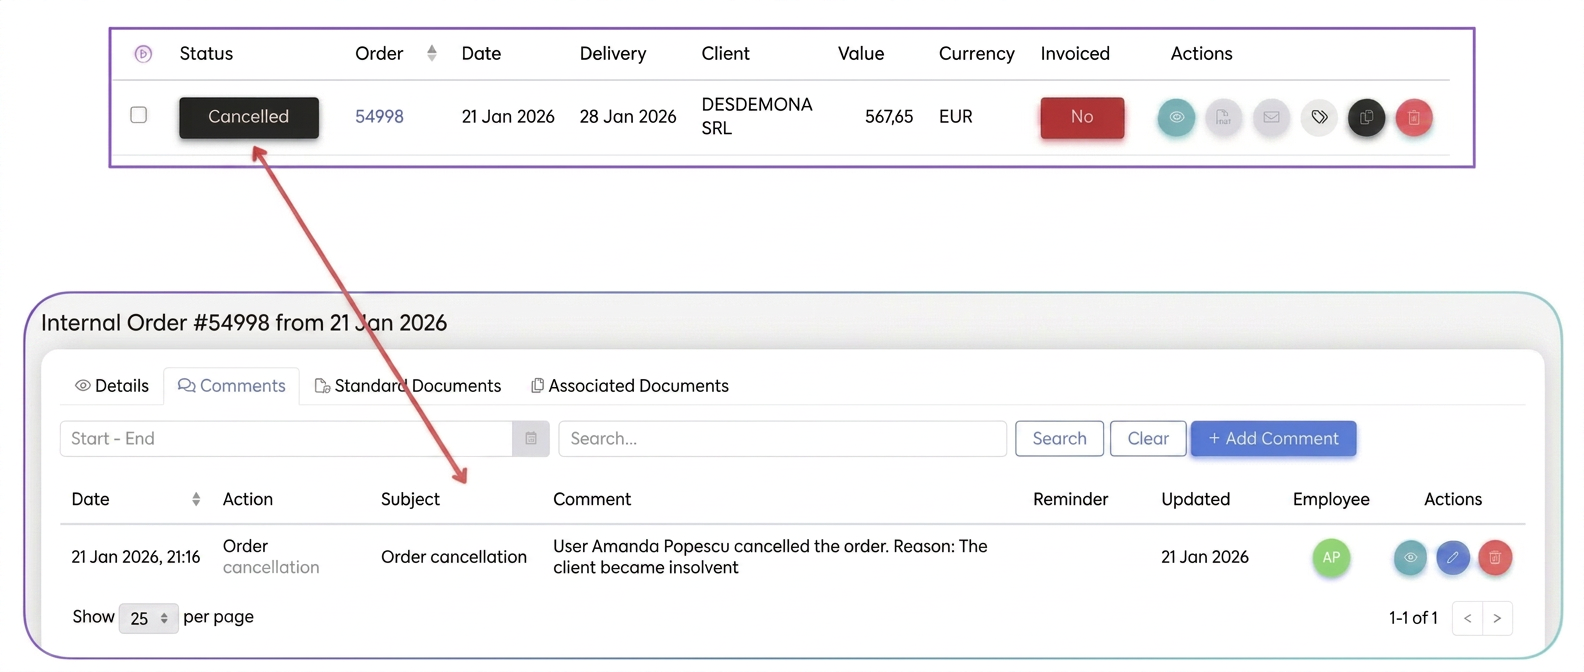
- The order status automatically changes to "Cancelled".
- Automation: The system instantly generates a note in the "Comments" section of that order. It contains the user's name, the action performed, and the explicit reason entered.
🔍 Where can you check the cancellation reasons?
- Open the respective Order in view mode.
- Access the Comments tab.
- You will find the complete log: Date, Time, User and the Explanation provided at the time of cancellation.