
New: Bank Statement Import
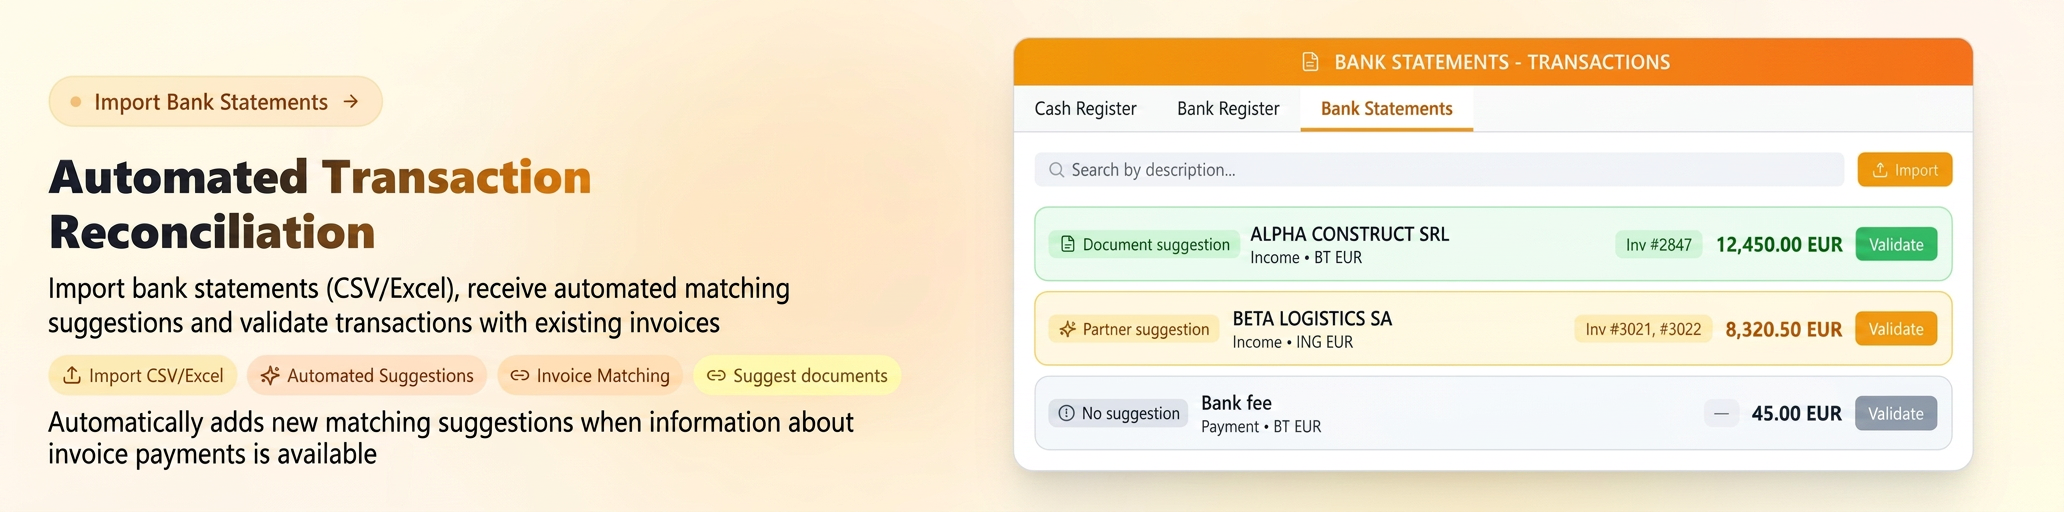
To eliminate manual and repetitive work when entering receipts and payments, there is a dedicated module called Bank Statement Import. This functionality allows you to upload files exported from your bank and automatically or semi-automatically reconcile transactions with existing invoices in iFlows.
Where to find it:
Access the Financial -> Transactions menu, where you will find the new tab named "Bank Statements".
Workflow:
- File Import:
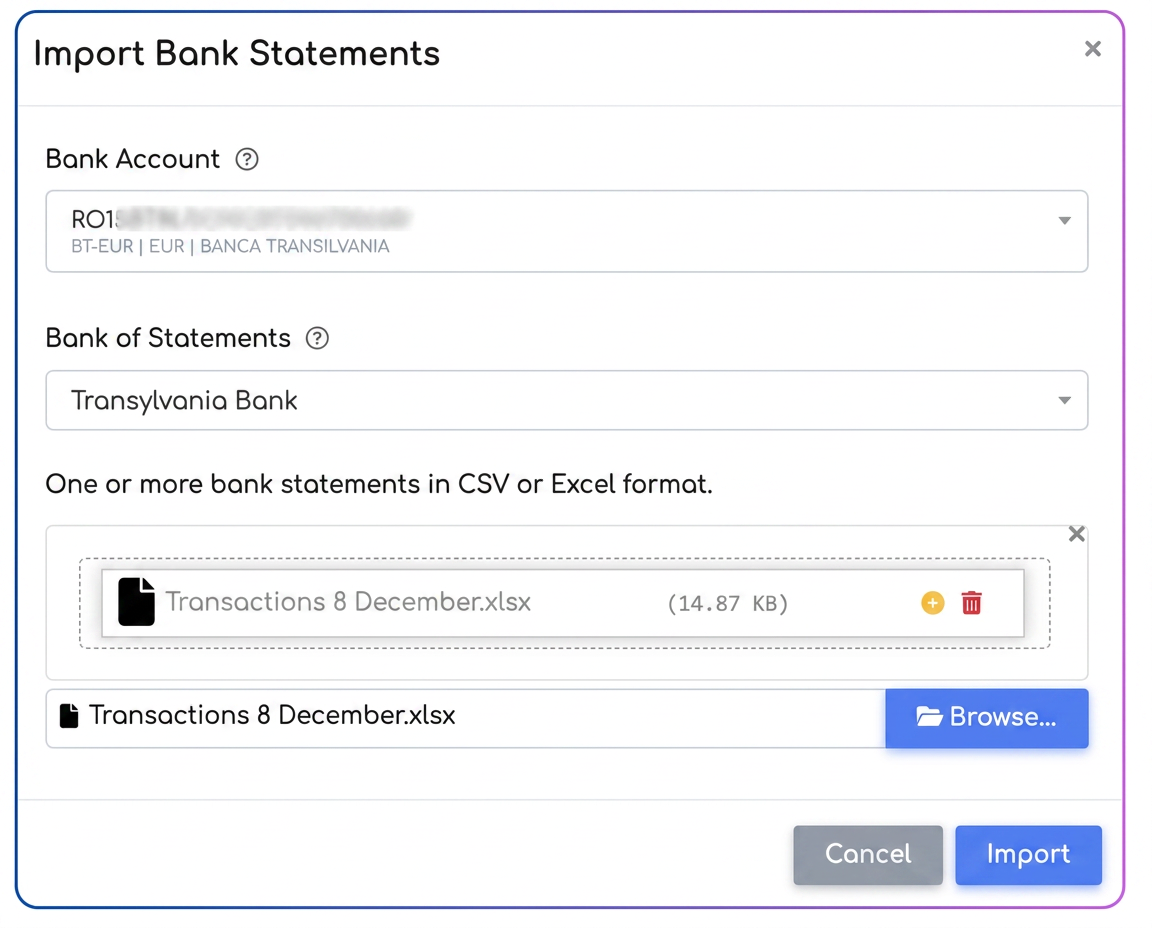
- Press the import button and upload the bank statement in digital format (CSV or Excel).
- Select the bank account registered in iFlows that you wish to operate the import on.
- Select the Bank the statement originates from (so the system can recognize the column structure).
- After importing, all lines from the statement will be displayed in a waiting list, ready for your validation.
- Validation Interface (Columns and Information):
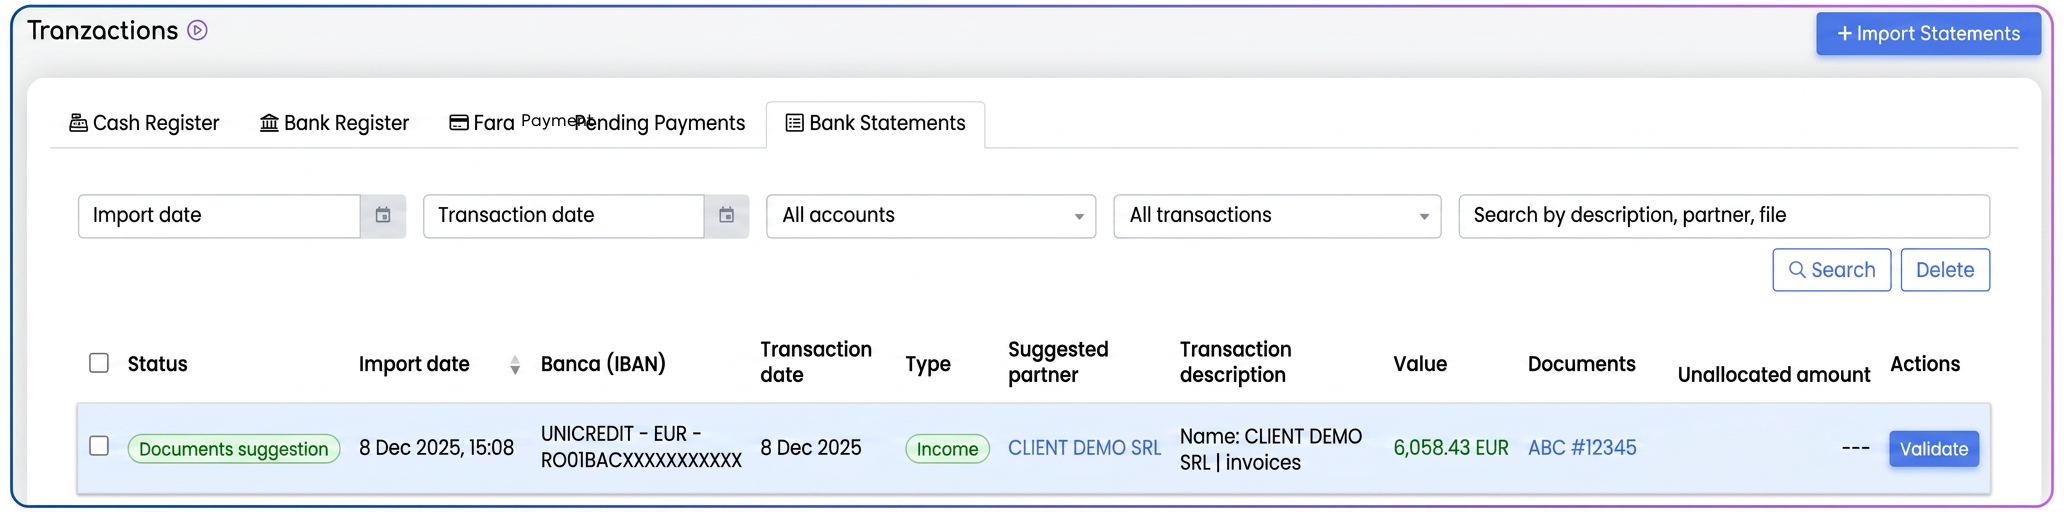
On the statements page, each imported transaction is detailed through the following columns:
- Status: Visually indicates if the system found a match. An active status signals that there is a matching suggestion (partner or invoice identified).
- Import date: The date you uploaded the file to the platform.
- Bank (IBAN): The account associated with the transaction.
- Transaction date: The actual date of the payment/receipt from the statement.
- Type: The nature of the operation (Receipt or Payment).
- Suggested partner: The name of the partner identified by iFlows based on the statement information (where the bank provides this data).
- Transaction description: Raw explanatory text taken from the bank statement (e.g., "Payment inv 123", "Commission").
- Value: Total transaction amount.
- Documents: Invoices suggested for reconciliation.
- Unallocated amount: This field is critical in the validation process. If there is a matching suggestion but the transaction value differs from the value of the selected invoices, the difference will be displayed here (excess balance or remaining payment).
- Actions: Buttons for validating or deleting the line.
- Validation Process:
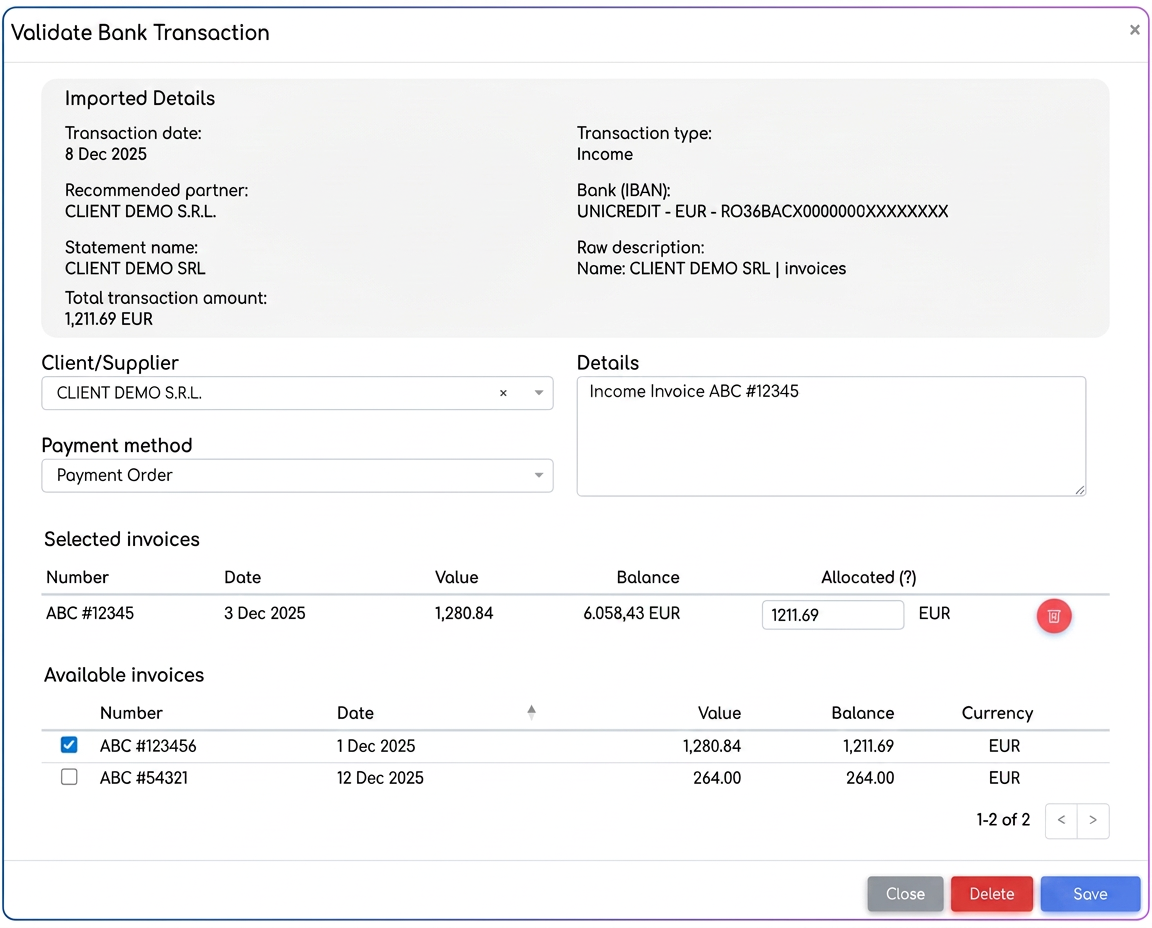
To process a line from the statement, press the "Validate" button. In the opened window, you will encounter two situations, depending on the information identified by the system:
- A. Without automatic suggestions (Manual Validation):
If the system could not automatically associate the transaction, you will need to manually complete the following fields before finalizing: - Partner: Select the corresponding client or supplier.
- Payment method: Choose the specific type of bank transaction (e.g., Payment order, Card payment, or other methods defined in your system).
- Select Invoices: Manually check the invoices (one or more) that you want to collect or pay via this transaction.
- Press Validate.
- B. With suggestions (Quick Validation):
If the system identified the partner and invoices (based on the statement details), the fields will be pre-filled.
In this case, your action is limited to verifying the accuracy of the suggested information and confirming the operation by pressing the Validate button.
Note: After validation, the transaction disappears from the "Bank Statements" list and is automatically transferred to the Bank Ledger, behaving like a standard transaction.
Recommendation for maximum success rate:
The "Smart Matching" system relies primarily on identifying the invoice number. To fully automate the process, recommend your clients to specify the invoice number in the payment details, and apply the same rule when you make payments to suppliers.
Obtaining the CSV/XLS file from the banking application
To use the Bank Statement Import function, it is necessary to export the bank transactions from your bank's online application (HomeBank, Internet Banking, or the web platform provided by the bank).
It is important to note that the required file is not downloaded, in most cases, from the "Bank Statements" section, but from the "Transactions" or "Transaction History" section, as that is where export options in CSV or Excel (XLS/XLSX) formats are available.
Differences between banks
Each bank has its own interface and menu names, which is why the exact location of the export button may vary.
For example:
• Some banks allow direct export to CSV format from the "Current Transactions" screen.
• Others offer export only after selecting a period (e.g., last 30 days).
• In certain cases, the option is visible only on the desktop version of the application, not on mobile.
Recommendation for obtaining the correct file
To avoid confusion and ensure you download the format compatible with iFlows, we recommend proceeding as follows:
- Access the bank's online platform.
- Navigate to the Transactions / Transaction History section, not to "Statements".
- Look for Export / Download options.
- Select the CSV or XLS format.
- If you do not identify the option, contact the bank and ask:
"From which section can I download my account transactions in CSV or Excel format for a specific period?"
The bank will indicate the exact corresponding section, depending on the platform you use.
Questions and Answers
- Which banks are compatible with statement imports?
The module supports importing statements from: Banca Transilvania, BCR, CEC Bank, Raiffeisen, ING, Unicredit, Garanti, First Bank, and Libra Bank.
- If the invoice number is not in the payment description, can the system still suggest a match?
Yes. If there is an invoice in iFlows with the exact same amount as the transaction in the statement, the system will suggest it automatically.
- What does the "Unallocated amount" field represent?
"Unallocated amount" represents the difference between the transaction value and the total of the associated invoices.
Example: if the client paid 1,000 EUR and the associated invoice is 800 EUR, the system will display 200 EUR as the unallocated amount. These 200 EUR become an excess balance (advance) in the ledger.
- What do I do if the transaction amount is smaller than the invoice value (partial payment)?
Select the invoice in the validation window and allocate the entire amount; the system will automatically mark the invoice as "partially paid", and the difference will remain as an outstanding balance.
- What do I do if the transaction amount is larger than the invoice value?
The difference will be considered an excess balance, recorded as a prepayment to that partner.
- Can I intentionally leave an unallocated difference? What happens to it?
Yes. The difference remains recorded as an excess balance, and you can later allocate it to any invoice you wish, at any time.
- Can I cancel the validation if I associated the transaction incorrectly?
Navigate to , select the validated transaction, and you can edit it for correction.
- Can I import statements for multiple IBAN accounts from the same file?
No. Each imported file must correspond to a single bank account.
- Is there a dedicated permission for access to statements?
No. Access to statements is automatically obtained through the access permission for the Transactions tab. Whoever can see Transactions can also see Statements.
- What happens if the invoice is already marked as collected manually? Will the system still suggest it?
Yes. If the transaction amount matches and there are matching criteria, the system may still suggest the invoice, even if it has already been manually collected.
- Why are some lines in the statements marked in green and others in red?
- Green = receipts
- Red = payments
It is a visual differentiation to facilitate validation.
New: Unified Accounting Export Center
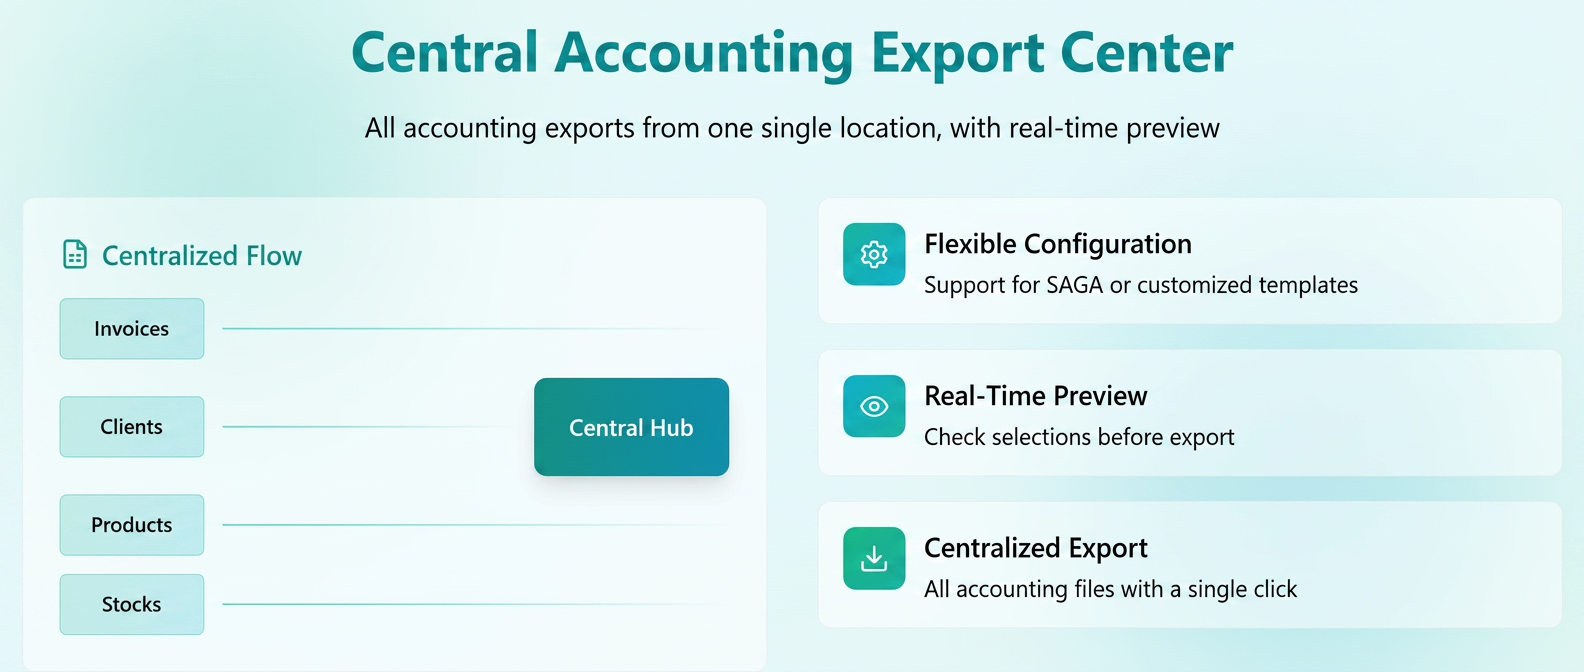
A Unified Accounting Export Center has been introduced, a completely new interface that allows generating and downloading all accounting files from a single place.
The purpose of this optimization is the complete centralization of accounting documents — so that users no longer have to navigate through each section (Invoices, Clients, Products, Stocks, etc.) to export them separately.
Additionally, the functionality can be configured for compatibility with the SAGA program, but it is equally useful for companies using other accounting systems through support for custom templates.
Part I – Activation and Configuration
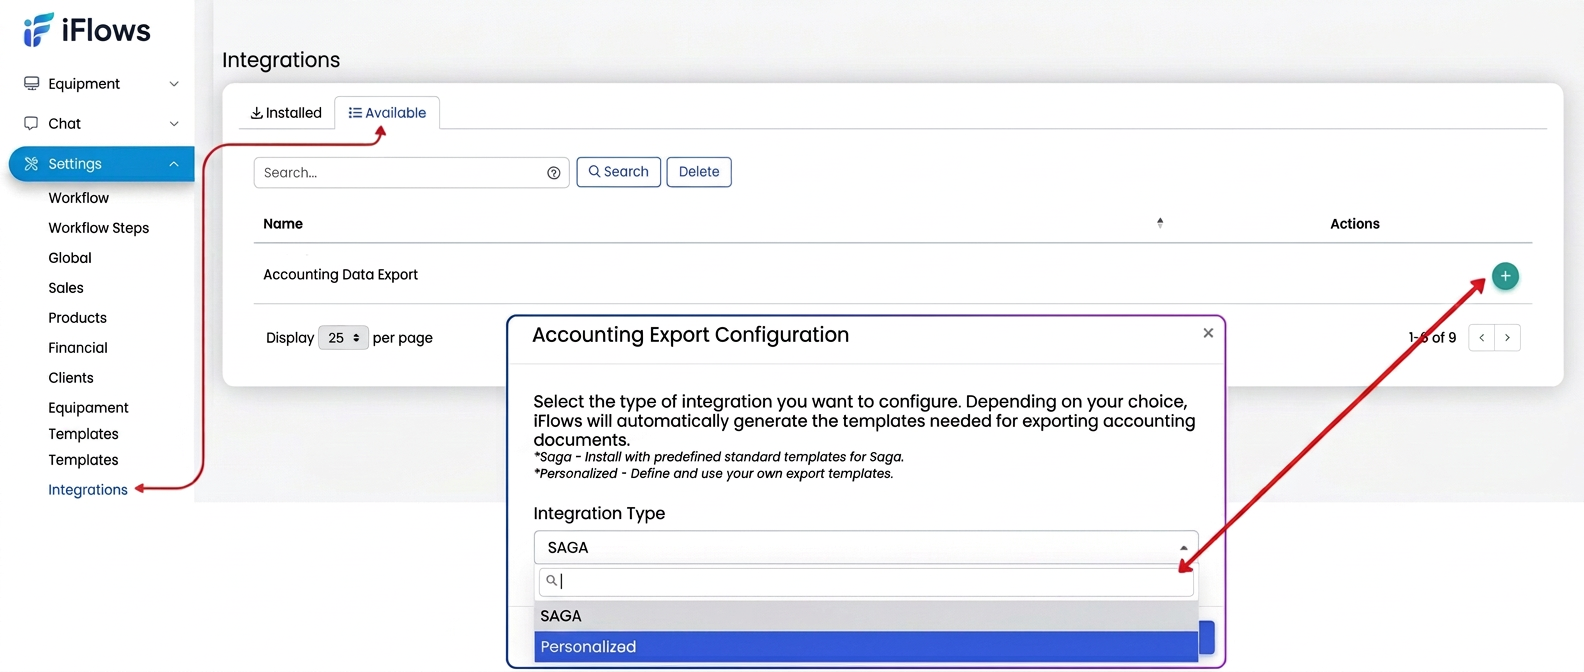
- Activating the export center
1️⃣ Access the menu.
2️⃣ Open the "Available" tab and select the "Export Accounting Data" option.
3️⃣ A configuration window will open where you must choose the export type:
- SAGA – automatically installs a set of standard templates, configured for direct import into the SAGA application.
- Custom – allows the use of your own templates previously defined in .
4️⃣ Select the desired option and finish the installation.
After installation, the new section will appear in the main menu:
Part II – Using the export center
🔸 Interface structure
The page is divided into two areas:
- Left: selection area (period, document types, export templates).
- Right: Export Preview area, which displays the selections made in real-time, allowing you to check everything before generating the files.
🔸 Workflow steps
1️⃣ Select the accounting period – choose the desired interval (month, quarter, year).
2️⃣ Choose document types – check the categories for export (Invoices, Clients, Products, Stocks, Suppliers, Payments/Receipts, etc.).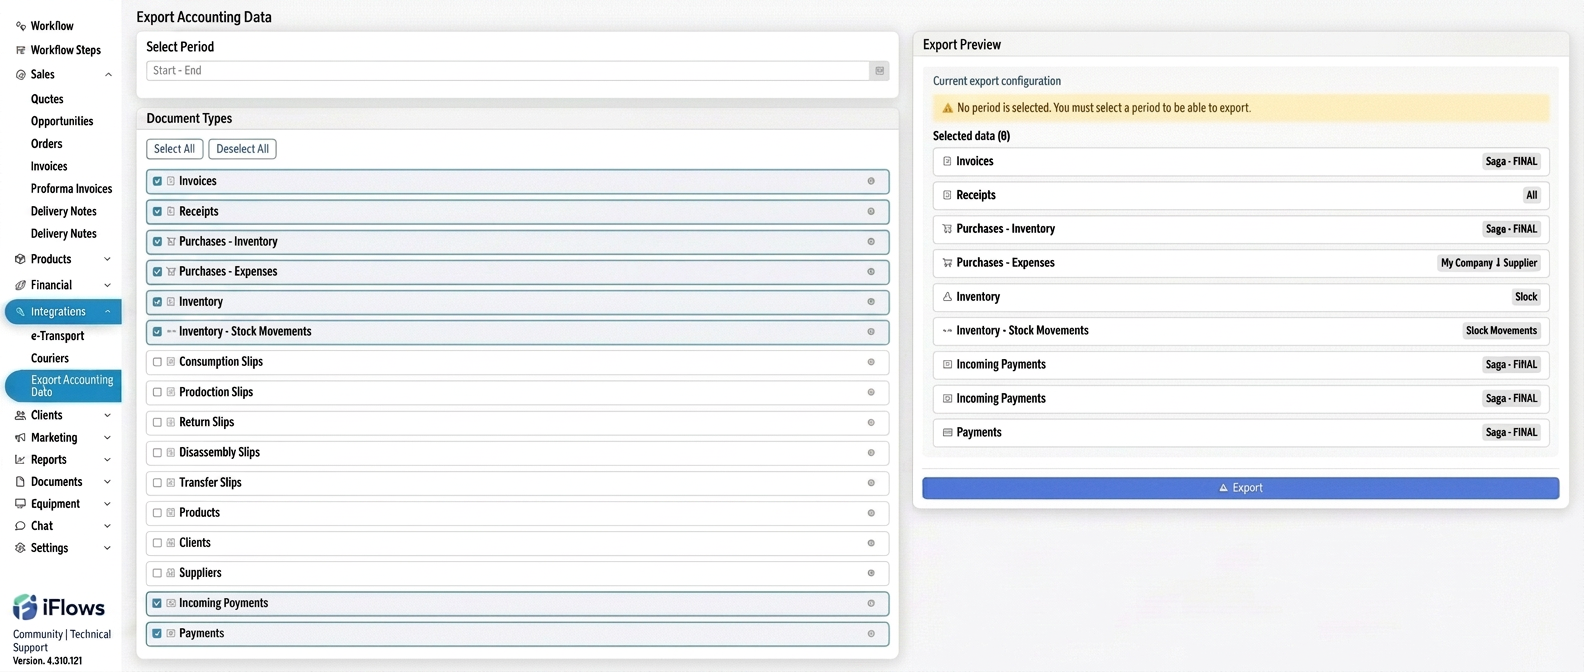
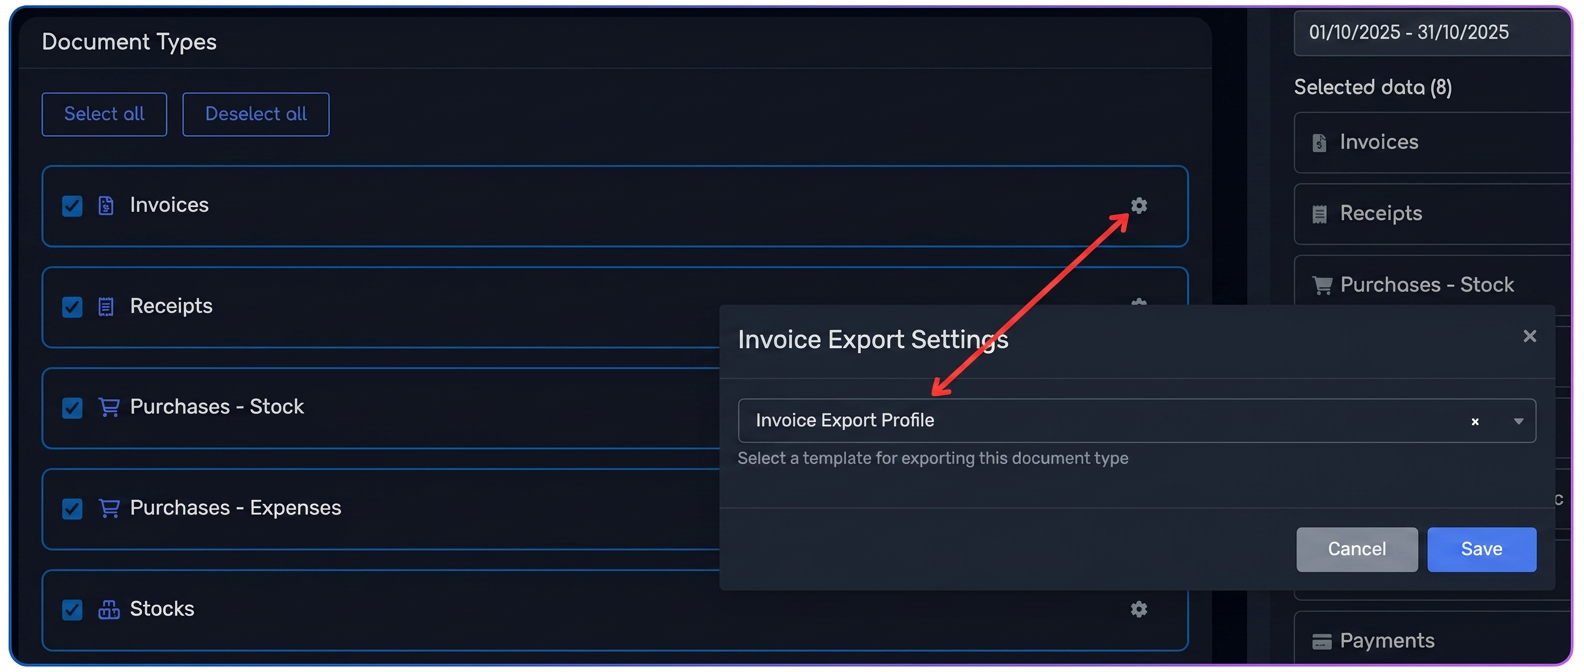
3️⃣ Choose the corresponding template for each document:
- Press the ⚙️ icon next to each category.
- Select the desired template. If SAGA integration is active, the system automatically proposes the corresponding template.
- For other accounting applications, you can select your own template created in .
4️⃣ Press "Export" – the platform generates a .zip archive file containing distinct folders for each document type, ready for import into SAGA or another accounting system.
Part III – Flexibility and advanced use
- Predefined SAGA templates:
Upon activation, the system automatically installs templates compatible with the SAGA import structure for:
Invoices, Products, Clients, Suppliers, Stocks, Acquisitions, Payments, and Receipts. - Custom templates:
Users can create their own templates in , adapted to other accounting software (Mentor, FGO, ContaNet, etc.) and can combine them freely during export. - Mixed use:
Data generated through SAGA templates and custom templates can be included simultaneously in the same export. - Preference retention:
The system automatically saves the last selections (period, document types, templates), so the next export is done instantly without reconfiguration.
Note for clients with SAGA integration:
For the SAGA system to recognize products upon import, it is mandatory that each item has a product code. In iFlows, the code is not mandatory, but in SAGA it is, which is why discrepancies may occur between the two systems.
In practice, two frequent situations arise:
- The product has no code in iFlows, but has a code in SAGA.
- The product has a code in iFlows, but the accountant entered the product in SAGA with a different code.
To prevent these problems, SAGA integration automatically creates the SAGA CODE field in iFlows, intended for the exact mapping of products between the two systems.
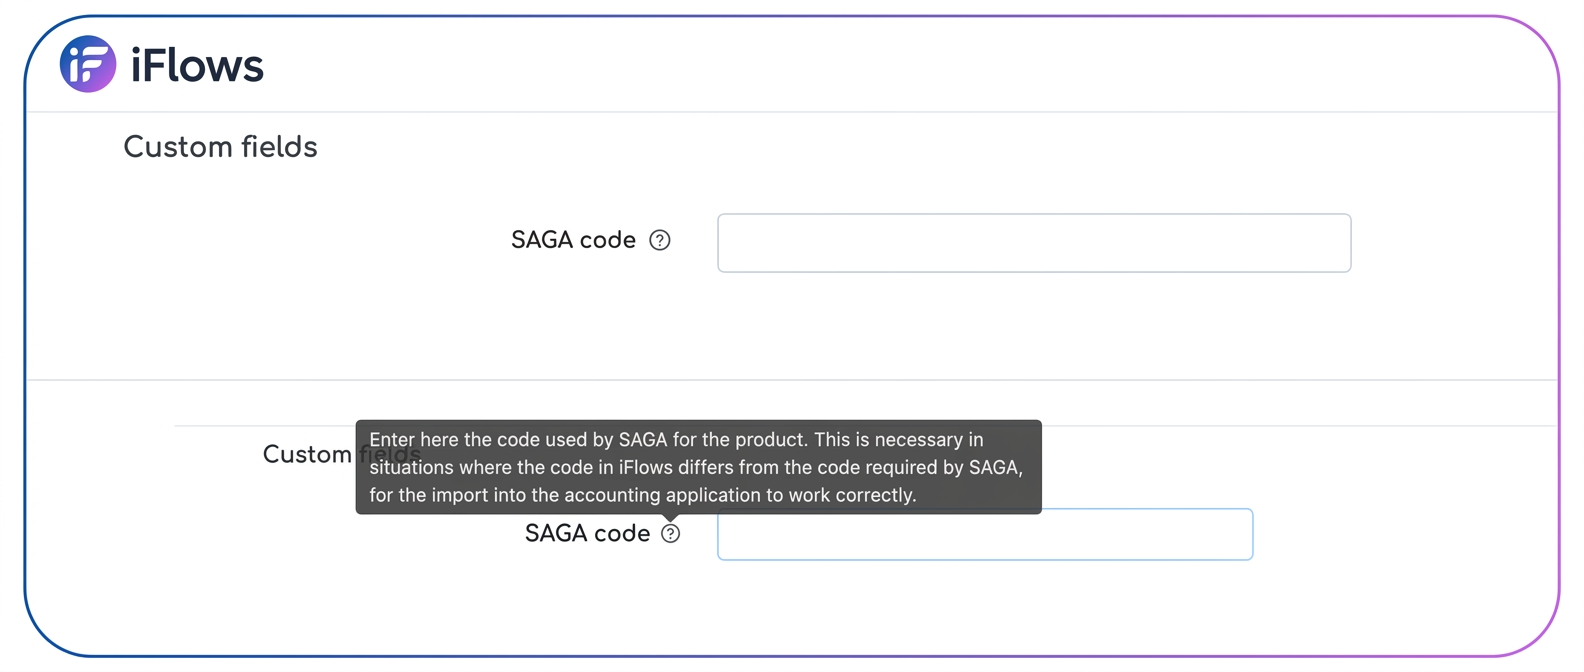
If the export does not recognize certain products, there are two correct remediation options:
- a) The user enters the exact SAGA codes into iFlows
The user must request the list of official codes from SAGA from the accountant and fill them in the SAGA CODE field for each product. - b) The accountant adjusts the codes in SAGA to correspond with those in iFlows
In the situation where the organization already has an established internal system of product codes in iFlows, the accountant can modify the products in SAGA so that the codes are identical. In this way, mapping is maintained coherently from iFlows to SAGA.
Regardless of the variant, the main condition is that the same product has the same code in both systems, either by filling in the SAGA CODE field in iFlows or by aligning the codes directly in SAGA.
New: Custom Fields for Products
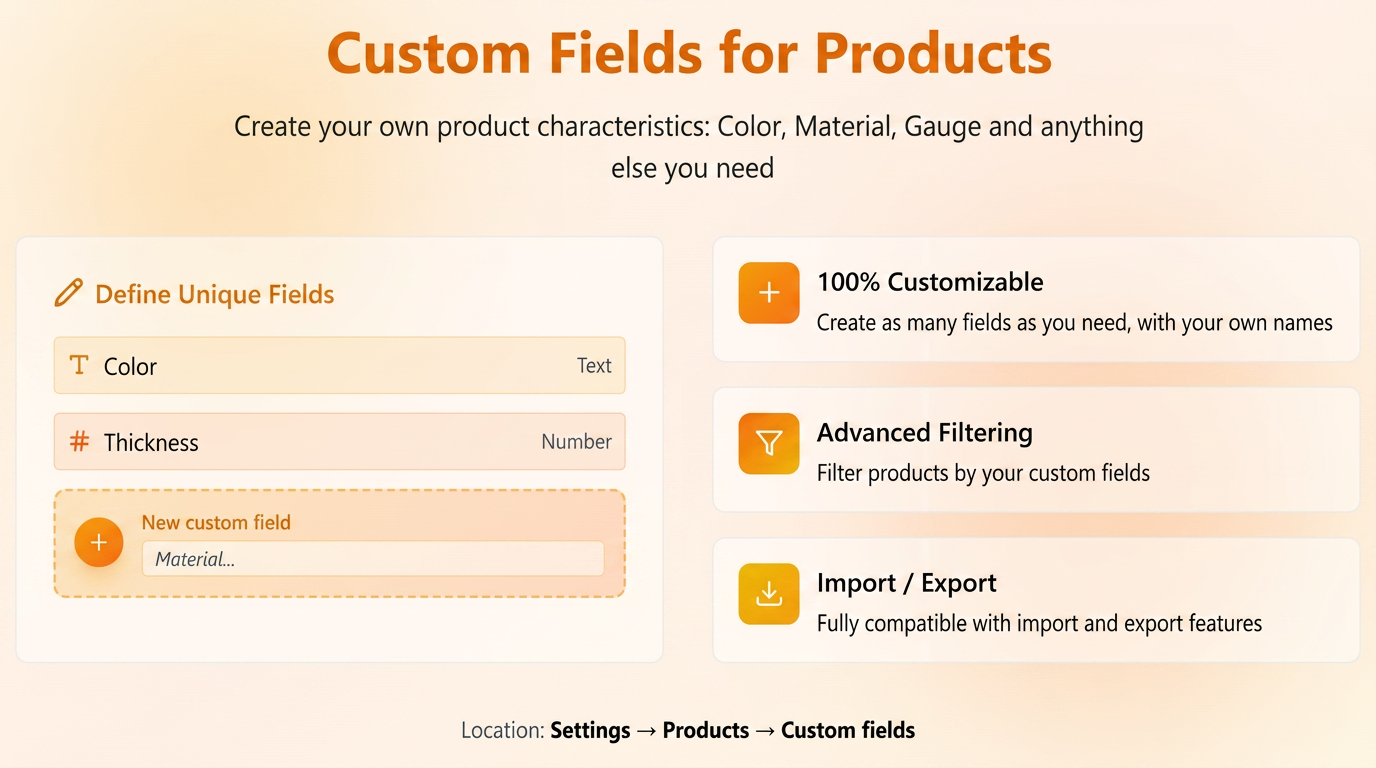
This functionality allows you to add specific characteristics to your products that are not covered by the standard fields in iFlows (e.g., Color, Thickness, Material, Caliber, etc.).
Configuration and Use:
- Defining fields:
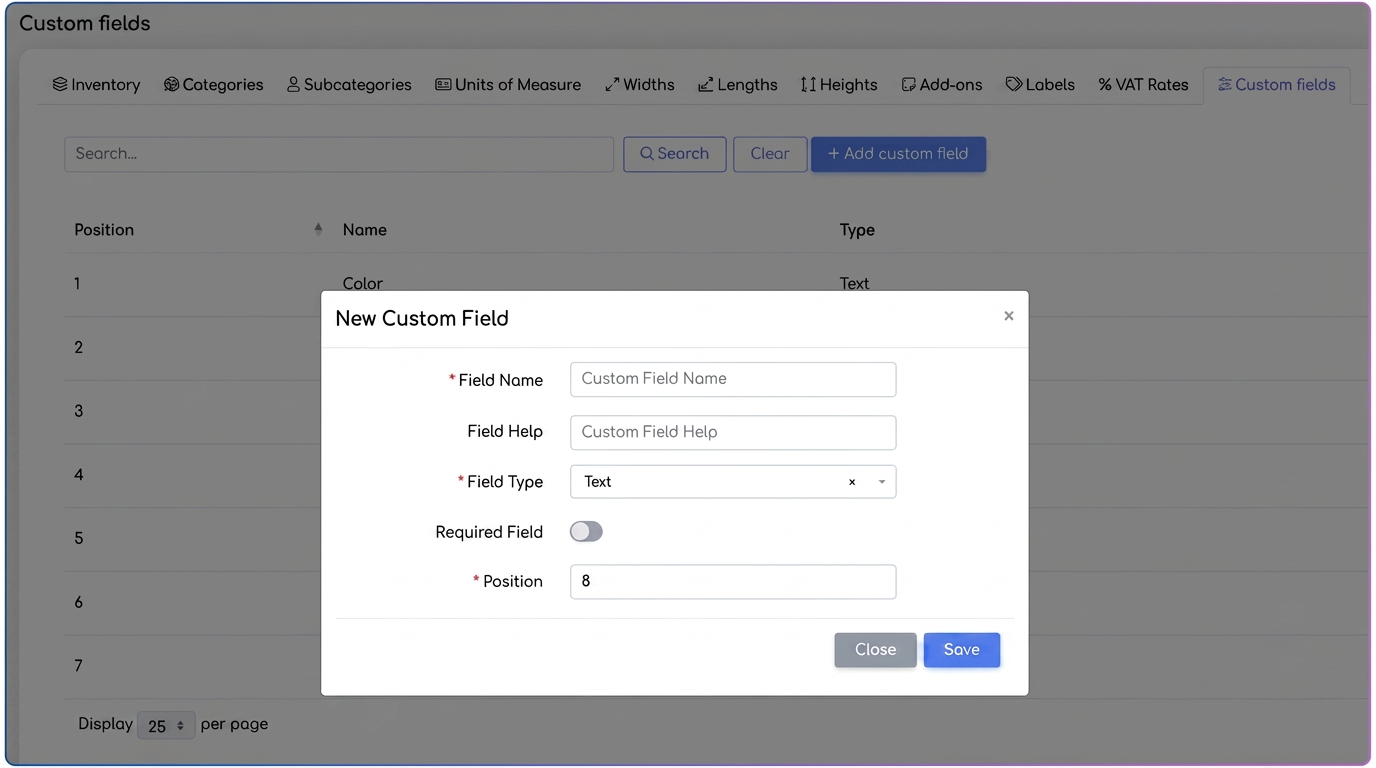
- Access the Settings -> Products -> Custom Fields tab.
- Press the "Add new field" button and complete the details:
- Name: The name of the characteristic.
- Helper text (Tooltip): A short description to guide the user on the information to be entered.
- Field type: Select between Text, Integer, or Decimal number.
- Position: Sets the display order in the list.
- Mandatory: Check if you want this field to be required when saving a product.
- Operation:
- Once created, the field will automatically appear in the editing page of each product.
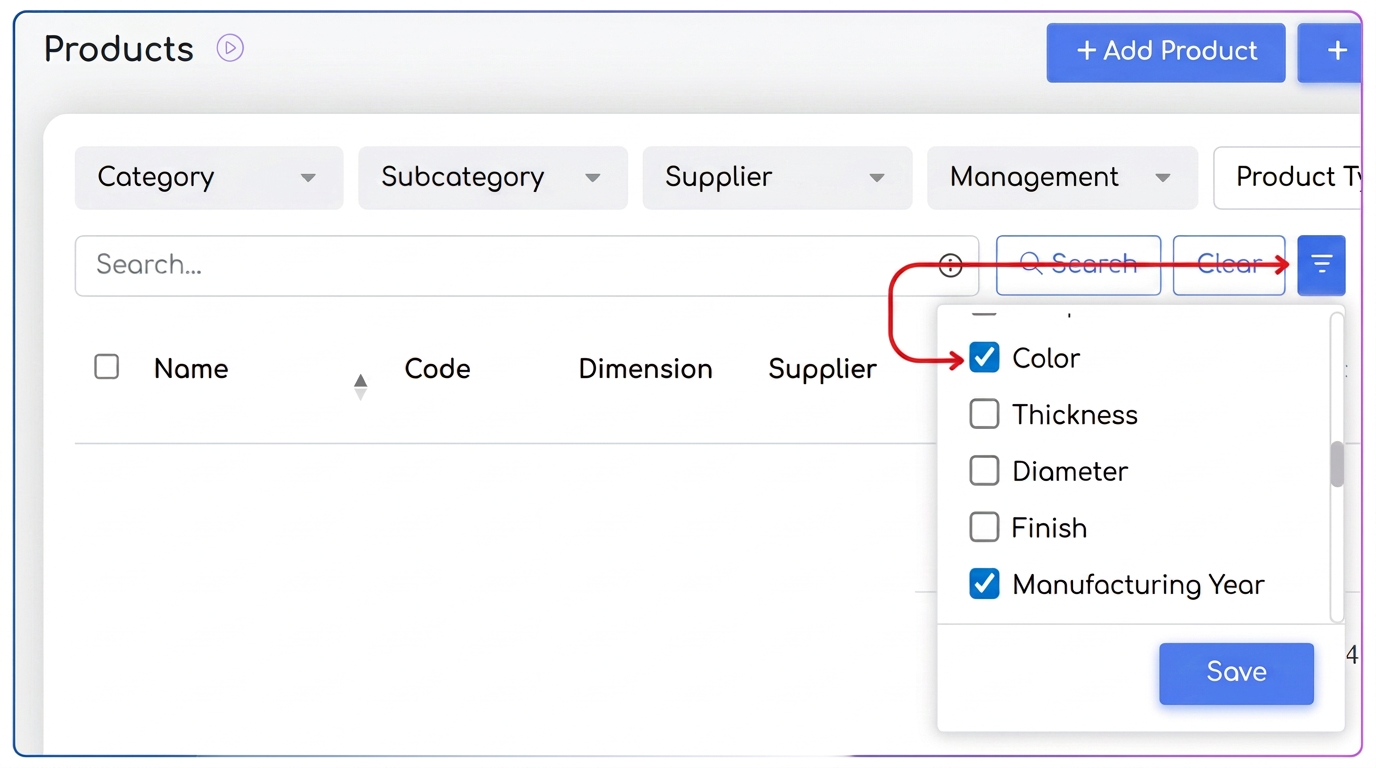
- Filtering: You have the possibility to filter the product list by these new characteristics (the filter must be activated after creating the field).
- Import/Export: Information stored in custom fields is compatible with the Data Import and Export functions.
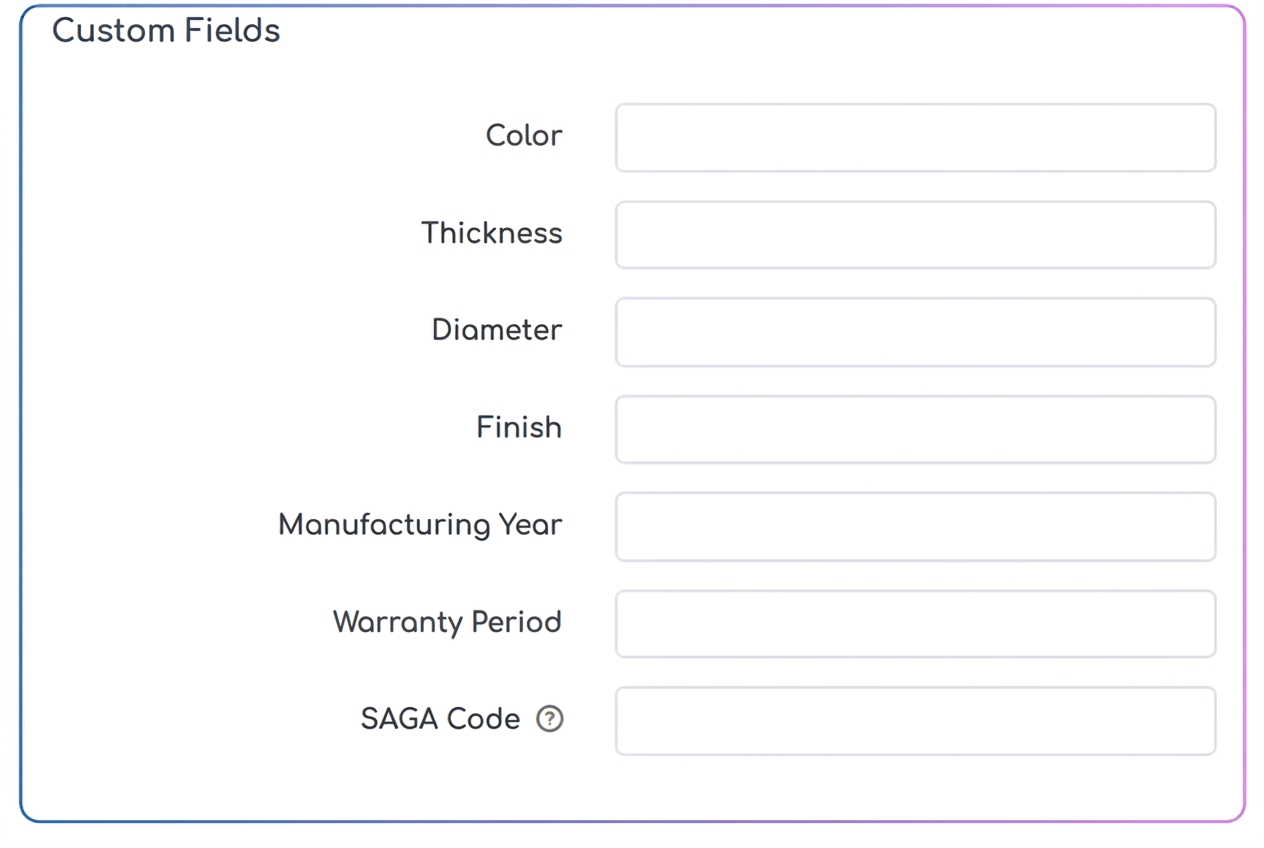
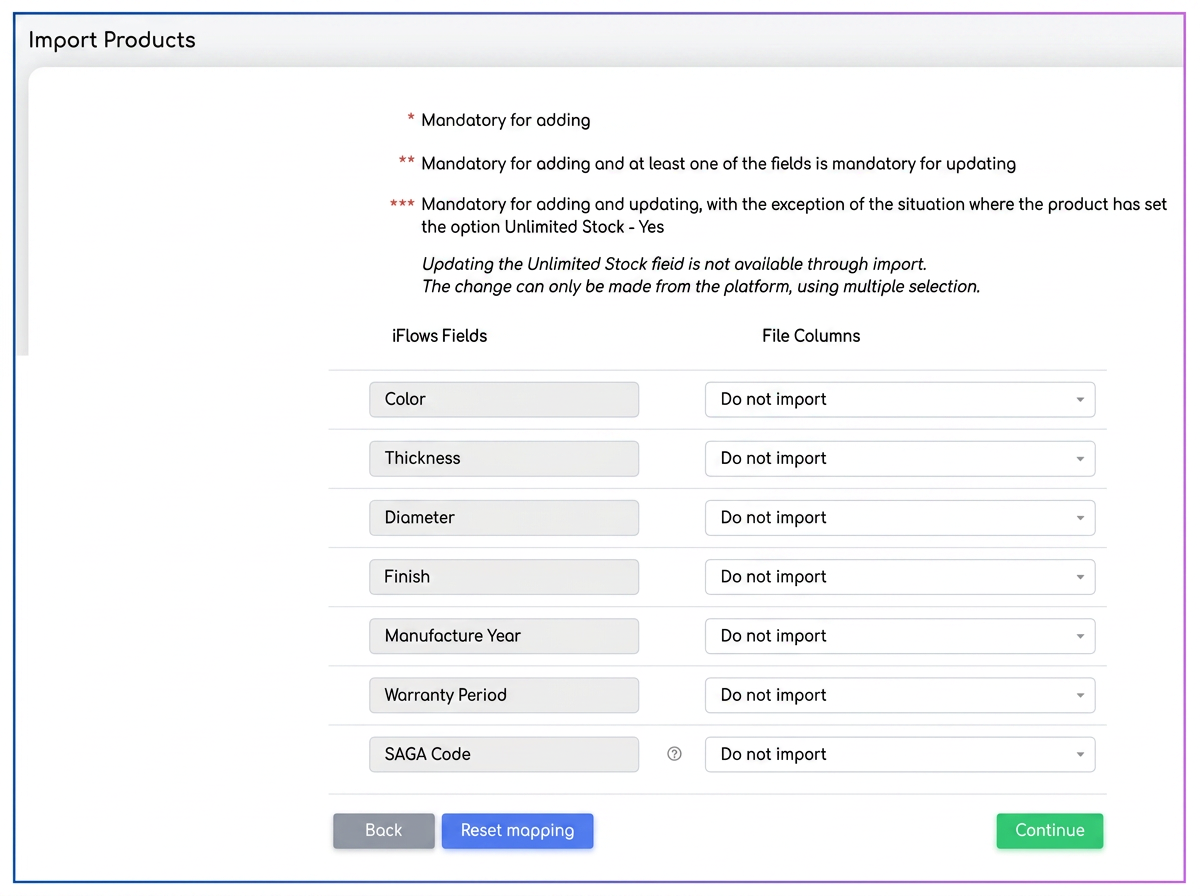
Upon import, all custom fields defined in iFlows will automatically appear in the mapping list, in the same section as standard fields. Thus, you can associate them directly with the corresponding columns in the uploaded file.
Editing and Deletion:
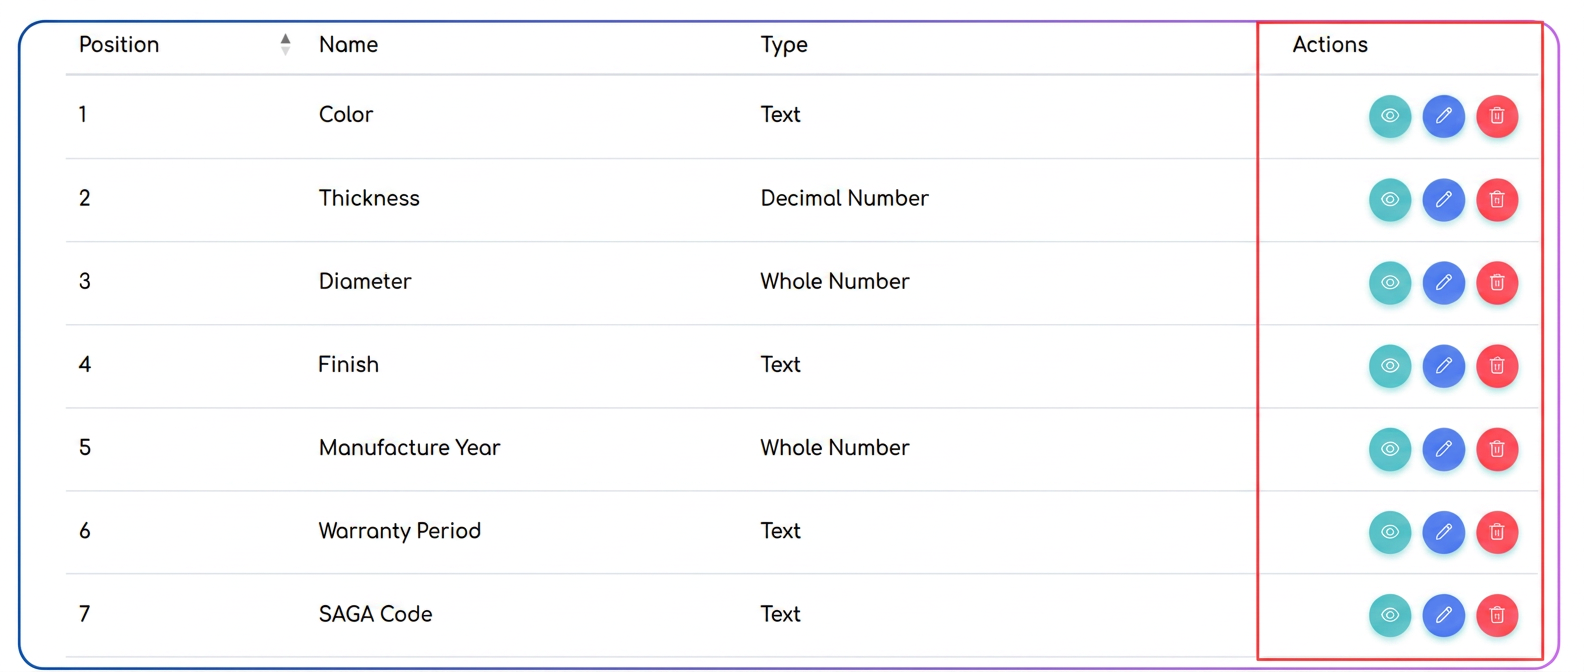
Custom fields can be modified or removed at any time from the area.
• Editing the name, type, or position applies instantly to all products where the field is used.
• When deleting a field, information previously entered in products will be lost, as the field is permanently removed from the product structure.
• Reordering fields can be done at any time by changing the position.
Limitations and functional behavior:
Custom fields are strictly informative and do not influence calculations, automatic price rules, or any other operational logic within the platform.
These characteristics are defined at a global level and apply to all products in iFlows, regardless of category, type, or class. They cannot be configured distinctly by product categories and cannot have differentiated behaviors on segments of the catalog.
Optimization: Centralization of emails sent to the client
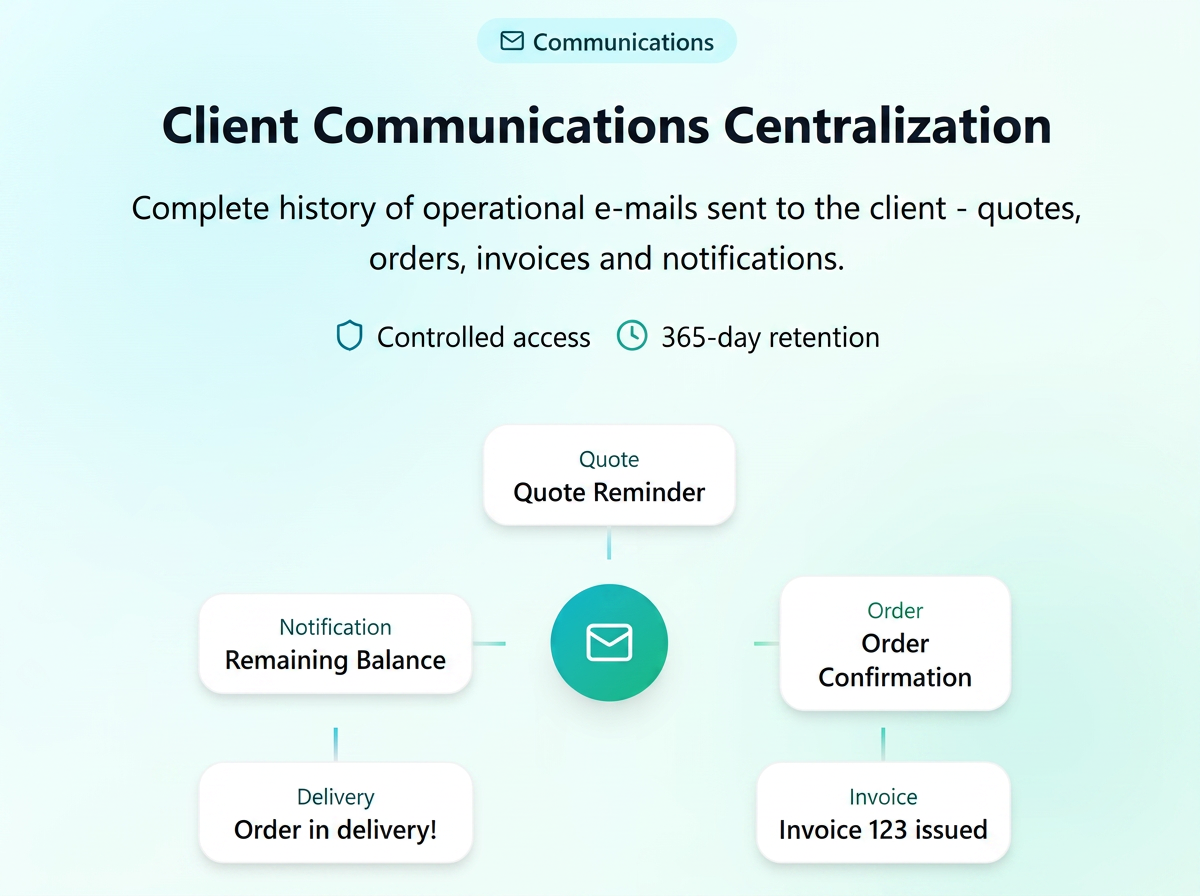
The Marketing tab in the client profile has been reorganized and renamed to offer total transparency over digital interactions. The tab is now called "Communications". In addition to existing options (Email Campaigns and Email Flow), a new Operational Emails section has been integrated, which acts as a complete history of transactional correspondence.
Activation and Permissions:
To ensure data confidentiality, access to this history is not default. It must be manually activated by the administrator:
- Navigate to the Financial -> Employees -> Permissions area.
- Select the desired access level (employee role).
- Check the specific permission: "Operational emails".
Functionality:
Once the permission is activated, all messages sent automatically or manually from the iFlows platform to that client will be displayed chronologically in the Operational Emails tab.
- What it includes: Transmitted offers, order confirmations, issued invoices, system notifications, and any other type of email sent from the platform.
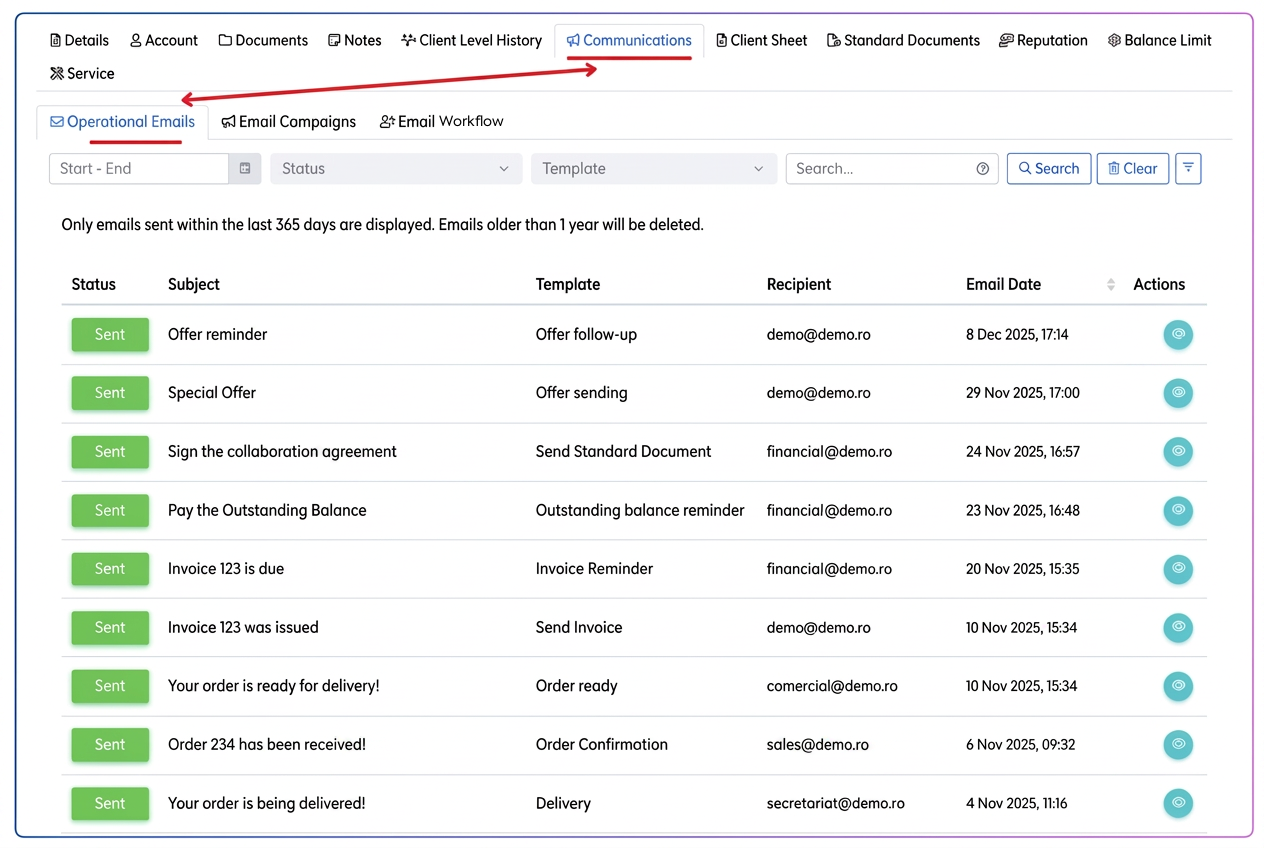
Detailed Communication View:
In the operational emails list, each communication has a "View" action associated with it. By accessing this option, a dedicated window opens that faithfully displays the entire content of the transmitted message:
- email subject;
• template used;
• sender and recipient;
• date and time of sending;
• full content of the message, exactly in the form it was received by the client (including buttons, signatures, layout, and HTML elements).
Retention Policy and Availability:
- Visibility: The history begins to populate from the moment this functionality became active (it does not retroactively recover emails sent before the function's implementation).
- Storage duration: The system keeps the operational email history for a period of 365 days. Messages older than 1 year are automatically deleted to maintain database performance.
Optimization: Reputation Section Redesign and Optimization – Financial Evolution View
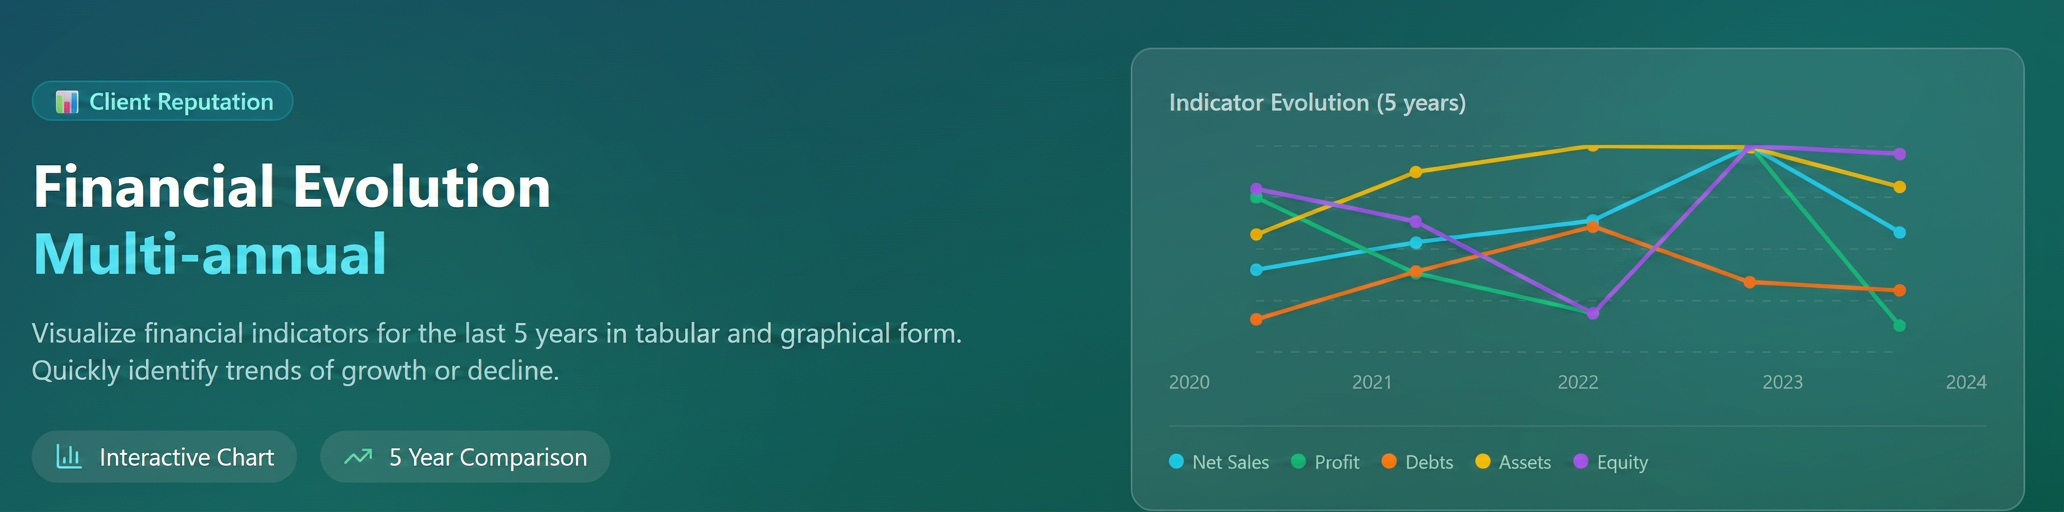
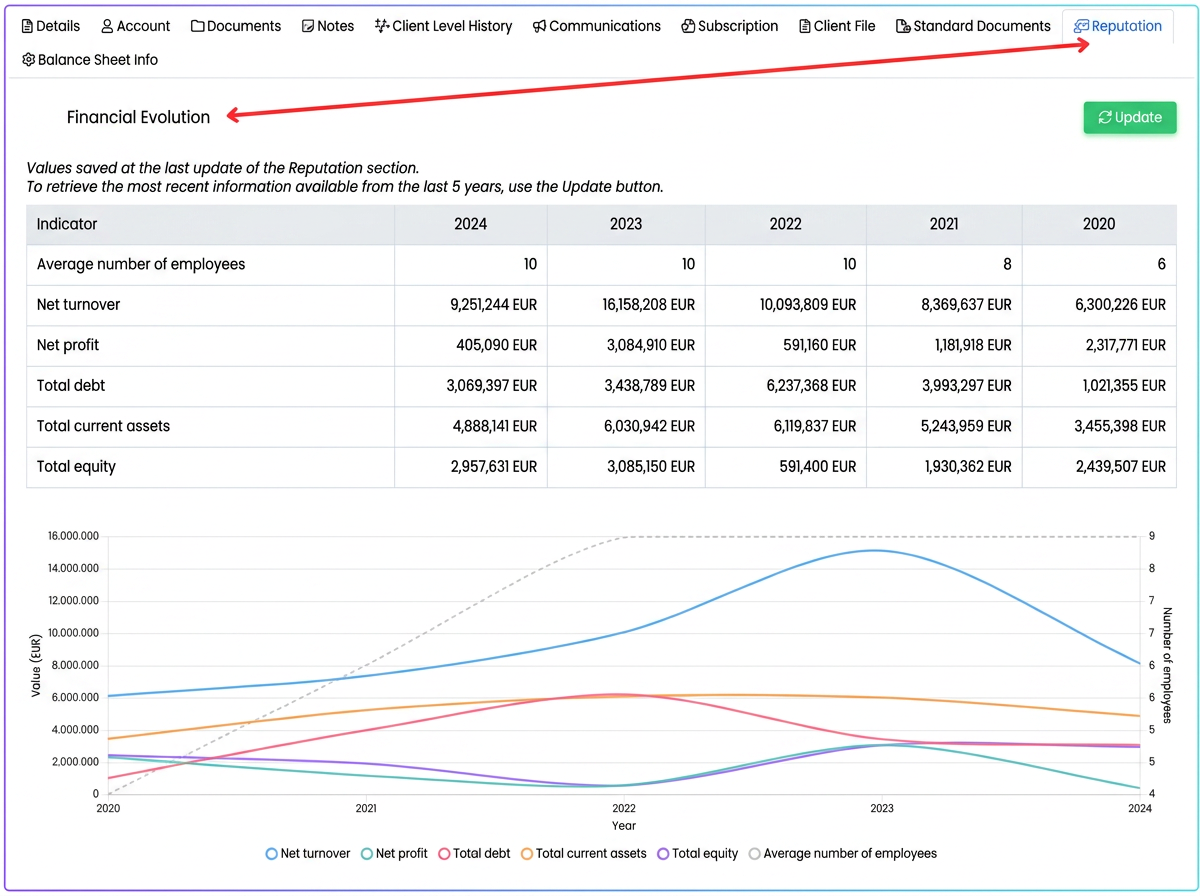
We have updated the Reputation section on the client page to provide a much clearer overview of partners' financial health.
What's New:
- Multi-year View: Financial data (balance sheet) is now displayed in a table for the last 5 years (where history exists), in parallel columns.
- Evolution Graph: We have introduced an interactive graph below the table, which visually illustrates the trends of main financial indicators (Turnover, Profit, Debts, etc.) over the analyzed period.
- Instant Comparison: Unlike the previous version, which allowed viewing data for only a single selected year, the new design facilitates quick comparative analysis and identification of growth or decline trends.
Optimization: Form Templates – Dynamic Interface and Modularity
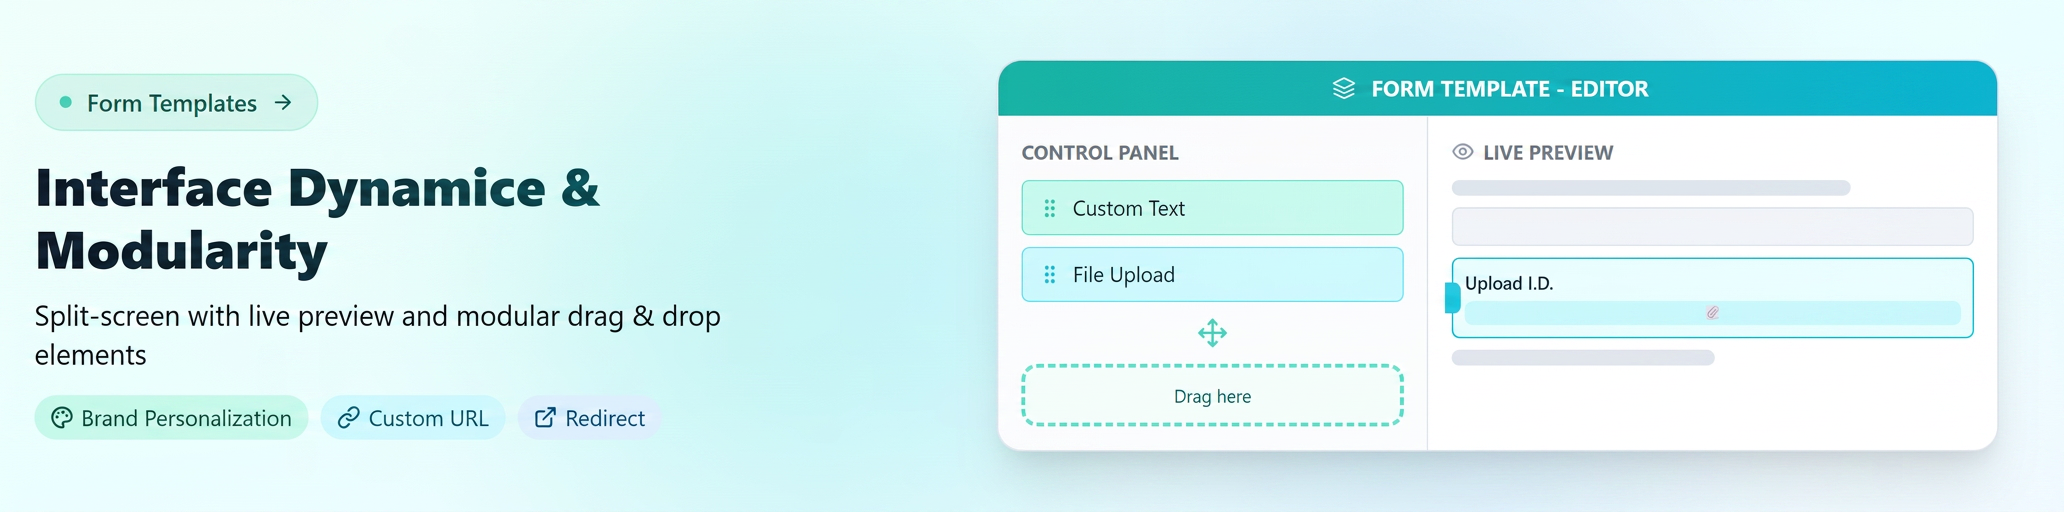
The new version replaces the old static form with a "Split-Screen" type interface, which emphasizes visual customization and structural flexibility.
- Interface and User Experience (UI/UX)
- Split-Screen Structure: The screen is divided into two distinct areas:
- Control Panel (Left): Centralizes all settings, from activating sections to design elements. Menus are collapsible for clean navigation.
- Live Preview (Right): Any change made on the left is instantly reflected on the right. See exactly how the form will look on the client's screen, eliminating the need to save and test repeatedly.
- Final Preview: A dedicated button has been added to simulate the exact client experience before publishing.
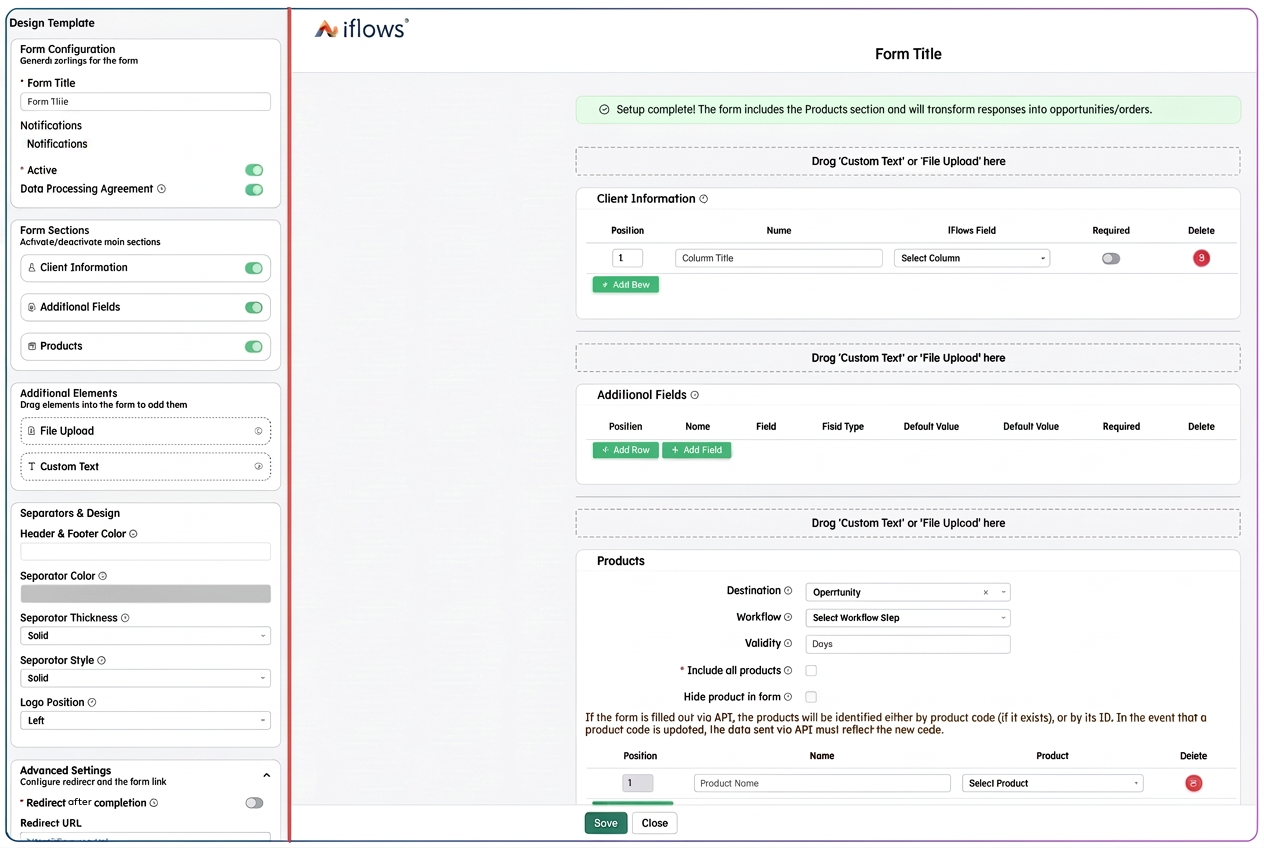
- Modular Elements and Drag & Drop
The form structure is no longer rigid. We have introduced the concept of "Additional Elements" that can be placed anywhere in the form:
- Drag & Drop Mechanism: Elements can be dragged from the menu and placed in any area of the form (between standard sections).
- Custom Text: A complex text editor (Rich Text) that allows adding instructions, welcome messages, text formatting (bold, colors, sizes), and even images.
- File Upload: The document upload area is no longer fixed. It can be moved anywhere in the form and, additionally, its title and description can be edited (e.g., "Upload I.D. here").
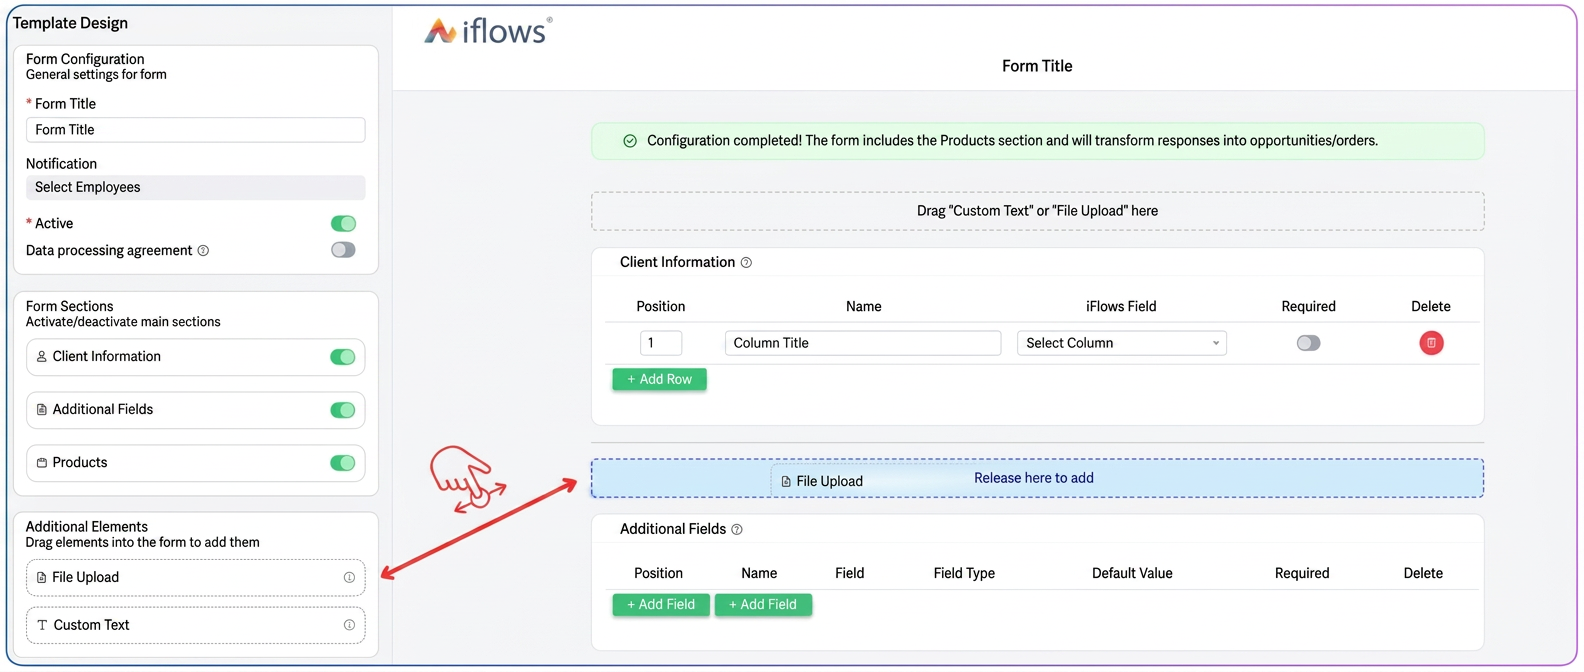
Editing Added Elements (Text / File Upload):
After placing an element in the form (text block or file upload block), each component can be configured individually.
In the top right of each element, the Edit icon (blue pencil) appears. By accessing it, you can define:
- Element Title – for example:
– „Add LOGO”
– „Upload Identity Card”
– „Additional request details” - Description / User Instructions – auxiliary text explaining what needs to be entered or uploaded, useful for operational clarifications (e.g., "Upload the Identity Card in PDF format to finalize the request"). In the case of the File Upload element, the message displayed in the form can be completely updated so the user understands exactly which file is needed.
This approach allows for the customization of each block according to the form's context, without limitations imposed by a pre-established structure.
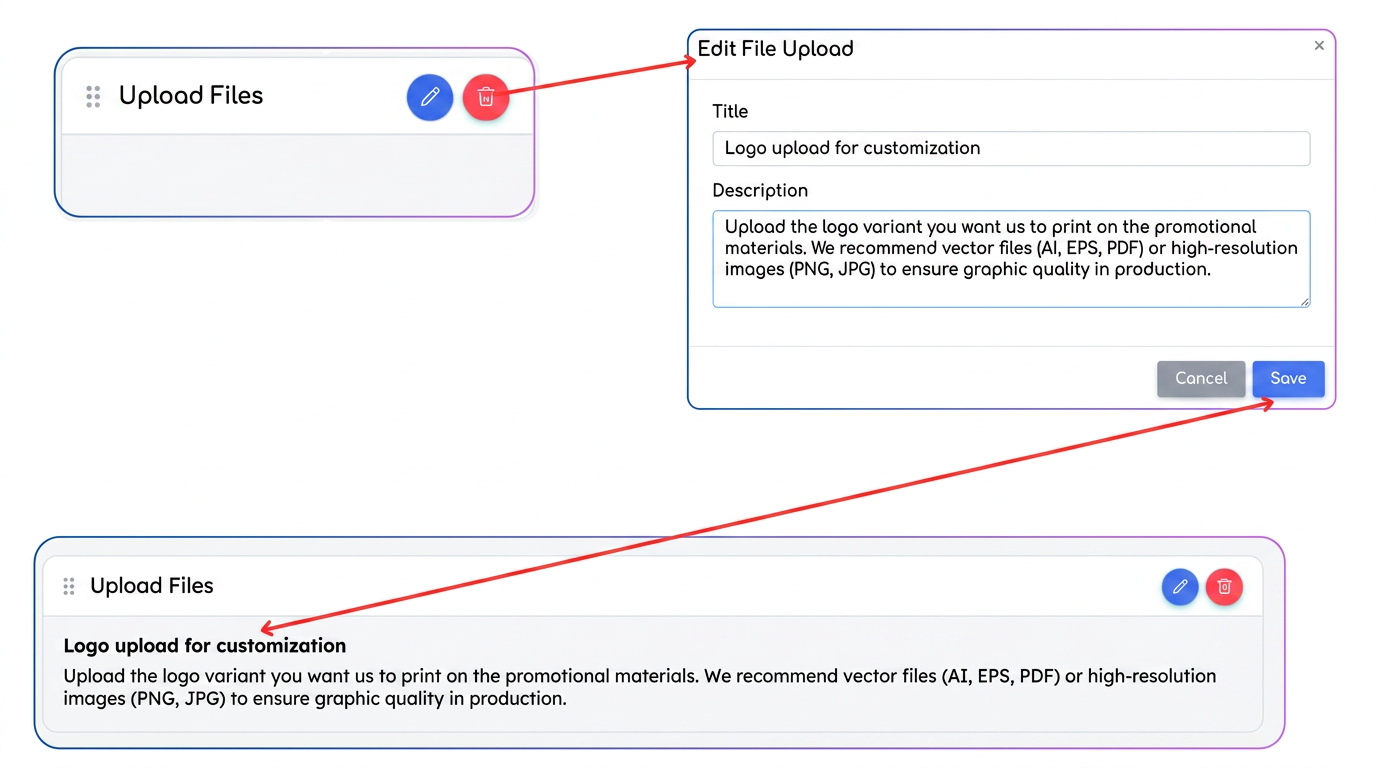
III. Design and Visual Identity
Forms can now be fully aligned with your company's brand:
- Color Customization: Specific colors can be defined for Header, Footer, and Separators.
- Logo Positioning: Control over logo alignment in the header (Left, Center, Right).
- Separator Styling: Control over the lines dividing sections (thickness, solid/dotted line style).
- Terminological Clarity and Logic
We have renamed sections to eliminate confusion from the previous version:
- "Opportunity" → becomes "Products": Reflects the purpose of the section more clearly (adding products to the cart).
- "Client" & "Client Information" → become "Client Information" & "Additional Fields": A clear distinction between standard contact data and customized fields.
- Validation Logic: The system now displays contextual warnings:
- Green Message: Complete configuration (response generates an opportunity).
- Orange Message: If the "Products" section is deactivated, the system warns that the response will only be recorded without creating a commercial opportunity.
- Advanced Settings
- Custom URL (Slug): Possibility to customize the form link to be easy to remember (e.g., .../registration-form).
- Automatic Redirection: Option to automatically send the client to a specific web page (e.g., Company website or a "Thank you" page) immediately after completing the form.
Optimization: Financial Module – Transaction Flexibility, Transfers, and Balance Management
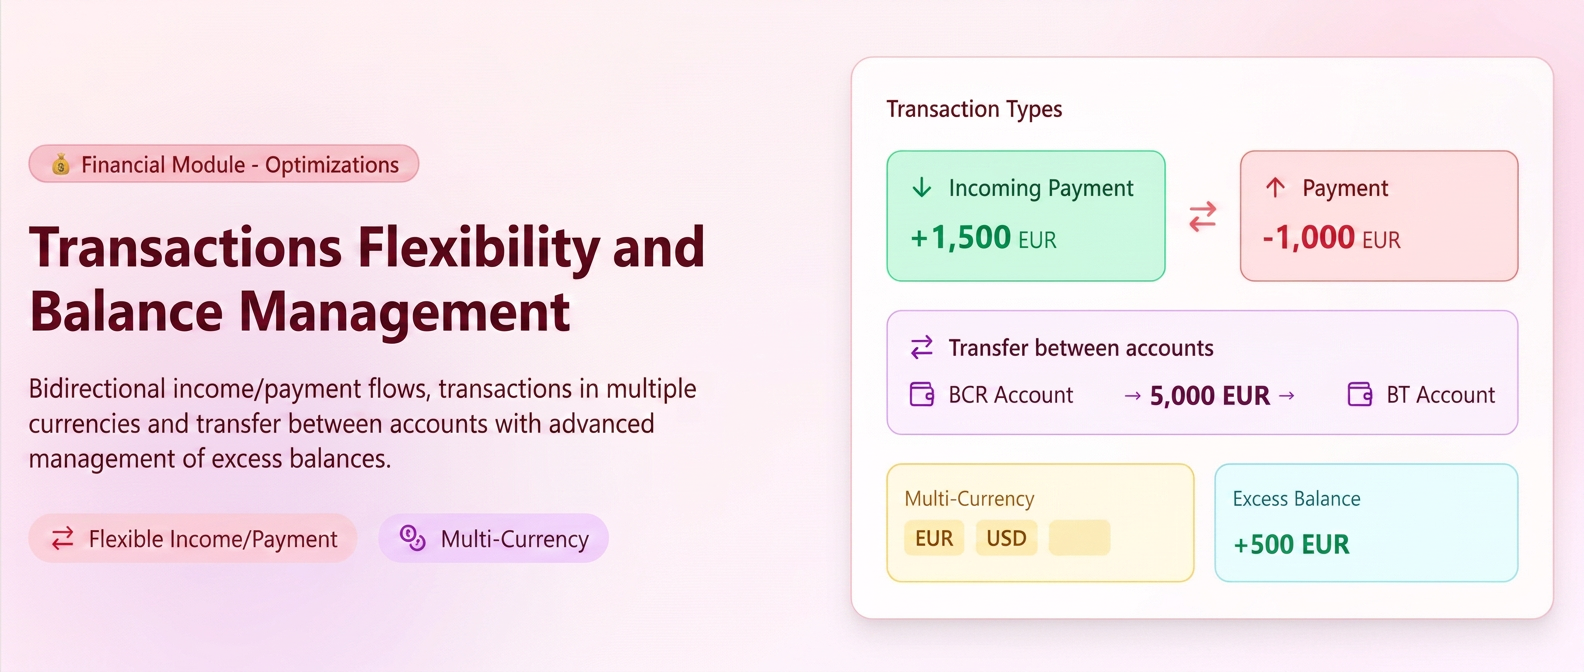
The Financial Module has been updated to offer increased flexibility in managing cash flows and greater balance clarity. The new functionalities simplify recording operations in foreign currency, internal transfers, and automate the calculation of unallocated amounts.
What's New and Functionalities:
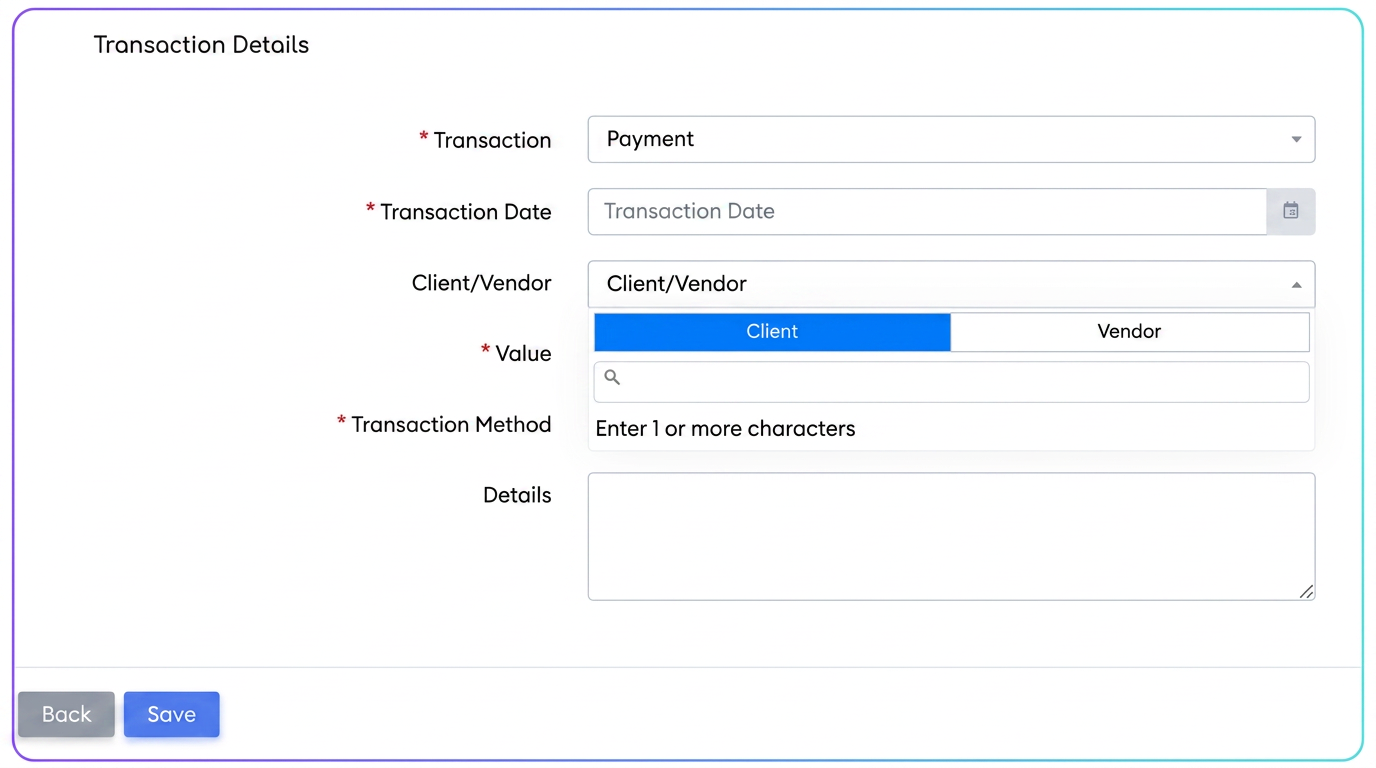
- Bidirectional Flows (Receipt/Payment) per Partner: The process of adding transactions has been redefined. Now, regardless of the selected partner type (Client or Supplier), you have the possibility to record both Receipt and Payment operations. This eliminates the need to use negative amounts to represent returns or reversals.
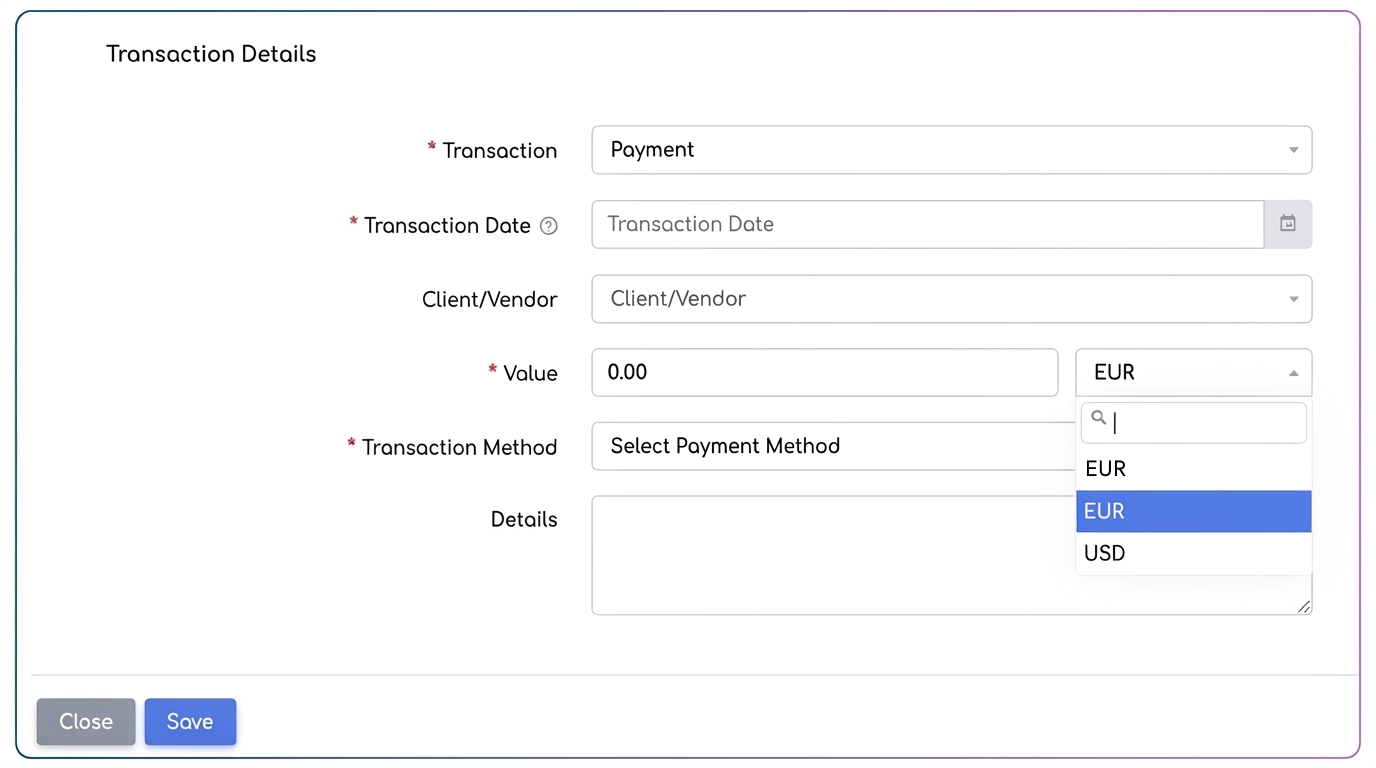
- Manual Addition of Foreign Currency Transactions: Currency restrictions have been removed. You can now manually add transactions directly in a currency other than EUR without being conditioned by the existence of a prior invoice or operation in that currency.
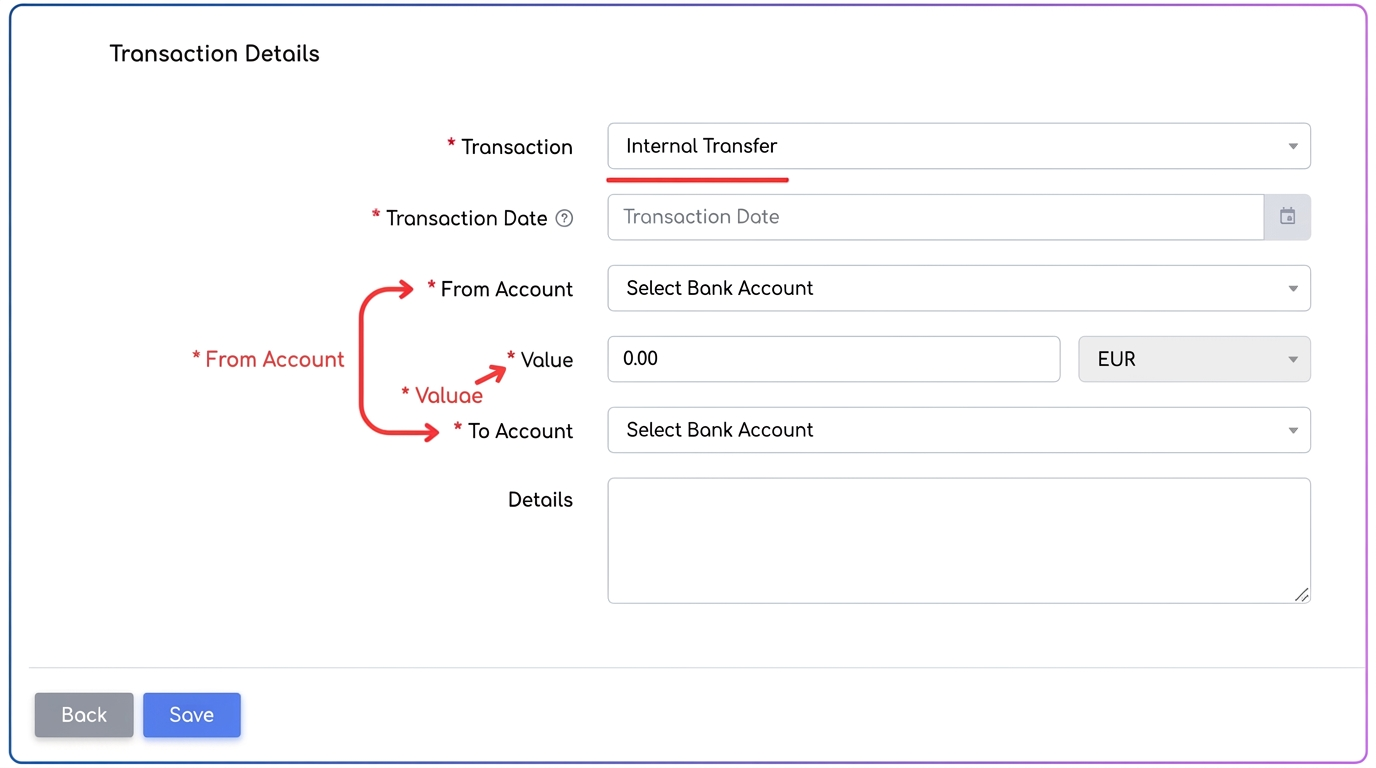
- New Transaction Type: "Transfer between accounts": A dedicated functionality has been introduced for moving money between internal accounts. The user only selects the source account, the amount, and the destination account. Upon saving, the system automatically generates two correlated records:
- A Payment type transaction from the source account (with details: "Transfer to account X").
- A Receipt type transaction in the destination account (with details: "Transfer from account Y").
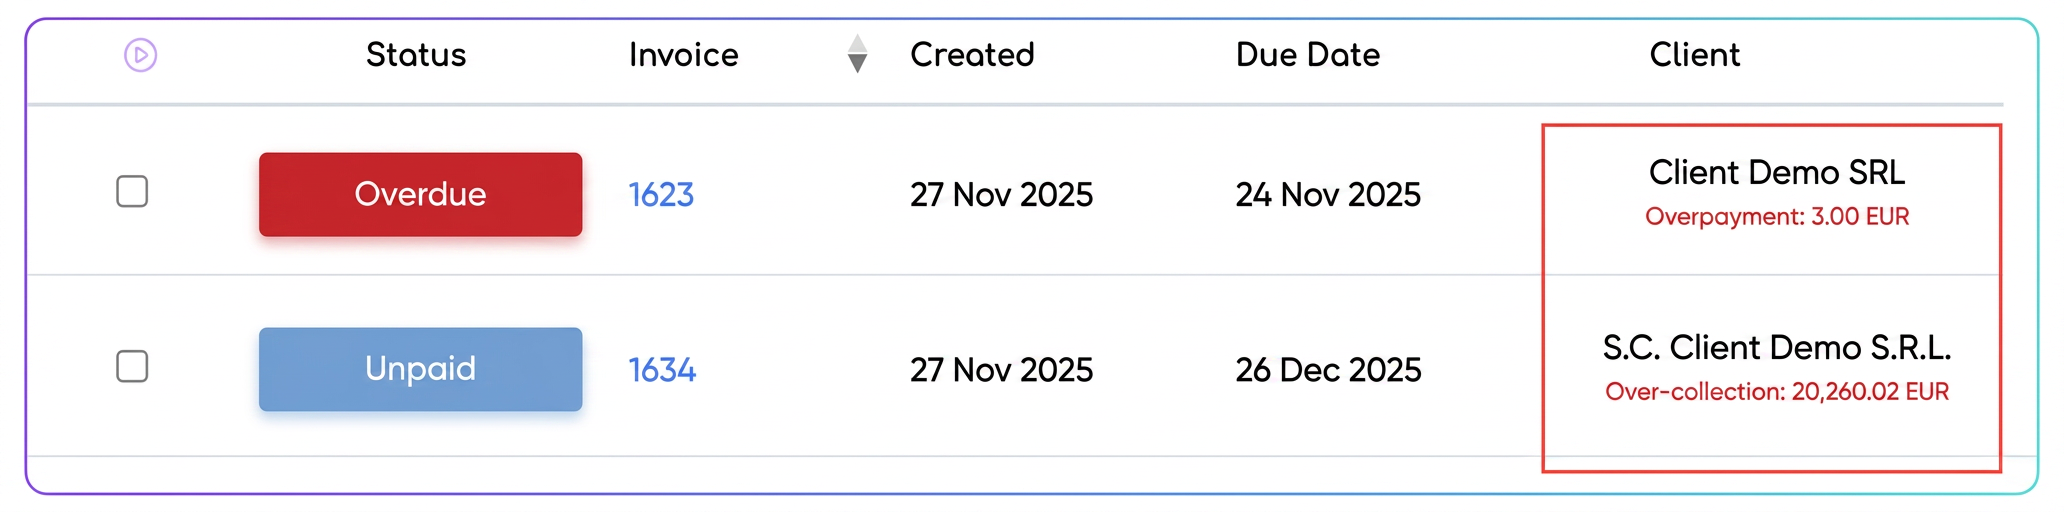
- Advanced Management and Contextual Display of Excess Balance: The display mode for unallocated amounts has been optimized on three levels:
- Adaptable Terminology: The name changes automatically based on the nature of the balance ("Receipt excess" vs. "Payment excess").
- Dynamic Recalculation: The displayed balance is the consolidated result of all unallocated transactions. Example: If for a client there is an unallocated receipt of 1500 EUR and an unallocated payment (refund) of 1000 EUR, the system will automatically calculate the difference and display a single final balance: Receipt Excess - 500 EUR.
- Smart Applicability: The Payment excess balance will be displayed exclusively next to invoices with a negative value (credit note/storno), as this is the only context in which it can be applied to settle obligations.
Optimization: Personalizing Address and Bank Accounts in PDF Documents – Advanced Setting
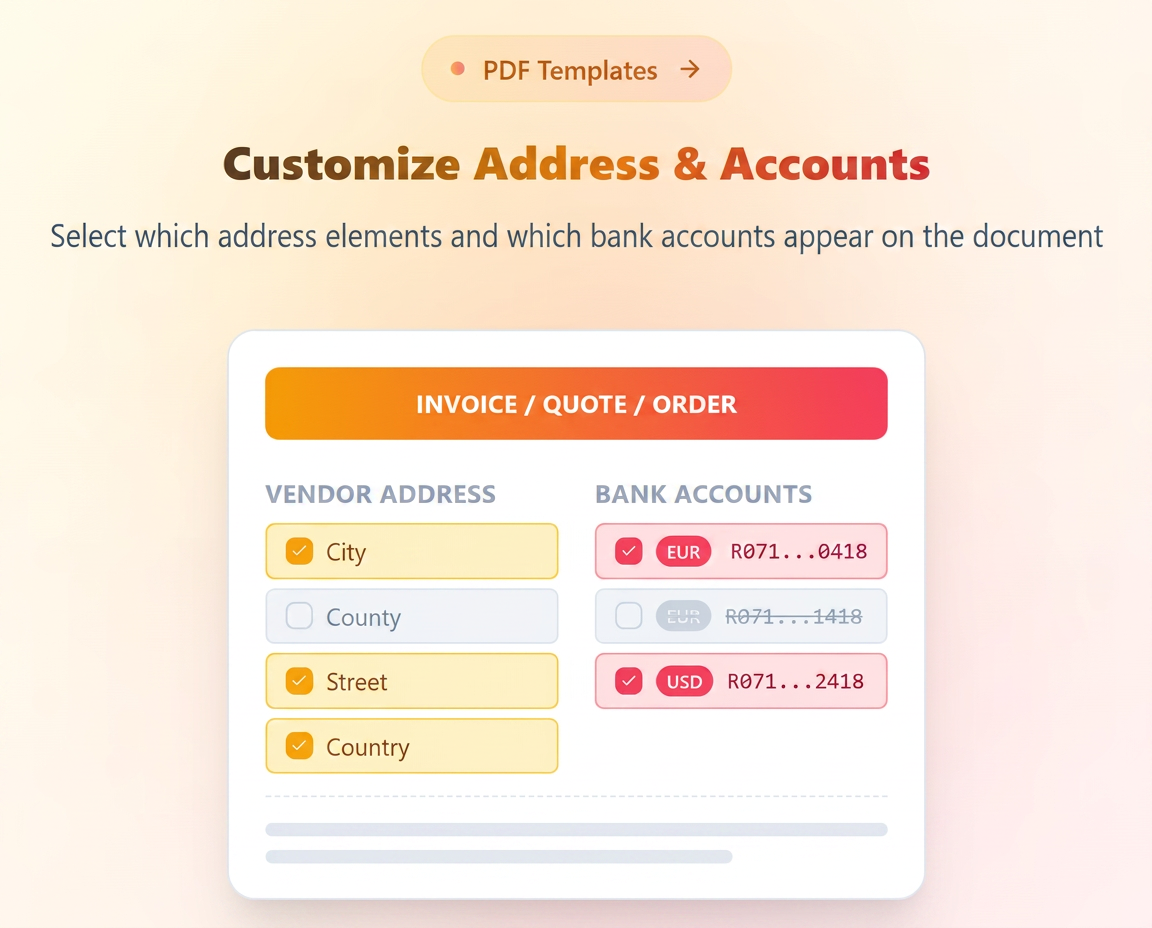
The PDF template editor has been updated to offer granular control over identification data displayed on issued documents (Invoices, Offers, Orders). This optimization allows you to adapt documents based on each client's context or transaction currency.
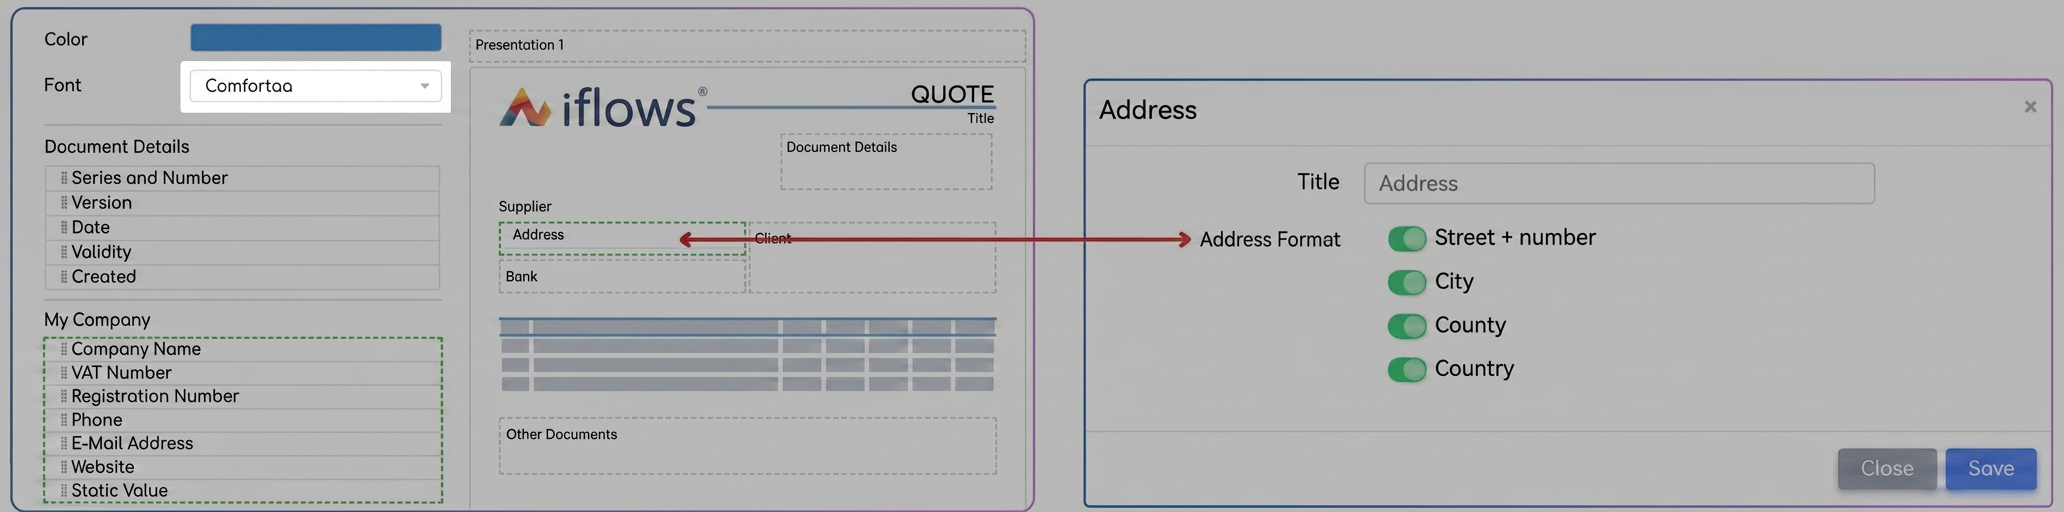
Navigate to Settings – Templates – PDF and edit a template or generate a new one.
- Address Element Selection: Within the template, the address area is no longer a fixed text block. You now have the possibility to individually select which components of the address to display on the PDF (e.g., displaying only the city and country, or the full address, depending on preferences).
- Bank Account Filtering: We have introduced the option to specifically select which bank accounts (IBANs) appear on the document. It is no longer necessary to list all company accounts on every invoice.
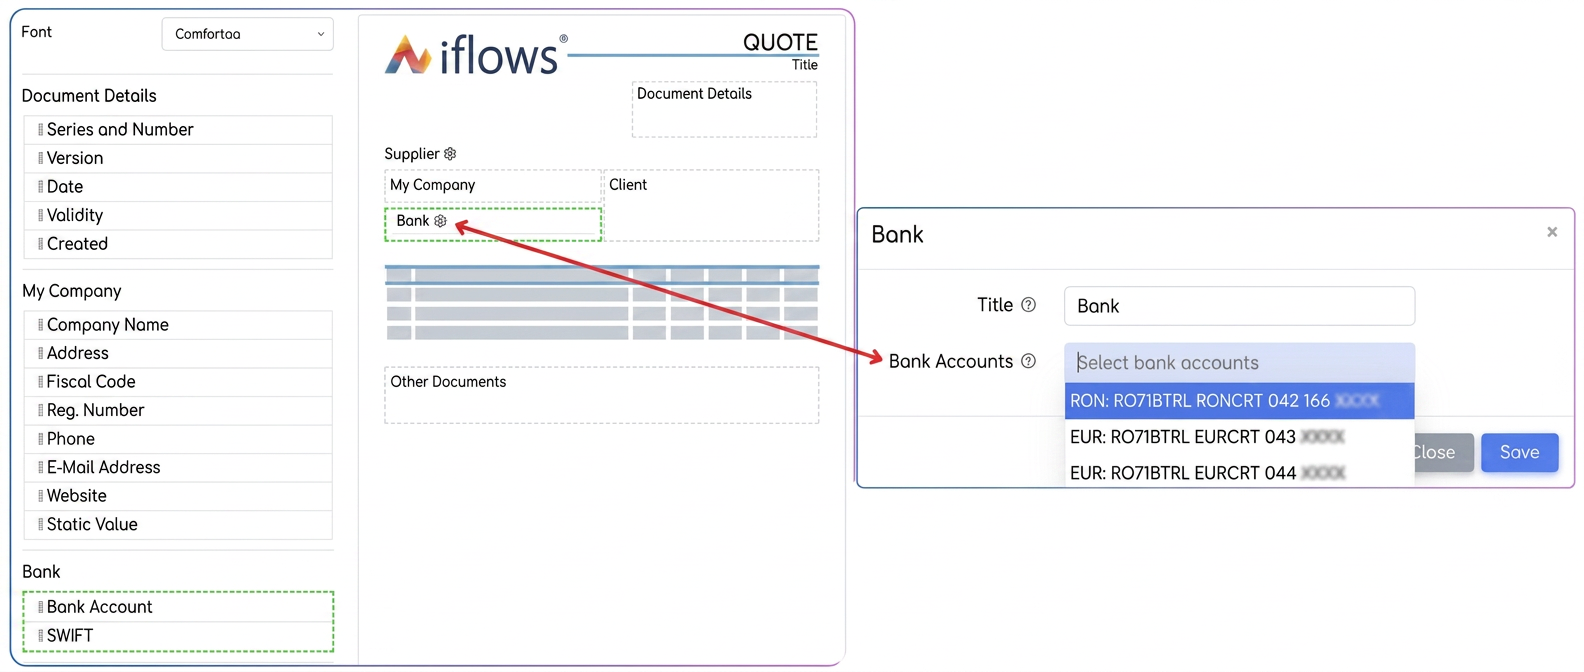
This functionality is essential for companies that invoice in multiple currencies or to different markets.
- Example: For a client in Romania, you can configure the template to display only the EUR account. For an external client, you can generate the document showing exclusively EUR or USD accounts, eliminating irrelevant information.
Optimization: Automatic Allocation of Employees and Departments on Stages
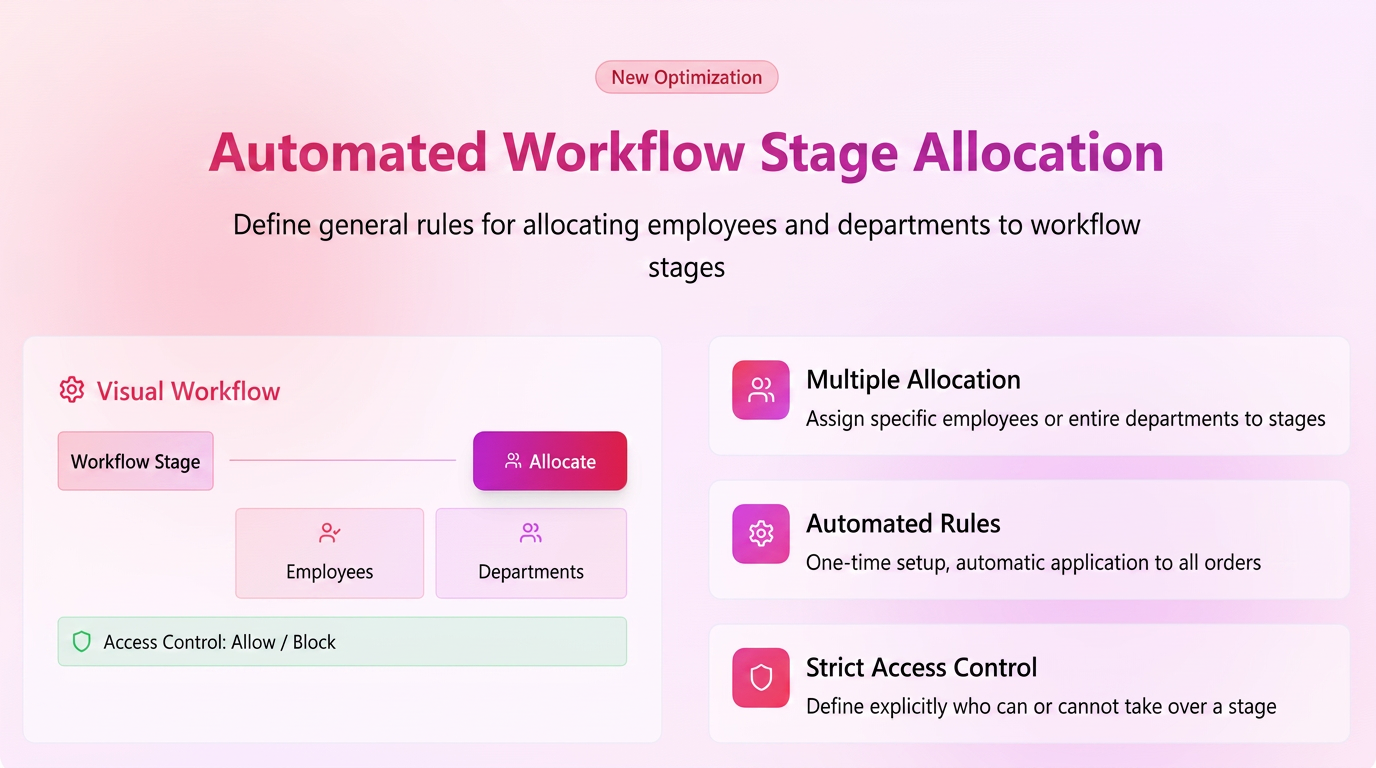
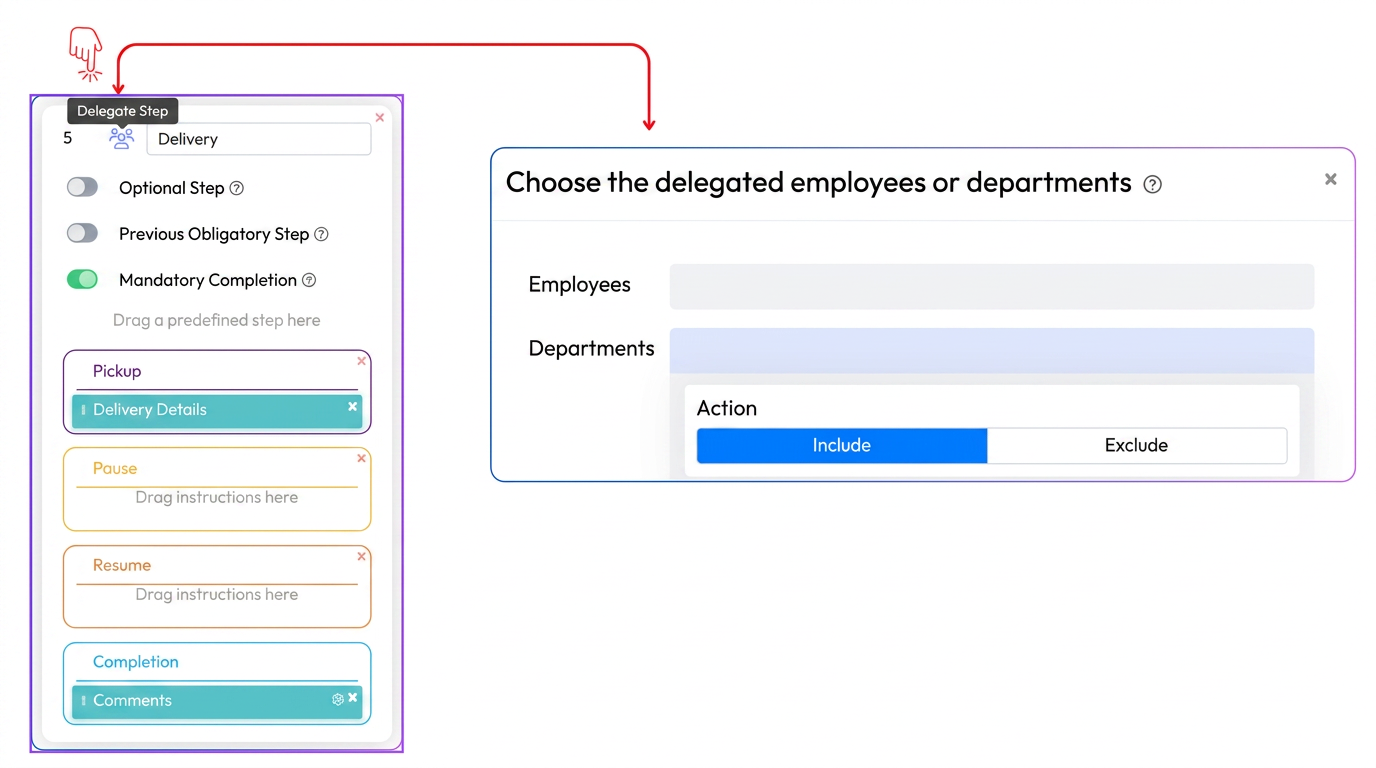
The system now allows defining general rules that establish, at the flow level, who can take over, process, or access a certain stage — either an employee or an entire department. These rules apply automatically to all orders in that flow, eliminating the need for repeated manual allocations. Additionally, the feature introduces an advanced level of operational security through the possibility to explicitly allow or block access to stages, guaranteeing they are managed exclusively by authorized personnel.
Functionalities:
- Multiple and Departmental Allocation: You now have the flexibility to designate one or more employees, or even an entire department responsible for a certain stage of the flow.
- Automation through General Rules: Manual allocation for each individual order is no longer necessary. A general rule can be defined at the workflow configuration level, which will apply automatically to all future orders.
- Strict Access Control (Allow/Block): The functionality includes advanced permission options. You can explicitly define who has the right to take over a stage and who is blocked from access. This ensures that critical stages are handled only by qualified personnel.
How to configure:
- Access the Settings -> Workflows menu.
- Identify the desired flow and the stage you wish to configure.
- Next to that stage, click on the allocation icon (the icon representing users/group).
- In the opened window, select the employees or departments that have permission (or prohibition) to manage that stage generally.
Practical Use Example:
To ensure correct order processing, you can configure the flow as follows:
- "Financial" Stage: Is automatically and exclusively allocated to the Accounting department (or specific financial users), blocking access to other departments.
If an unauthorized employee attempts to take over a stage according to general allocation rules, the system will automatically block the action and display an explicit message stating the stage cannot be processed by that person: „Action cannot be processed! The product [product name] cannot be taken over by [employee name].”
Note: Manual Override (Priority): The general rule can be overridden at the individual order level.
If on the workflow page, for a specific order, you use the manual "Allocate Employee" option, this action becomes priority.
Concrete example: Suppose for the "Production" stage the entire Production Department is allocated via a general rule. If for Order #105 the manager intervenes and manually allocates only employee "Ion Popescu", then the departmental rule is ignored strictly for that order, and the stage can be taken over and processed only by Ion Popescu.