
The iflows platform is regularly updated for improvements and new functionalities.
Inserting product information directly into the quote
This functionality allows the insertion of product details (images, technical sheets, colors, other documents) directly into the quote PDF. This information was previously added in the product section at the bottom of the page. Here you will find the following: Details – where we can usually enter the product description or its characteristics, Product Images, technical sheet, color palette, and any other relevant documents.
When creating the quote, we will find the export options section at the end. On the right side, we can choose which information we want to include in the quote, such as: images, documents, product details, product images, technical sheet, colors, or any other documents. After activating the buttons for each desired option, a selector will open, allowing us to choose between Iflows CLOUD and PDF File for each type of information.
The difference between the two is as follows:
- iflows Cloud: Information will appear as hyperlinks in the PDF. These hyperlinks will open a web page with an interactive carousel, allowing the client to navigate between multiple tabs with product information.
- PDF File: Information will be inserted directly into the quote PDF. This includes details presented in a static format within the document.
Advanced Customization of PDF Invoices
The functionality allows extensive customization of invoices generated in PDF format. Users can create custom PDF templates for invoices, similar to the quote customization functionality. This includes customizing colors, adding pre- or post-invoice presentations, as well as configuring the layout and elements visible to the client. There are two template variations that users can customize: Modern and Contemporary, which differ in design and page element organization.
How to Use:
- Navigate to Settings -> Templates -> PDF:
- Access the Settings section from the main menu.
- Select the Templates option.
- Choose PDF to access invoice customization options.
- Create a New Template:
- Click the "New PDF Template" button to start creating a new template.
- Configure the Template:
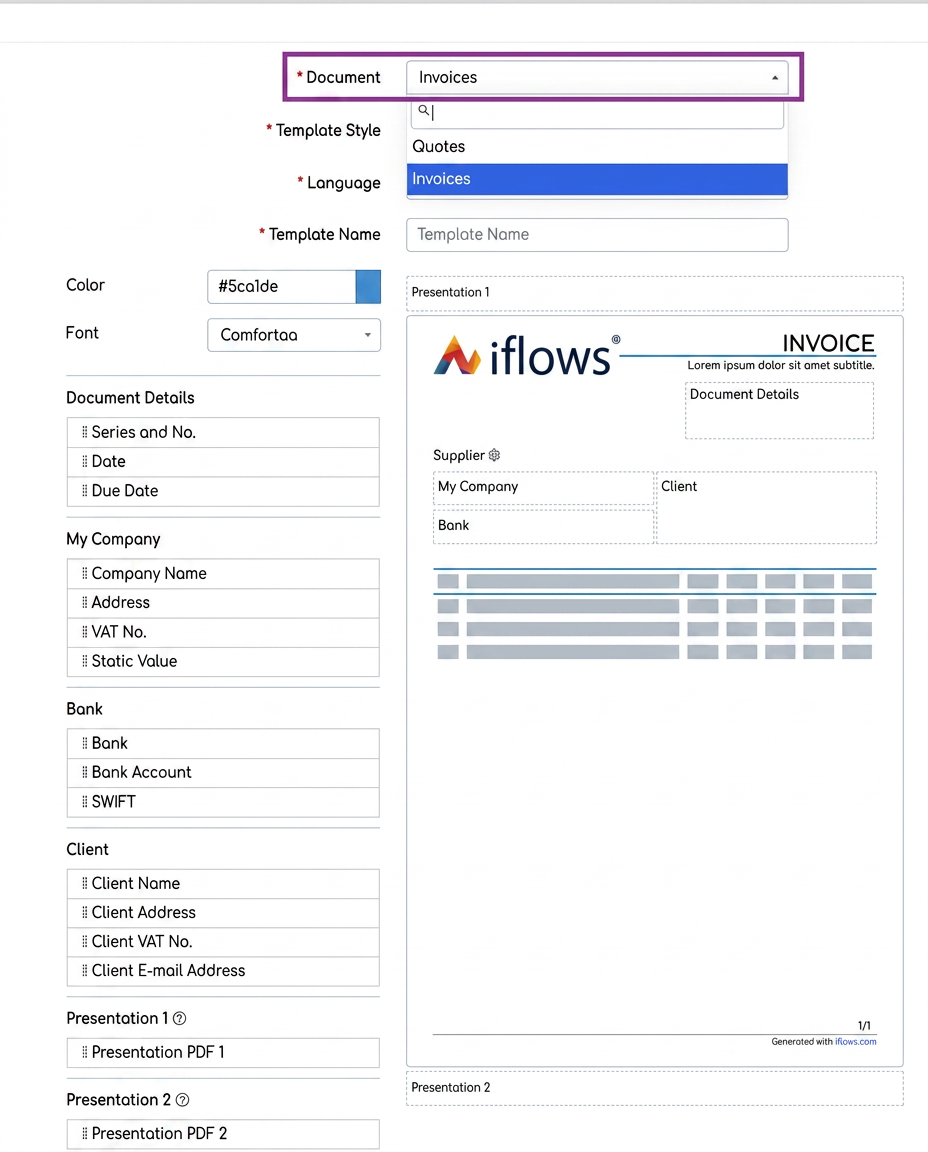
- Choose Document Type: In the "Document" section, select "Invoices" from the dropdown list.
- Template Style: Select between Contemporary or Modern styles, depending on preference.
- Language: Choose the language in which you want the PDF to be generated.
- Template Name: Enter a name for the newly created template to organize and identify it quickly.
- Customize Color and Font:
- Click on the colored box next to the "Color" section to open the color picker. Choose the desired tone and shade for the PDF invoice. Select the desired font for the text in the PDF.
- Add Fields to the Invoice:
- The invoice is initially empty, with no fields included.
- Choose the desired fields from the following categories:
- Document Details: Series and number, date, due date
- My Company: Company name, address, CIF (Tax ID), static value.
- Bank: Bank, bank account, SWIFT.
- Client: Client address, client name, client CIF, client email address.
- Presentation: Presentation files that will be inserted before or after the actual invoice.
- Customize Field Order and Naming:
- Drag and drop fields from the boxes on the left into the PDF invoice. The field where they can be placed will be colored green to indicate available zones. You can organize fields in any order you prefer.
- After placing a field, click on the gear icon next to it to give it a custom name that will appear on the invoice. If you do not provide a name, only the field value will appear.
- Using Static Value:
- The "Static Value" option allows you to enter any other company information that is not already found in the existing options. Enter the static value, click on the gear icon, and rename it as you wish.
- Export Customization Options:
- At the bottom of the page, you have PDF export options for invoice information, which you are already familiar with. These options can be saved as defaults in relation to the created template.
- Set the Default Template:
- You can set the created template as default by going to Settings -> Invoices -> Template. Choose the template you will use most often to set it as default.
- Using the Template when Creating a New Invoice:
- When creating a new invoice, you will find the "PDF Template" field filled with the default template, but this can be changed if necessary. After creating and saving the invoice, you can download the PDF or send it directly to the client.
Automating Invoice Submission to e-Factura
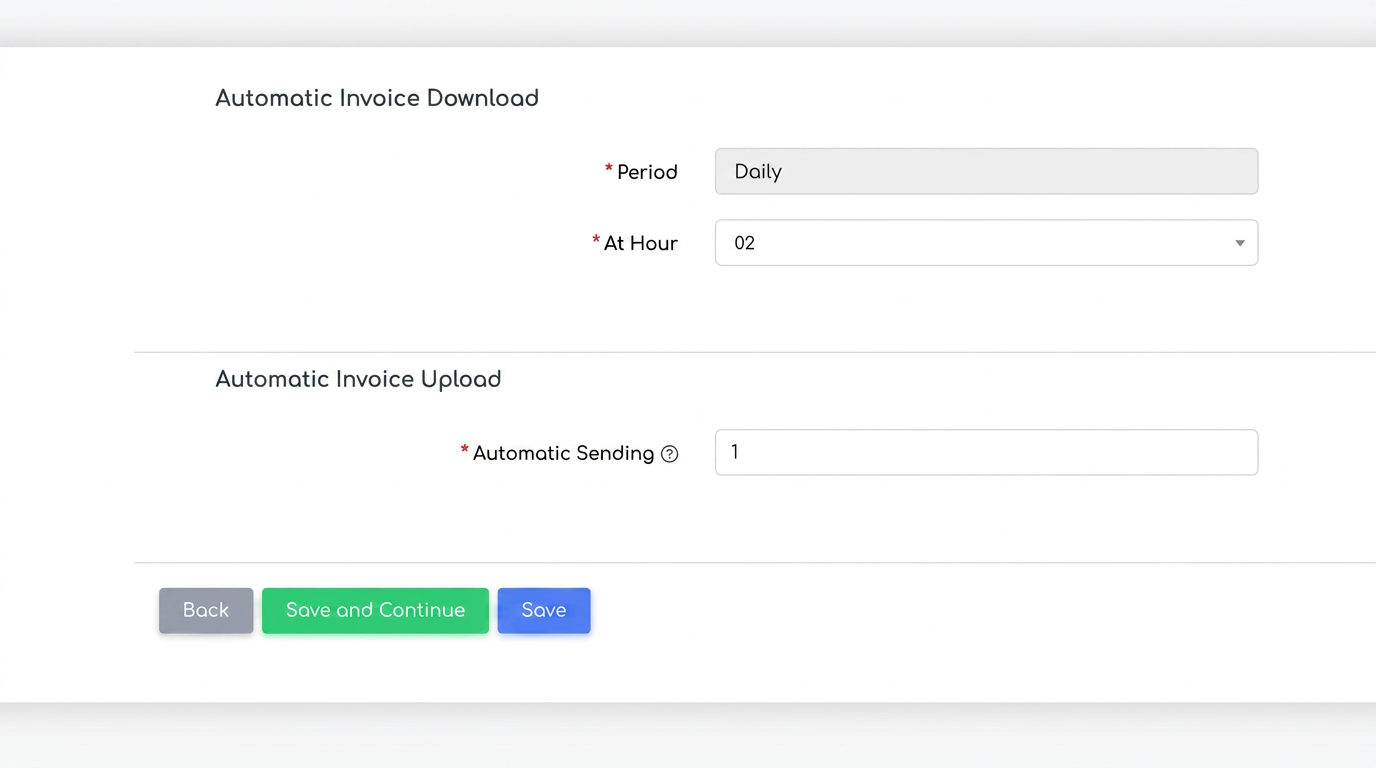
Users can establish an interval of days from the invoice issuance date, after which it will be automatically transmitted. Additionally, the exact time for the automatic download of invoices received from suppliers can be set.
How to Use:
- Accessing Integration Settings:
- Navigate to the Settings section from the main menu.
- Select Integrations from the list of available options.
- Configuring e-Factura Integration:
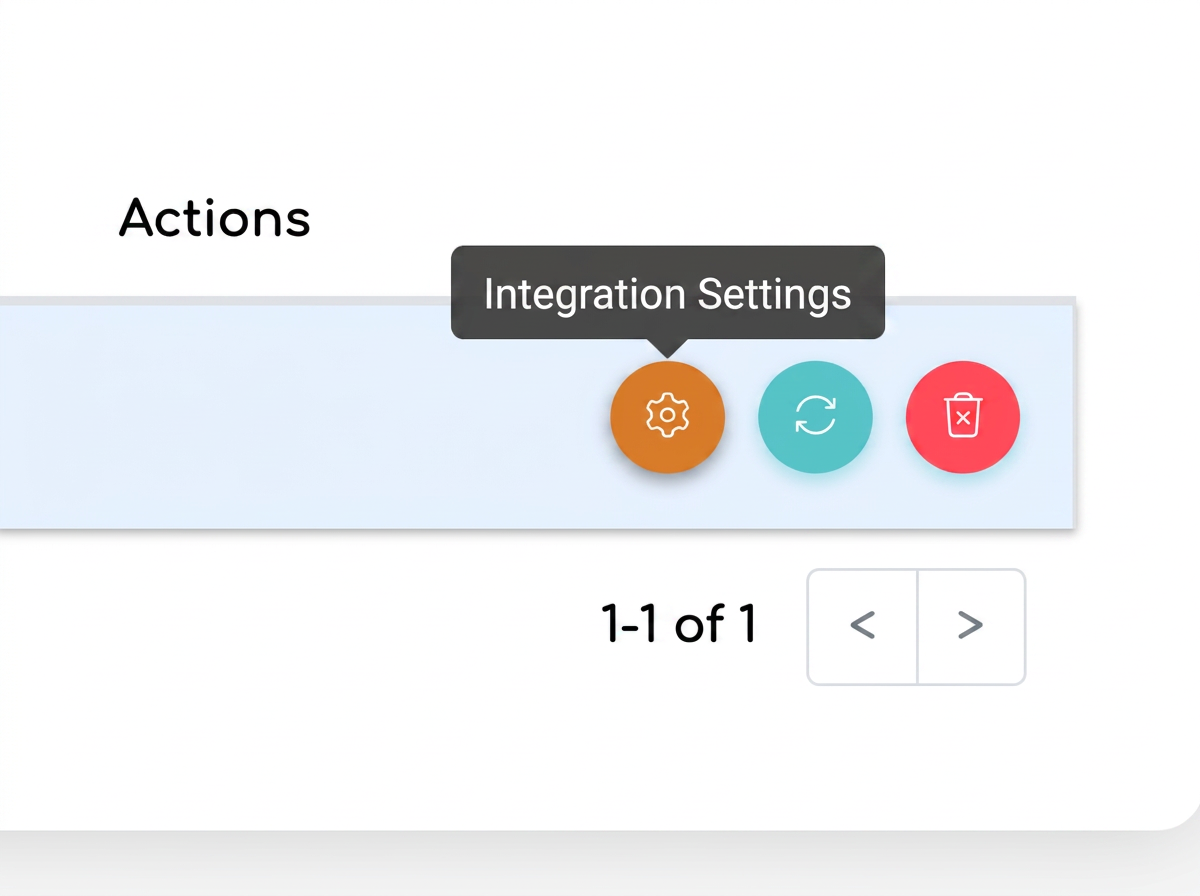
- Next to the e-Factura integration, in the Actions column, click on the orange gear symbol named Integration Settings.
- The e-Factura settings page will open, where you can configure the desired options.
- Setting Automatic Download and Upload of Invoices:
- Automatic Invoice Download:
- Establish the exact time you want the automatic invoice download to take place.
- Note that regardless of the time set for automatic download, users can manually update invoices at any time by pressing the Update button on the e-Factura page to perform a refresh.
- Automatic Invoice Upload:
- Enter the number of days from the invoice issuance date after which it will be automatically sent to the RO e-Factura system. To disable automatic sending, set the value to 0.
- Automatic Invoice Download:
- Saving Configurations:
- After configuring the settings, click the Save button to record the changes.
Renaming the Financial section: Incomings to Financial: Purchases
- New Name: The section previously named Financial: Incomings (Intrări) will now be found under the name Financial: Purchases (Achiziții).
- Unchanged Functionality: All existing functions and features in the old section remain unchanged.
Ability to create an Incoming entry directly from e-Factura
The new functionality in iflows allows the direct creation of a purchase from invoices received via e-Factura. This optimizes the purchase management process by automatically pre-filling invoice data, saving time and reducing the risk of errors.
How to Use:
- Accessing the Financial - Purchases Section:
- Navigate to the Financial section from the main menu, select the Purchases subsection, and access the e-Factura tab.
- Creating a Purchase from e-Factura:
- Next to each invoice received via e-Factura, in the Actions column, you will find an orange button named Create purchase. Click this button to start the purchase creation process.
- Selecting the Purchase Type:
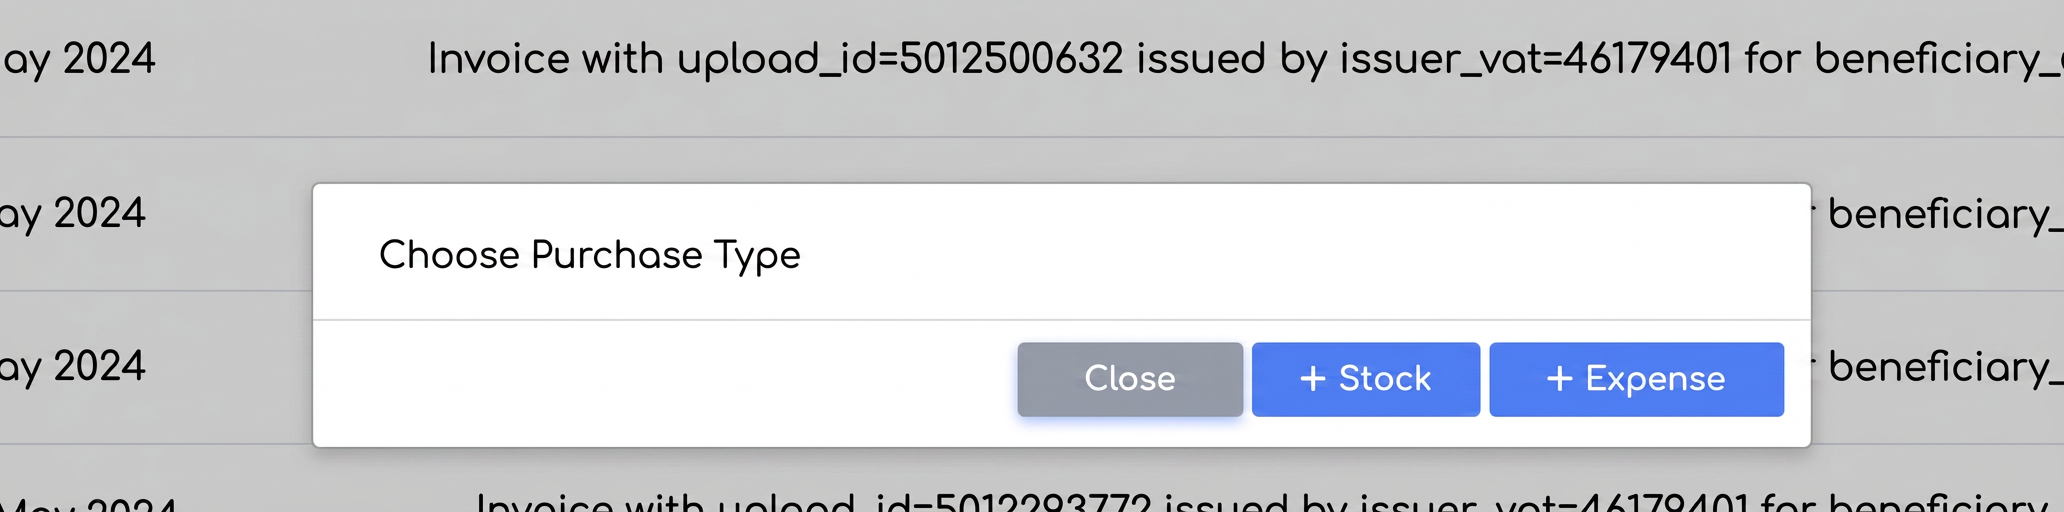
- After clicking the Create purchase button, the system will ask you to select the purchase type: Stock or Expense. Select the desired type based on the nature of the purchase.
- Automatic Data Pre-filling:
- The system will automatically pre-fill the respective entry with all data taken from the e-Factura invoice, including the products and services mentioned.
- Completing and Customizing Information:
- After the automatic pre-fill, you can add or modify necessary information, such as additional details, attached files, internal notes, etc.
- You can add NIR (Note de Intrare Recepție - Reception Entry Notes), allocate stock to an existing product, and complete details related to the reception commission, delegate, warehouse manager, and other relevant information.

Ability to export an invoice in XML format
This format is useful for integration and data exchange between various systems and applications, ensuring compatibility and efficiency in managing financial documents.
How to Use:
- Accessing Invoices:
- Navigate to the Sales section from the main menu, select the Invoices subsection to access the list of available invoices.
- Selecting the Invoice for Export:
- Identify the invoice you want to export in XML format. Next to the respective invoice, in the Actions column, click on the eye symbol, named Invoice Details, to open the invoice details page.
- Exporting the Invoice in XML Format:
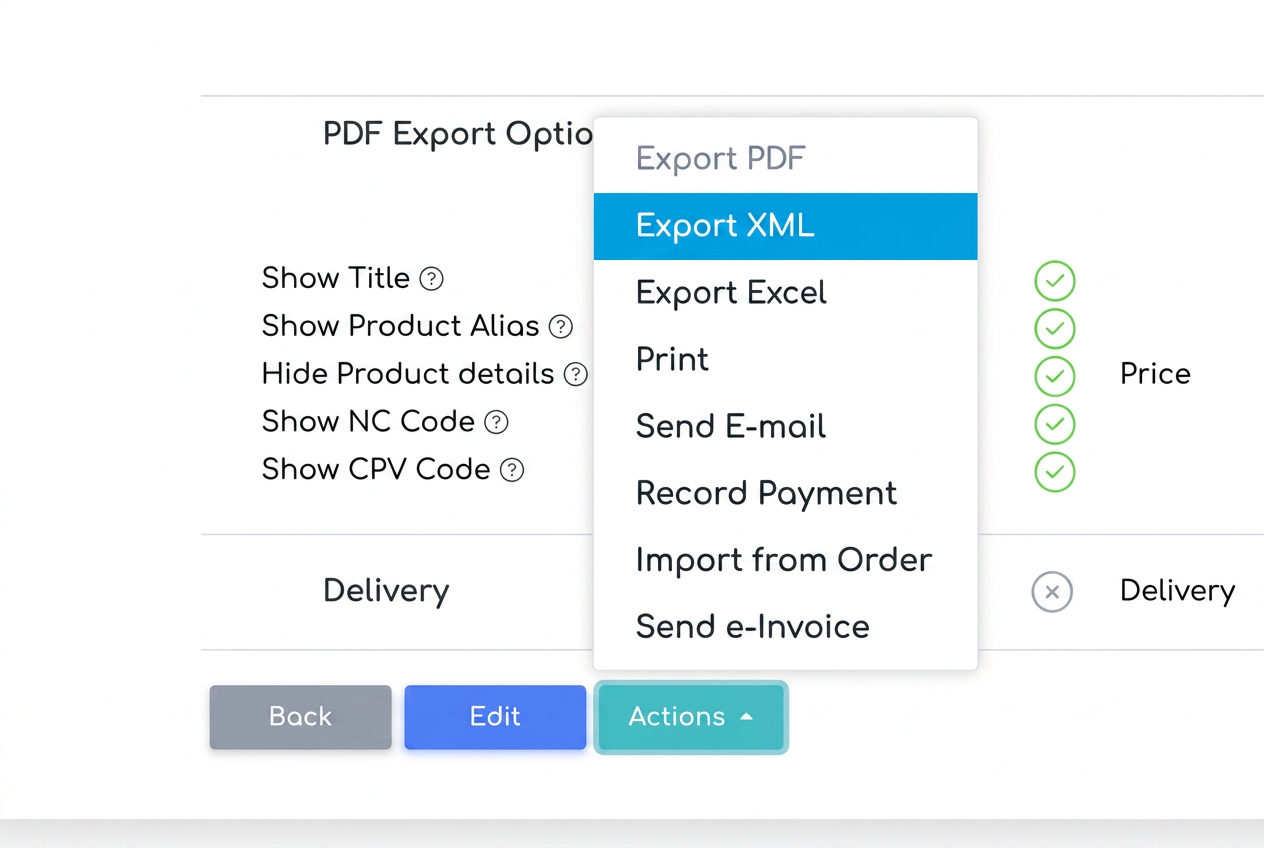
- At the bottom of the page, you will see a button named Actions. Click this button to open the dropdown menu with available options. Select the Export XML option from the list.
- Saving the XML File:
- After selecting the Export XML option, the system will automatically generate and export an XML file containing all relevant invoice information.
Ability to download the acceptance confirmation in e-Factura
The new functionality in iflows allows users to download the acceptance confirmation for invoices in e-Factura. This provides proof that the invoice has been uploaded and accepted by the e-Factura system, ensuring the compliance and validity of financial documents.
How to Use:
- Accessing Invoices:
- Access the Sales section from the main menu. Select the Invoices subsection to view the list of available invoices.
- Viewing the Desired Invoice:
- Identify the invoice for which you want to download the acceptance confirmation. Next to the respective invoice, in the Actions column, click on the Invoice Details icon to access the invoice details page.
- Downloading the Acceptance Confirmation:
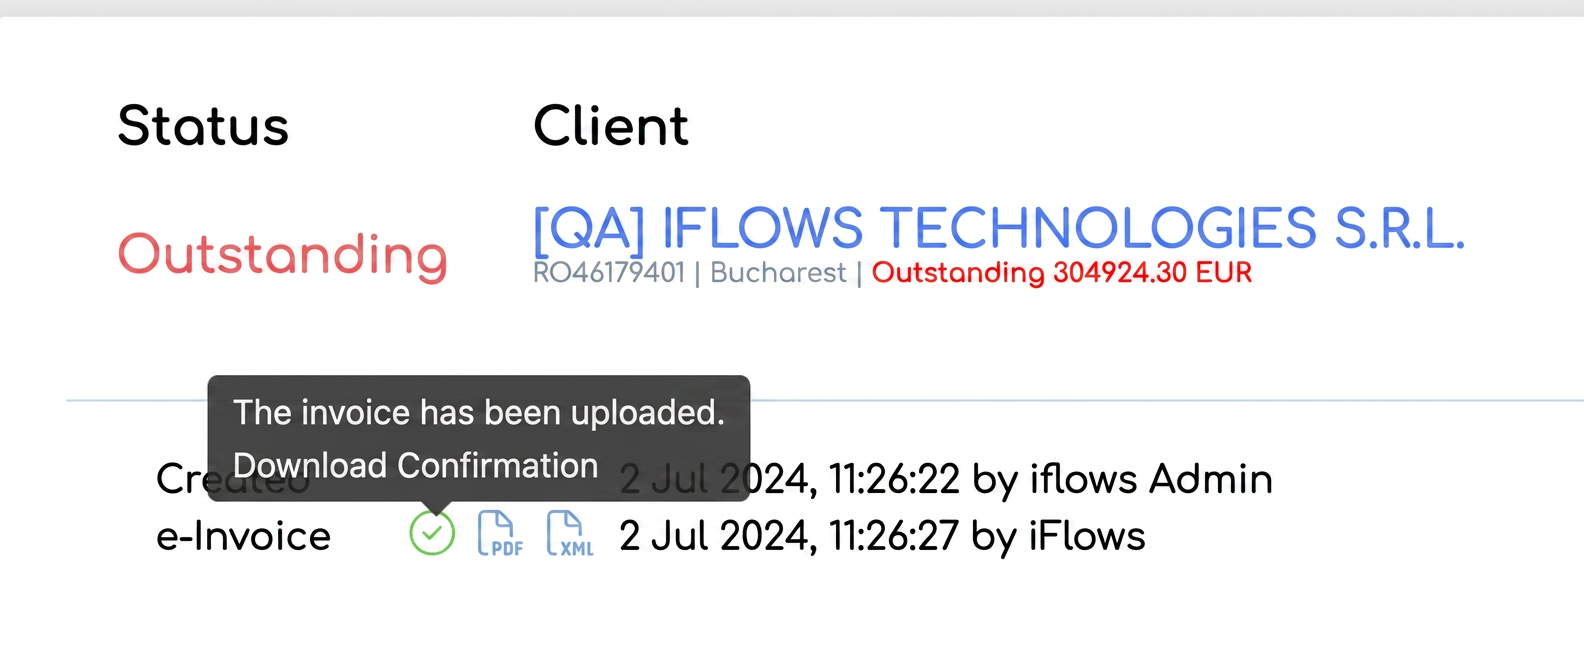
- On the Invoice page, locate the information regarding the invoice status in e-Factura, situated at the top. Hover the cursor over the green checkmark symbol, indicating the invoice has been uploaded. The message "Invoice has been uploaded. Download Confirmation" will appear. Click on this message to initiate the download of the acceptance confirmation.
Ability to add comments for costs in the quote
The new functionality in iflows allows users to add detailed comments for costs in calculated quotes. This extends the automatic cost calculation functionality, offering the possibility to note and clarify various cost-related aspects directly within the quote.
How to Use:
- Accessing the Quote:
- Navigate to the Sales section from the main menu. Select the Quotes subsection to access the list of available quotes.
- Editing or Viewing the Quote:
- Identify the quote for which you want to add comments. Choose to edit or view the quote by clicking the corresponding button in the Actions column.
- Calculating Costs:
- At the bottom of the quote page, click the Calculate Cost button. The system will automatically calculate the costs for each product included in the quote.
- Adding Comments:
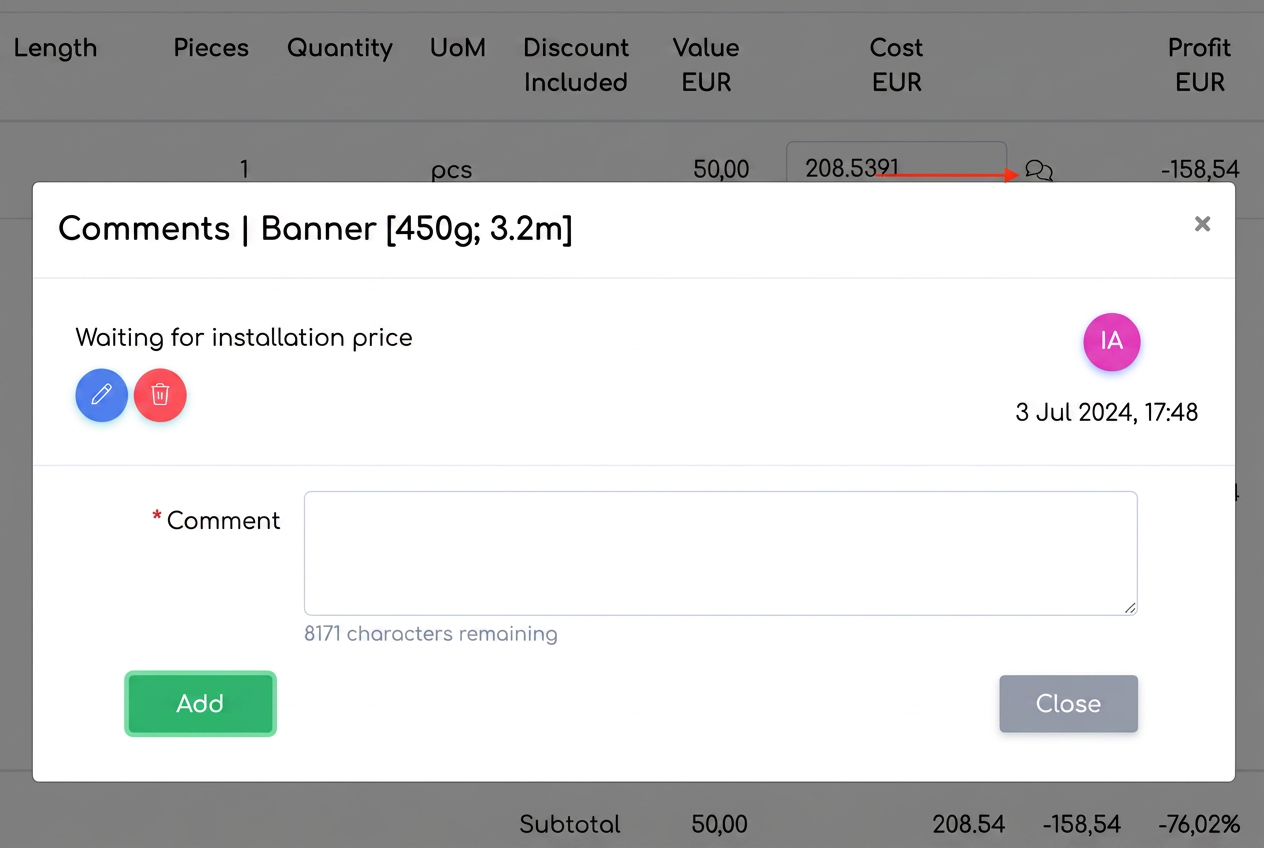
- After the calculation is finished, you will see a comment symbol next to each product line. Click on the comment symbol to open the comments window. Enter the desired comments in the dedicated field and click the Add button to save the comments.
Automatic Retrieval of Tags when Adding a Purchase
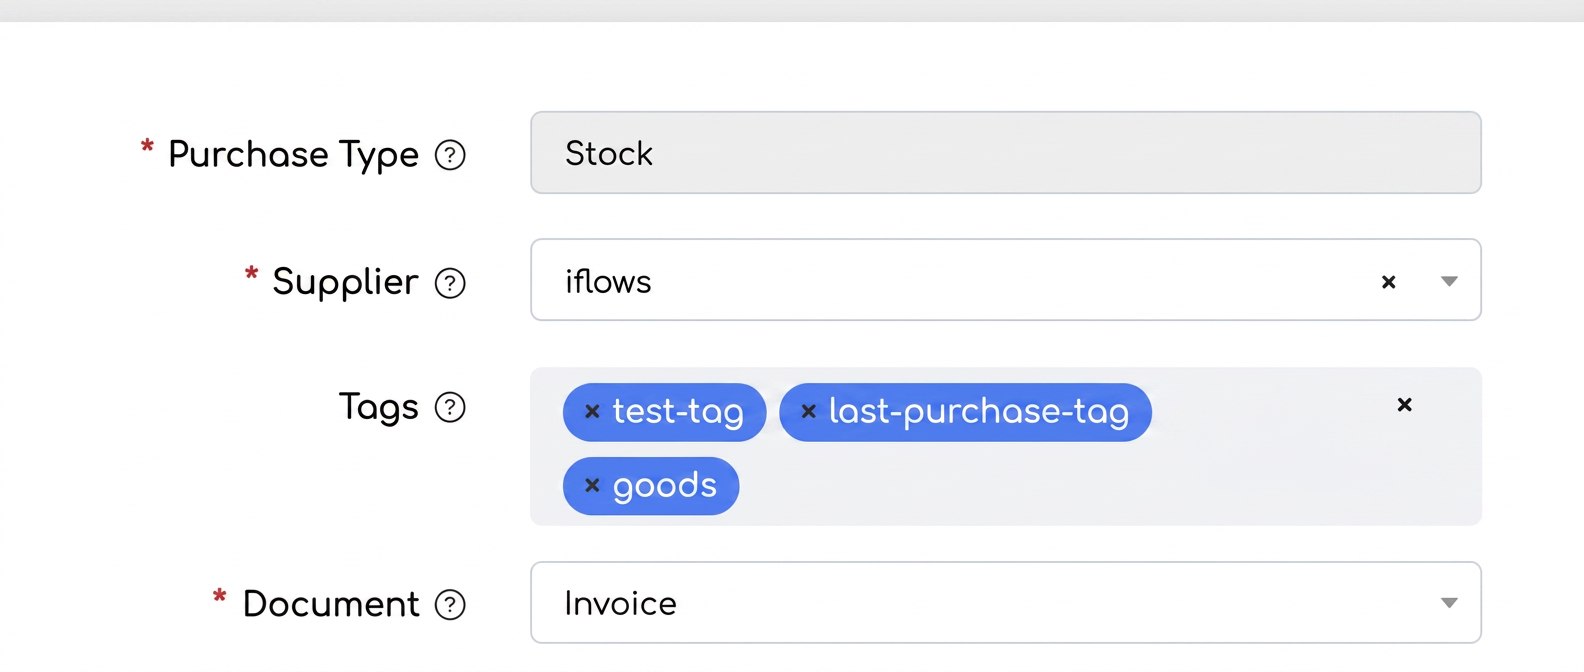
The functionality allows the automatic retrieval of tags used in the last purchase from the same supplier. This facilitates the management and classification of purchases.
How to Use:
- Accessing the Purchases Section:
- Navigate to the Financial section from the main menu.
- Select the Purchases subsection.
- Adding a New Purchase:
- Click the New Purchase button to start the process of adding a new purchase.
- Adding Tags:
- In the Tags field, enter the relevant tags for the current purchase. Save the purchase to record these tags.
- Automatic Retrieval of Tags:
- When adding a new purchase from the same supplier, the system will automatically retrieve the tags used in the last purchase from that supplier. You can edit or add additional tags if necessary.
Example: When adding a new stationery purchase from the supplier ProdusePapetărie XYZ SRL, the tag "Office Accessories" is used to classify the products. For the next purchase from the same supplier, iflows will automatically retrieve this tag. Thus, you will have a quick overview of that respective purchase.
Multiple Invoicing & Consolidated Orders in a Single Invoice
In iflows, you have the possibility to manage invoicing in a flexible and efficient way, adapted to your needs. We will cover two essential types of invoicing:
Multiple Invoicing - This method allows you to select multiple orders and generate individual invoices for each order simultaneously.
Consolidated Orders in a Single Invoice - This method allows you to combine multiple orders into a single invoice.
We will start with multiple invoicing. Suppose you have three orders from three clients (different or not), and you want to generate invoices for each order. With multiple invoicing, you select the three orders in iflows, and the system will automatically generate three separate invoices, one for each order.
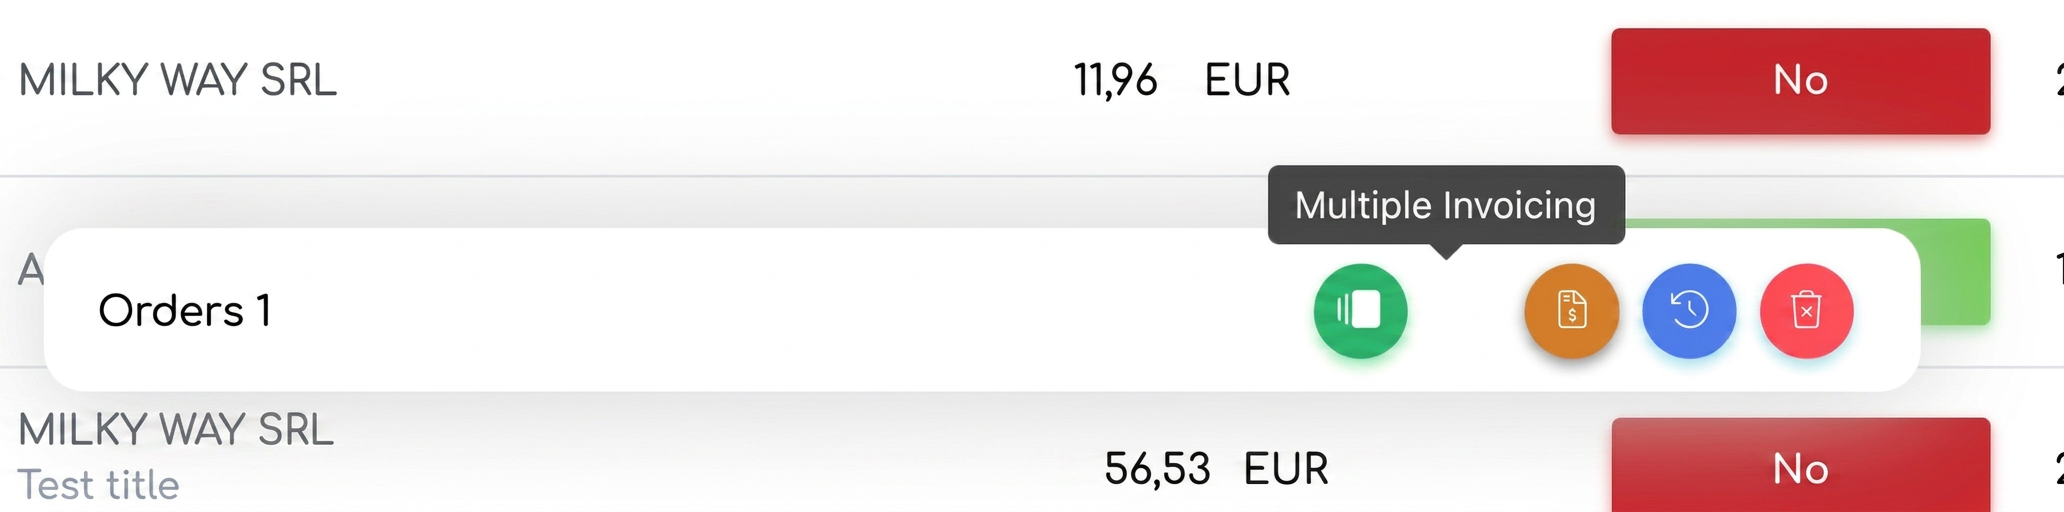
To perform multiple invoicing, start by navigating to the "Sales" section in the main menu, then select "Orders". In the displayed order list, select the orders you want to invoice simultaneously. To do this, check the boxes to the left of each order's status. After selecting the desired orders, you will notice a quick menu appearing at the bottom of the screen, offering multiple options. From this quick menu, click on the green symbol named "Multiple Invoicing". This will initiate the process of generating invoices for all selected orders. After clicking the "Multiple Invoicing" button, the system will offer the option to activate the "Send email" function. Activating this option will automatically send the emails with the generated invoices to the respective clients.
We will move on to the option of consolidated orders in a single invoice. Suppose a client has placed three separate orders in the same period. Instead of sending three different invoices, you can choose to consolidate these orders into a single invoice. To do this, we have two variations:
- First variation: Consolidation from the Orders section
We will go to the "Orders" section and select the orders we want to combine into a single invoice by checking the boxes next to each order. After selection, a quick menu will appear at the bottom of the screen. We will select the orange button named "Generate document". From this menu, we will choose the "Invoice" option. Thus, all products and services included in the client's orders will be populated into a single invoice. - Second variation: Consolidation from the Invoices section
We will go to the "Sales" section, then to "Invoices" and click the "Import from order" button. In the designated box, we will enter the order numbers we want to consolidate. After selecting an order, we can add other order numbers to insert multiple orders into a single invoice.
Possibility to create NIRs for different warehouses from the same Purchase
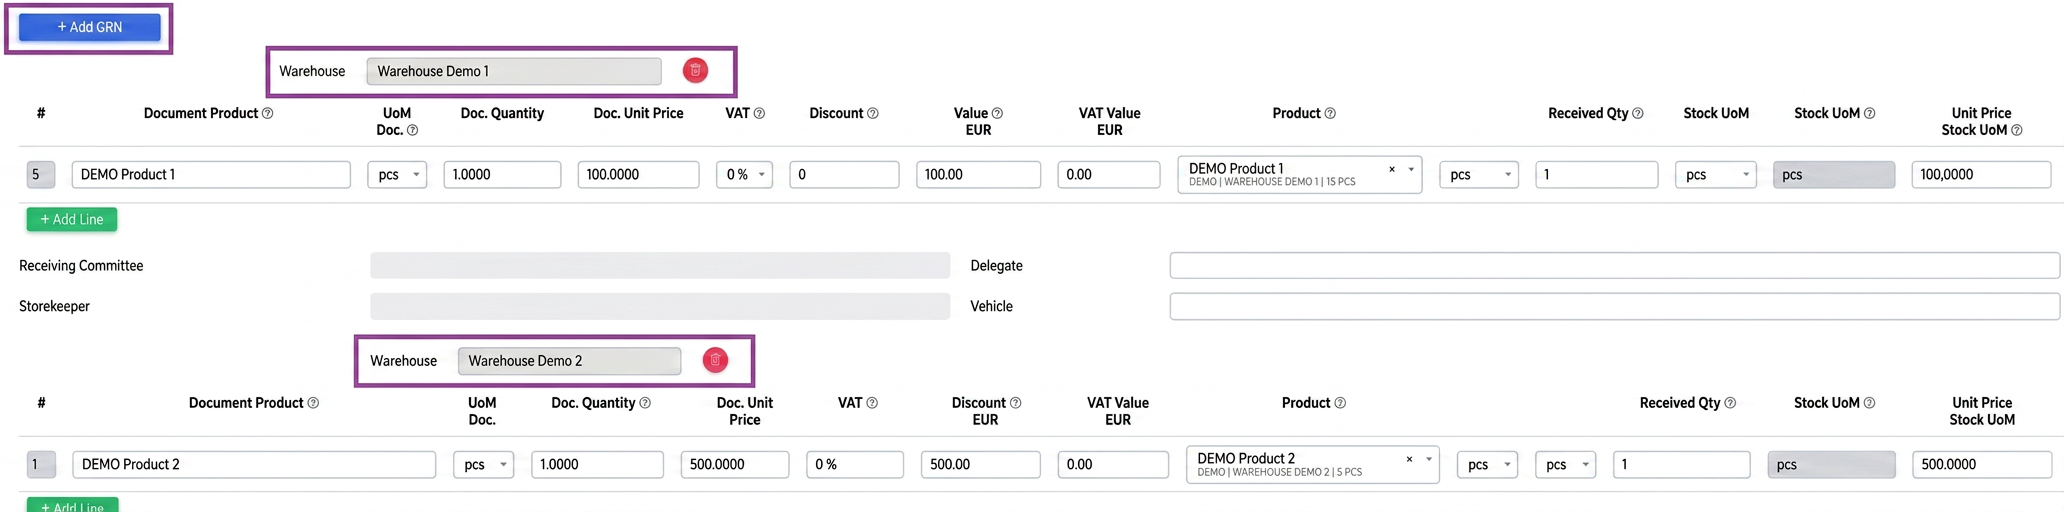
The functionality allows users to generate NIR (Note de Intrare Recepție - Reception Entry Notes) for different warehouses within the same purchase. This brings an advanced level of flexibility to stock management, facilitating the efficient allocation of products to multiple warehouses.
How to Use:
- Initiating a New Purchase:
- Access the Financial section from the main menu of the platform. Select the Purchases subsection and click the New Purchase button to start the registration process for a new purchase.
- Adding Products and Creating NIRs:
- In the area for adding lines from the incoming invoice, located at the bottom of the page, identify the Add NIR button. Click this button to open the warehouse selector and select the desired warehouse for that set of products. Enter the necessary details for the products associated with the first warehouse.
- Generating NIRs for Additional Warehouses:
- After finishing the entry of products for the first warehouse, click the Add NIR button again to add products to another warehouse. Repeat this process for each additional warehouse, selecting the desired warehouse and completing the corresponding product details.
- Finalizing and Saving the Purchase:
- After all products have been distributed to the corresponding warehouses, save the purchase. When downloading the documents, the system will automatically generate a folder containing separate PDF files for each created NIR, corresponding to each individual warehouse.
If you have suggestions or ideas that could bring improvements to the iflows platform, we encourage you to send us feedback. We are dedicated to continuous improvement and assure you that all suggestions will be carefully evaluated.