
The iflows platform is regularly updated with improvements and new functionalities.
Advanced Customization of PDF Quotations
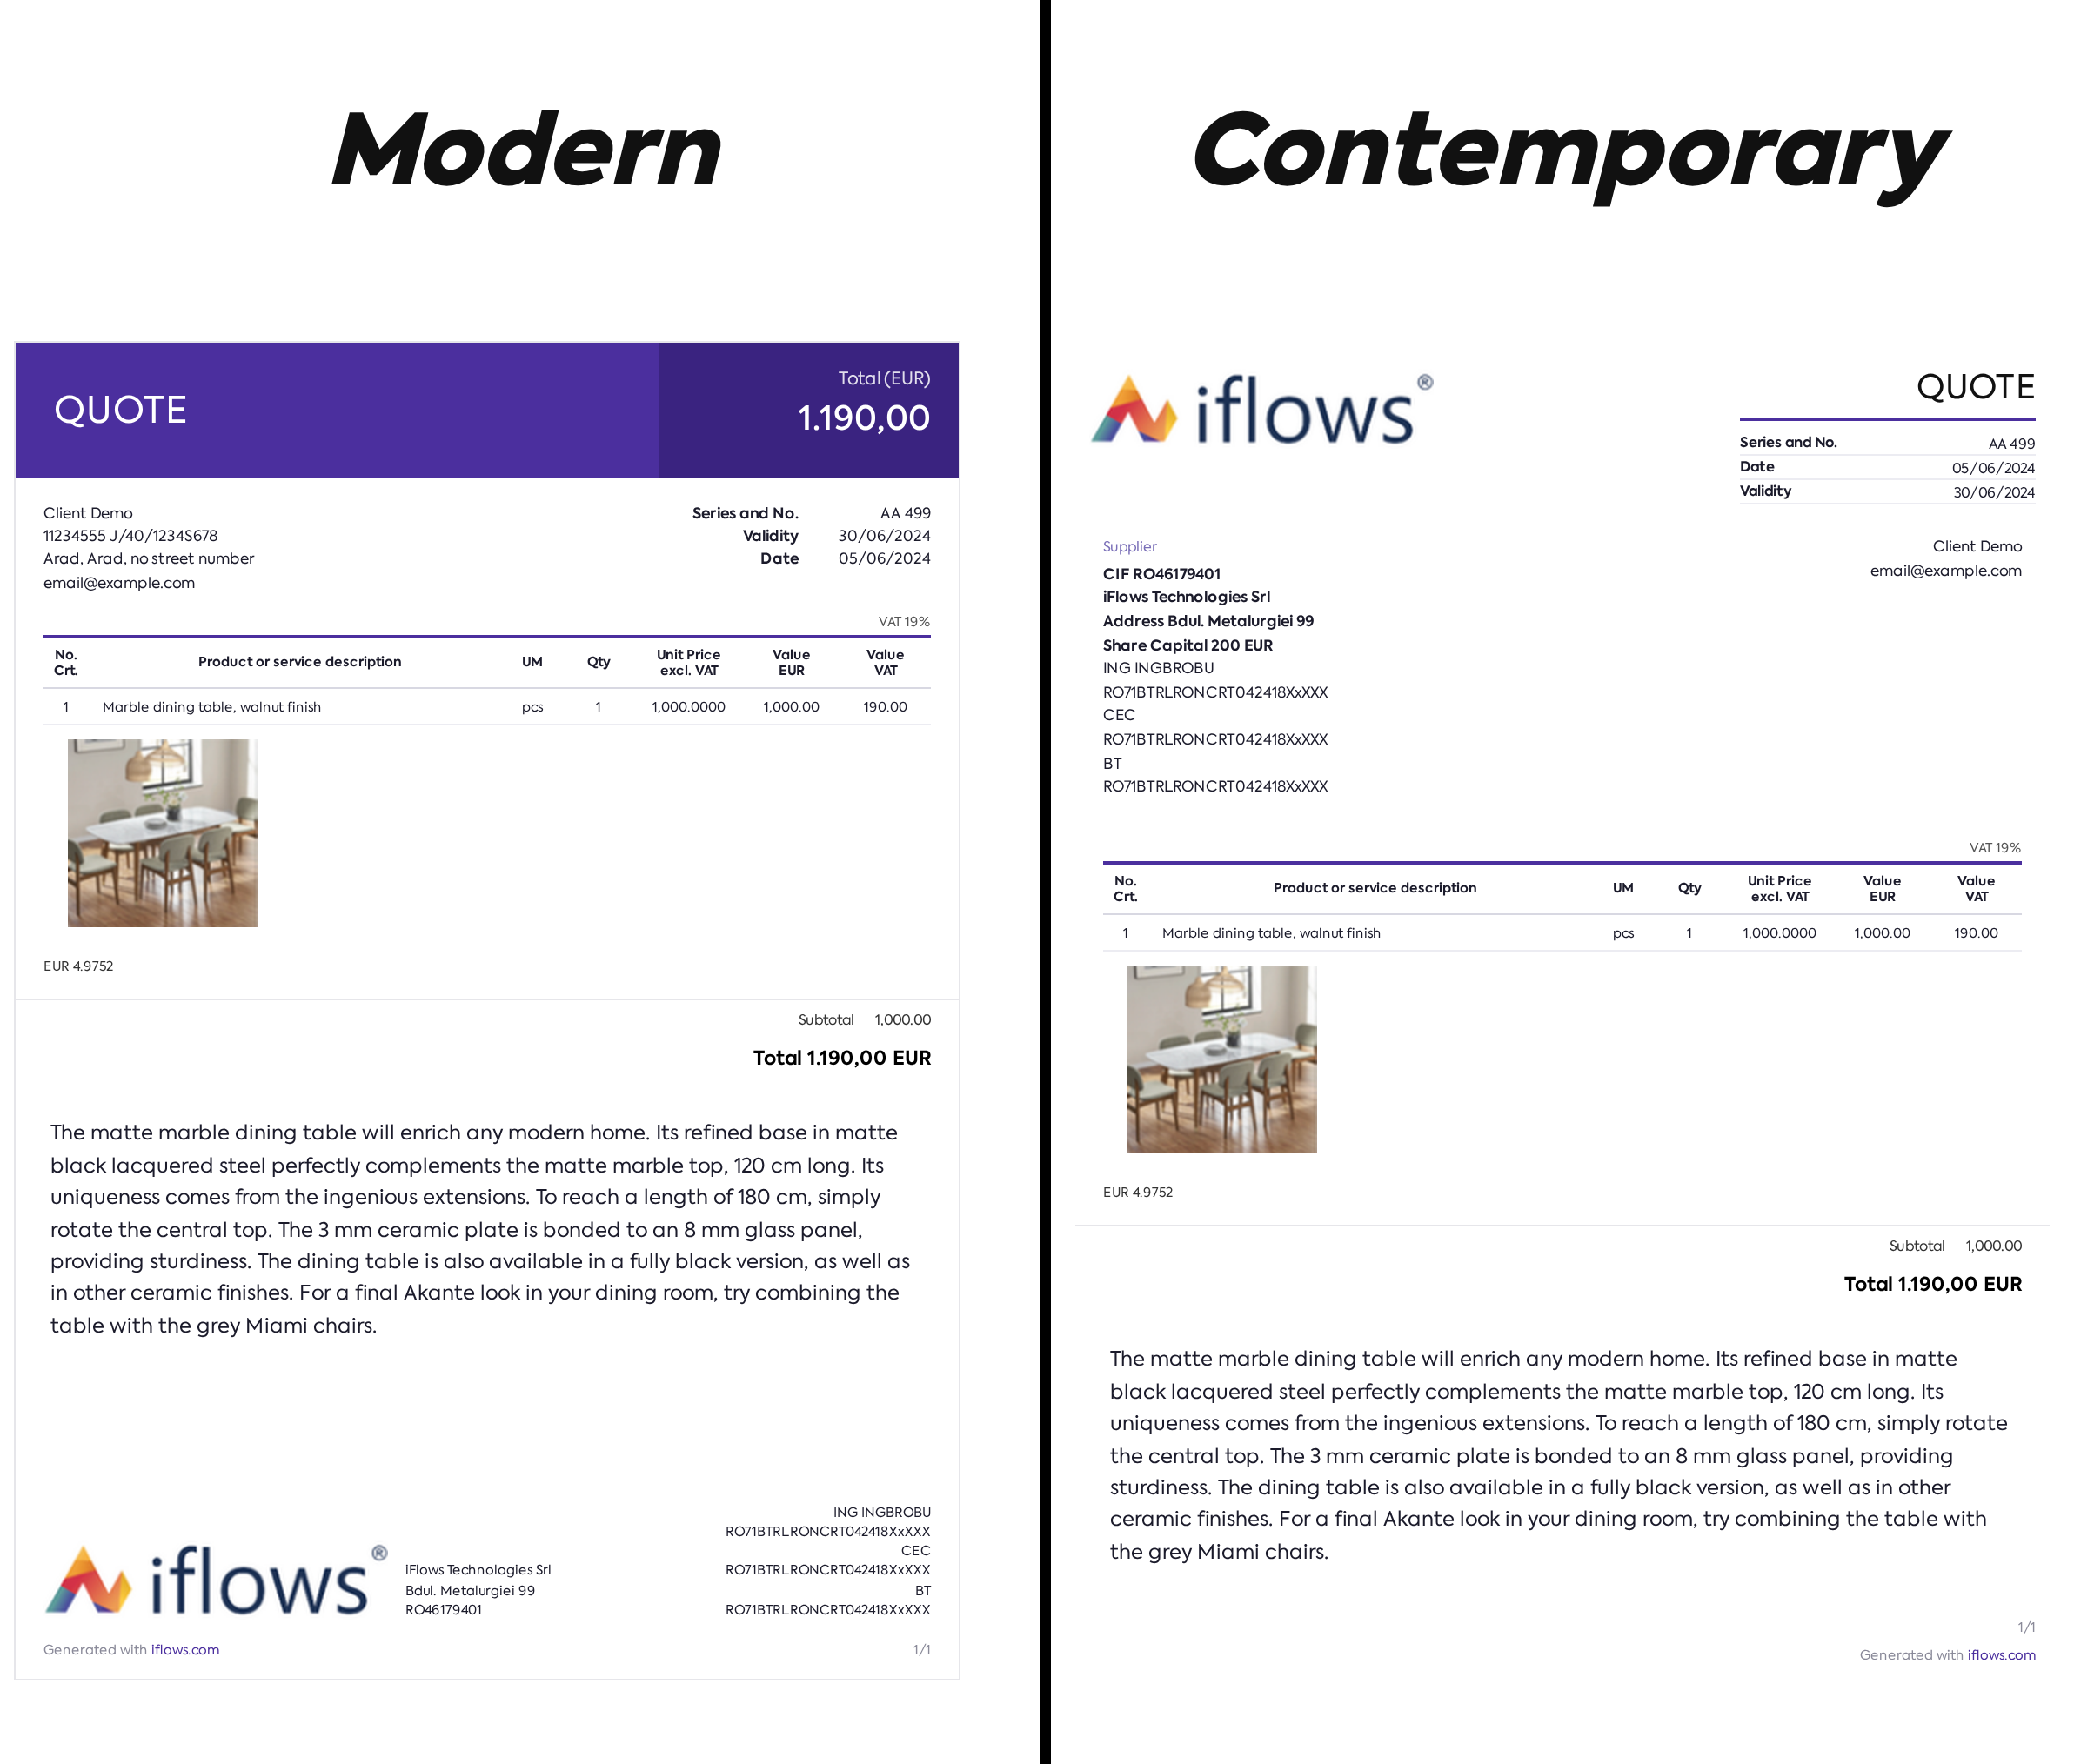
The PDF Quotation Customization feature in the new iflows update allows for extensive customization of how the quotation looks when exported to PDF. Now we can customize the colors used in the quotation, insert a presentation before or after the actual quotation, as well as the page layout or elements visible to the client. We have two template variants that we can customize: Modern and Contemporary, which differ in their page layout and design.
Navigate to Settings -> Templates -> PDF:
- Access the Settings section from the main menu.
- Select the Templates option.
- Choose PDF to access customization options.
Create a New Template:
- Click on the "New PDF Template" button to start creating a new template.
Configure the Template:
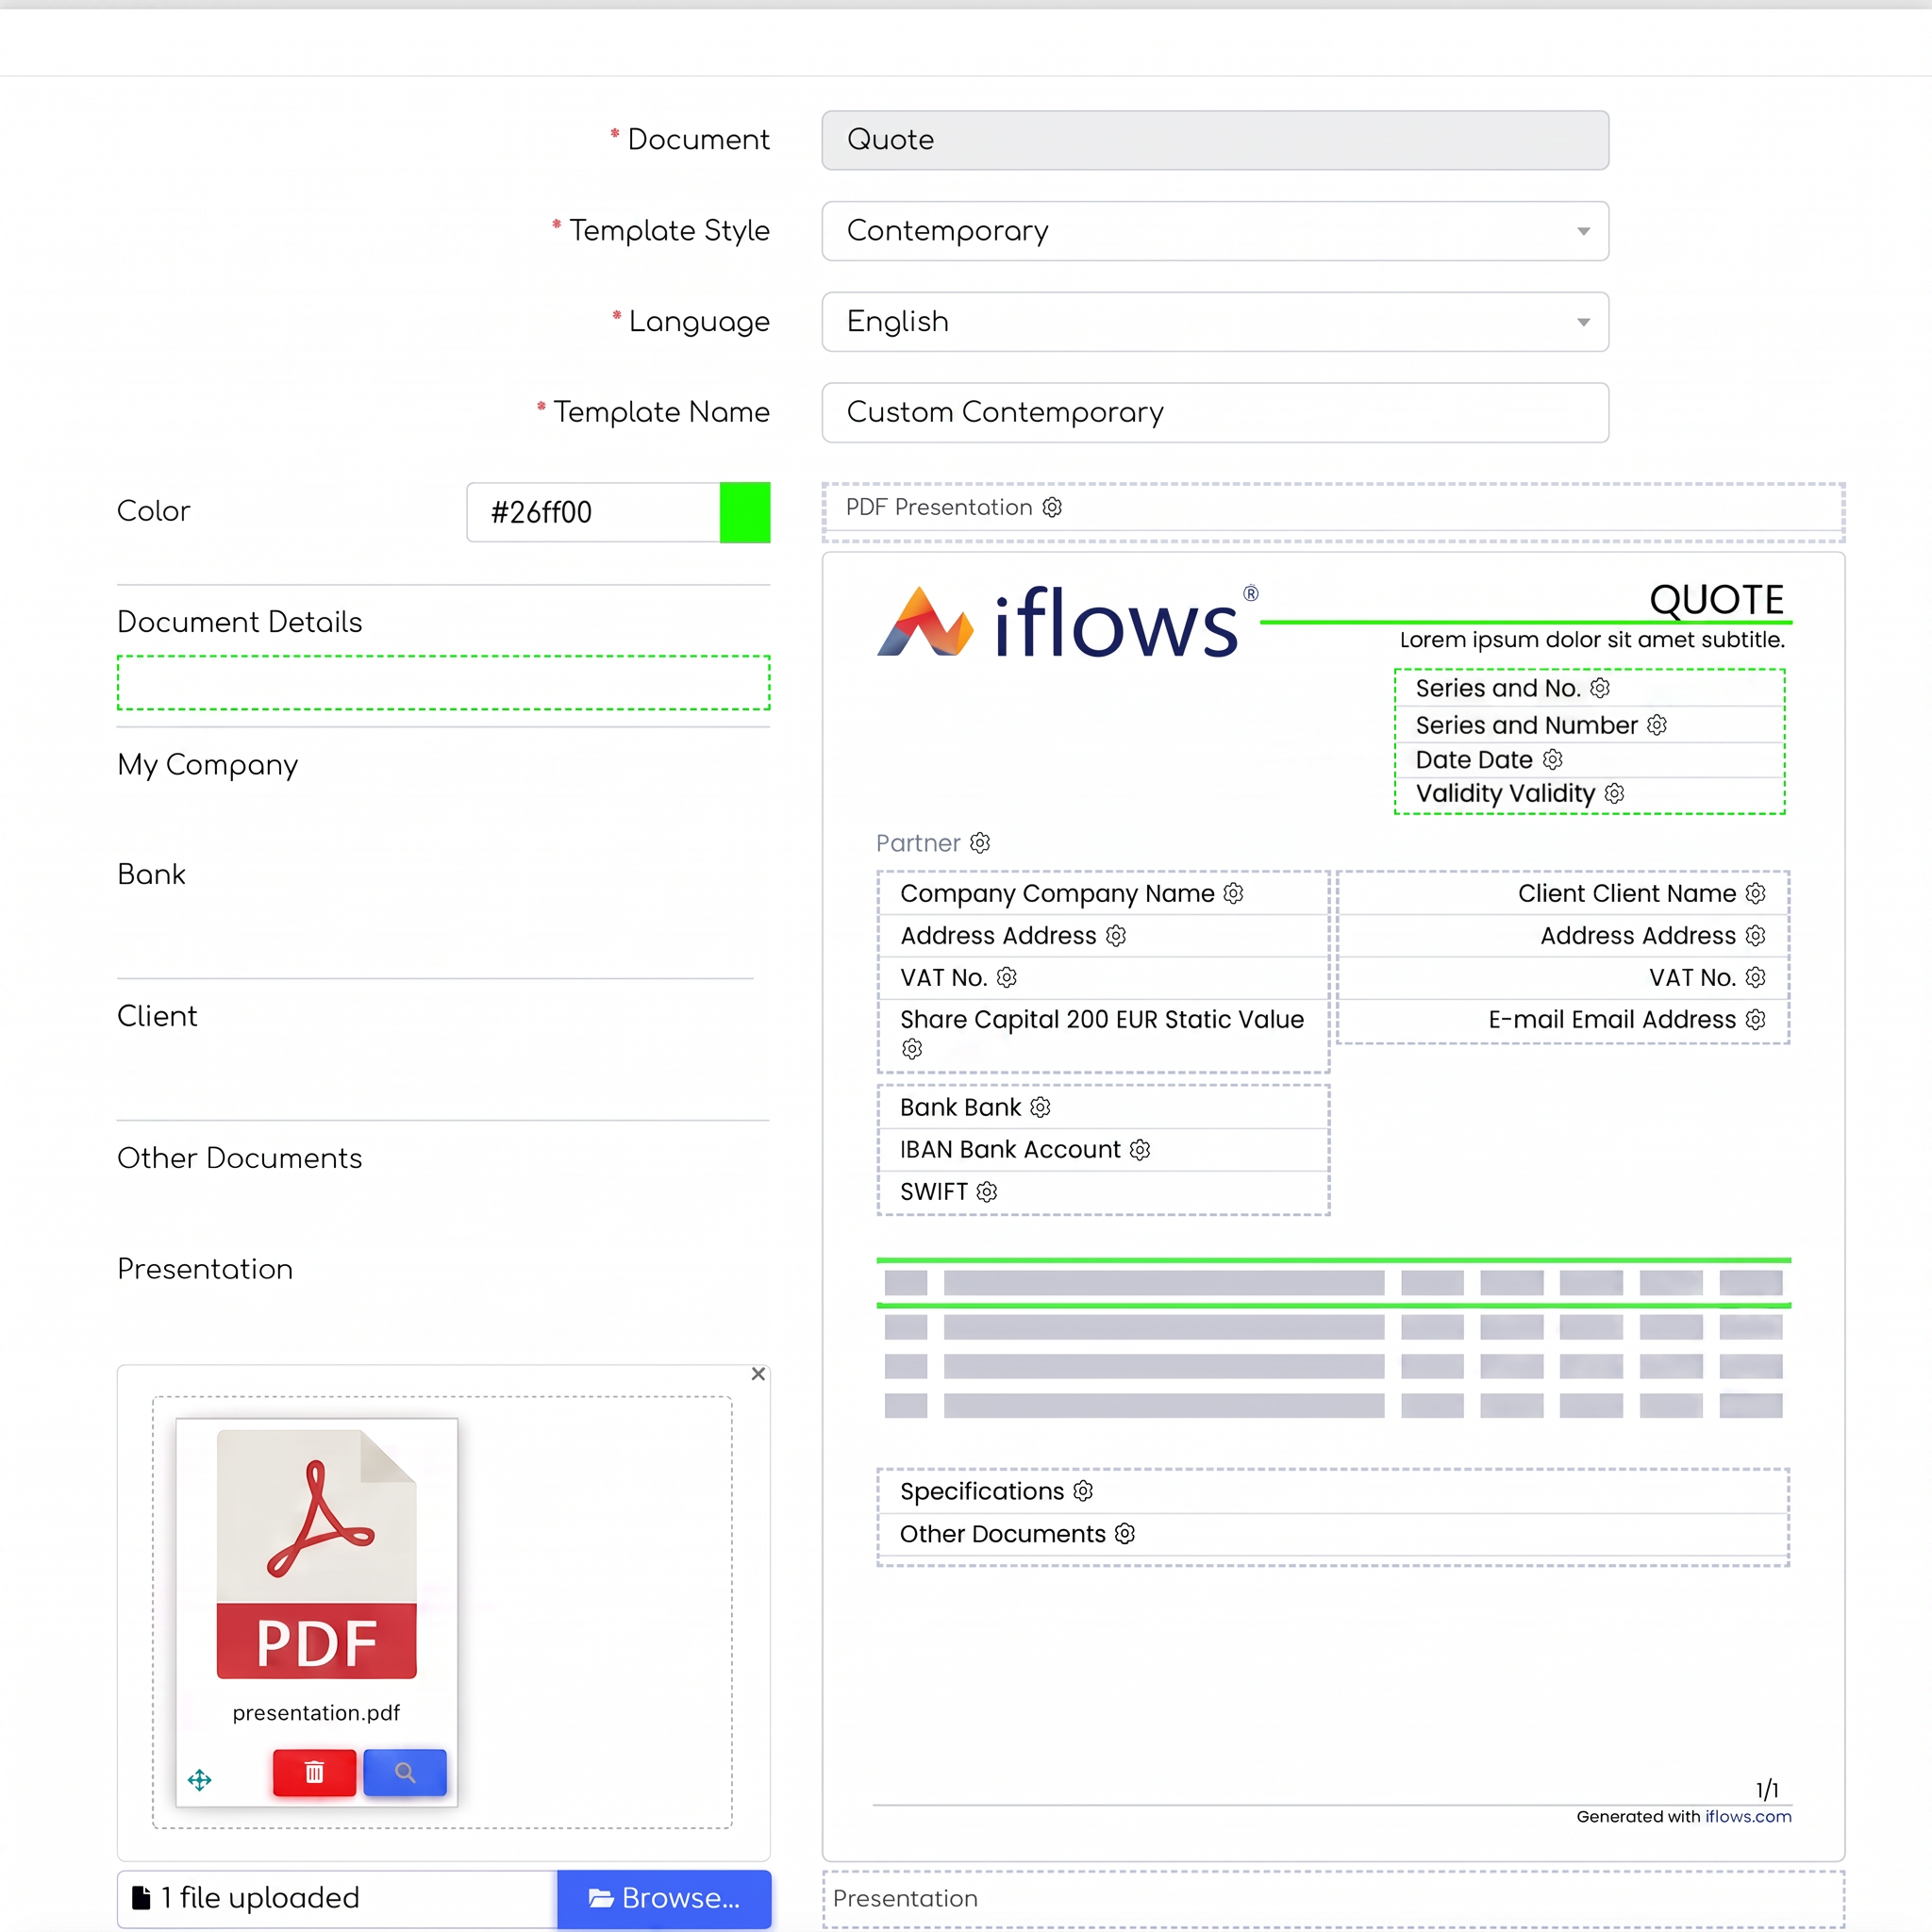
- Template Style: Select between Contemporary or Modern styles, depending on your preference.
- Language: Choose the language in which you want the PDF to be generated.
- Template Name: Enter a name for the newly created template. This helps you organize and quickly identify created templates.
- Customize Color:
- Click on the colored box next to the "Color" section to open the color picker.
- Choose the desired tone and shade for the PDF quotation.
- The chosen color code will be visible in the box, making it easy to reuse.
- Add Fields to the Quotation:
The quotation is initially empty, without any fields included.
Choose the desired fields from the following categories:- Document Details: Series and number, version, date, validity.
- My Company: Company name, address, CIF (Tax Identification Number), Static Value.
- Bank: Bank, bank account, SWIFT.
- Client: Client address, client name, client CIF, client email address.
- Other Documents: Other documents, specifications.
- Presentation: Presentation files that will be inserted before or after the actual quotation.
- Customize Field Order and Naming:
- Drag and drop fields from the boxes on the left into the PDF quotation. The field where they can be placed will be colored green to indicate available areas.
- You can organize the fields in any order you prefer.
- After placing a field, click on the gear icon next to it to give it a custom name that will appear in the quotation. If you do not give it a name, only the field value will appear. For example, if you insert the "Client Name" field and do not name it, then only the name will appear in the quotation, e.g.: CLIENT DEMO SRL. If you write a title, e.g.: "Client Name", then "Client Name: CLIENT DEMO SRL" will appear on the quotation.
- Using Static Value:
- The "Static Value" option allows you to enter any other information about the company that is not already found in the existing options.
- Enter the static value, click on the gear icon and rename it as you wish, for example: "Social Capital 200 EUR". This will remain on that template for future use.
- Adding a PDF Presentation:
- The presentation can be inserted both at the beginning and at the end of the quotation.
- Presentation files can include, for example, an illustration of the company's mission and values. Furthermore, you can create multiple templates, each containing a presentation of the product category you are selling. For example, a template for office furniture can start with a presentation of the range of tables and chairs. Alternatively, you can include a general company presentation, providing an overview of the entire range of products and services.
- Export Customization Options:
- At the bottom of the page, you have PDF export options for the information in the quotation, which you are already familiar with. These options can be saved as defaults in relation to the created template.
Set the Default Template:
- You can set the created template as default by going to Settings -> Quotations -> Template.
- Choose the template you will use most often to set it as default.
Using the Template when Creating a New Quotation:
- When you create a new quotation, you will find the "PDF Template" field filled with the default template, but this can be changed if needed.
- After you have created the quotation and saved it, you can download the PDF or send it directly to the client.
Don't forget the existing feature: Detailed Product Viewing Functionality:
When the client clicks on the image associated with the product in the quotation, a page will open where they can see:
- All product images.
- Technical data sheet.
- Available colors.
- Any other documents associated with that product.
Automatic Cost Calculation from Quotation
The Calculate Costs from Quotation functionality in iflows allows users to automatically calculate costs associated with products in the quotation after it has been saved.
How to Use:
- Creating and Saving the Quotation:
- Start by creating a new quotation, adding all necessary products and details.
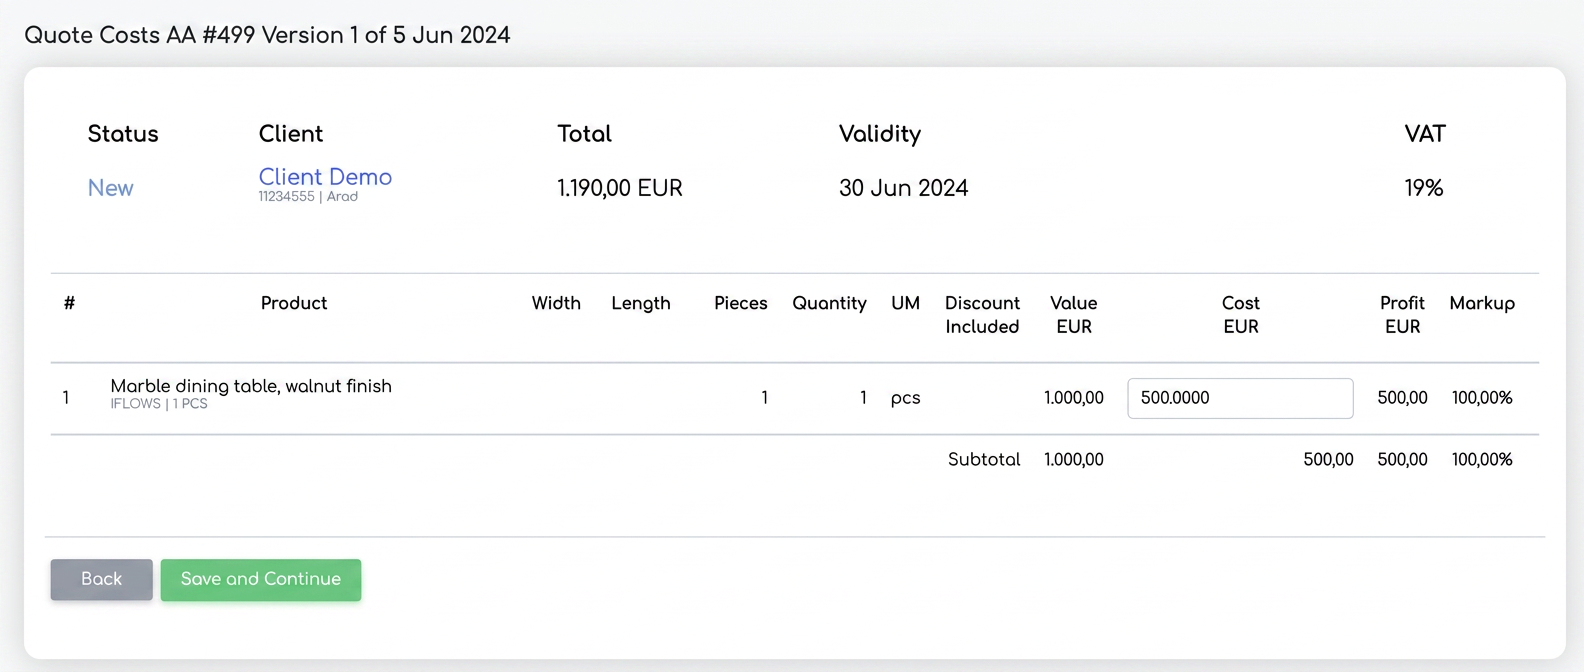
- After adding all required information, press the "Save and Continue" button to save the quotation.
- Accessing the Cost Calculation Functionality:
- After saving the quotation, you will notice the "Calculate Cost" button appearing at the bottom of the page.
- Click this button to start the cost calculation process.
- Configuring and Customizing Costs:
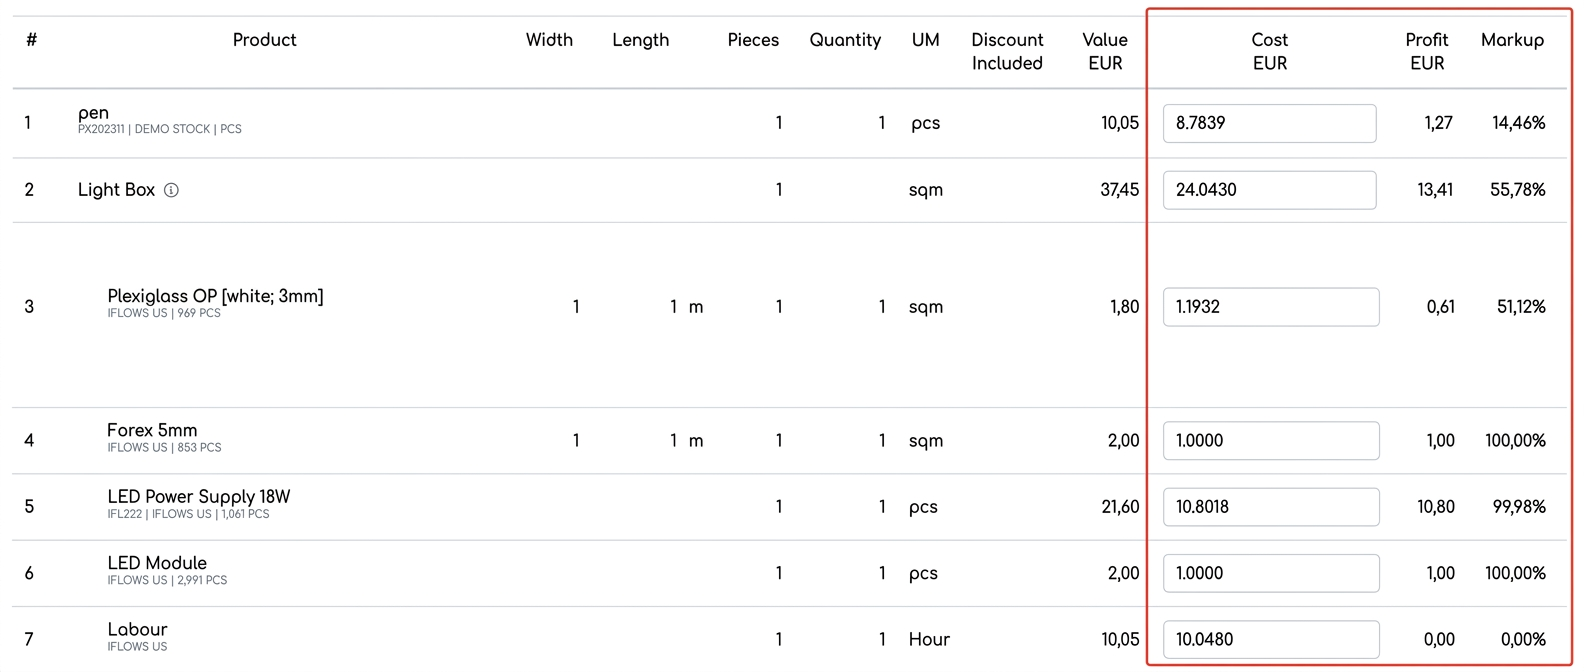
- The system will automatically calculate costs for each product included in the quotation and will generate a special column to illustrate them.
- Verify and adjust, if necessary, the cost price of the products.
Export Quotation to Excel
The Ability to Export Quotation to Excel functionality allows users to quickly and efficiently export created quotations into Excel format. This facilitates handling quotation data outside the iflows platform.
How to Use:
- Accessing the Quotations Section:
- Navigate to the Quotations section from the main menu of the iflows platform.
- Viewing the Quotation:
- Select the quotation you want to export and click on the view option.
- Exporting Quotations to Excel:
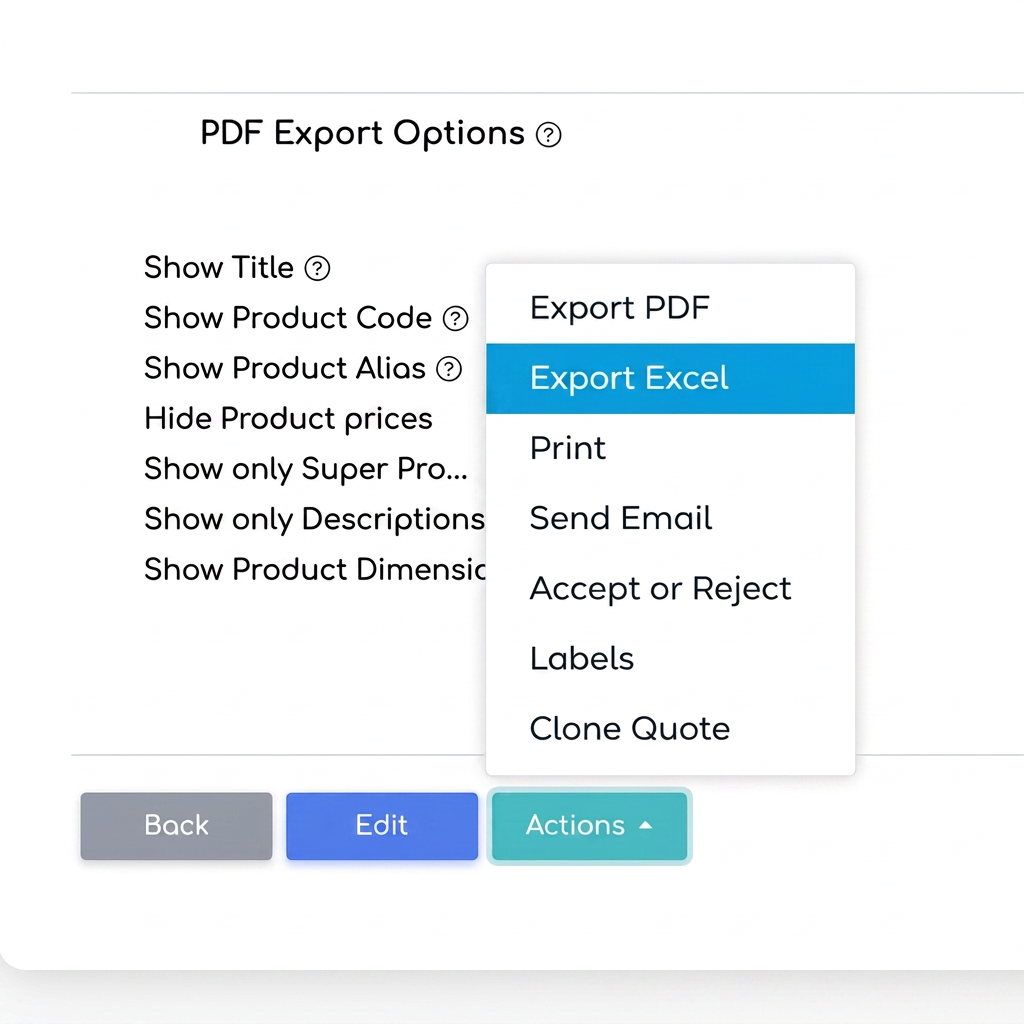
- At the bottom of the quotation view page, click on the Actions button.
- From the dropdown menu, select the "Export Excel" option.
- The system will automatically generate an Excel file containing all details of that quotation.
Associating Invoices for Delivery Notes
To associate invoices with delivery notes, follow the steps below. This functionality is particularly useful when a partial delivery note is made and the invoice is generated directly from the order.
How to Use:
- From the main menu, navigate to the Sales section and select Delivery Notes to view all available delivery notes.
- Associate the Invoice:
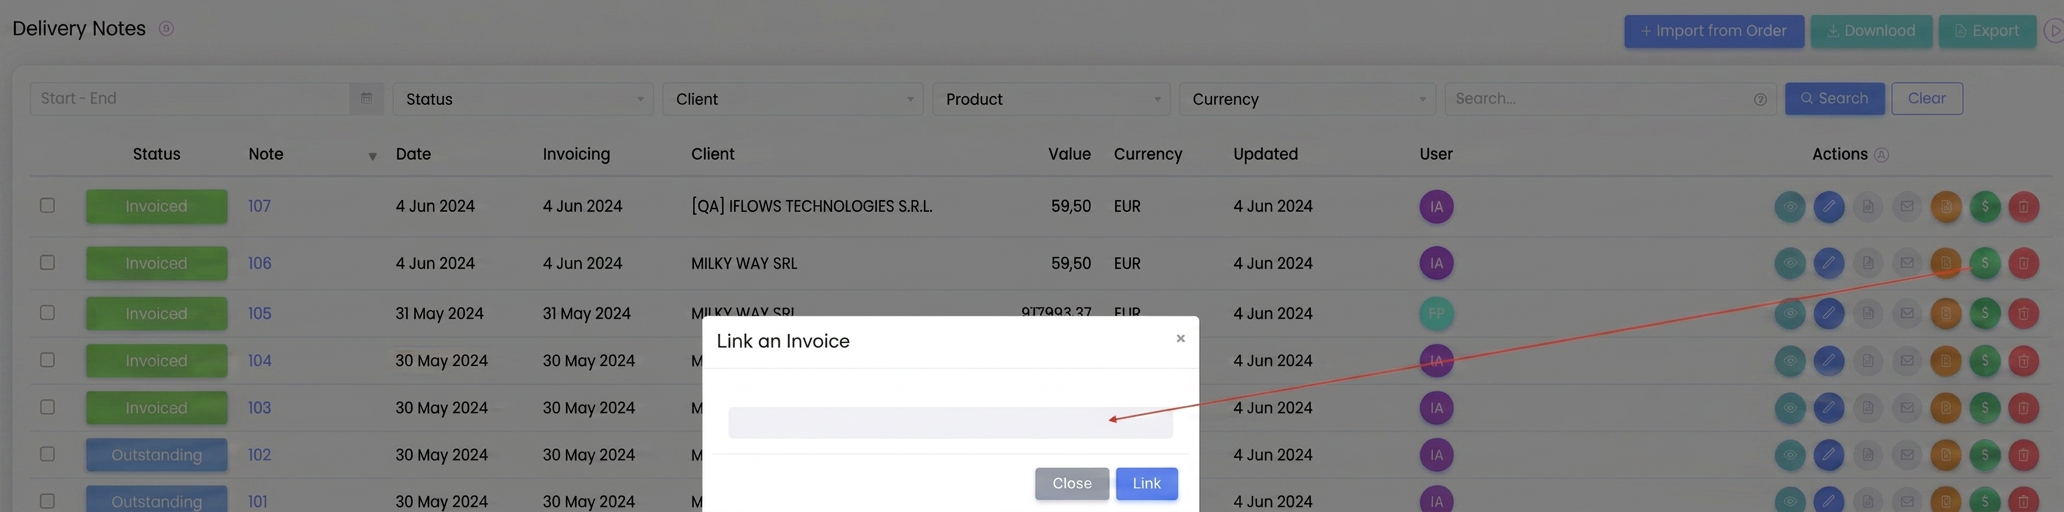
- Next to the desired delivery note, click on the green symbol (dollar icon) in the Actions column.
- The Associate an Invoice pop-up window will open.
- Select the desired invoice from the available list and click on the Associate button to complete the process.
Adding SWIFT Code to Bank Account
Adding the SWIFT code to bank accounts allows for error-free international transactions, ensuring the accuracy and compliance of banking information.
How to Use:
- Access the Global Settings Section:
- From the main menu, navigate to the Settings section and select Global.
- Configuring the Bank Account:
- Within the global settings, find the section dedicated to bank accounts.
- Next to the desired bank account, fill in the SWIFT field with the corresponding code.
- Ensure all other information (such as account name, currency, and bank name) is correctly filled in.
- Saving the Configuration:
- After you have entered the SWIFT code and verified the other information, save the changes to update the bank account settings.

e-Factura Optimization
If you have suggestions or ideas that could bring improvements to the iflows platform, we encourage you to send us feedback. We are dedicated to continuous improvement and assure you that all suggestions will be carefully evaluated.