
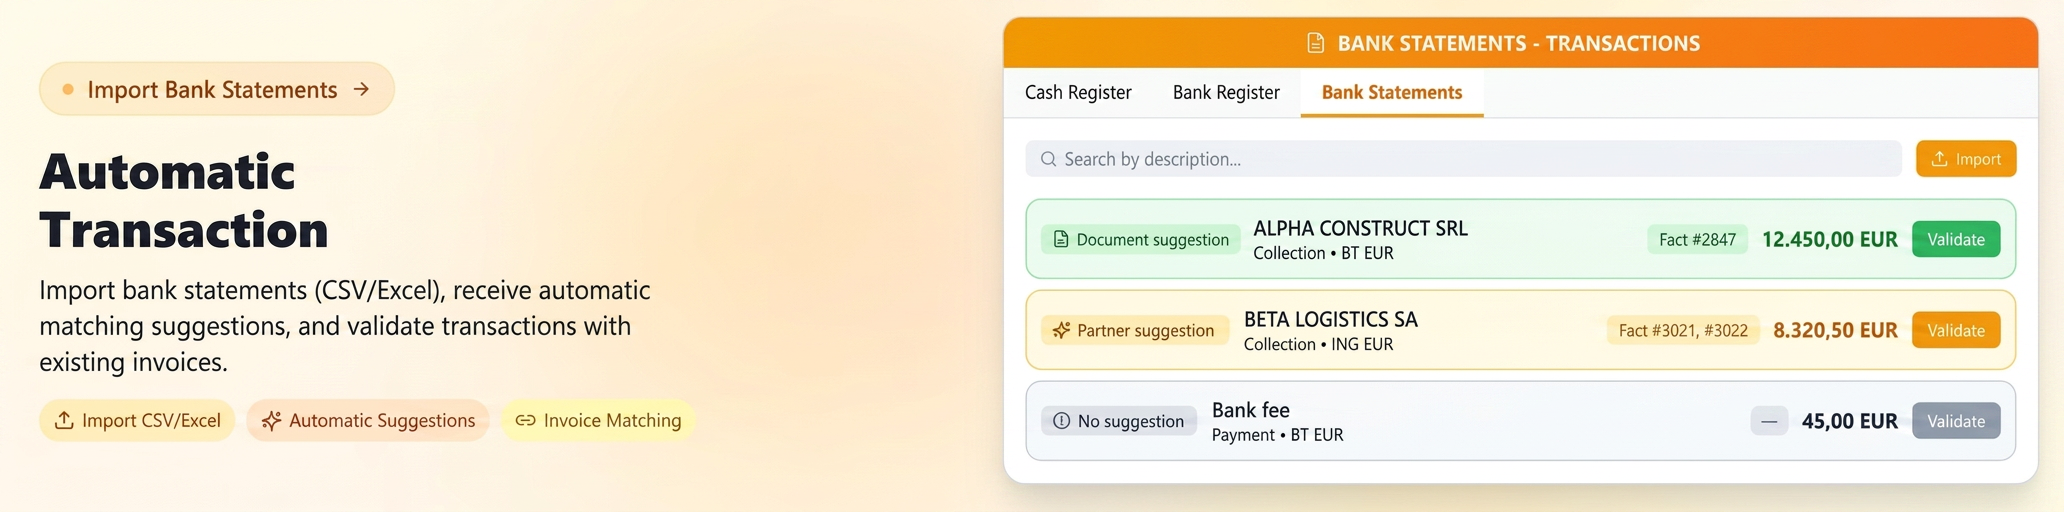
To eliminate manual and repetitive work of entering receipts and payments, there is a dedicated module called Bank Statement Import. This functionality allows you to upload files exported from your bank and automatically or semi-automatically reconcile transactions with existing invoices in iFlows.
Where to find it:
Access the Financial -> Transactions menu, where you will find the new tab named "Bank Statements".
Workflow steps:
1. File Import:
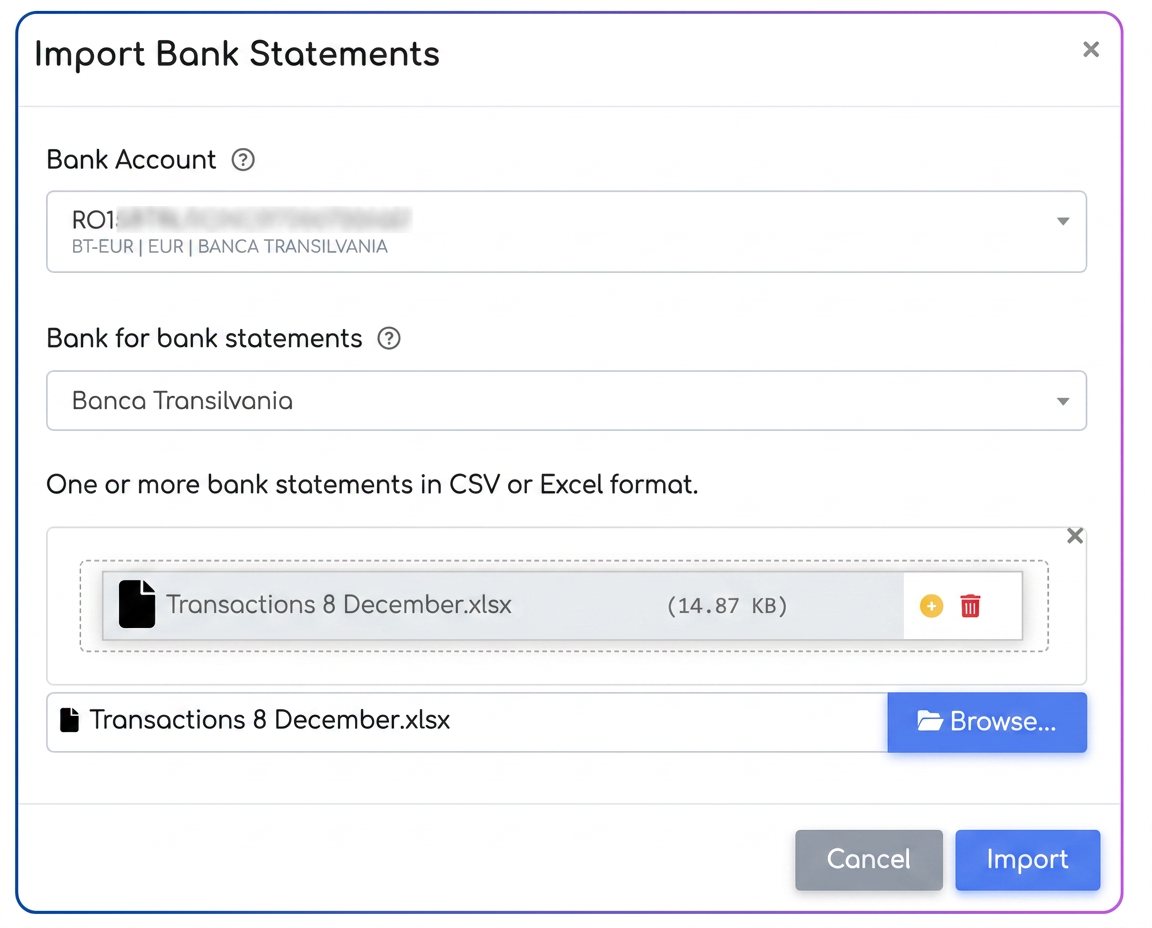
- Press the import button and upload the bank statement in digital format (CSV or Excel).
- Select the bank account registered in iFlows on which you want to perform the import.
- Select the Bank from which the statement originates (so the system can recognize the column structure).
- After importing, all lines from the statement will be displayed in a waiting list, ready for your validation.
2. Validation Interface (Columns and Information):
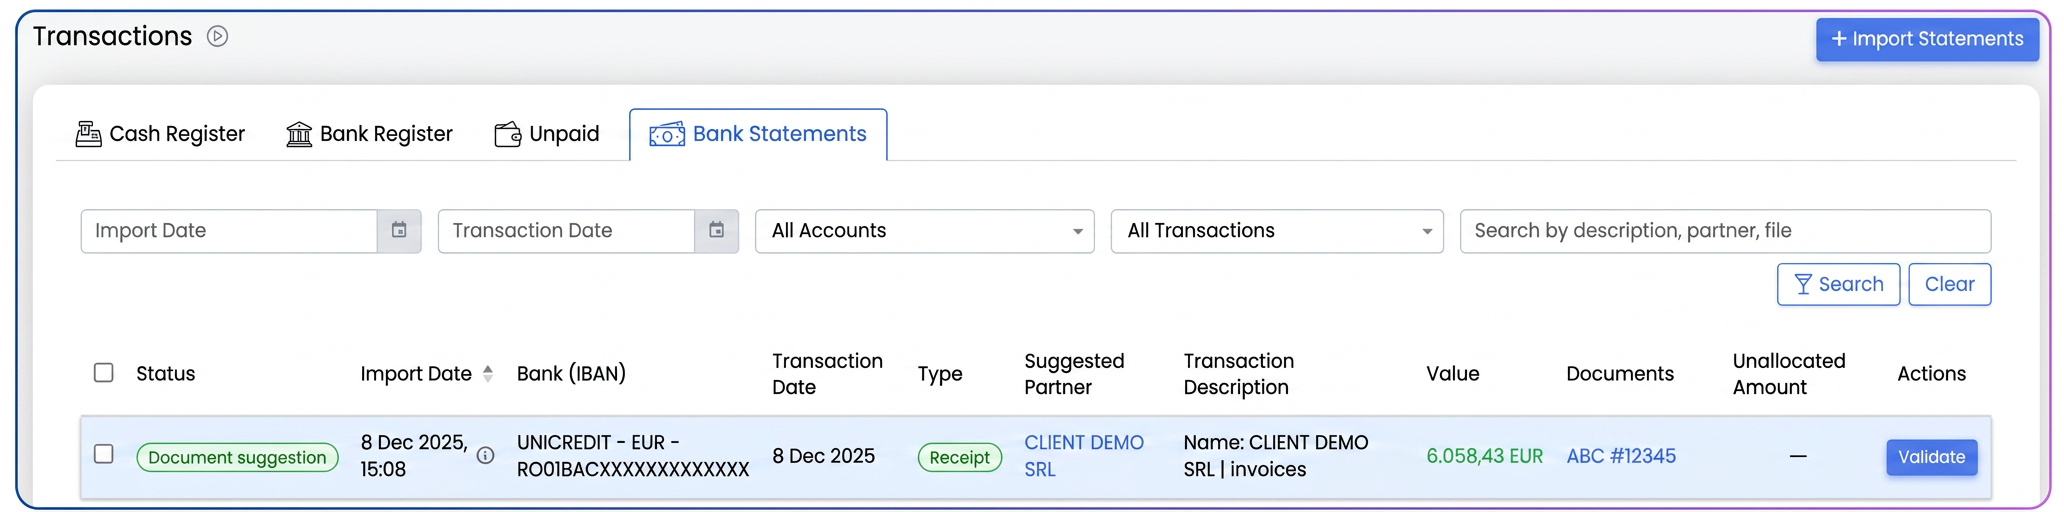
On the statements page, each imported transaction is detailed through the following columns:
- Status: Visually indicates if the system found a match. An active status signals that there is an association recommendation (identified partner or invoice).
- Import Date: The date you uploaded the file to the platform.
- Bank (IBAN): The account associated with the transaction.
- Transaction Date: The actual date of the payment/receipt from the statement.
- Type: Nature of the operation (Receipt or Payment).
- Suggested Partner: The name of the partner identified by iFlows based on statement information (where the bank provides this data).
- Transaction Description: The raw explanatory text taken from the bank statement (e.g., "Payment inv 123", "Commission").
- Value: Total amount of the transaction.
- Documents: Suggested invoices for reconciliation.
- Unallocated Amount: This field is critical in the validation process. If there is an association recommendation but the transaction value differs from the value of the selected invoices, the difference will be displayed here (excess balance or remaining payment).
- Actions: Buttons for validating or deleting the line.
3. Validation Process:
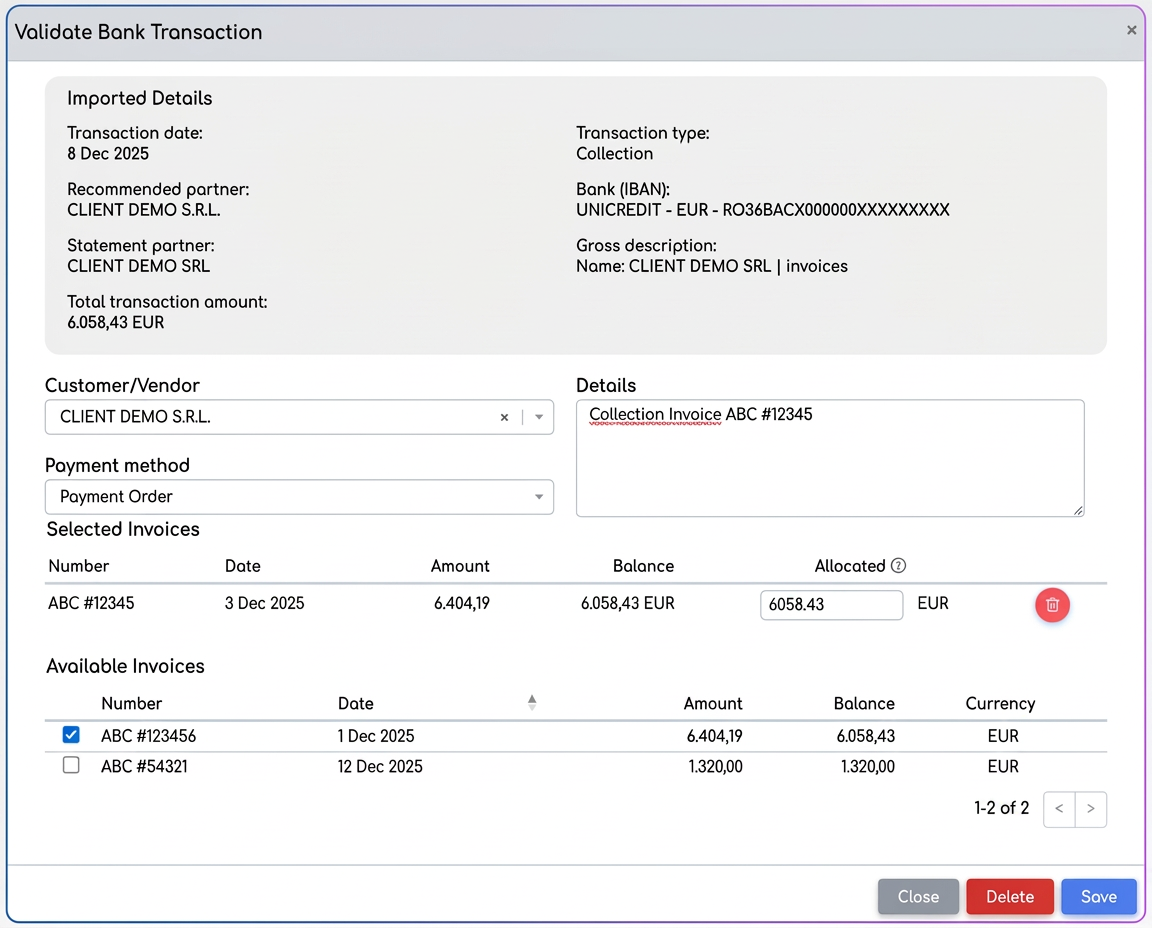
To process a line from the statement, press the "Validate" button. In the window that opens, you will encounter two situations, depending on the information identified by the system:
- A. Without Automatic Suggestions (Manual Validation):
If the system could not automatically associate the transaction, you will need to manually complete the following fields before finalization:- Partner: Select the corresponding customer or supplier.
- Payment Method: Choose the specific type of bank transaction (e.g., Payment Order, Card Payment, or other methods defined in your system).
- Select Invoices: Manually check the invoices (one or more) that you wish to receive or pay through this transaction.
- Press Validate.
- B. With Suggestions (Fast Validation):
If the system has identified the partner and invoices (based on statement details), the fields will be pre-filled.
In this case, your action is limited to verifying the accuracy of the suggested information and confirming the operation by pressing the Validate button.
Note: After validation, the transaction disappears from the "Bank Statements" list and is automatically transferred to the Bank Register, behaving like a standard transaction.
Recommendation for maximum success rate:
The "Smart Matching" system relies primarily on identifying the invoice number. To fully automate the process, recommend your customers to specify the invoice number in the payment details, and apply the same rule when making payments to suppliers.
Obtaining the CSV/XLS file from the banking application
To use the Bank Statement Import function, it is necessary to export bank transactions from your bank's online application (HomeBank, Internet Banking, or the web platform provided by the bank).
It is important to mention that in most cases, the required file is not downloaded from the "Bank Statements" section, but from the "Transactions" or "Transaction History" section, as that is where export options in CSV or Excel (XLS/XLSX) formats are available.
Differences between banks
Each bank has its own interface and menu naming conventions, which is why the exact location of the export button may vary.
For example:
• Some banks allow direct export to CSV format from the "Current Transactions" screen.
• Others offer export only after selecting a period (e.g., last 30 days).
• In certain cases, the option is visible only on the desktop version of the application, not on mobile.
Recommendation for obtaining the correct file
To avoid confusion and ensure you download the format compatible with iFlows, we recommend proceeding as follows:
- Access the bank's online platform.
- Navigate to the Transactions / Transaction History section, not "Statements".
- Look for Export / Download options.
- Select CSV or XLS format.
- If you cannot identify the option, contact the bank and ask:
"From which section can I download my account transactions in CSV or Excel format for a specific period?"
The bank will point you to the correct section depending on the platform you are using.
Questions and Answers
1. Which banks are compatible with statement imports?
The module supports importing statements from: Banca Transilvania, BCR, CEC Bank, Raiffeisen, ING, Unicredit, Garanti, First Bank, and Libra Bank.
2. If the invoice number is not in the payment description, can the system still suggest an association?
Yes. If there is an invoice in iFlows with the exact same amount as the transaction in the statement, the system will automatically suggest it.
3. What does the "Unallocated Amount" field represent?
"Unallocated Amount" represents the difference between the transaction value and the total of the associated invoices.
Example: if the customer paid 1,000 EUR and the associated invoice is 800 EUR, the system will display 200 EUR as an unallocated amount. These 200 EUR become an excess balance (advance) in the register.
4. What do I do if the transaction amount is smaller than the invoice value (partial payment)?
Select the invoice in the validation window and allocate the entire amount; the system will automatically mark the invoice as "partially paid", and the difference will remain as an outstanding balance.
5. What do I do if the transaction amount is larger than the invoice value?
The difference will be considered an excess balance, recorded as a prepayment for that partner.
6. Can I intentionally leave an unallocated difference? What happens to it?
Yes. The difference remains recorded as an excess balance, and you can subsequently allocate it to any invoice you want, at any time.
7. Can I cancel the validation if I associated the transaction incorrectly?
Navigate to , select the validated transaction, and you can edit it for the correct adjustment.
8. Can I import statements for multiple IBAN accounts from the same file?
No. Each imported file must correspond to a single bank account.
9. Is there a dedicated permission for accessing statements?
No. Access to statements is automatically obtained through the access permission for the Transactions tab. Anyone who can see Transactions can also see Statements.
10. What happens if the invoice is already marked as collected manually? Will the system still suggest it?
Yes. If the transaction amount matches and matching criteria exist, the system may still suggest the invoice, even if it has already been manually collected.
11. Why are some lines in the statements marked in green and others in red?
• Green = receipts
• Red = payments
It is a visual differentiation to facilitate validation.