New: Advanced stock transformation function (Increase/Decrease, Assembly/Disassembly, Transformation)
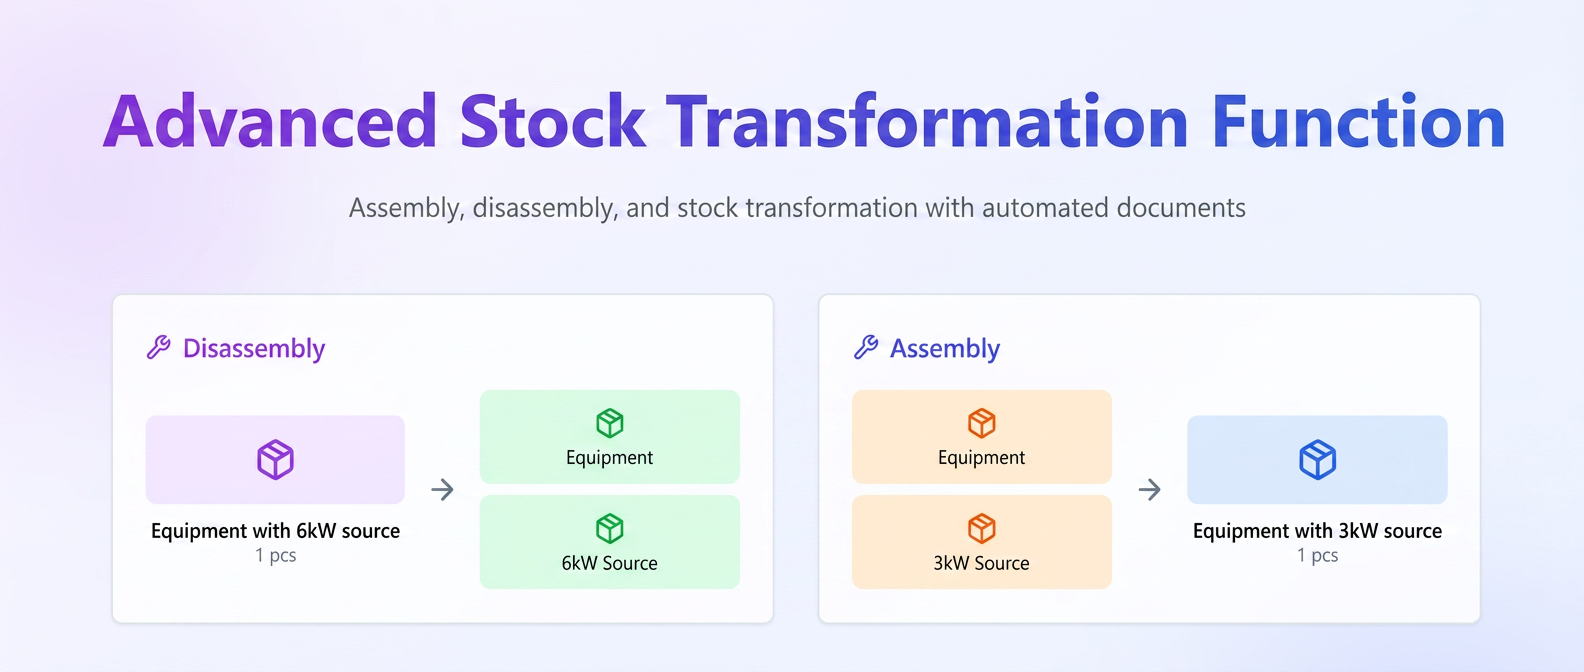
The Stock Transformation function has been completely redesigned to cover complex management scenarios where existing products in stock are converted, combined, or disassembled into other products.
How to access
The function is available from the menu:
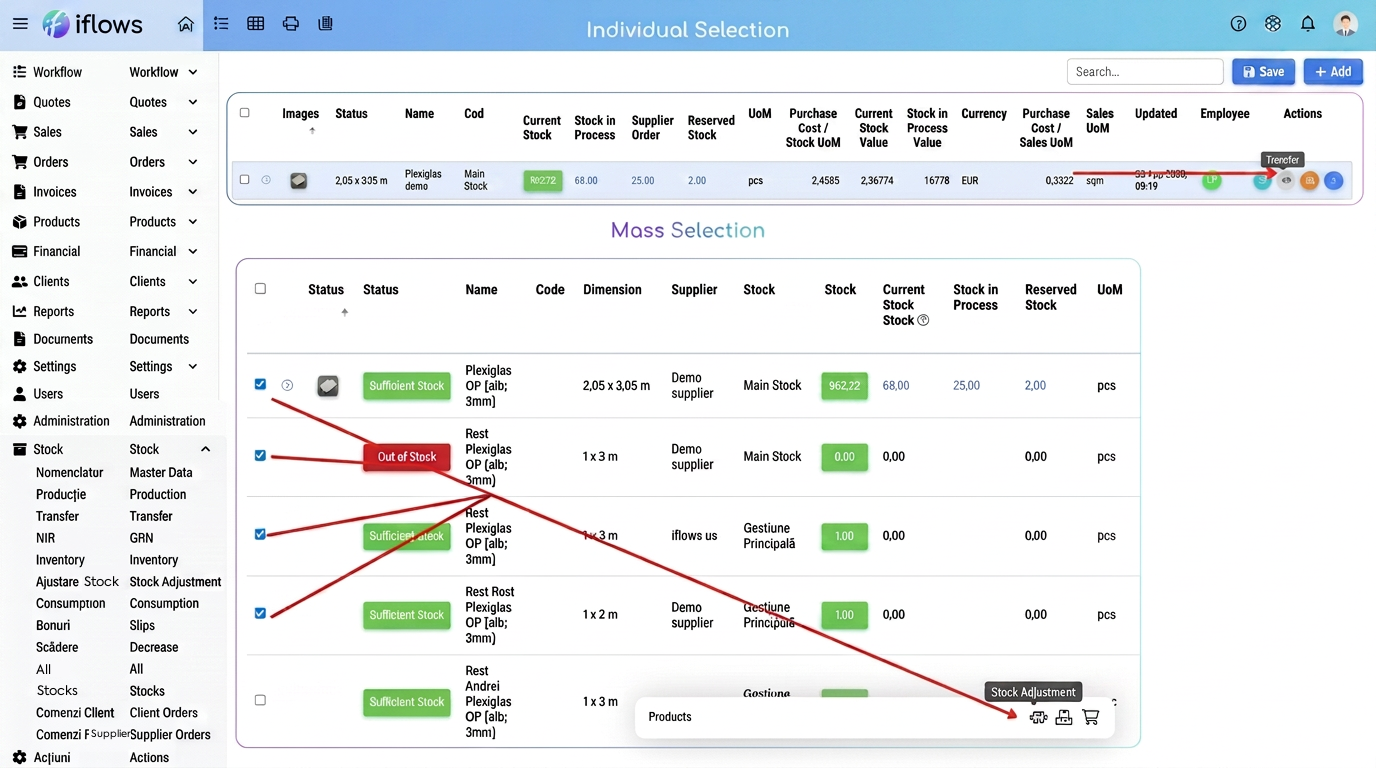
- a) Individual Transformation
Press the "Transformation" 🔁 button next to the desired product.
- b) Bulk Transformation
Check multiple products, then select the "Transformation" action from the bulk actions bar.
Transformation process stages
🔹 Step 1 – Configuring output products
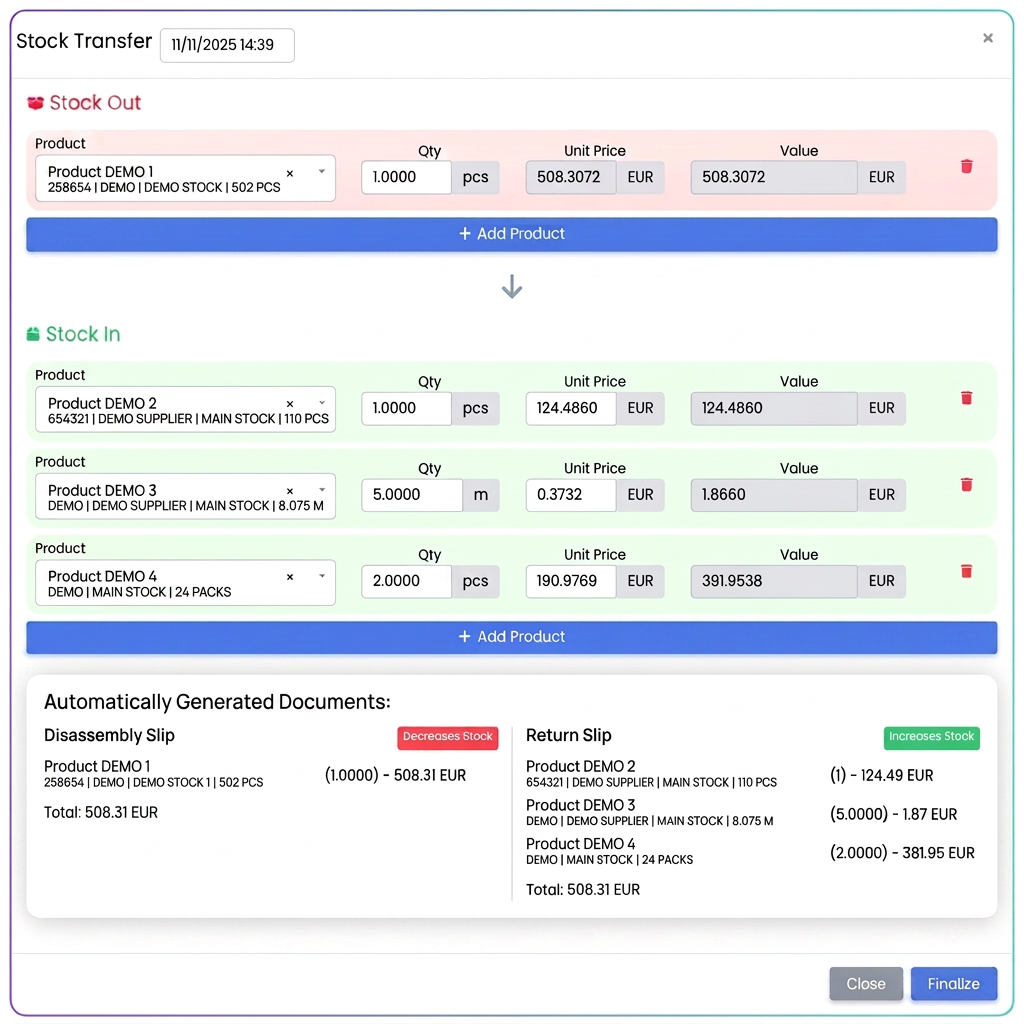
Selected products are automatically added to the "Stock Out" area.
Here, the items being deducted from management are defined — raw material, disassembled product, or components used.
For each output product:
- Quantity is automatically filled according to the selection but can be adjusted.
- Unit value is automatically retrieved.
- Total value (quantity × unit price) is calculated in real-time and represents the total output value.
🔹 Step 2 – Adding resulting products (Stock In)
In this section, products obtained from the transformation are entered — either components or the resulting finished product.
For each product entered:
- Quantity is filled manually.
- Unit price is automatically filled by the system.
- Total value is automatically calculated.
➡️ The user can manually modify the unit price or total value, such that:
Total input value = Total output value
This adjustment allows the redistribution of costs between the resulting products without altering the overall balance of the operation.
The system automatically recalibrates all values upon saving to maintain accounting consistency.
🔹 Step 3 – Checking value balance
At the bottom of the window, the correspondence between the following is displayed in real-time:
- total products out (deducted from stock),
- total products in (added to stock).
We recommend that the operation be validated only when the balance is perfectly equalized.
🔹 Step 4 – Document generation
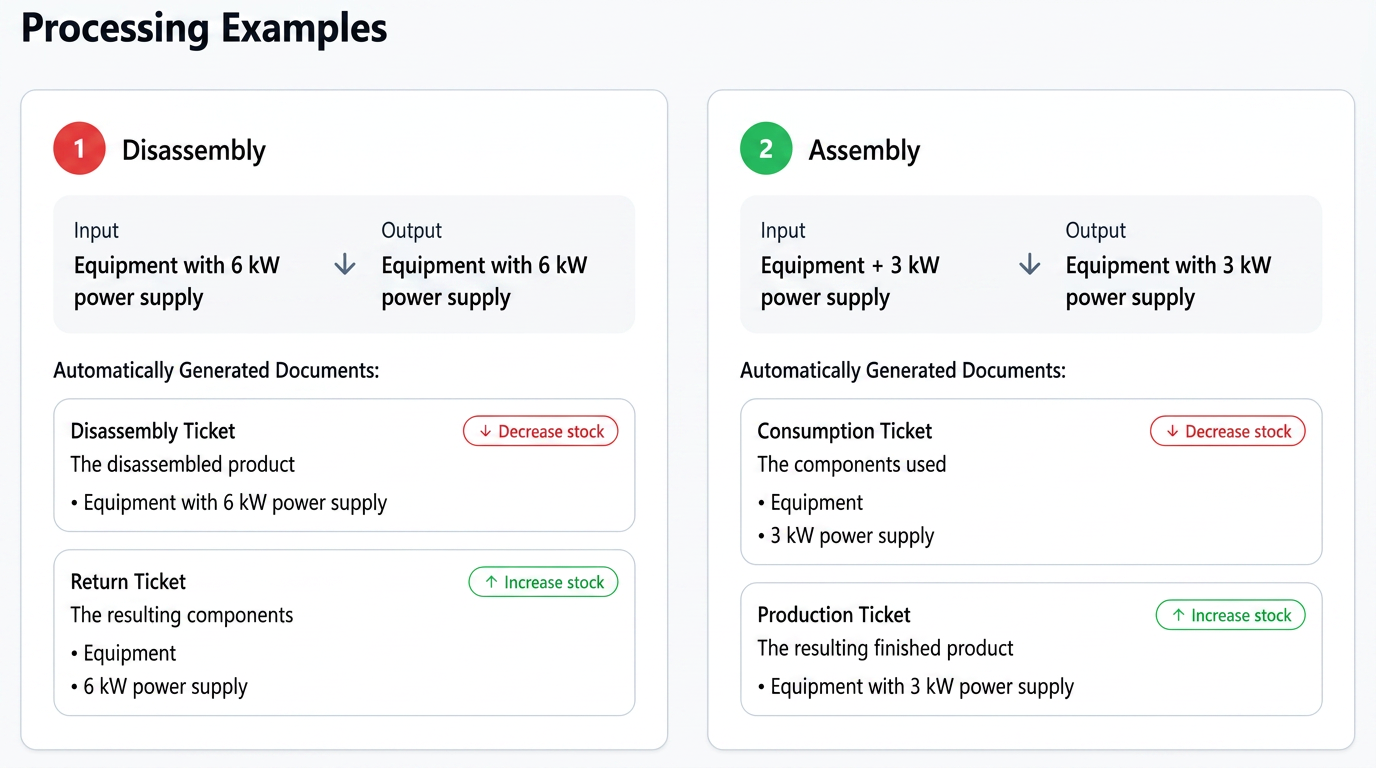
After completion, the system automatically generates:
- Bon de Dezasamblare / Consum (Disassembly / Consumption Slip),
- Bon de Restituire / Producție (Restitution / Production Slip),
- Proces Verbal de Transformare (PV) (Official Transformation Report),
all numbered and interconnected.
Documents are automatically filled with the values corresponding to each movement, ensuring full cost traceability.
Document management
After completion, all documents can be consulted in:
For each record, the following is displayed:
- official report (PV) number,
- date and time of the operation,
- responsible employee,
- direct link to the Disassembly / Restitution / Production Slips.

Important rules:
- Associated slips cannot be deleted individually.
- Deleting the main Official Report (PV) will automatically remove all associated documents.
- The system always ensures full traceability between products, slips, and warehouses.
⚖️ Structural balance principle
In addition to the value balance, the system always maintains the structural balance of the transformation:
On one side (output or input) there will be a single product, and on the other side one or more products.
Thus, the transformation correctly reflects a unified flow:
- either a finished product is disassembled into multiple components,
- or multiple components are assembled into a single finished product.
Optimization: Editable Email Templates at Sending
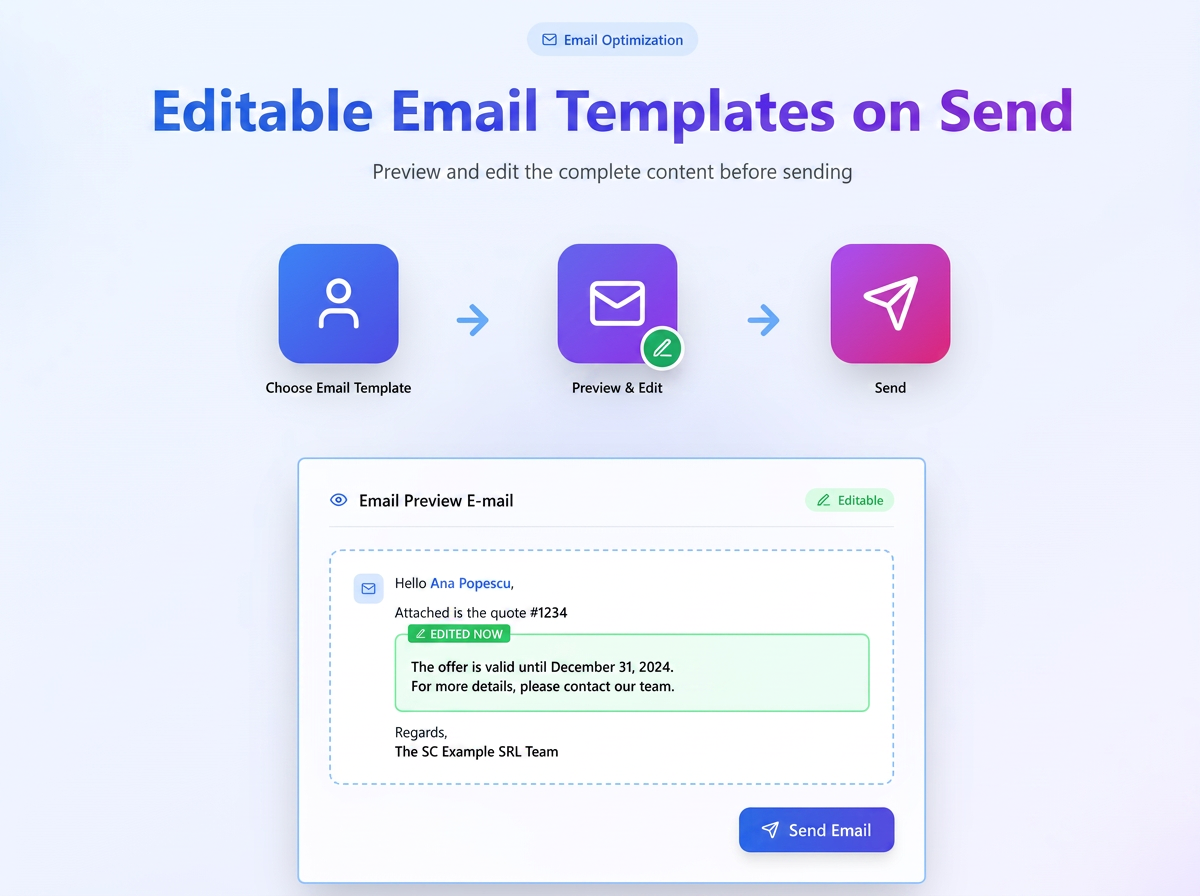
A new option has been introduced that allows editing the full content of an email template directly in the sending window.
Through the new "Editable text at sending" option, users can adapt the content before sending without modifying the base template in the system.
This novelty completely replaces the old {informatii} variable, offering a modern and more intuitive solution.
How it works
Activating the option
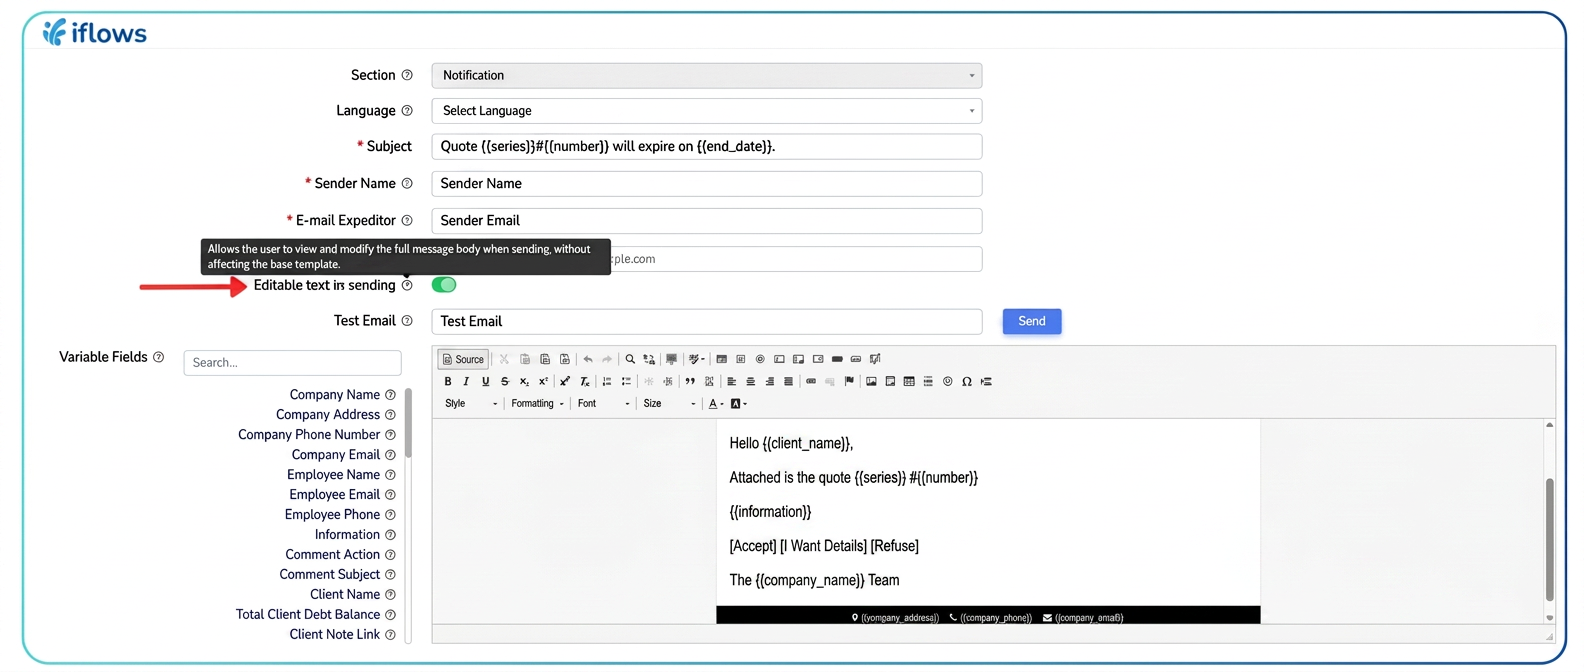
The function is available at the template level:
In the configuration editor, a new option has been added: "Editable text at sending"
Activating this allows users to freely modify the message content at the time of sending.
When the option is active:
- the entire message body becomes editable at sending;
- changes made during sending do not affect the base template;
- original formatting (font, colors, layout, buttons, etc.) is automatically preserved.
Backward compatibility
To ensure a smooth transition, all existing templates that used the old {informatii} variable have been automatically updated:
- the "Editable text at sending" option is enabled by default;
- the behavior remains identical to the previous one, but in a more visual and controlled way;
- no manual intervention is required from users.
Usage when sending an email
When the user selects a template for which the option is active:
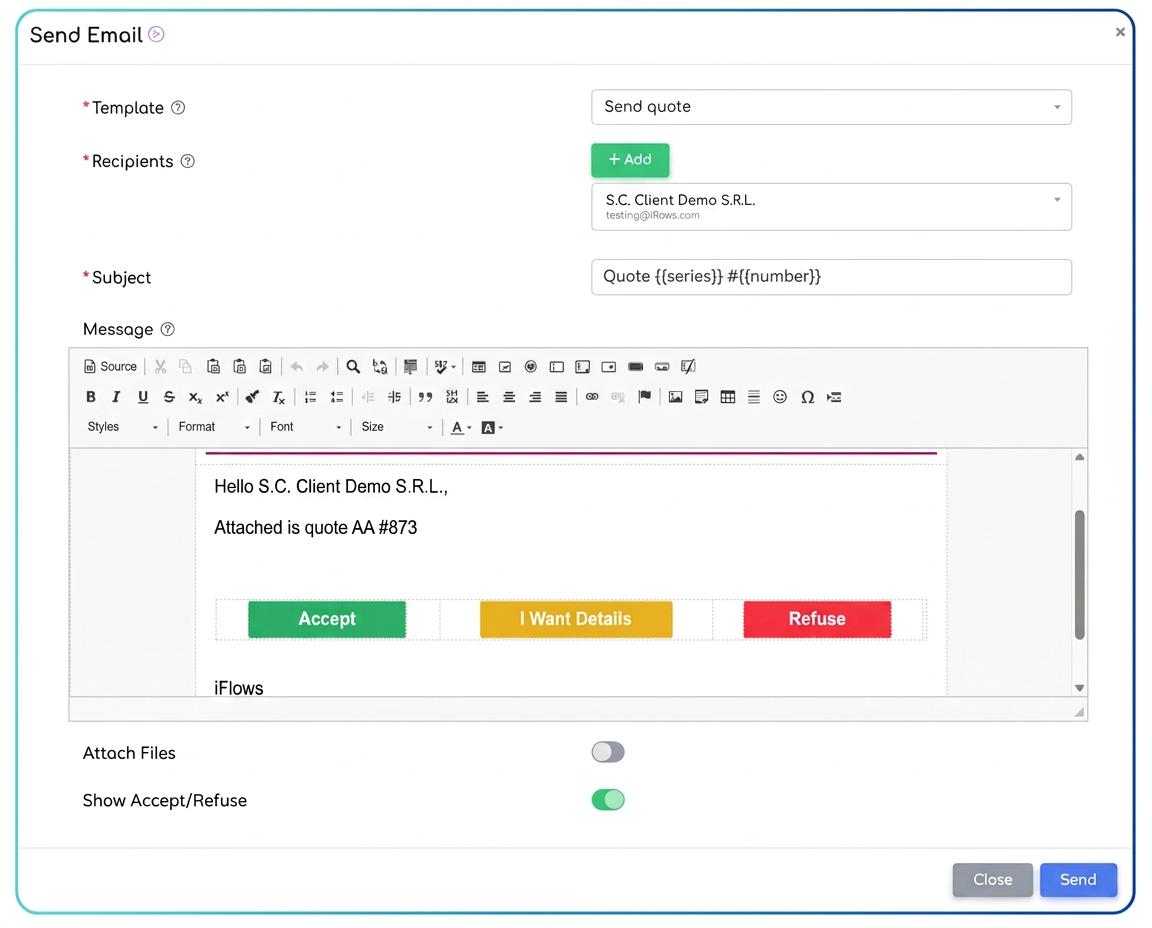
- The full content of the message is loaded directly into the visual editor of the "Send email" window.
- The text is fully editable — sections can be added, deleted, or rephrased without affecting the graphic structure.
- Changes apply only to the current message, keeping the original template intact.
- Manually entered text automatically inherits the formatting style (font, size, color, alignment) of the rest of the email.
🔒 Limitations and rules
- The option applies individually to each email template.
- Templates without this option active will remain non-editable (text is locked at sending).
- The function is available only for users with email sending rights.
Optimization: Bulk Actions for e-Factura
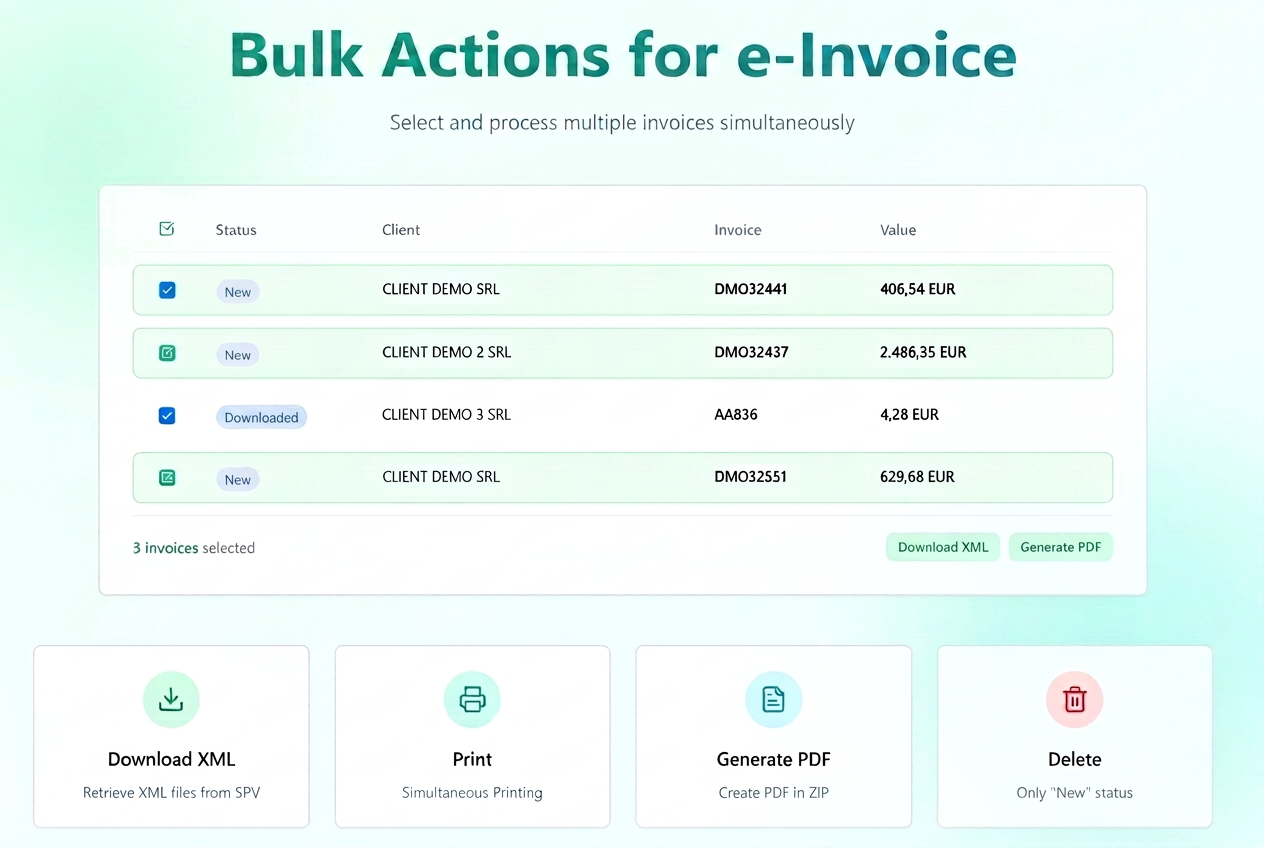
Bulk actions have been introduced in the modules dedicated to e-Factura.
Users can now simultaneously select multiple invoices and apply a common action without repeating the operation for each document individually.
Availability
The functionality is active in the following sections:
- Sent Invoices:
→ e-Factura Tab - Received Invoices:
→ e-Factura
Actions available in bulk mode
After selecting multiple documents, the following actions can be performed simultaneously:
| Action | Description | Effect |
| Download | Automatically retrieves XML files from SPV for all selected documents. | Saves e-Factura files locally. |
| | Opens a preview window for simultaneous printing of selected invoices. | Allows multiple printing. |
| Generate PDF | Instantly creates PDF files for all checked invoices. | PDFs are downloaded locally in an archived file (ZIP). |
| Delete | Removes selected documents from the list. | Irreversible action, available only for invoices with New status. |
How to use
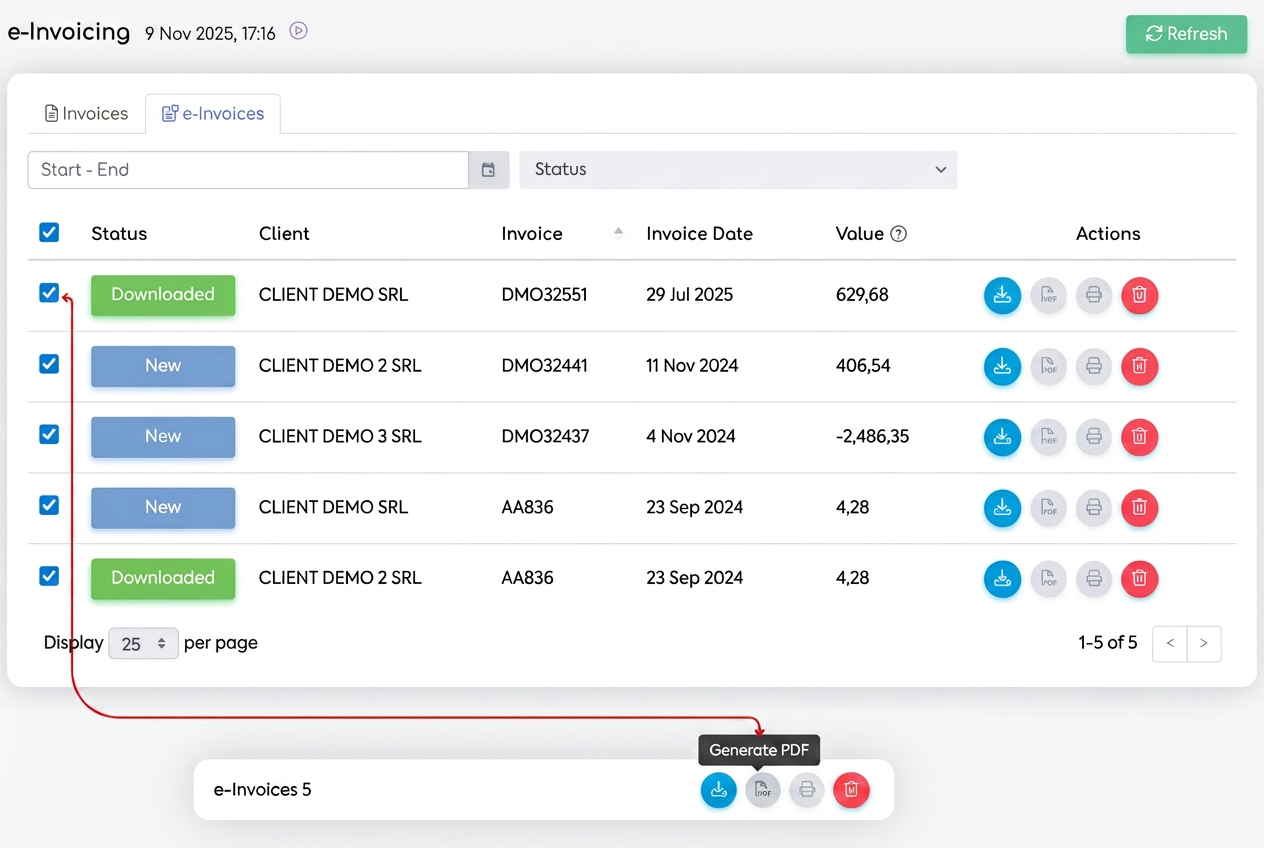
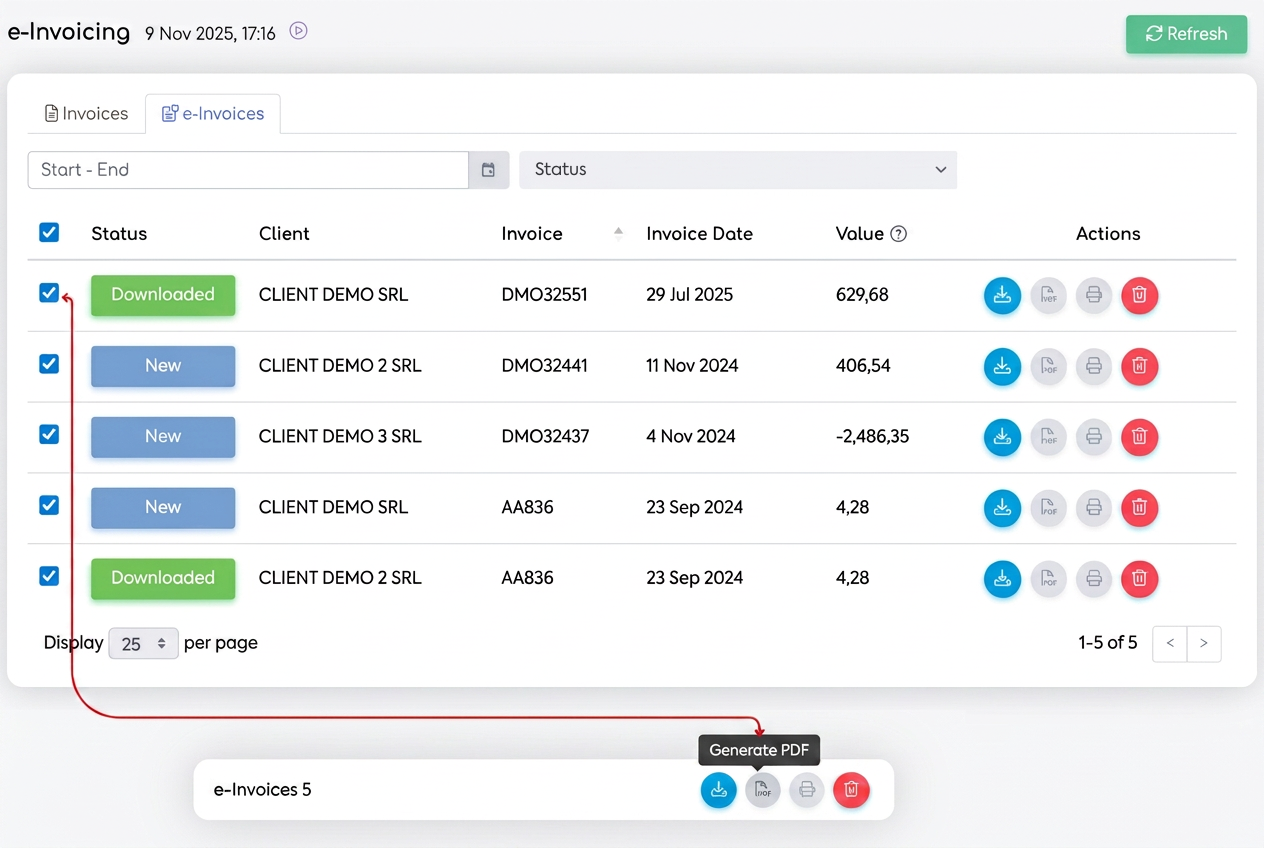
- Navigate to one of the e-Factura tabs (Sent Invoices or Received Invoices).
- Use the selection boxes (checkboxes) on the left side to mark the desired invoices.
- After selecting at least one document, the bottom bulk actions bar becomes active.
- Choose the desired action — for example, "Generate PDF" — to apply it to all selected invoices at once.
Usage examples
- Select all invoices from a certain period to bulk download them.
- Select invoices with New status to simultaneously download them in PDF format.
- Select multiple redundant documents for quick deletion.
⚠️ Rules and limitations
- Actions apply only to invoices visible on the page; for a larger volume, use the "Show X per page" function.
- Invoices with Downloaded or Transmitted status cannot be deleted.
- In the case of massive actions (over 100 documents), processing is done sequentially and may take a few seconds.
Optimization: Generate Orders or Opportunities through Marketing Forms
The functionality of the Forms module ( section) has been extended to provide closer integration between marketing and sales.
If previously filling out a form automatically generated an Opportunity, users can now choose for the same form to directly create a Client Order.
This optimization eliminates intermediate steps and allows for complete automation of the sales flow, from initial interest to order conversion.
How it works
When configuring a form (new or existing), a dedicated field has been introduced — Opportunity / Order, which allows choosing the action that will be automatically executed when a client completes the form.
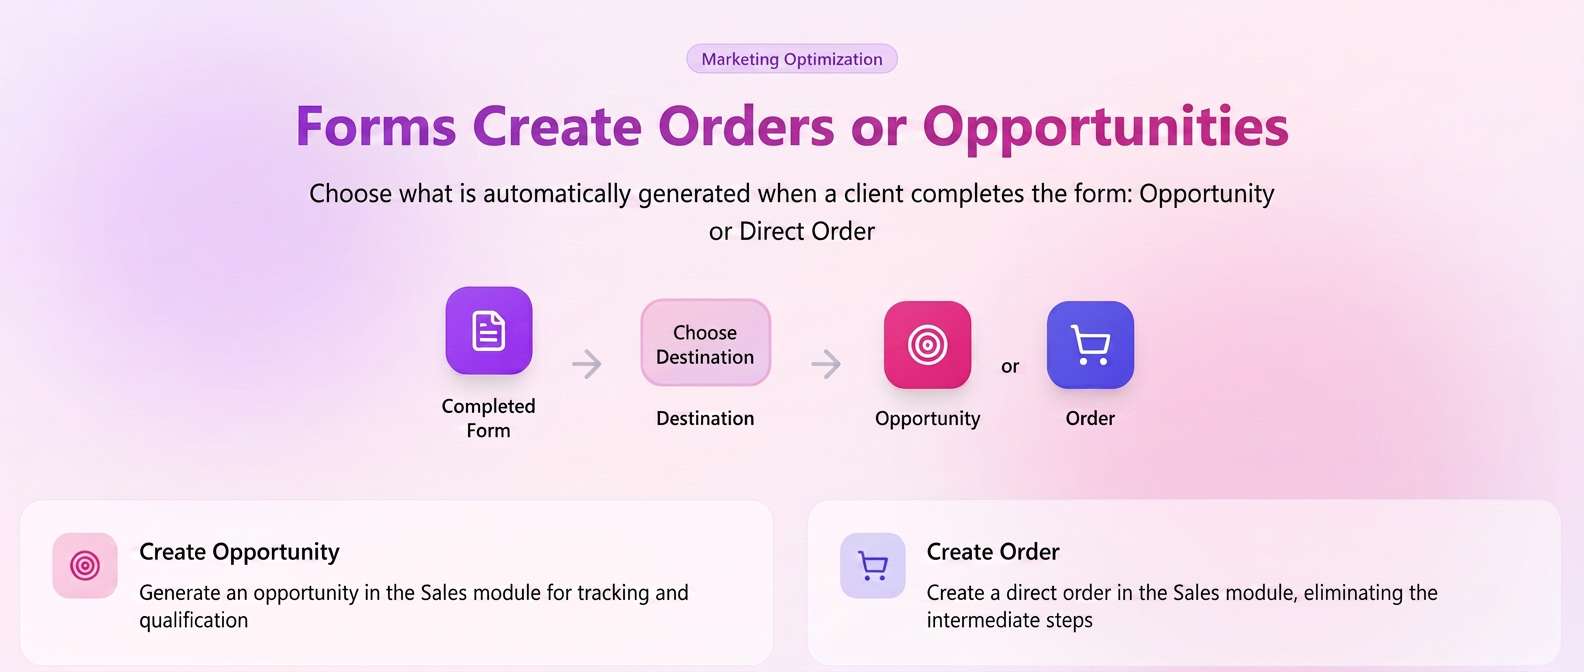
The user can select one of two options:
| Option | Description |
| Create Opportunity | Generates a new opportunity in the module (previous standard behavior). |
| Create Order | Automatically creates a client order in the module based on the data filled in the form. |
How to use
- Access .
- Create a new form or edit an existing one.
- Activate the Opportunity / Order option.
- In the Destination field, select whether you want the form to automatically create an
Opportunity or an Order.
- Save changes.
- When the client completes the form, the system will automatically generate the chosen entity, with all data taken directly from the responses.
Optimization: Defining default email templates per employee/document
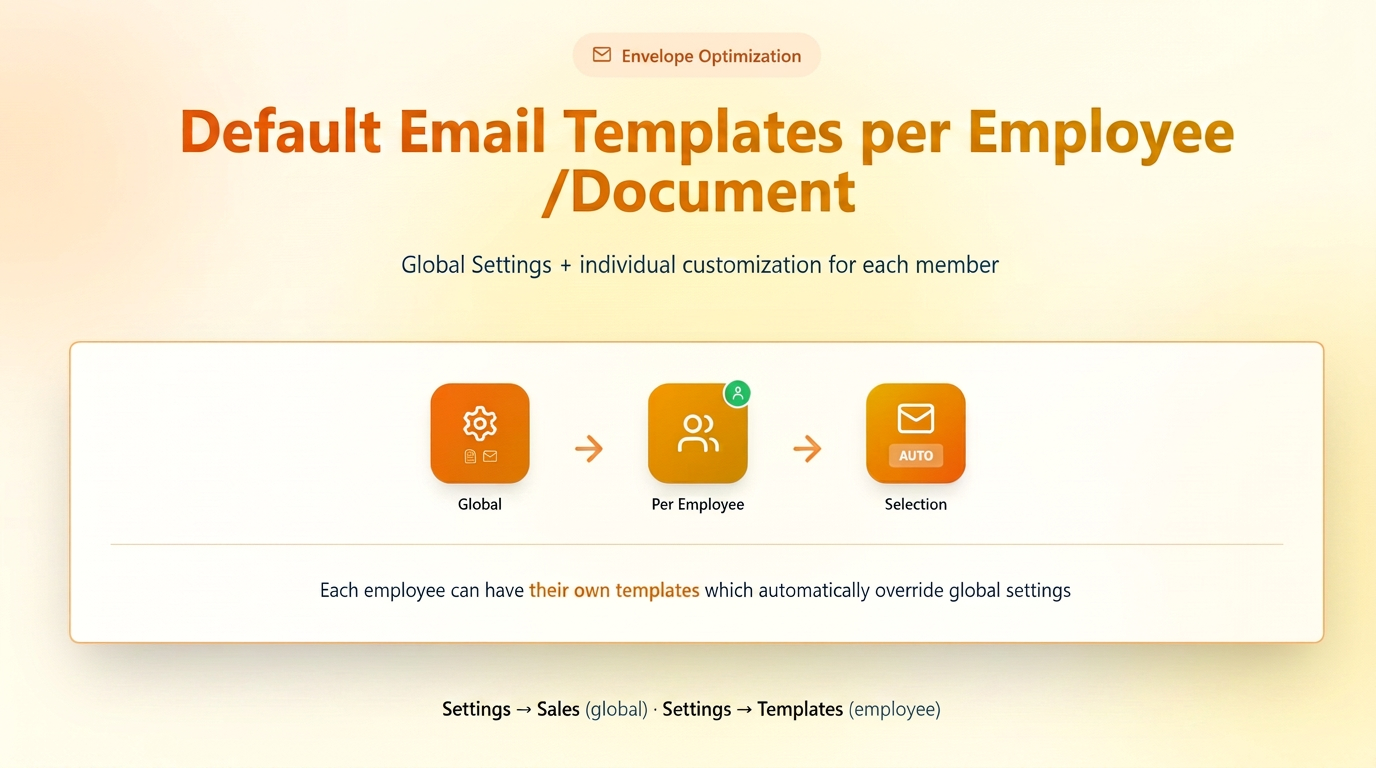
This optimization offers advanced control over default templates, allowing:
- separate definition of PDF and Email templates for each type of document (quote, order, invoice, etc.);
- association of personalized templates per employee, which automatically override the global setting.
The functionality extends the iFlows notification and email sending system, offering a more personalized experience and a unified company image.
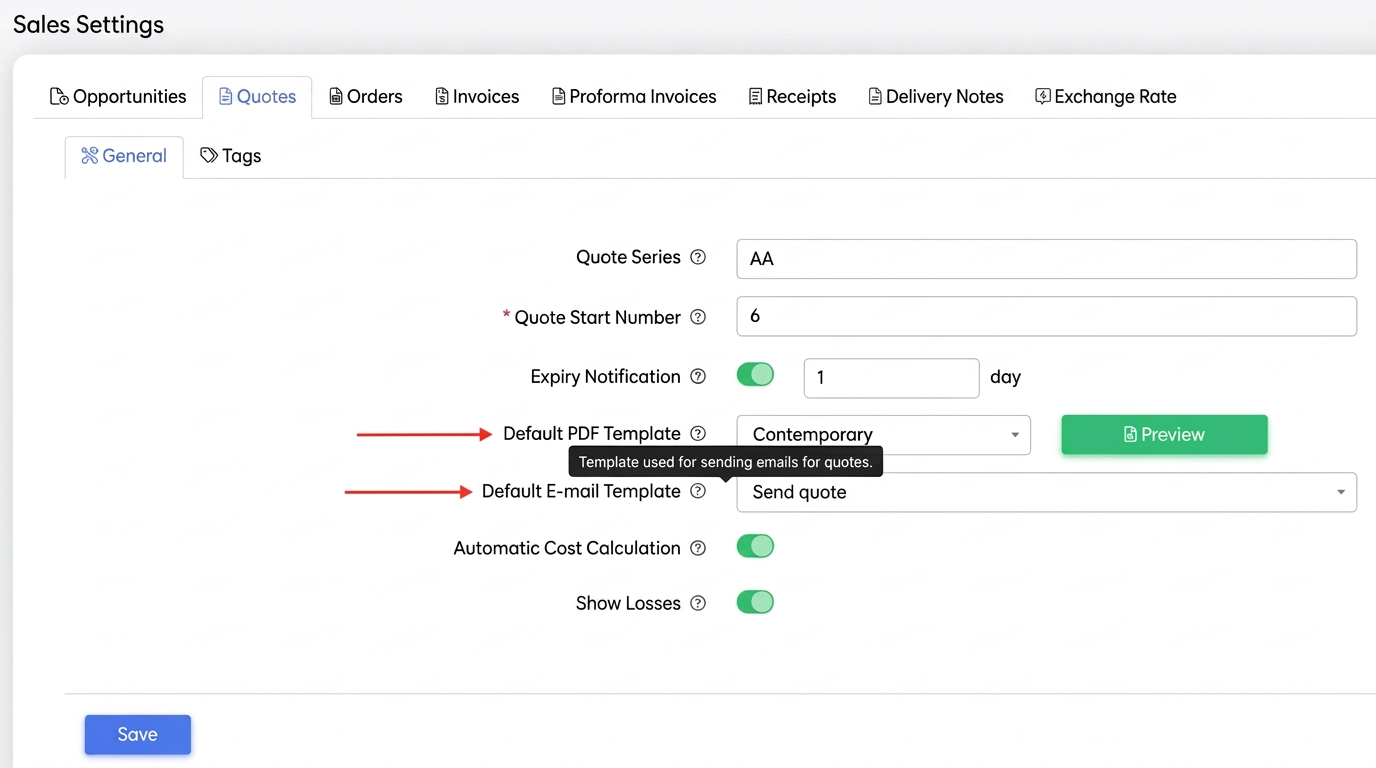
- Default Template Management (Global)
In the document settings pages, such as:
/ Orders / Invoices / etc., dedicated fields have been added for selecting default templates:
- Default PDF Template – defines the visual format of the document (PDF layout).
- Default Email Template – defines the text and structure of the message used when sending the document.
Thus, each type of document can have:
- a distinct PDF format
- a personalized email template
Purpose:
This separation allows full control over how the document is displayed to the client (PDF) and how it is communicated via email (message text and style).
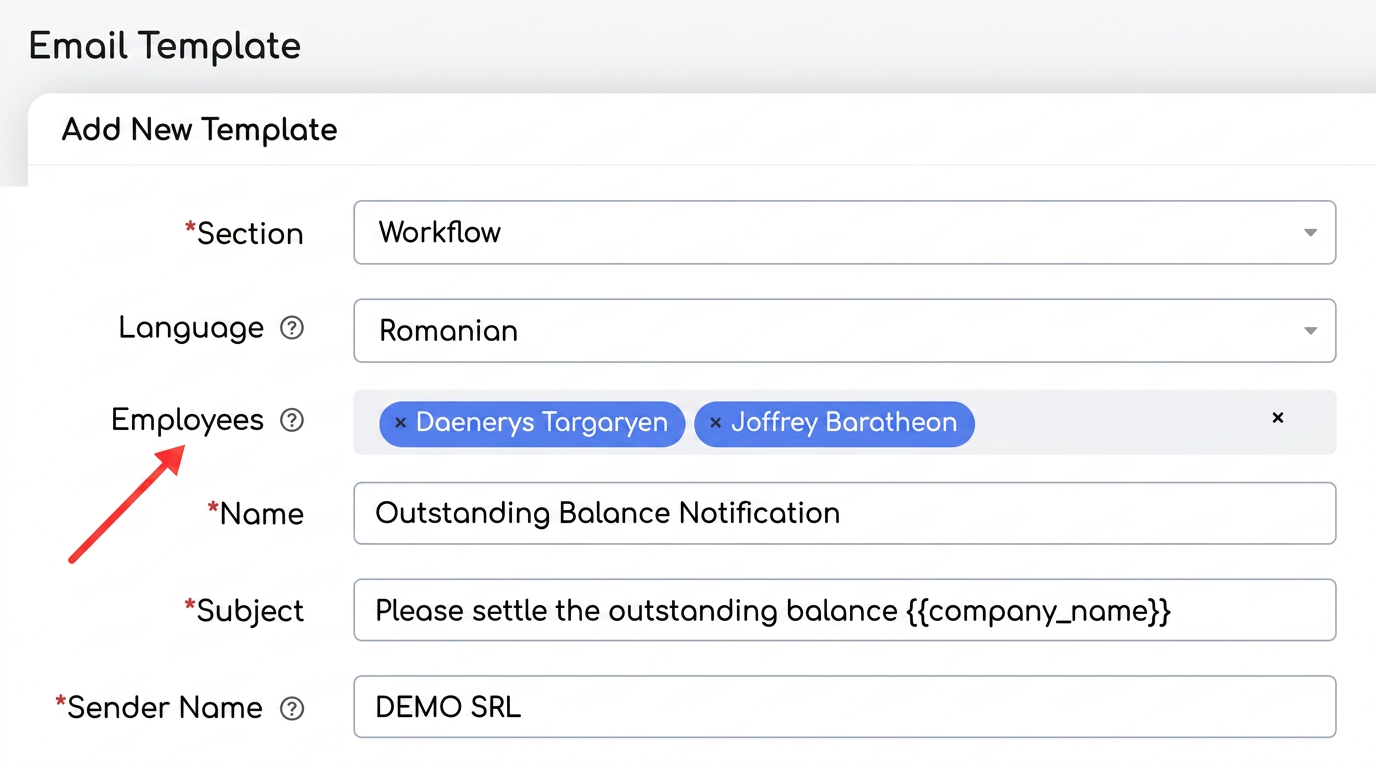
- Specific User Settings (Global Override)
On the page, when creating or editing a template (PDF or Email), the new Employee field has been added.
Through this field, individual templates for each employee can be assigned.
A template can be associated with one or more team members, depending on operational needs.
🔸 How it works:
- If an employee has their own template defined, it automatically becomes the default template when that user sends documents.
- In the absence of an individual association, the system uses the global template set in the configuration pages (e.g., "").
How this functionality helps
- Team-level personalization
Allows each employee to communicate with clients in their own style, but within the same approved visual format.
Example:
- Agent Andrei sends quotes with a personal signature and commercial tone;
- The sales manager uses more formal phrasing for B2B negotiations.
- Clarity between content and form
Separating PDF and Email templates avoids confusion between the document format and the message sent.
Thus, a document can have the same PDF layout but different email messages (e.g., for new quotes vs. renewal quotes).
- Operational efficiency
Each employee no longer has to manually select the template for every sending — the system applies it automatically based on the configured association.
- Complete flexibility
Managers can define:
- standard templates (corporate, global);
- personal templates (individual, for each agent);
- combinations between them (e.g., common PDF, personalized email).
Optimization: Archiving Email Templates
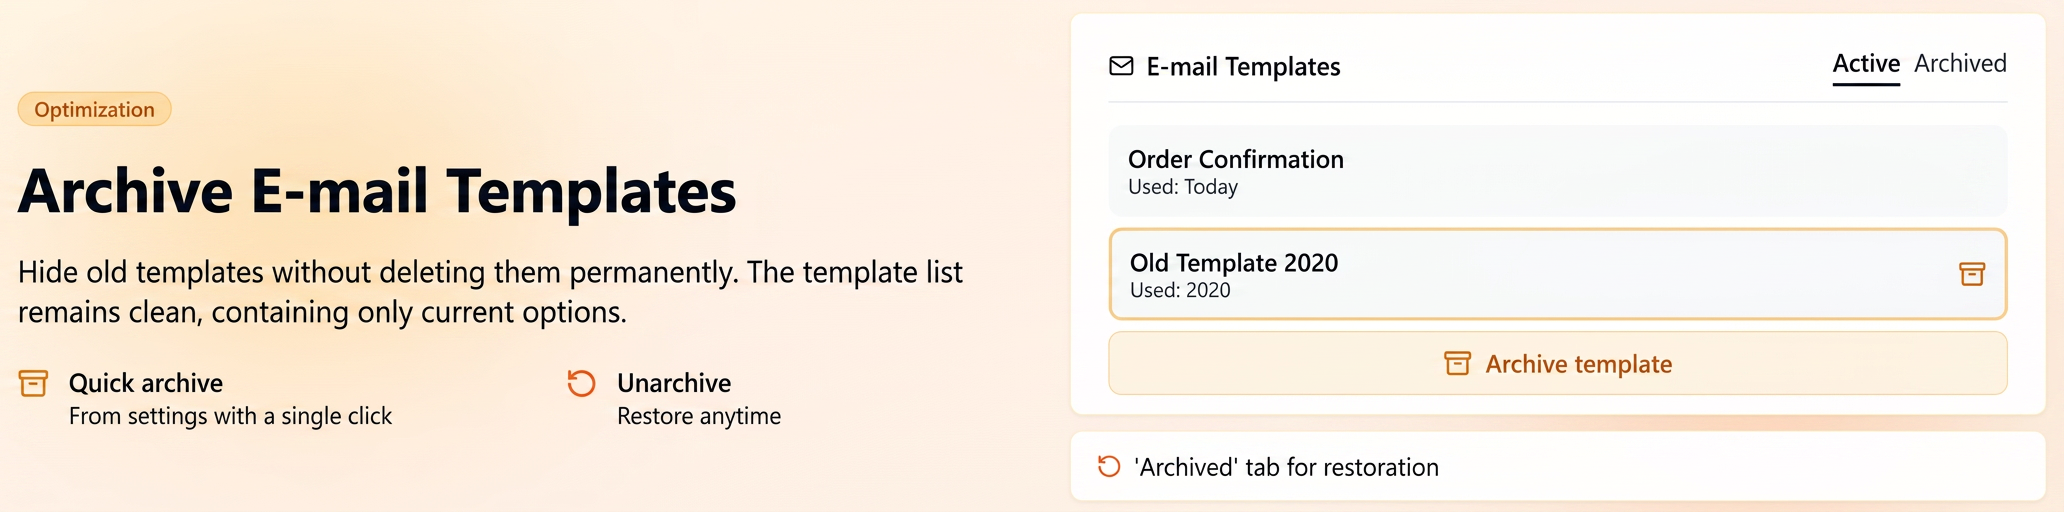
This functionality allows hiding templates that are no longer frequently used without deleting them permanently.
Thus, the list of templates available when sending emails remains clean and relevant, containing only current options, while old templates can be kept in the archive for later reuse.
How to use
🔸Archiving a template
- Navigate to .
- Next to the desired template, press the 🗑️ (trash can) icon.
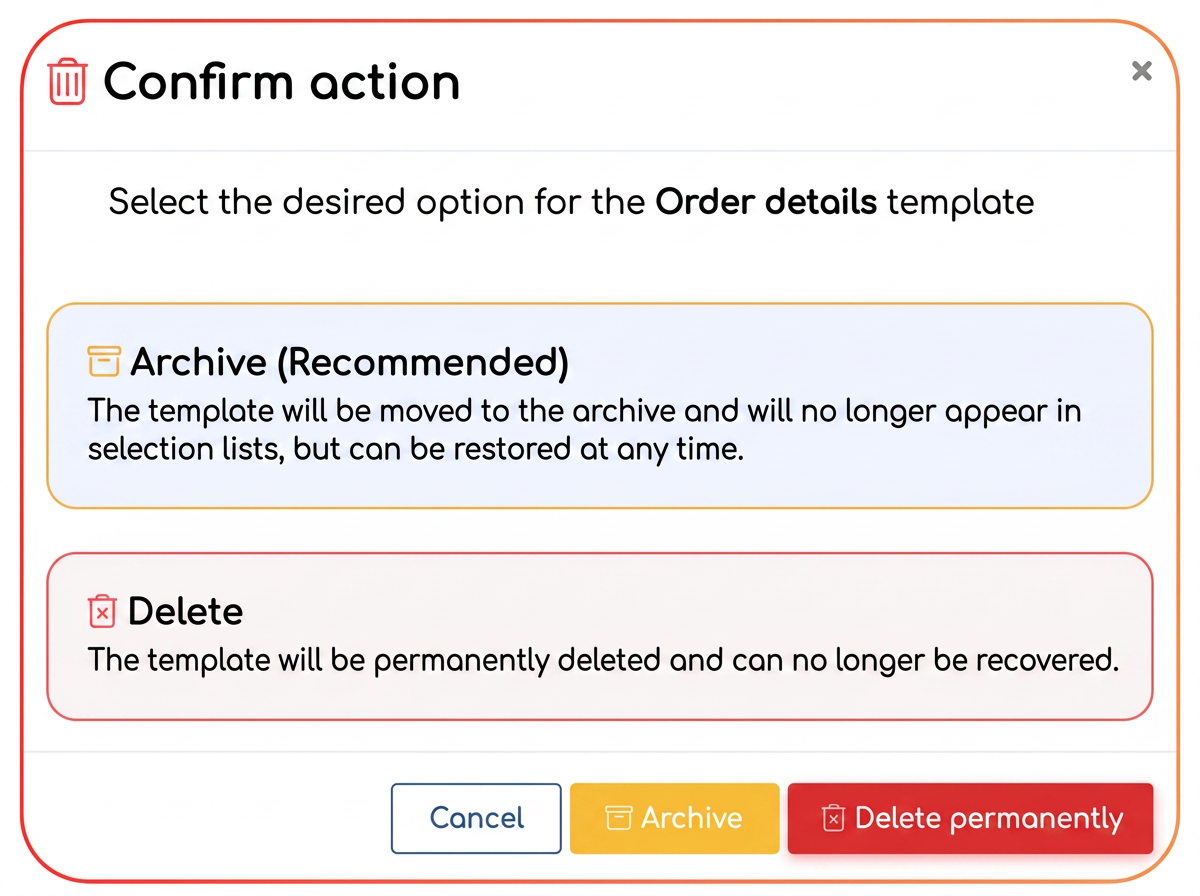
- In the window that opens, select the "Archive (Recommended)" option.
- The template will be automatically moved to the new "Archived" tab and will no longer appear in selection lists when sending emails.
🔸 Unarchiving a template
- On the same page (), access the "Archived" tab.
- Identify the desired template and press the "Unarchive" option.
- The template returns to the active templates list and can be used immediately.
Optimization: Custom Export by Applied Filters (Stocks Page)
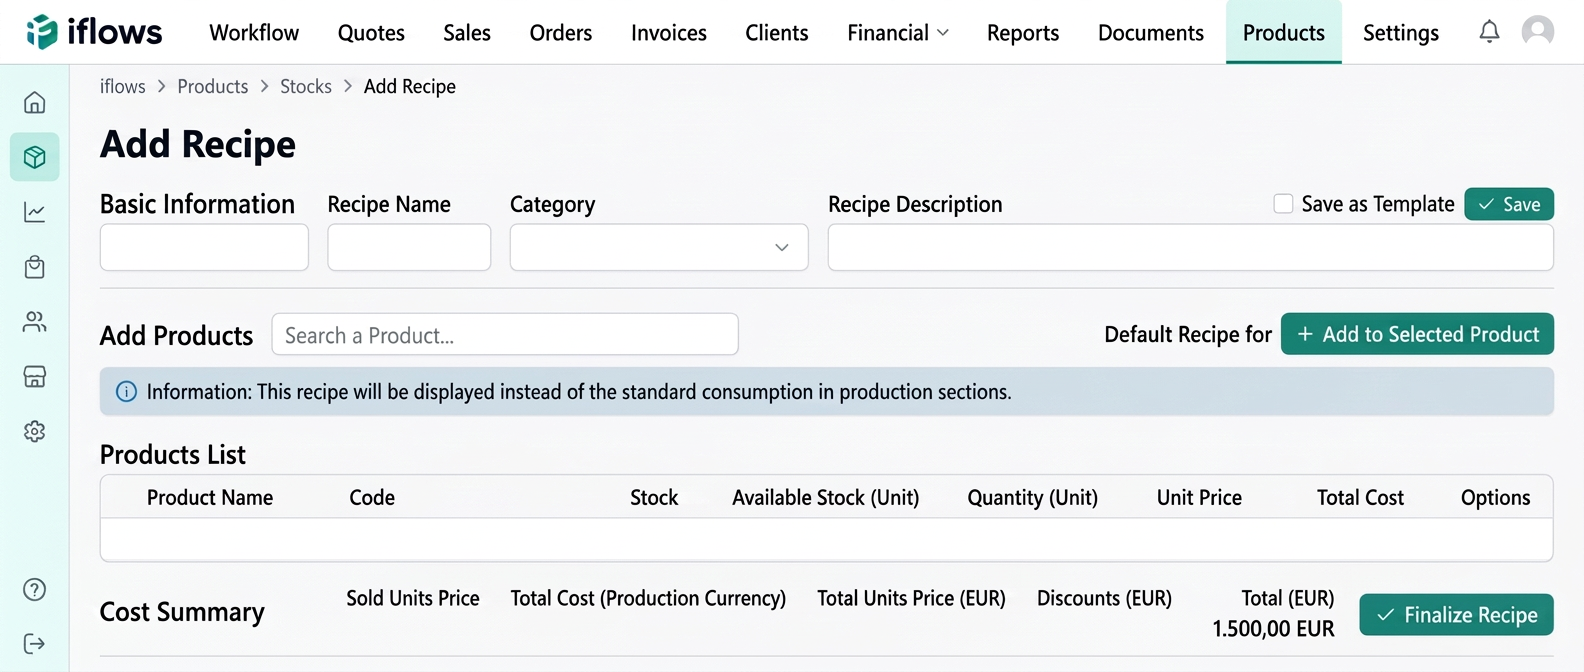
The export functionality from the page has been optimized to accurately reflect the active filters at the time the file is generated.
Thus, the export no longer retrieves the entire set of products, but only the records that match the selected criteria (e.g., warehouse, supplier, category, product type, stock status, etc.).
How to use
1️⃣ Navigate to .
2️⃣ Apply desired filters (e.g., select a specific warehouse, category, supplier, or product state).
3️⃣ After the list has updated according to the filtering, press the Export button located in the action bar.
4️⃣ Choose the desired interval and template for the export.
5️⃣ The system will generate a file containing exclusively the products displayed after filtering.
Usage examples
| Scenario | Applied Filters | Export Result |
| Check stocks per warehouse | Warehouse = "Central Warehouse" | Export contains only products from that warehouse |
| Analysis per category | Category = "Consumables" | Export limited to products in the filtered category |
| Critical stock control | Status = "Limit stock" | Export only for items with low stock levels |
Optimization: New Filter: Warehouse
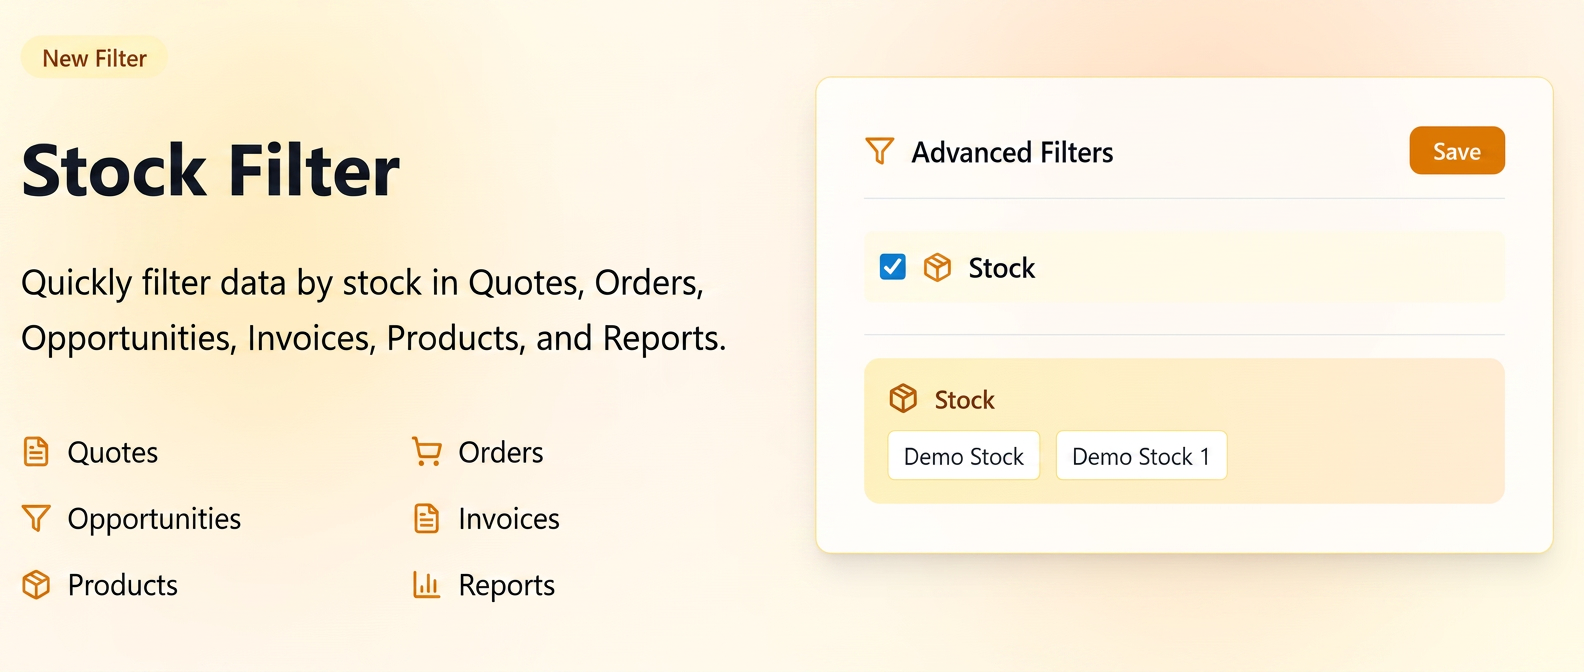
This allows users to quickly limit displayed results based on the warehouse the data originates from (e.g., in Sales, Orders, Products, Invoices sections, etc.).
The filter contributes to clear visibility over operations carried out at each warehouse, facilitating comparative analysis and data-driven decisions.
Availability
The "Warehouse" filter is available in the following platform modules:
Sales: Opportunities / Quotes / Orders /Invoices
Reports: Products / Purchases / Orders
How to use
1️⃣ Activating the filter
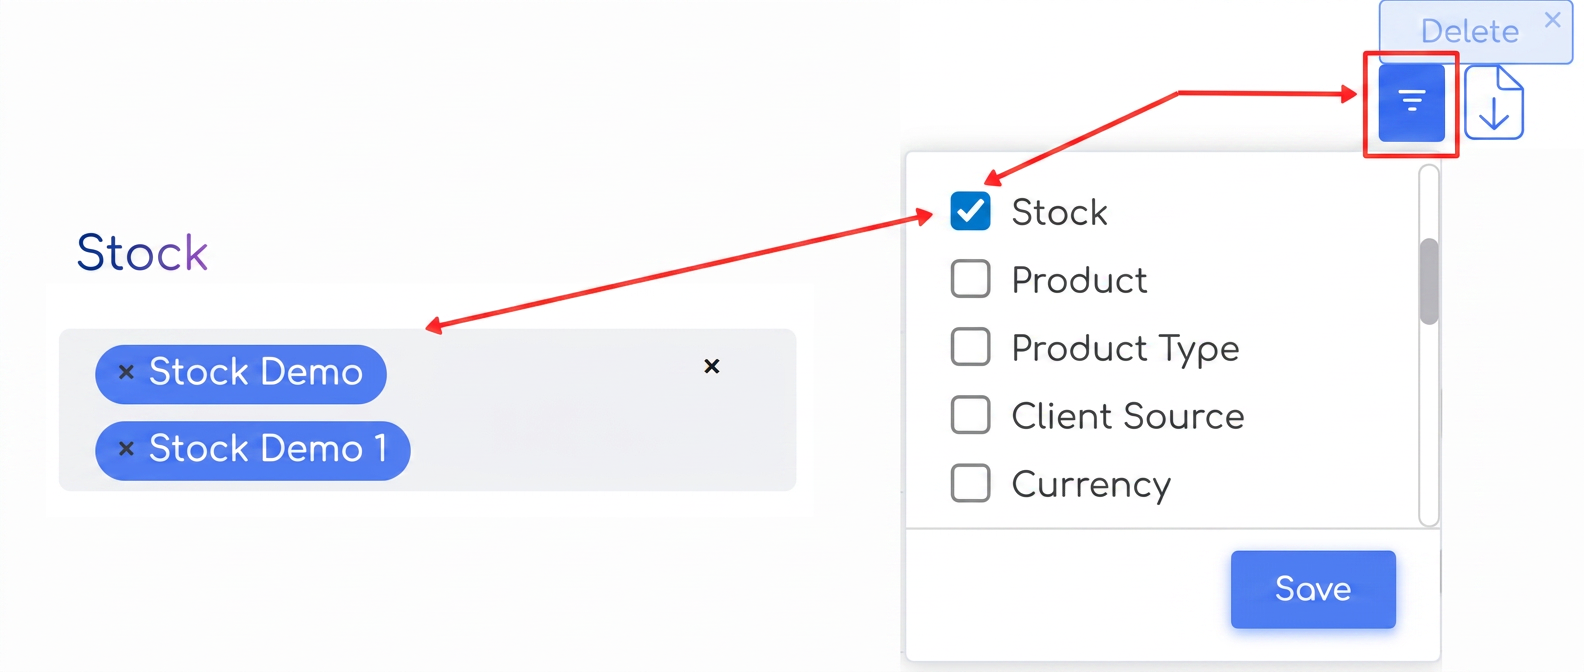
In the upper right corner of each page containing advanced filters, the user can activate the "Warehouse" filter by checking the option in the list, then pressing "Save".
2️⃣ Applying the filter
After activation, the Warehouse field will appear in the upper area of the page, where one or more warehouses can be selected.
The filtering applies instantly to the displayed data, limiting the list only to records associated with the selected warehouses.
Optimization: New Variables in PDF Templates
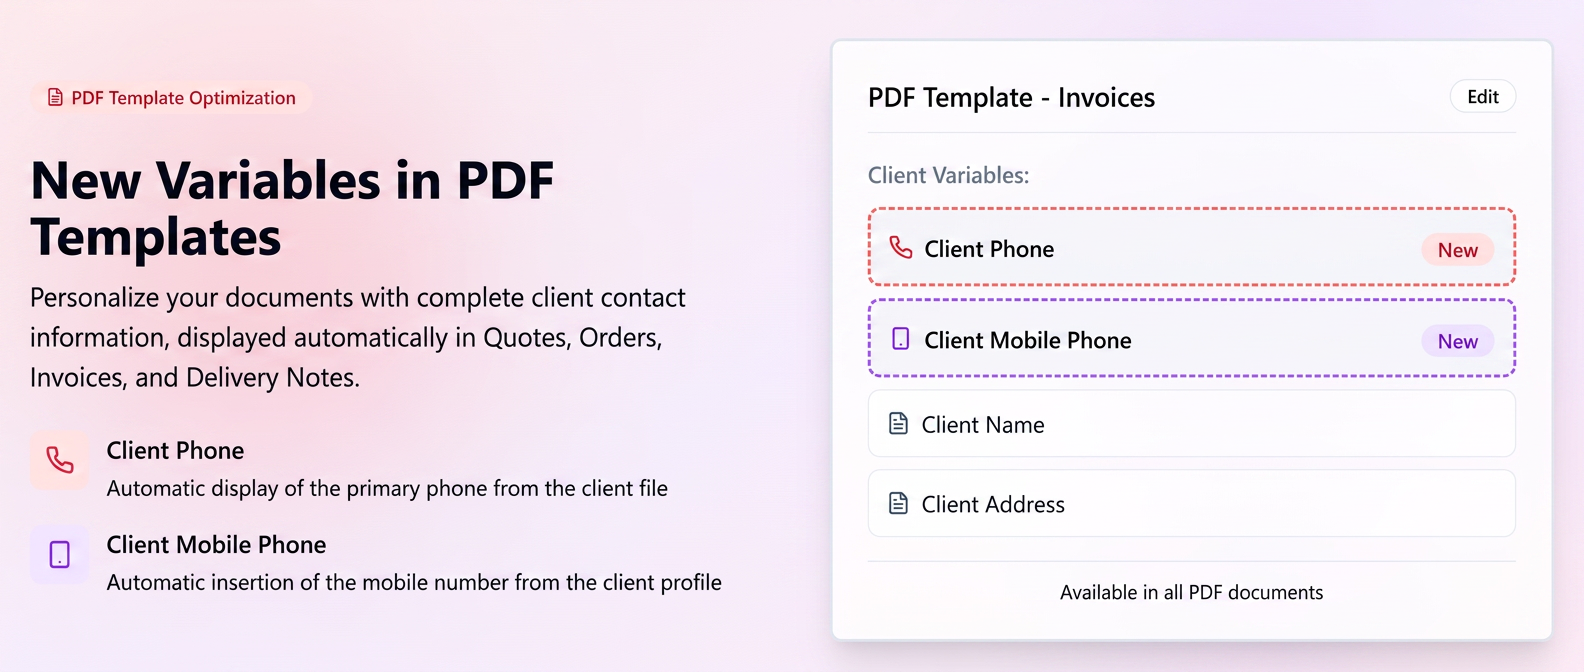
To extend the personalization possibilities of documents generated in iFlows, two new variables dedicated to client contact details have been introduced.
These can be used in all types of PDF documents (Quotes, Orders, Invoices, Delivery Notes, Proformas, etc.) and allow the automatic display of client phone numbers directly in the template used.
The new functionality offers a complete presentation of client information on documents without additional manual intervention.
Added Variables
| Variable | Description | Display Example |
| Client Phone | Inserts the client's main phone number from their record. | "021 123 4567" |
| Client Mobile Phone | Inserts the client's mobile phone number if filled in the profile. | "0722 123 456" |
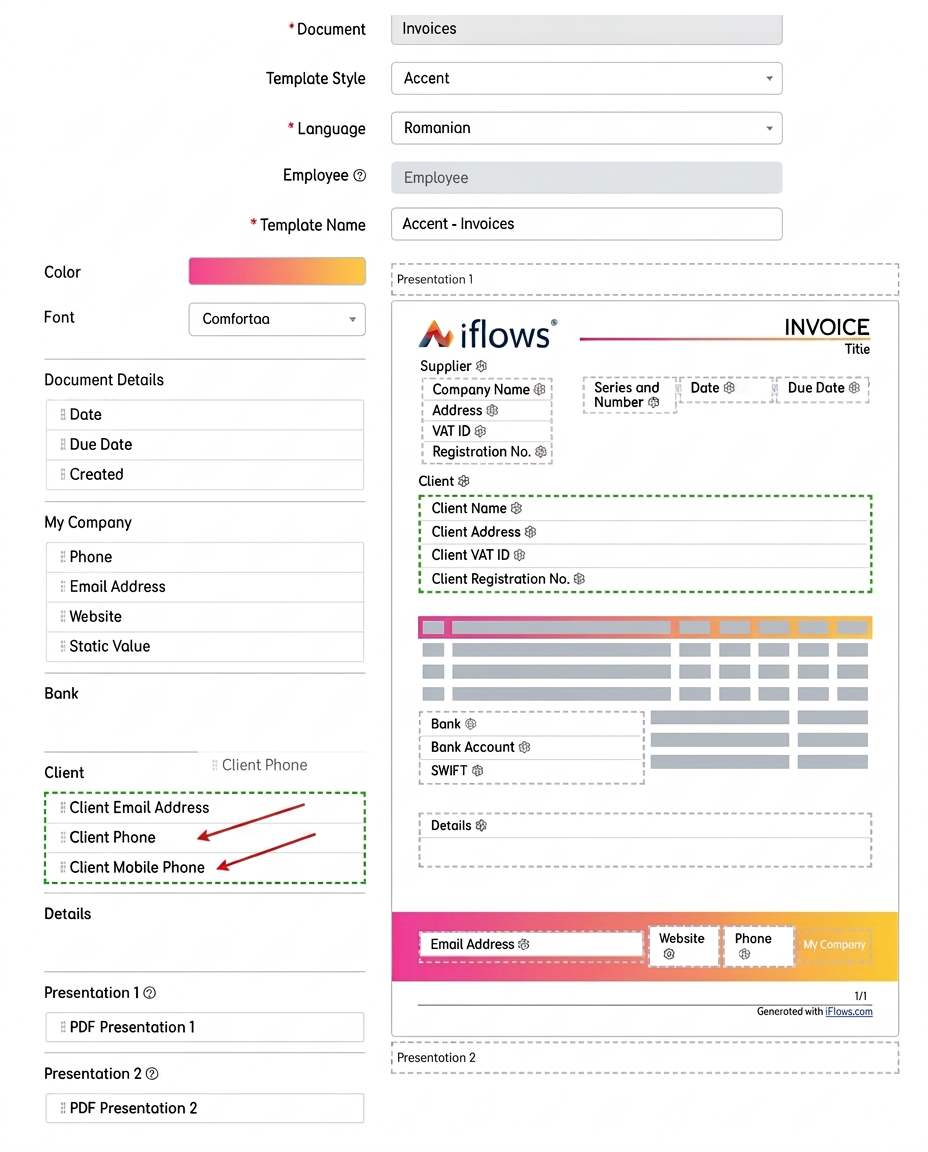
How to use
1️⃣ Access .
2️⃣ Select the document for which you want to update the template (e.g., Invoices, Quotes, Delivery Notes, etc.).
3️⃣ Press "Edit" on the currently used template.
4️⃣ In the left section, under the Client category, you will find the new variables:
- Client Phone
- Client Mobile Phone
5️⃣ Use the "Drag & Drop" function to drag the variables into the central area of the template, in the Client section.
6️⃣ Press "Save" to update the template.
When generating documents, the system will automatically replace these variables with real values from the selected client's profile.
Note: If a client does not have a phone number filled in their profile, the corresponding field will not be displayed on the document.
Optimization: "Service" Tab in the Client Page
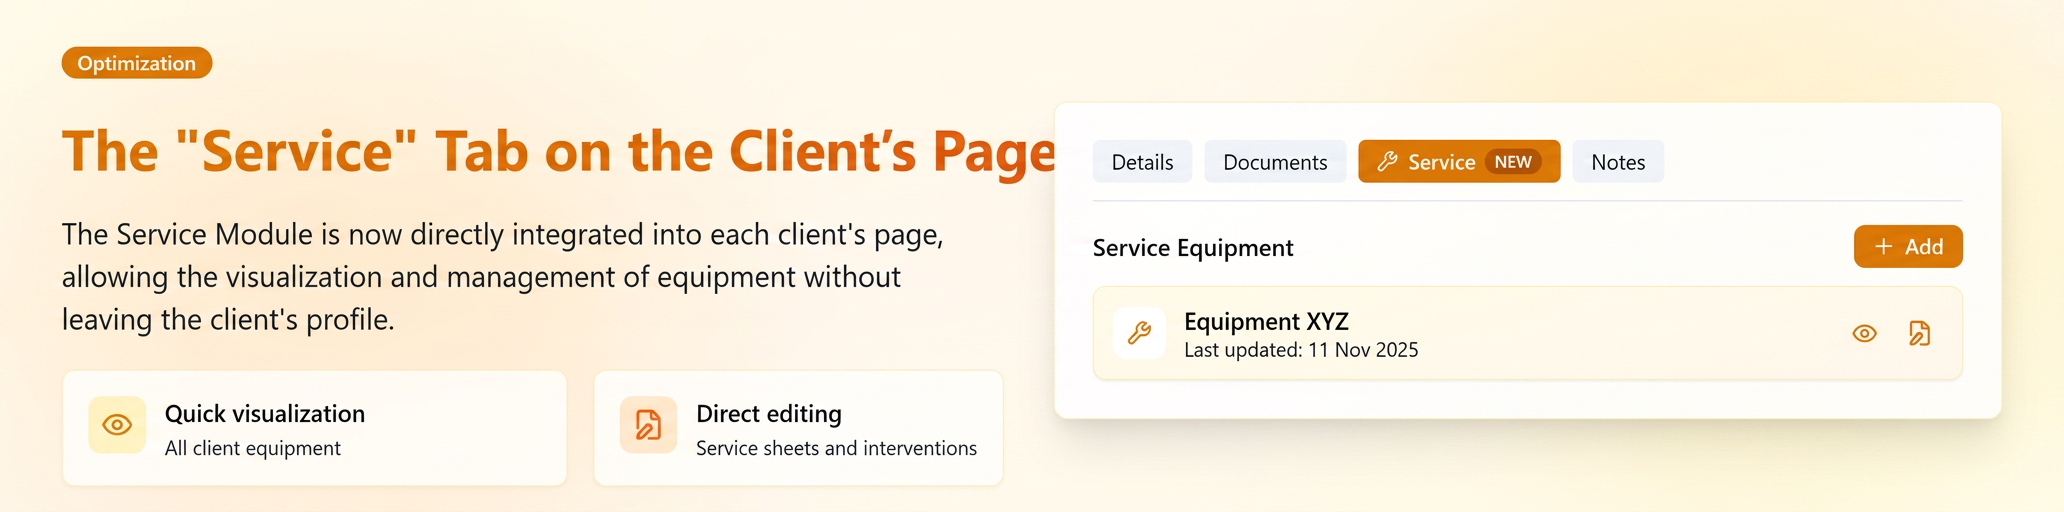
The Service module is now integrated directly into each client's page by adding a new dedicated tab — "Service".
This integration allows viewing and managing equipment associated with a client without the need to navigate to the main Service module, offering a unified and complete experience at the client profile level.
How it works
- The new "Service" tab is available on each client's page in view mode.
- The tab automatically displays all equipment associated with that client from the Service module.
- The tab is visible only for clients who have at least one piece of equipment registered in the Service module.
- From this section, users can quickly access service records, edit entries, or add new interventions without leaving the client profile.
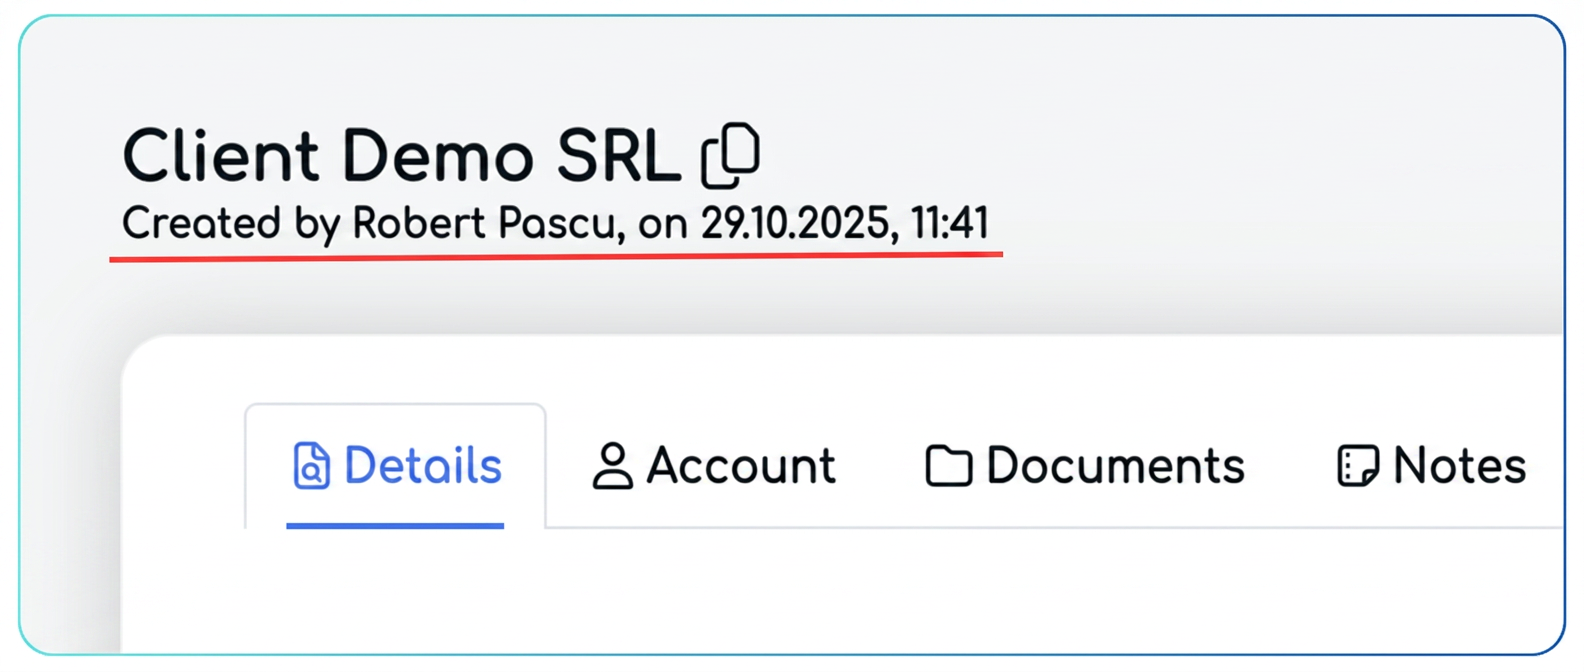
Optimization: Displaying Creation Date and User in the Client Page
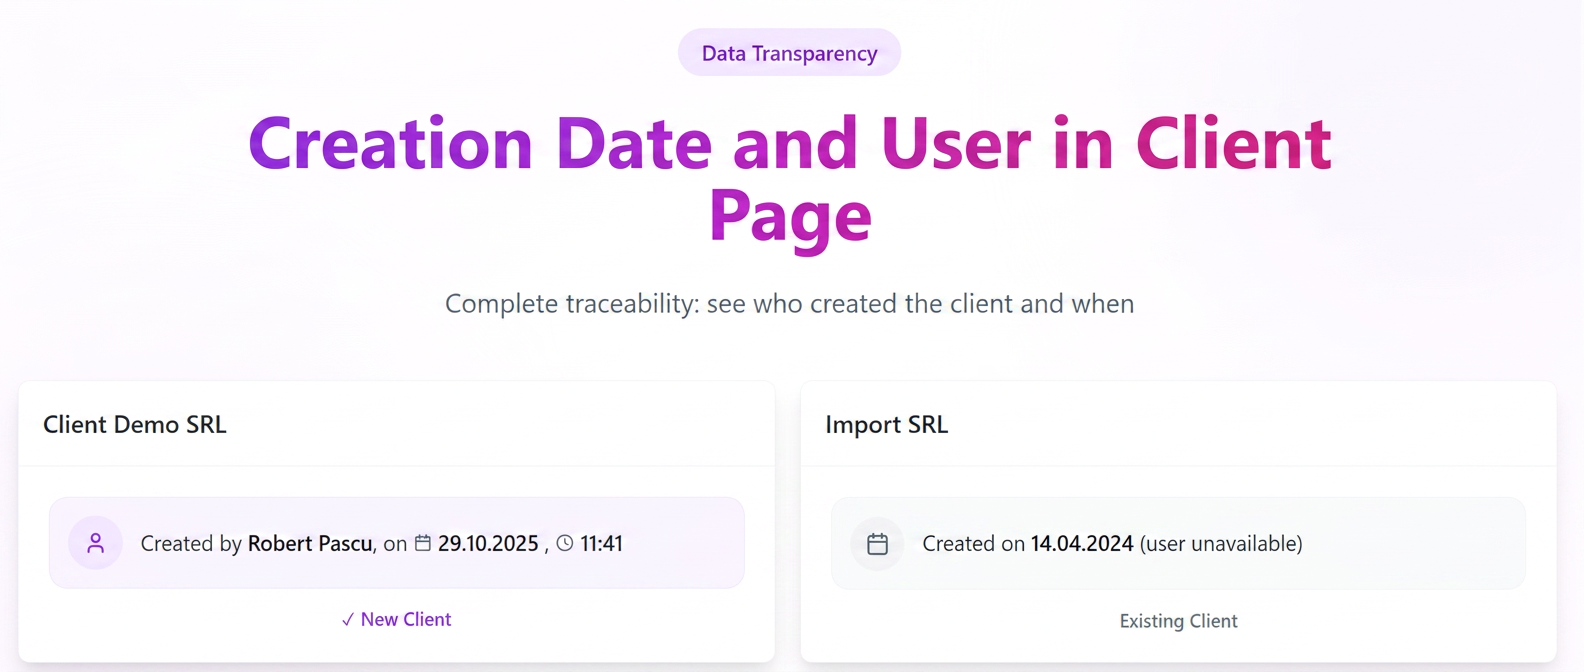
To increase transparency and data traceability, the following information is displayed on each client's details page:
- the user who created the record, and
- the exact date and time the client was created in the platform.
This simple addition facilitates monitoring internal activities and offers a clear picture of how clients are added to the system.
How it works
In the upper section of the client page (in view mode), under their name, the new informative line is displayed:
Created by [username], on [date + time]
🔸 Differentiated behavior:
- For clients added after the update:
The full name of the user and the exact date + time the client was created are displayed. - For existing clients (before implementation):
Only the registration date in the system is displayed, without association with a user (if the information was not historically available).
| Situation | Display in Platform |
| New client added by Robert Pascu | "Created by Robert Pascu, on 29.10.2025, 11:41" |
| Old client (added before update) | "Created on 14.04.2024" |
Optimization: Reorganization of the Notifications Menu
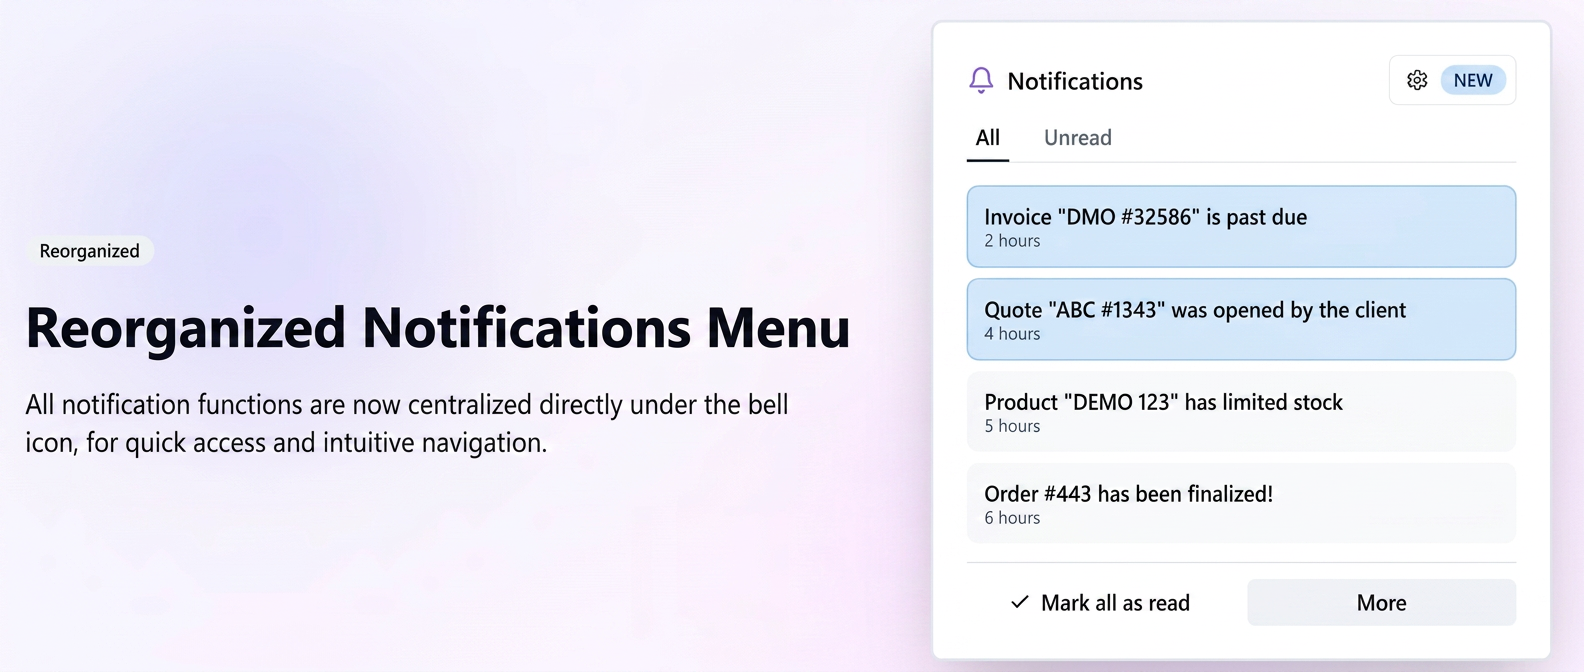
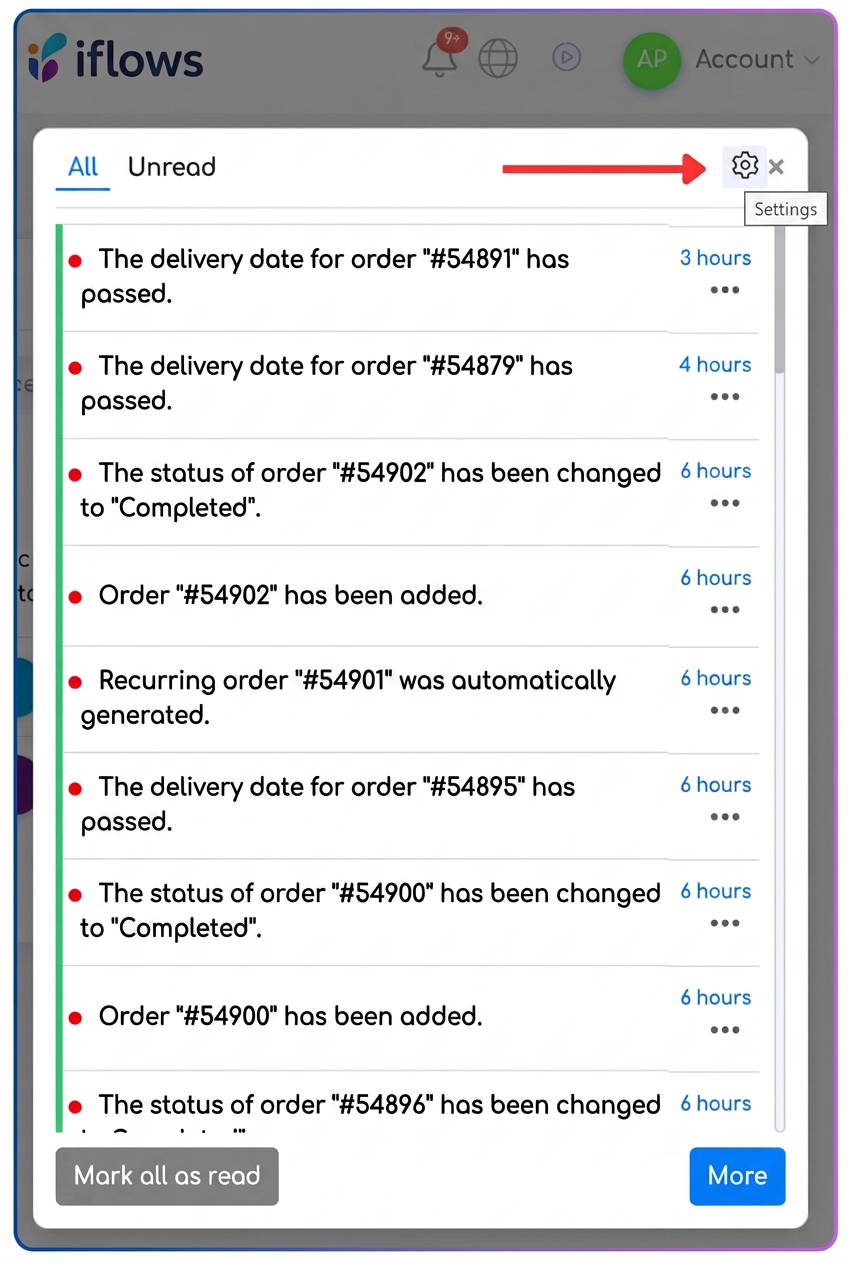
For more intuitive navigation and quick access to important information, the notifications menu has been moved. All extended functions (full view, configuration, marking notifications) have been centralized directly under the 🔔 Bell icon in the main bar, eliminating the need for a separate section in the menu.
How to access
1️⃣ Access the notification center: Click on the bell icon in the top bar of the application to open the recent notifications panel.
2️⃣ View notifications:
The panel displays two tabs by default:
- All – complete list of the most recent notifications;
- Unread – quick filtering for messages requiring attention.
3️⃣ Quick options available in the panel:
- NEW: Settings: directly access the page where you can choose which types of notifications you wish to receive.
- 📄 See more: opens the full page with notification history.
- ✔️ Mark all as read: allows quick reset of the notification badge.