
NEW: Customer Credit Limit
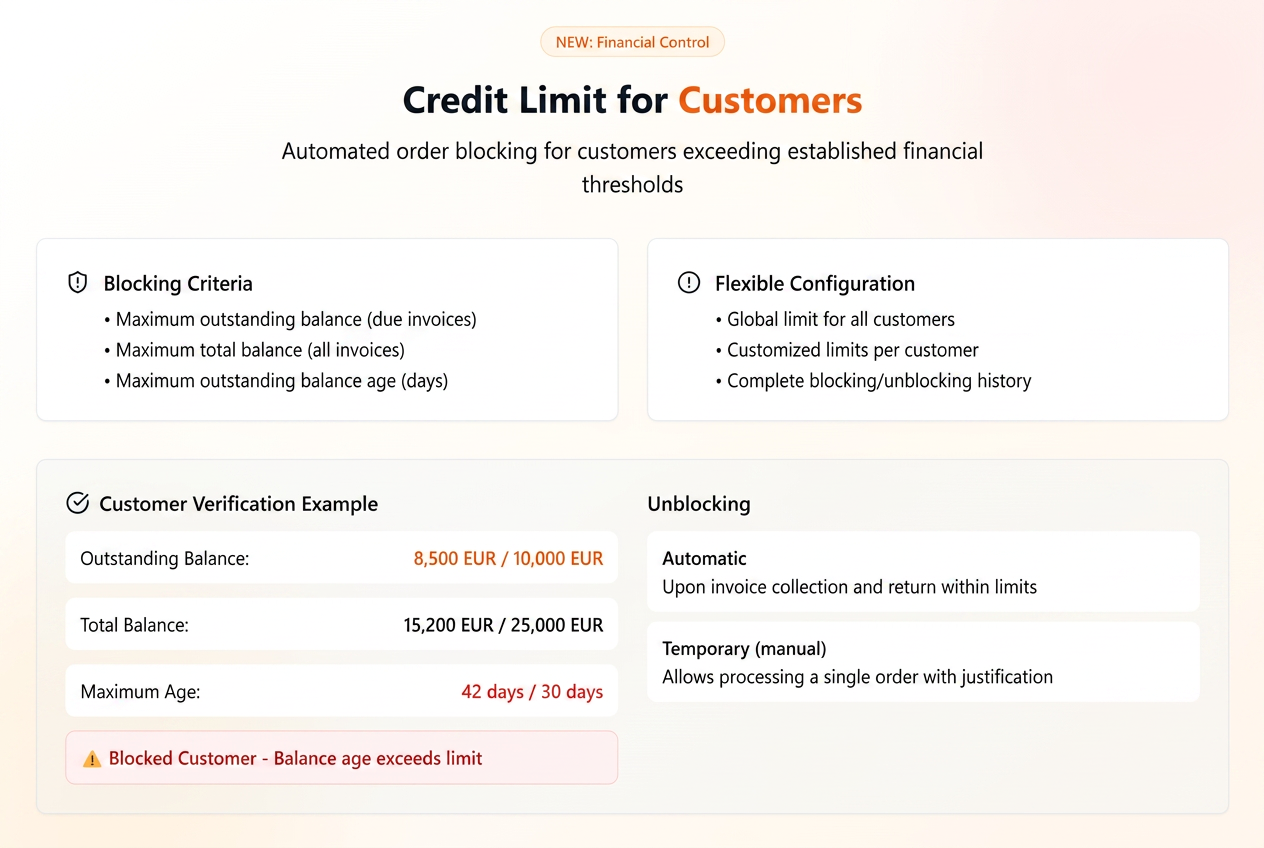
To ensure rigorous financial control and minimize risks associated with commercial credit, the iFlows platform introduces an advanced customer credit limit management functionality. This system allows for the automatic blocking of order processing for customers who exceed certain pre-established financial thresholds, thus preventing the accumulation of uncontrolled debt.
The Credit Limit system allows you to define clear rules that, once breached, will block the ability to process new orders for that specific customer. Blocking can be based on three essential criteria:
- Overdue Balance Limit: Represents the maximum value of overdue, unpaid invoices a customer can have at any given time.
- Total Balance Limit: Represents the total value of issued, unpaid tax invoices, regardless of whether they are overdue or not.
- Overdue Balance Age Limit (days): The maximum number of accepted delay days for overdue invoices.
Once a customer exceeds any of these set limits, their status will become "Blocked", and their orders can no longer be processed in the workflow until the situation is rectified.
Configuring Credit Limits
The functionality can be activated in two modes, offering both global and personalized control.
Global Activation (Default)
This option is ideal for applying a standard credit policy for all customers who do not have personalized settings.
- Navigate to Settings -> Customers.
- In the "Credit Limit" section, enable the "Activate default credit limit" option.
Effect:
- All new customers, as well as existing ones who do not have a personalized limit, will have a default credit limit of 0 EUR. This means that an order cannot be processed in the workflow if an invoice is generated for it that has not already been paid. Essentially, the customer will need to make an advance payment to allow the production/delivery workflow to operate.
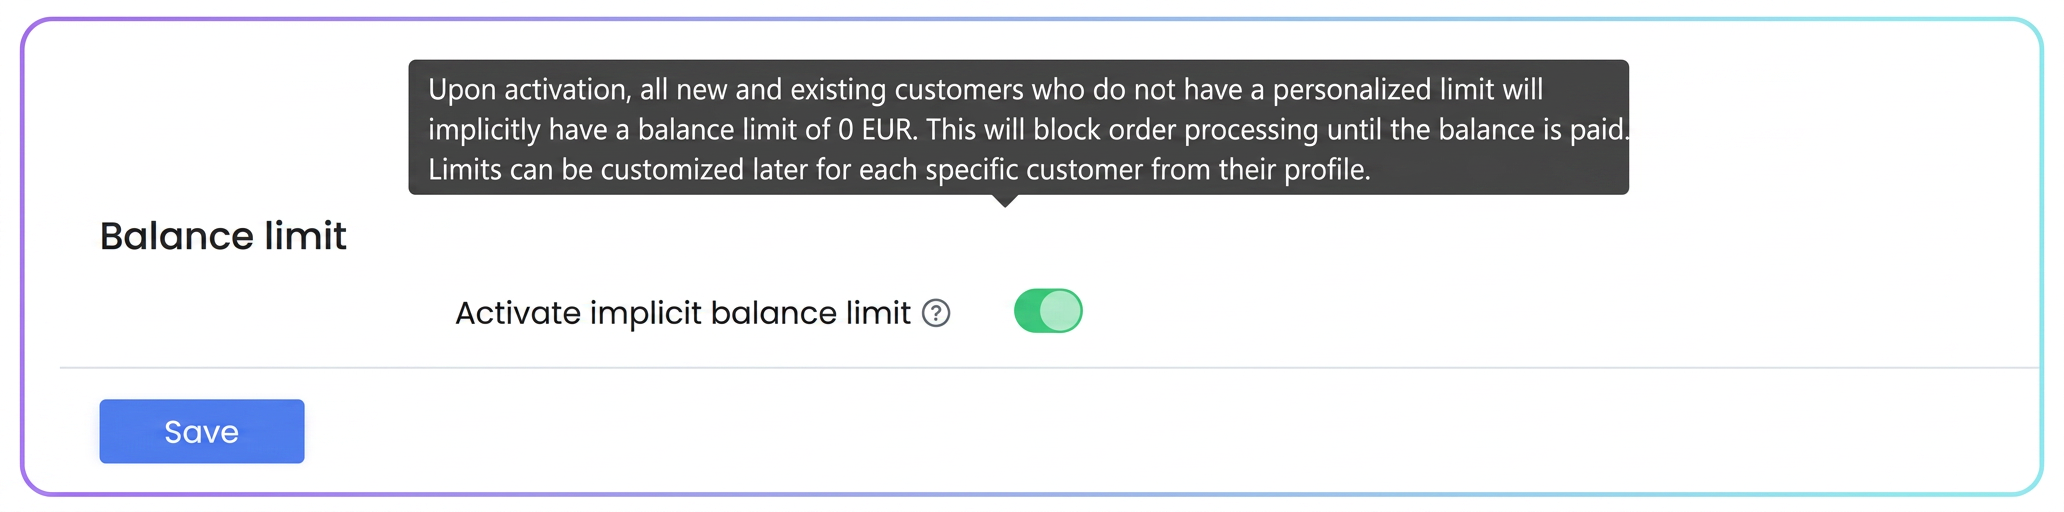
Important: Activating or deactivating this global option will not affect customers who already have a personalized limit set on their profile. Individual settings always take precedence over the default setting.
2. Individual Activation per Customer
To set specific limits for a particular customer:
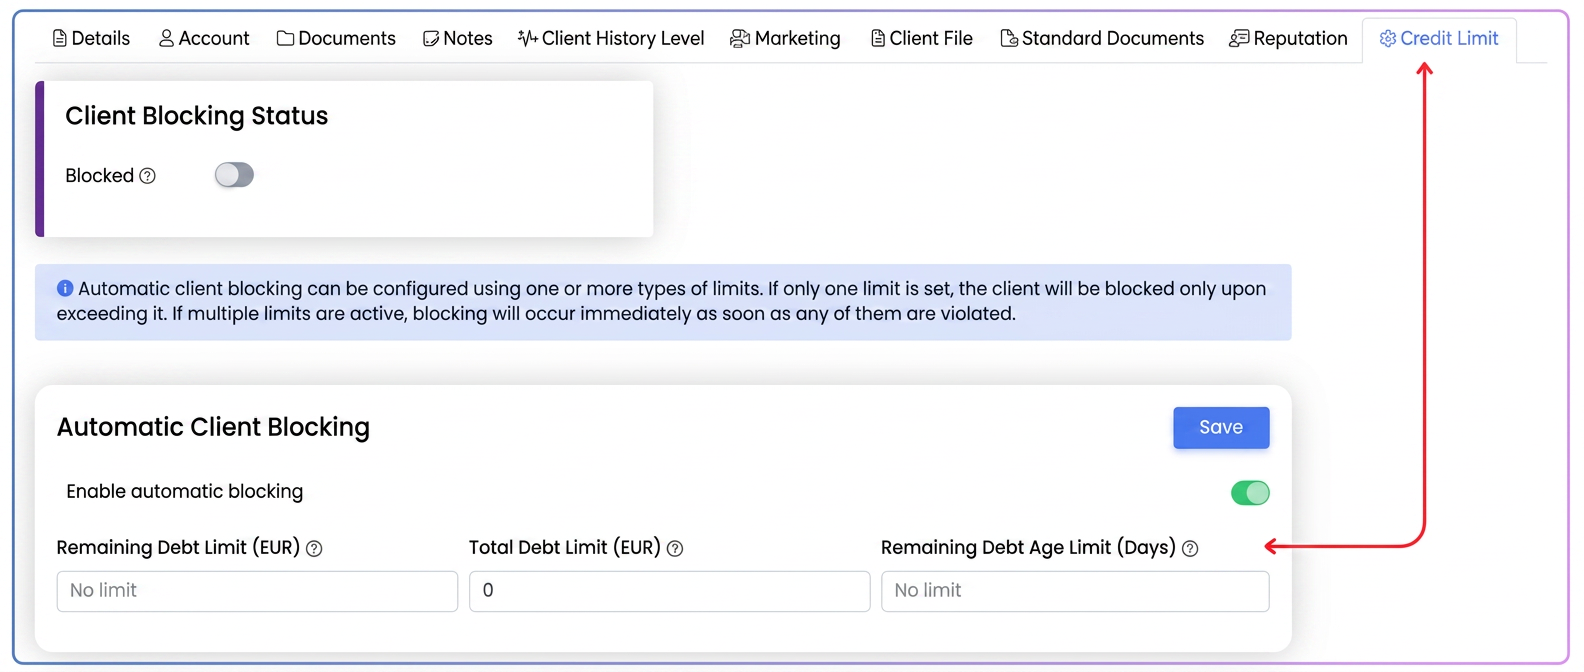
- Navigate to Customers, select the desired customer, and access the "Credit Limit" tab.
- Enable the "Activate automatic blocking" option.
- Fill in the desired values for one or more of the three limit types (Overdue Balance, Total Balance, Overdue Balance Age).
- Press the "Save" button.
In the "Limit History" section, you can view a complete log of all events: limit activations, automatic blocks (with details on the exceeded limit), and unblocks.
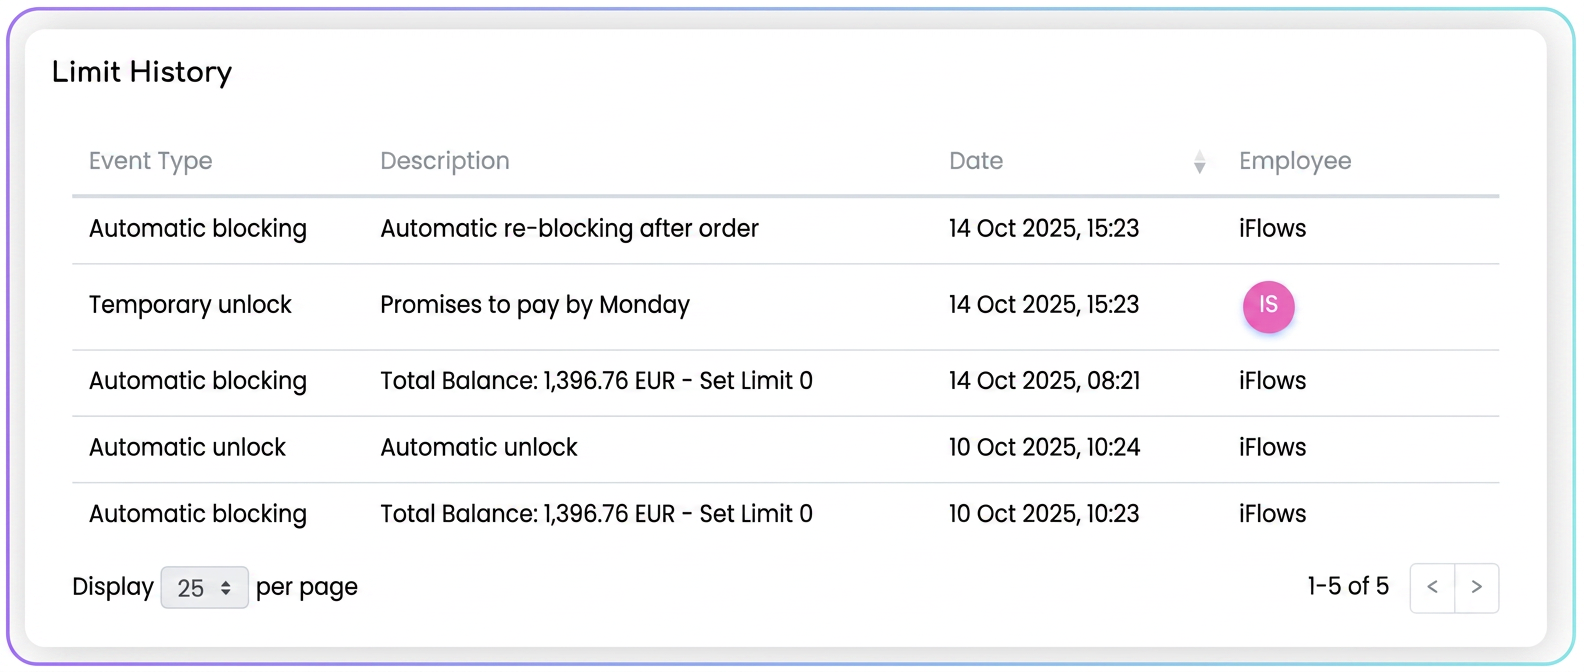
Managing a Blocked Customer
When a customer is blocked, the platform will notify you in several places:
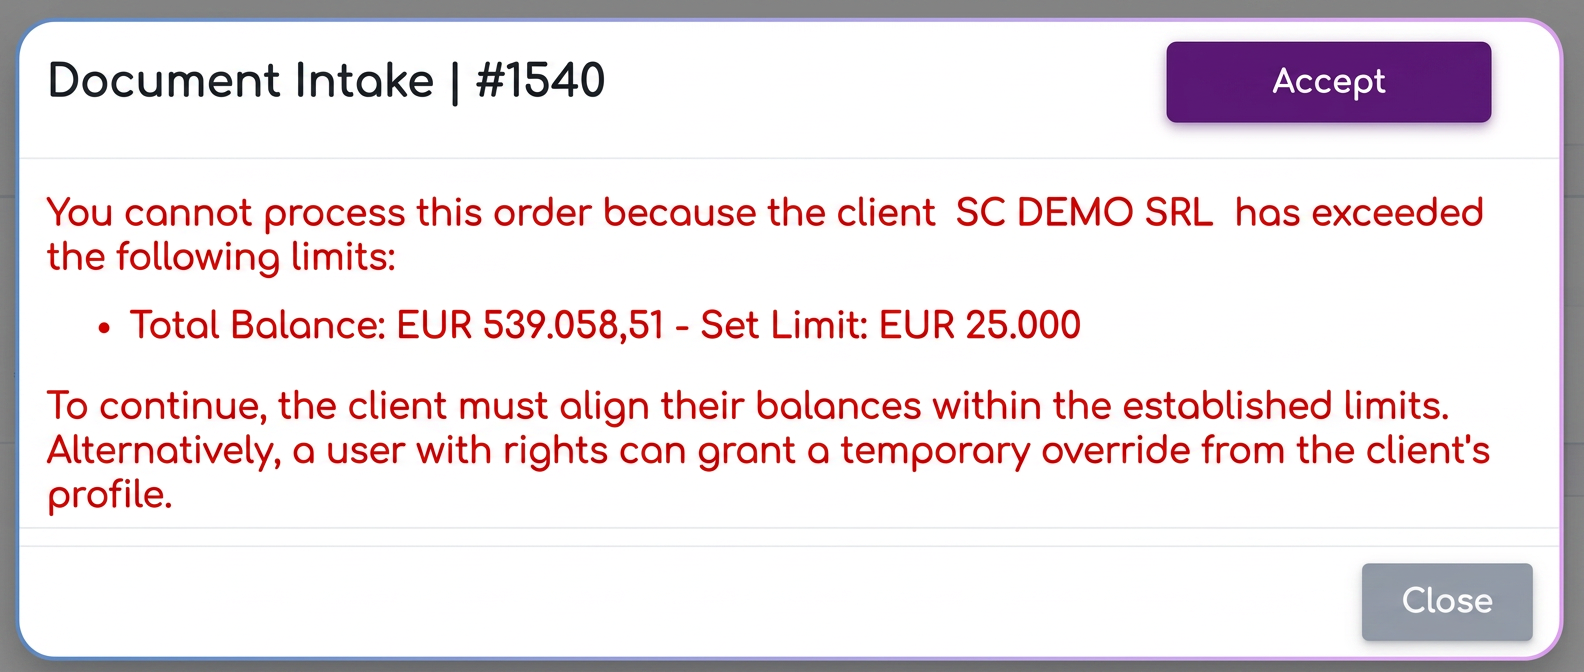
- When attempting to save a new order for that specific customer.
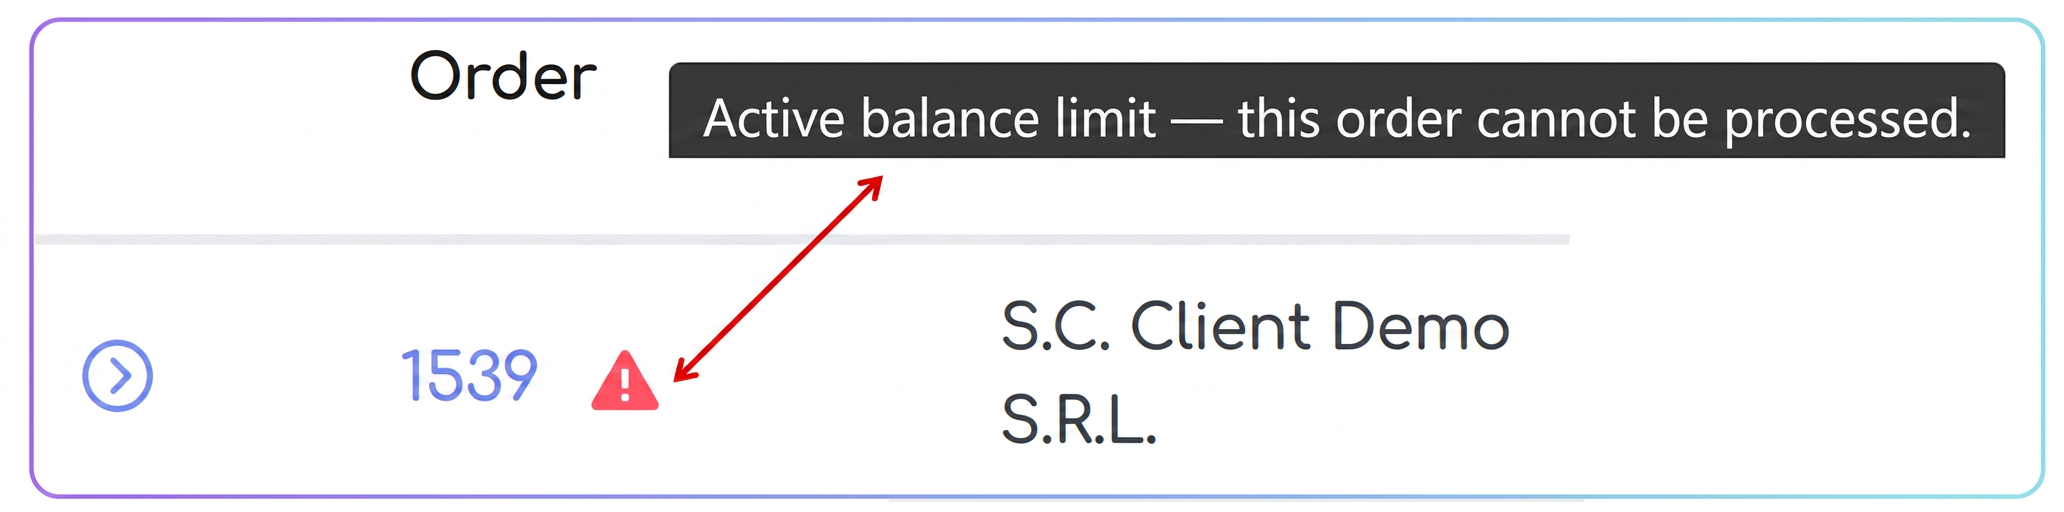
- In the order list and the workflow, via a visual indicator next to the blocked order.
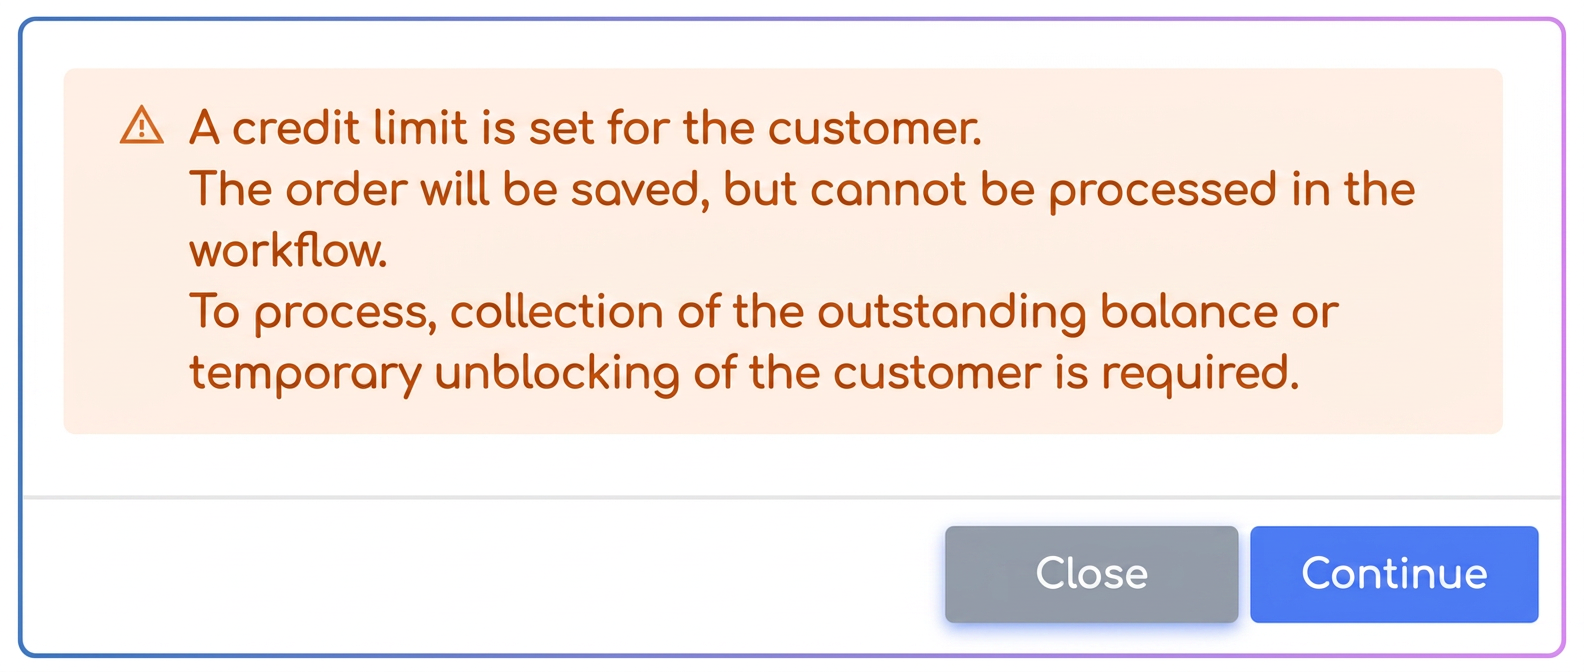
To process an order for a blocked customer, you have two options:
1. Rectifying the Financial Situation
The customer is automatically unblocked once their financial situation returns to the established parameters (for example, by paying the overdue invoices that led to the block).
2. Temporary (Manual) Unblocking
In exceptional situations, an authorized user can temporarily unblock a customer to allow the processing of an urgent order.
- Access the customer profile, "Credit Limit" tab.
- In the "Customer Block Status" box, toggle the button from "Blocked" to "Unblocked".
- A window will open where you must select the unblocking type: "Temporary unblock (one order)".
- Enter a reason for the unblocking (this will be saved in the history).
- Press "Unblock".
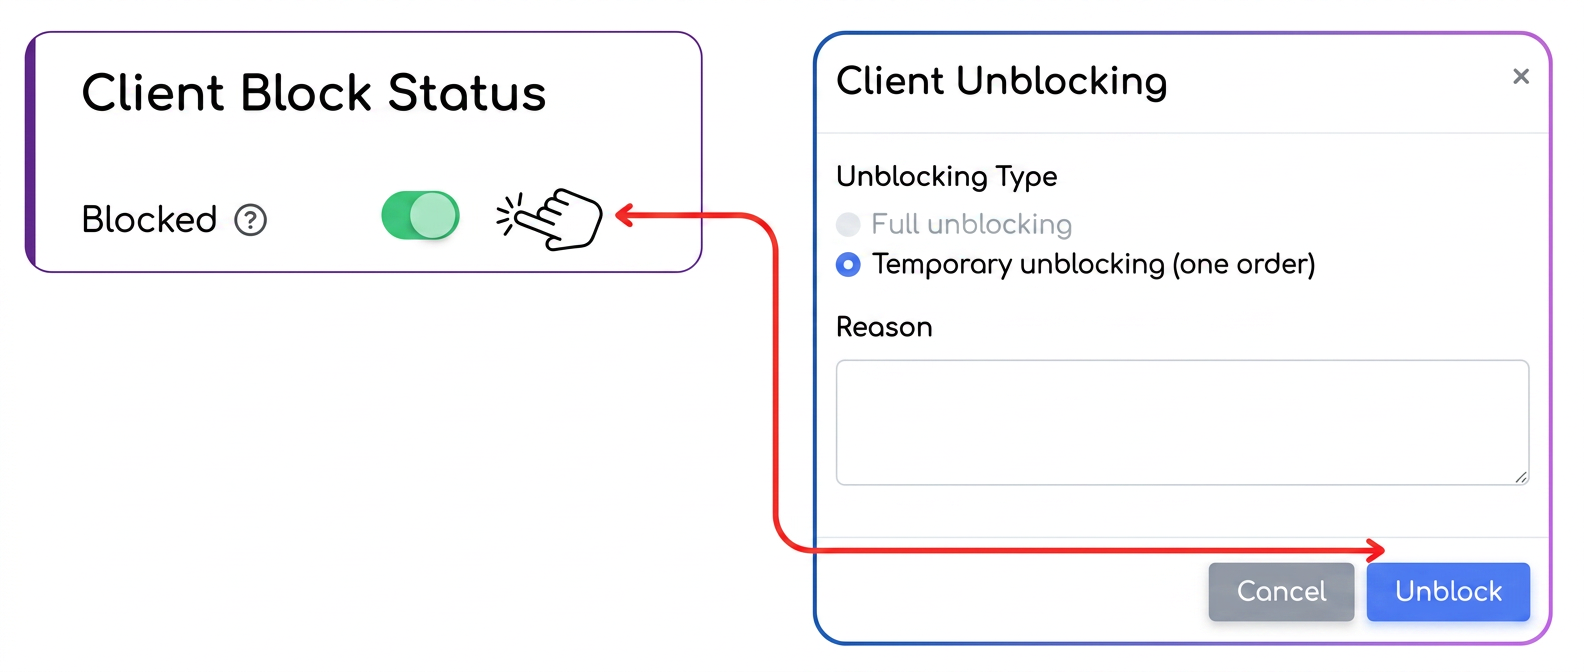
The customer will be unblocked to allow the processing of a single order from the workflow. After completing the action, if their balance still exceeds the limits, the customer will be automatically blocked again.
Notes:
- Does blocking affect invoice generation or just saving orders?
Blocking only affects the order workflow. Invoicing is permitted. - If I have both a global limit and an individual limit active, which takes priority?
The individual limit always takes priority over the global one. - Can I define only one of the limits (e.g., only overdue balance)?
Yes. The system allows the activation of any combination of the three criteria. Blocking occurs when any of the defined thresholds are exceeded. - Is the unblocking history saved?
Yes. All actions (block, unblock, reason, user, date) are recorded in "Limit History". - What exactly does "Overdue balance" mean and how is it calculated?
It represents the total sum of overdue and unpaid invoices as of the current date. - Does "Total balance" include invoices not yet due?
Yes, the total balance includes all issued and unpaid tax invoices, regardless of the payment term. - What happens if an invoice is partially paid?
The system subtracts only the collected value from the balance. The remaining unpaid portion continues to be considered when checking limits. - How is the overdue balance age calculated?
It refers to the oldest unpaid overdue invoice. If it exceeds the maximum number of set days, the customer is blocked. - Is the balance automatically updated based on payments recorded in the system?
Yes, the balance is recalculated in real-time with every collection or invoice issuance. - What happens if a customer exceeds the credit limit, but the order has already been entered into the system and processed up to a certain point?
If the breach occurs while an order is already in the workflow, it can no longer be processed further from that point.
Stages in progress can be paused or finalized (so as not to block already recorded work times), but they cannot be resumed later, and no new stages can be taken over for that order.
The block takes effect immediately and prevents any further operational progress in that workflow. - What happens if I later deactivate the global option?
Deactivating the global credit limit option has an immediate effect on all customers who were affected by the default setting (0 limit + blocking).
These customers will be automatically unblocked, and the system will consider that there is no longer an active limit for them.
Exception: customers who have received individual personalized limits in the meantime — for them, specific settings remain active and unaffected by the global change. - What permissions are required to unblock a customer?
To unblock a customer (temporarily or permanently), the user must hold the "Customer Limits – View and Edit" right.
This right allows access to the "Credit Limit" tab in the customer profile, modification of limit values, and execution of manual unblock / block actions.
Users without this right can only view the block status but cannot intervene.
NEW: Export Stock Movement History per Product (Product Sheet)
The functionality allows for the detailed export of all stock movements for a single product. This report, also known as a "Product Sheet/Warehouse Sheet", provides a complete view of entries and exits.
Stock exports are performed at a global level, covering all products. However, this feature allows generating a detailed report, in PDF or Excel format, which centralizes the complete movement history (entries, exits, transfers, consumption notes, etc.) for an individual product.
How to use it?
- Navigate to the Stocks section: Access the Products -> Stocks menu.
- Identify the product: Use the search fields or filters to locate the specific product for which you want to generate the report.
- Access the export option: Next to the desired product, in the "Actions" column, you will find a new button: "Export Stock History".
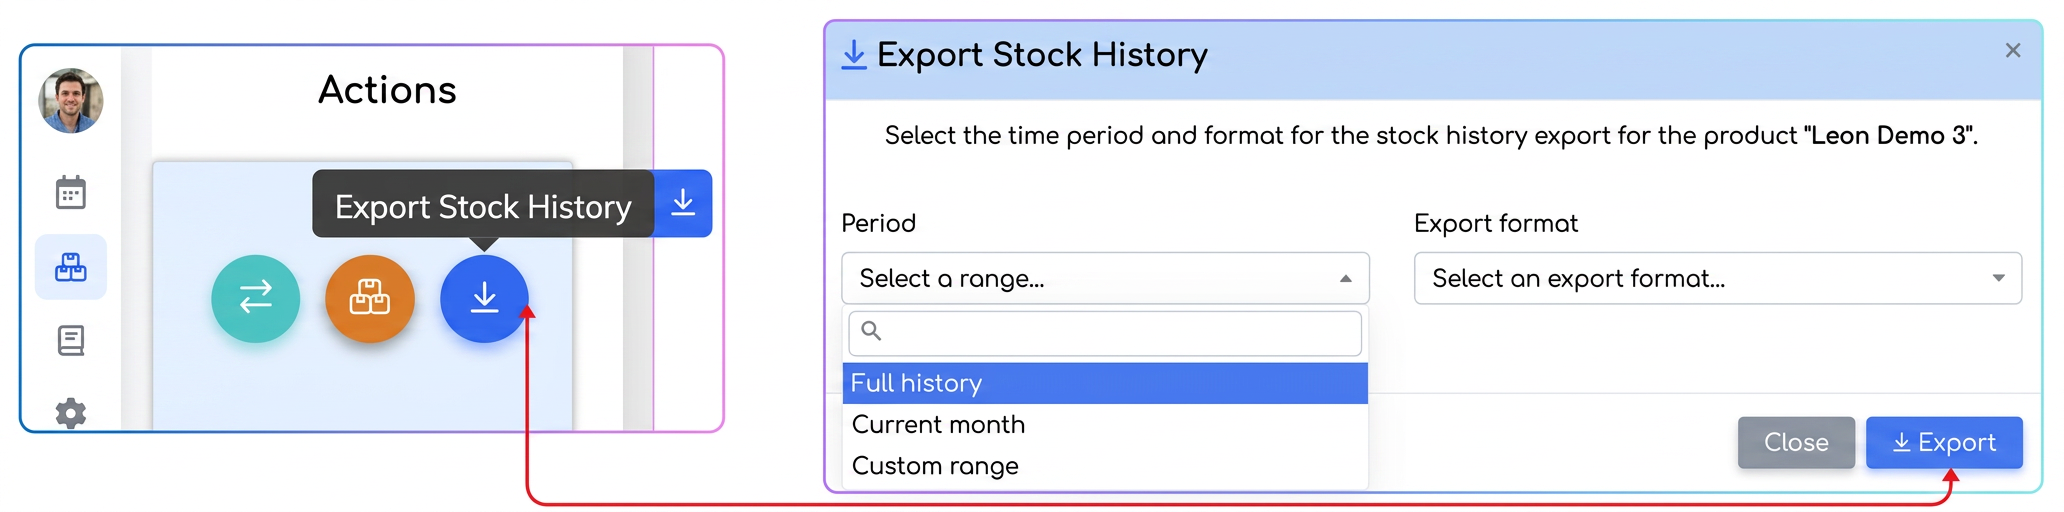
- Configure the report: Clicking the button will open a configuration window where you can select:
- Period: Choose the time interval for which you want to generate the report. Options include "Full history", "Current month" or a "Custom range" selected by you.
- Report format: Select the desired file format, PDF or Excel.
- Generate file: Press the "Export" button. The file will be automatically generated and downloaded.
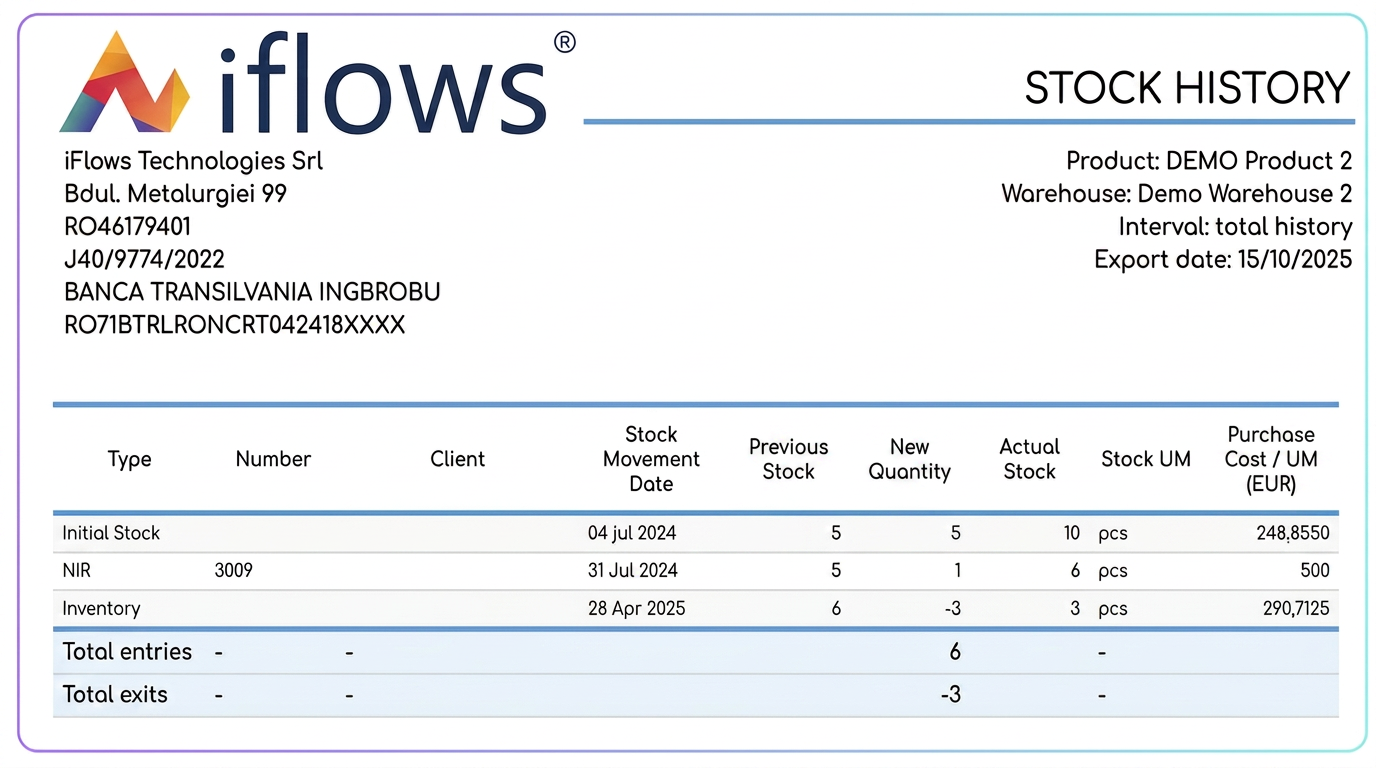
Report Content (Product Sheet)
The exported document is structured to provide a clear and complete overview.
Optimization: Additional Details for Products in Orders
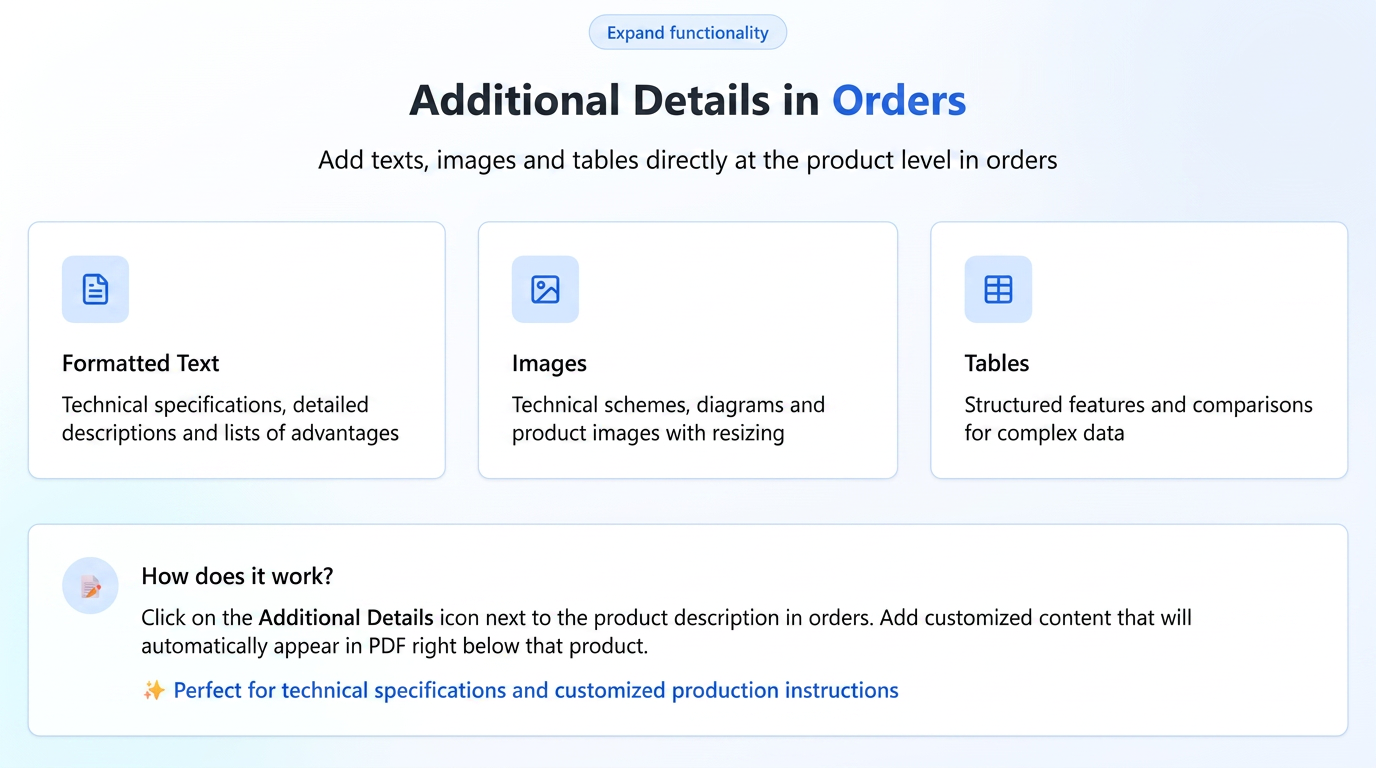
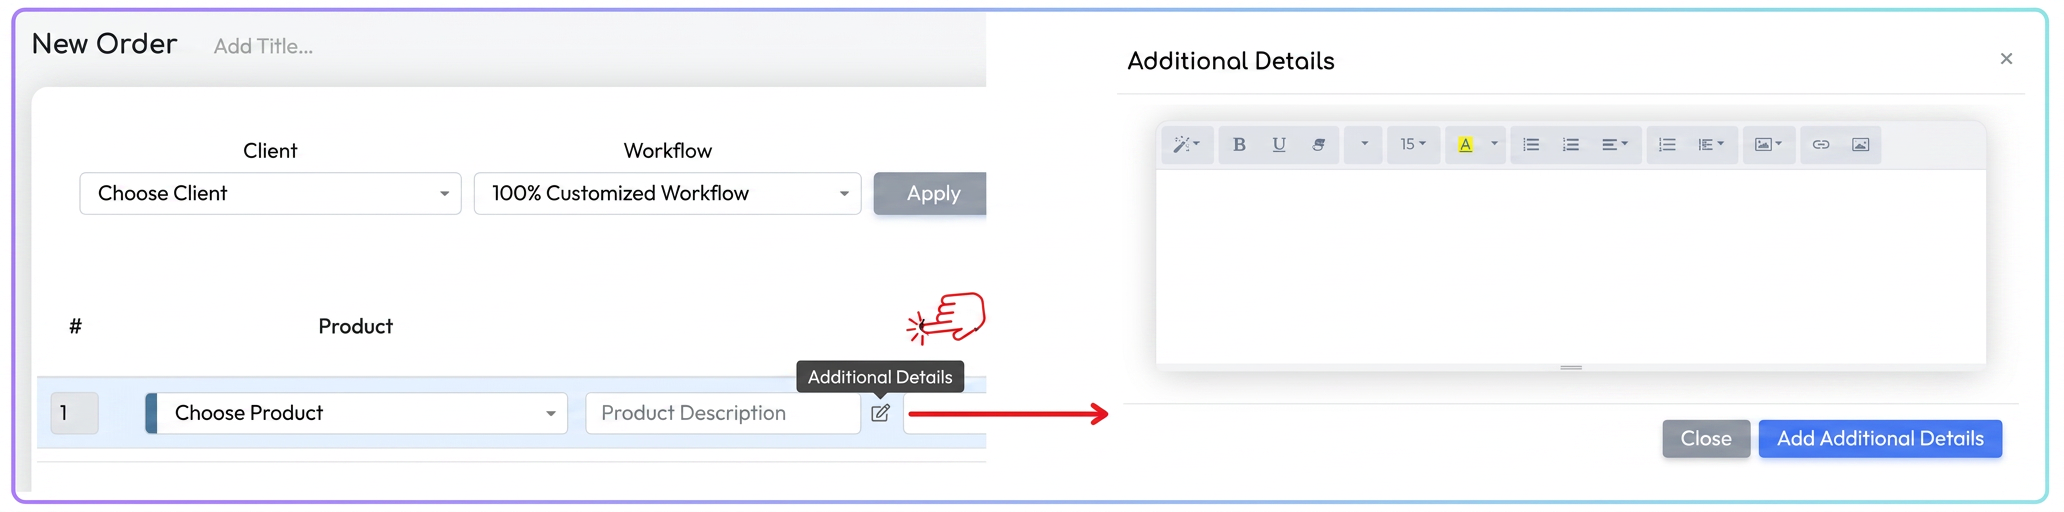
The „Additional Details” functionality is now also available in Order forms, not just in Quotes.
Thus, for each product line in an order, you can add personalized content — text, images, tables — directly from the 📝 icon next to „Product description”.
The entered information will be automatically displayed in the order PDF, immediately below the respective product, providing clarity and additional context for production, delivery, or the customer.
🔹 Purpose: to precisely document the specifics of each product (e.g., sketches, specifications, technical instructions) without modifying the standard sheet in the nomenclature.
Additional examples available here.
Optimization: Sending History and Visible Status for Standard Documents
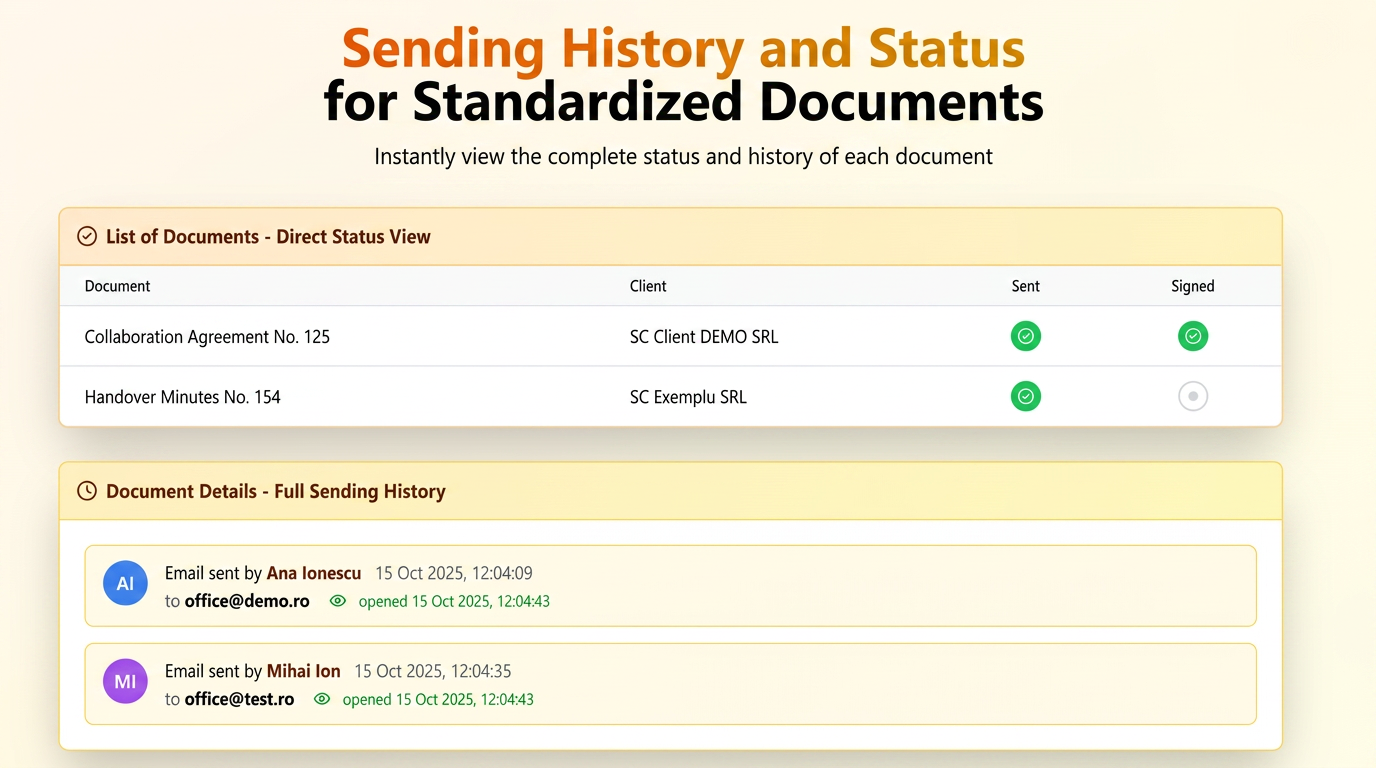
The new update in the Standard Documents (Documente Tipizate) module offers full visibility into the status of each document — both at the list level and in the individual record detail.
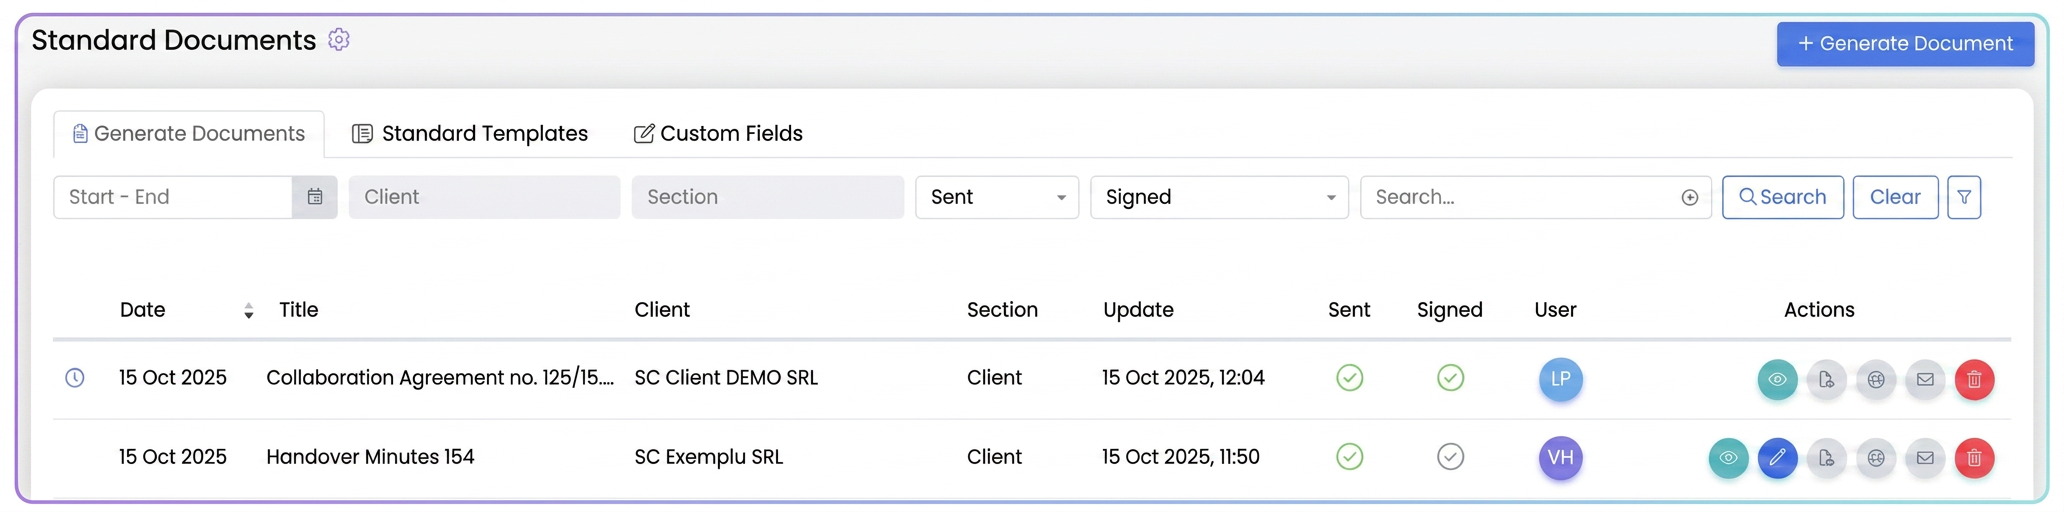
1. Direct visibility in the list
In the main table ( section), you can now instantly see:
- if a document was sent (green ✓ in the Sent column);
Thus, without opening the document, you already know its state — sent / not sent, signed / unsigned.
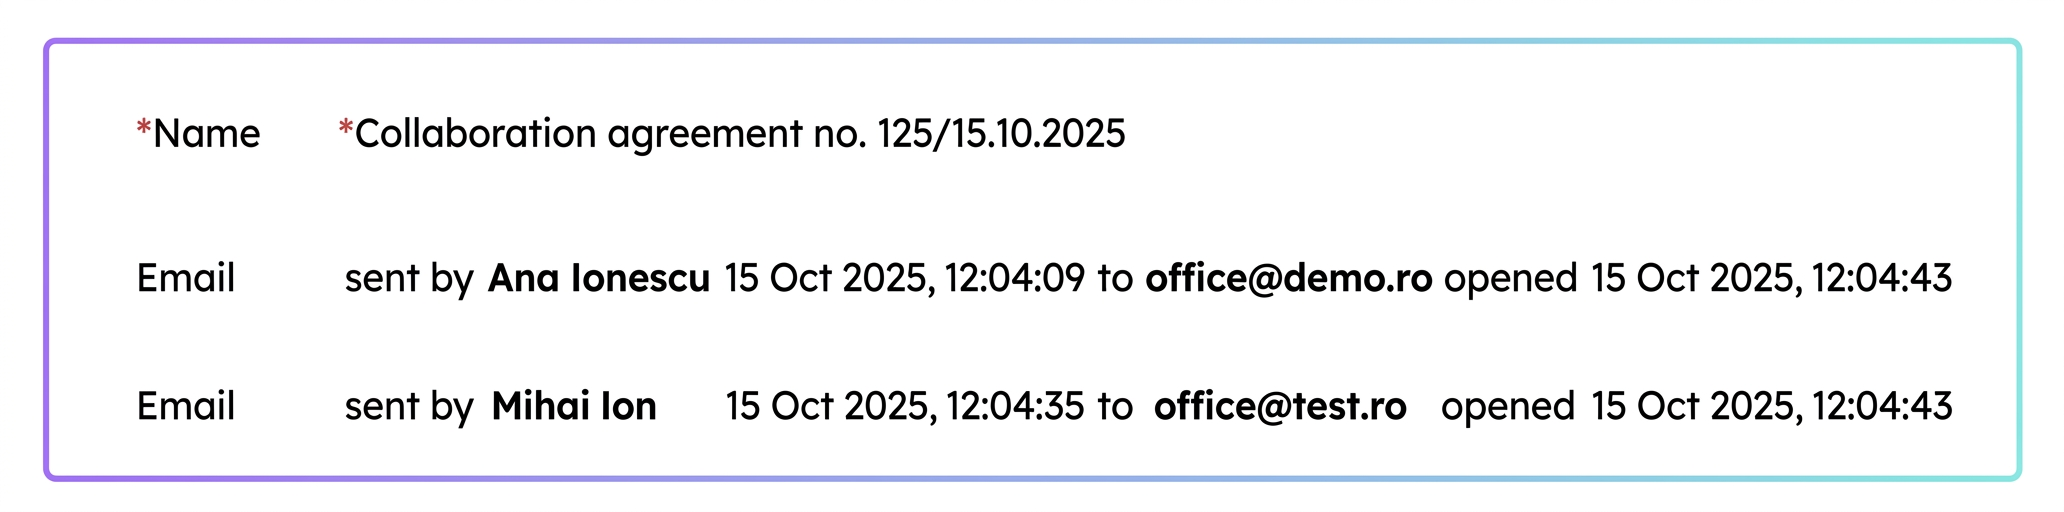
2. Full details in the document record
When accessing the document via the View action, a section with the email sending history now appears at the top, which includes:
- the name of the user who sent the document;
- the exact date and time of dispatch;
- the recipient's email address;
- the moment the recipient opened the email.
If the document was sent multiple times, each dispatch appears separately, providing full traceability.
Optimization: New display mode for information in the PDF Quote
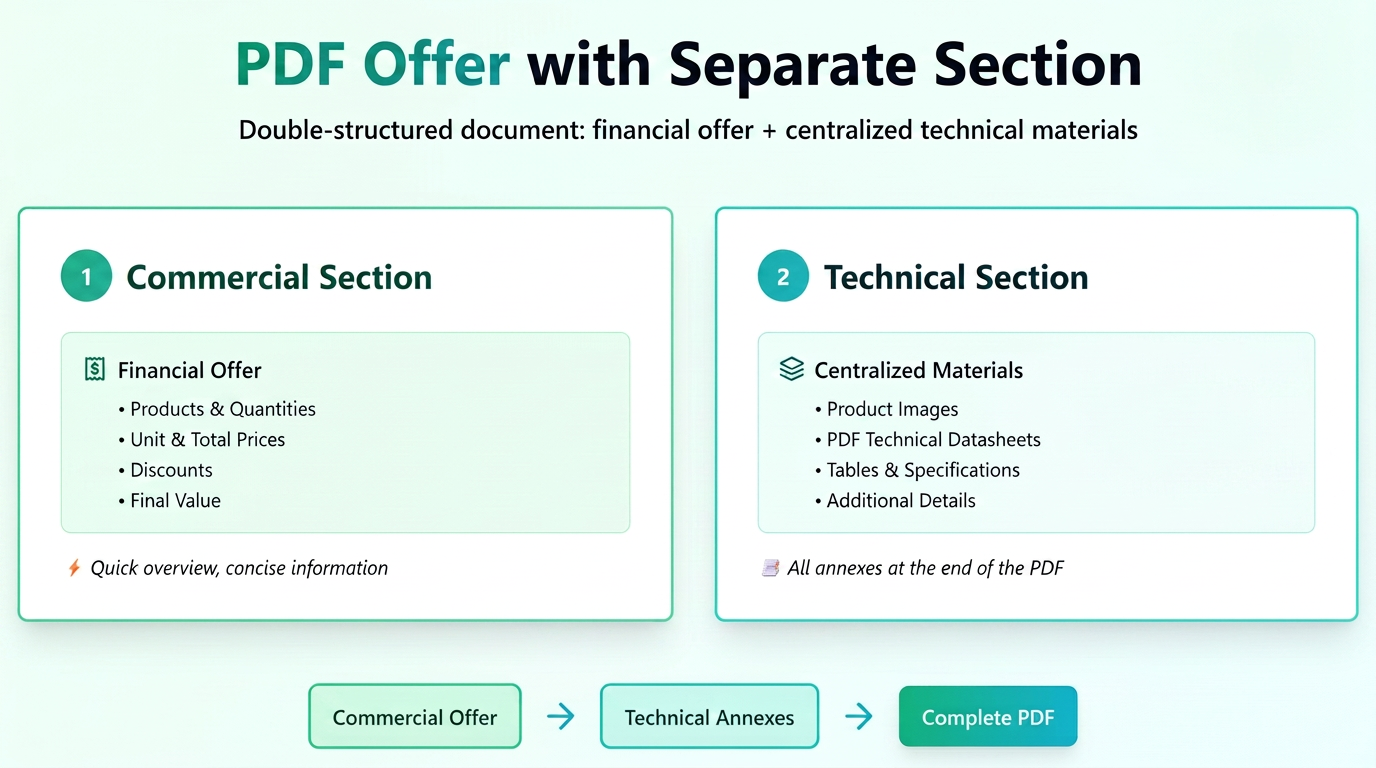
The „Centralization of Product Information in Quotes” functionality introduces a new logical structure for the PDF document, dividing the quote into two distinct sections for a clearer presentation:
1. Main section – Commercial Quote
This remains concise and focused on essential data:
- product names,
- quantities,
- unit and total prices,
- any discounts and the final value.
The goal is for the first part of the document to be quickly scannable by the customer, offering a clear view of the economic proposal.
2. Secondary section – Centralization of technical and visual information
In this part, each product in the quote is revisited individually, as a subtitle (e.g.: Product: LED Billboard 120x240 cm), followed by all attached materials:
- product images,
- PDF technical sheets,
- tables or detailed specifications,
- texts added via the „Additional Details” functionality.
Thus, all documents associated with the products are centralized and presented at the end, offering a clear structure between the commercial part and the technical/informational part.
In short, the new centralization mode transforms the quote into a double-structured document:
📄 first part – the financial offer,
📑 second part – sheets and annexes related to each product.
Where to find the setting:
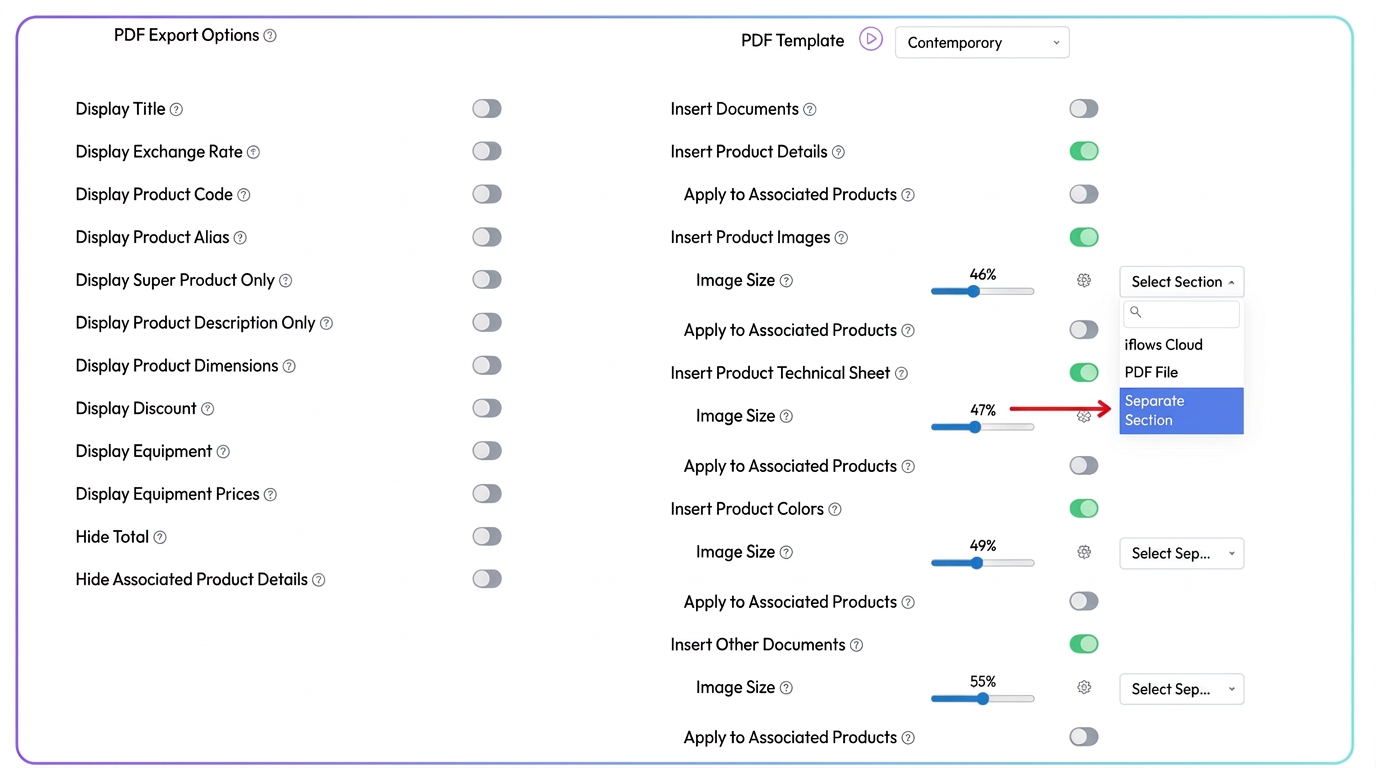
In the „PDF Export Options” section, you will find all categories of information that can be included in the quote:
- Insert Product Images
- Insert Product Technical Sheet
- Insert Product Colors
- Insert Other Documents
For each type of information, there is a dropdown menu allowing you to choose the display mode:
🔸 1. PDF File
This is the classic variant — information is inserted directly into the body of the quote, immediately below the respective product.
🔸 2. iFlows Cloud
In this mode, materials (images, sheets, documents) are stored in the iFlows cloud and are accessible to the customer via links.
✔ Recommended when file sizes are large or you want a more compact PDF.
🔸 3. Separate Section
New option — allows all materials related to products to be automatically centralized at the end of the PDF, in a dedicated section.
✔ The first part of the document will contain the financial offer (products, quantities, prices).
✔ In the second part, each product is listed again, followed by its related images, sheets, and documents.
Optimization: New Statuses for Purchase Orders
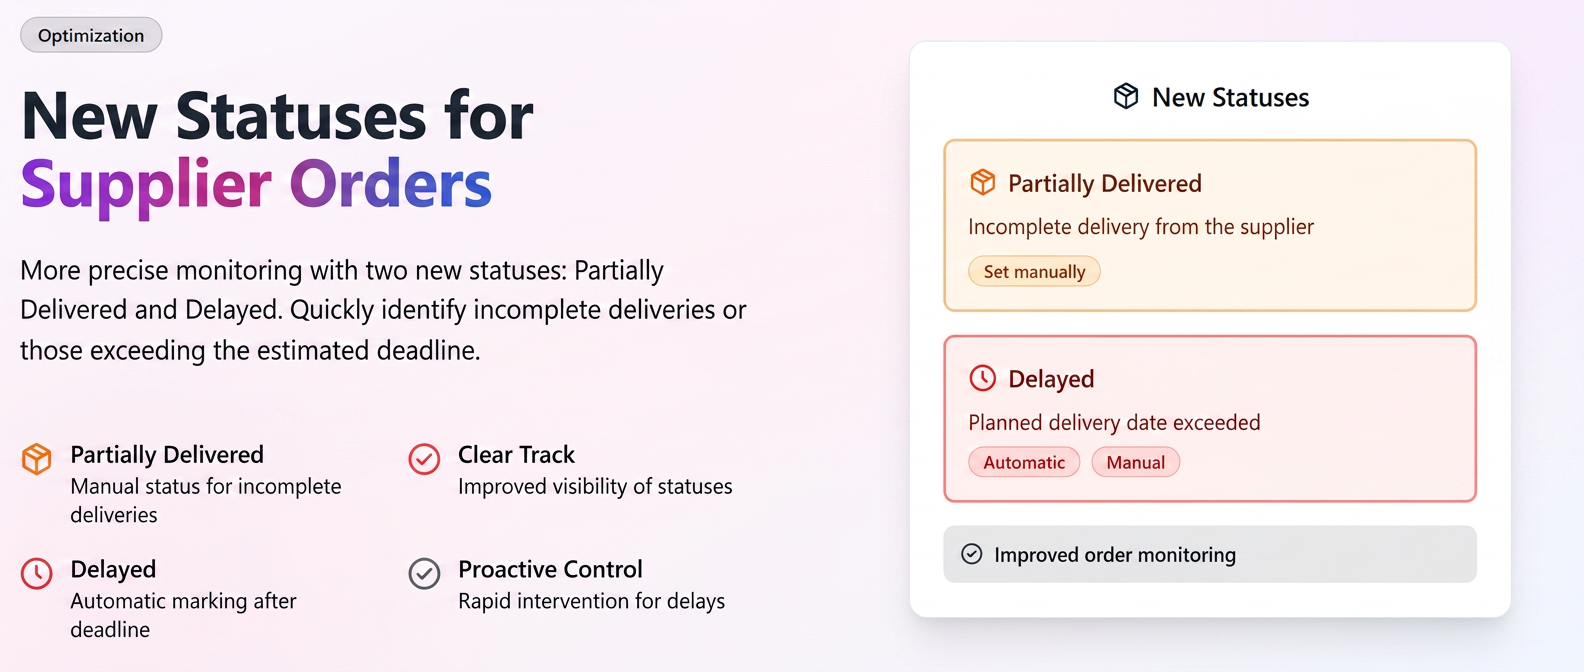
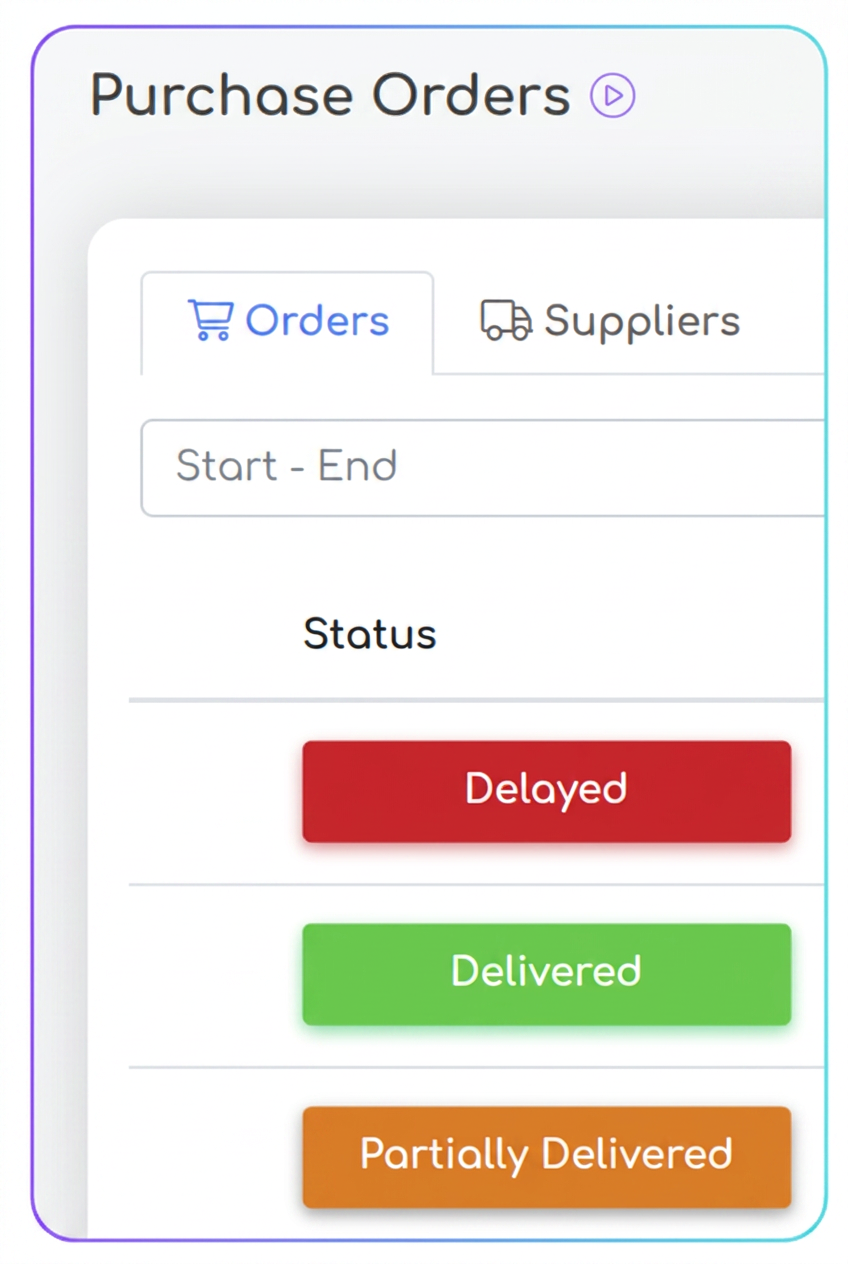
To provide a clearer overview and better control over the procurement process, we have introduced two new statuses in the purchase orders section: Partially Delivered and Delayed.
These additions allow for more precise monitoring of each order's stage, facilitating quick identification of incomplete deliveries or those that exceed the estimated deadline.
1. "Partially Delivered" Status
This status is designed for situations where you receive only a portion of the ordered goods from the supplier. It helps you keep a clear record of orders that have not yet been fully fulfilled.
- Identification color: Orange
- Setting mode: Manual
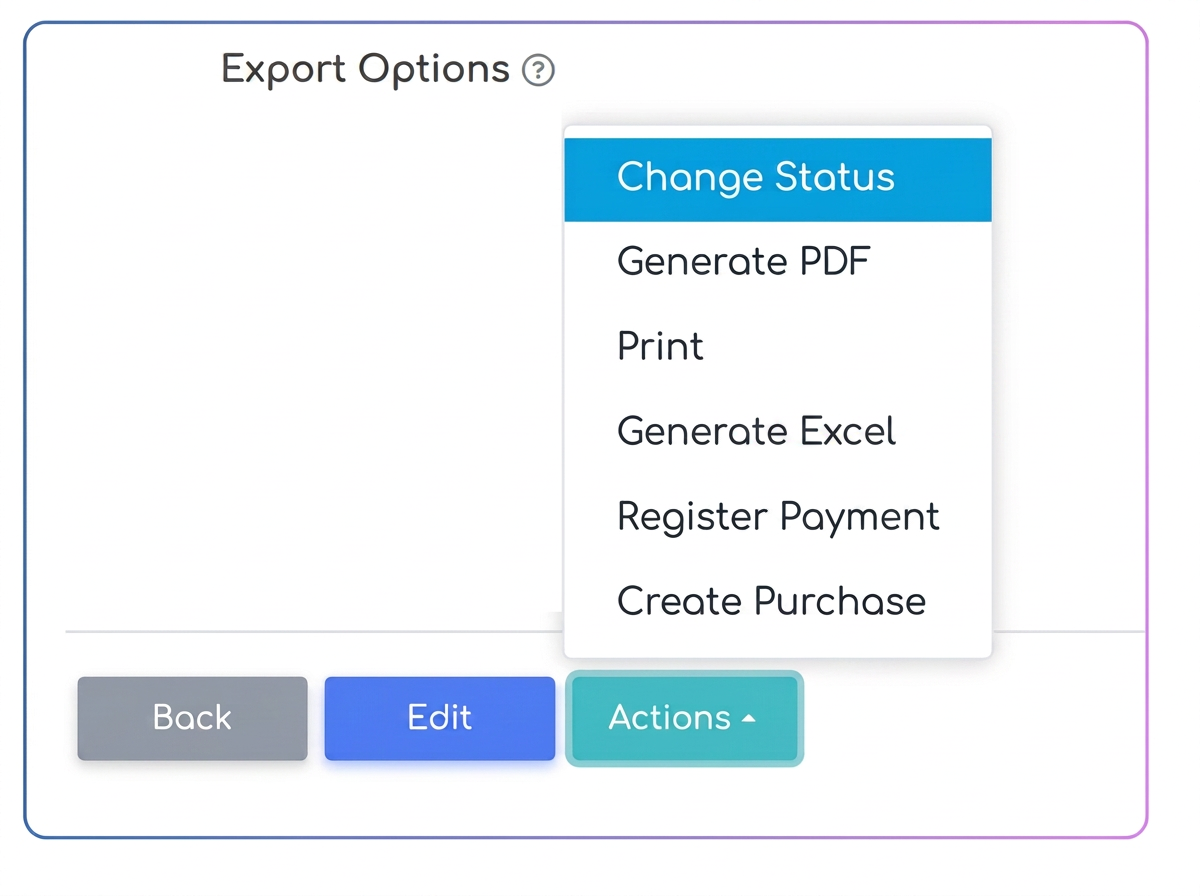
How to use it?
The "Partially Delivered" status is activated exclusively manually. When you receive an incomplete delivery and generate the NIR (Nota de Intrare și Recepție - Reception and Inspection Note) for the received products, follow these steps to update the order:
- Navigate to the Financial -> Suppliers -> Purchase Orders section.
- Open the corresponding order.
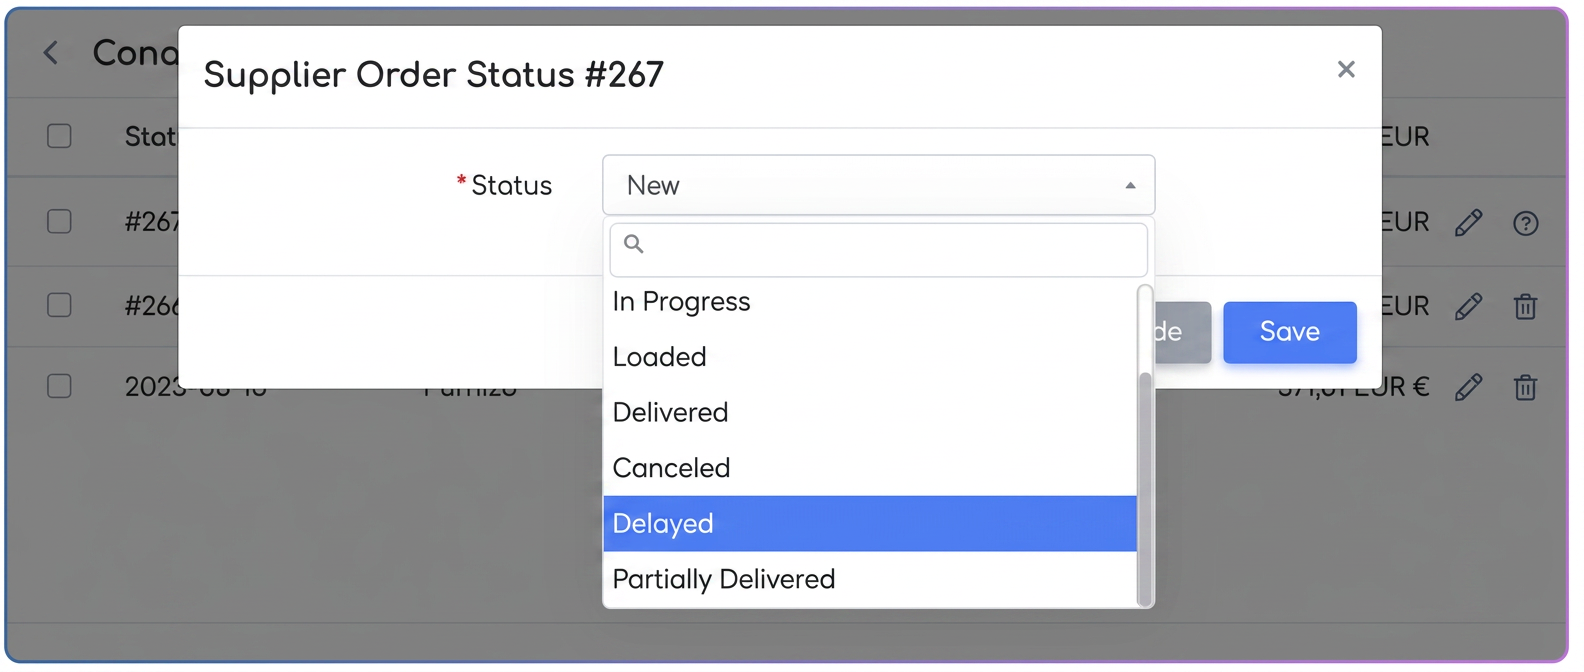
- Access the Actions -> Change Status menu.
- From the displayed list, select the "Partially Delivered" status and save the modification.
The order will remain with this status until you receive the rest of the products and move it to the "Delivered" state.
2. "Delayed" Status
This status is essential for drawing attention to orders that have not been delivered by the supplier by the agreed date, allowing you to intervene proactively.
- Identification color: Red
- Setting mode: Automatic and Manual
How does the automatic setting work?
The iFlows platform will automatically mark an order as "Delayed" if two conditions are met simultaneously:
- The current date has exceeded the "Delivery Date" specified in the order.
- The order status is still an intermediate one (e.g., Sent, In Progress) and has not been marked as "Delivered" or "Partially Delivered".
Manual setting
Similar to other statuses, "Delayed" can also be set manually if you want to mark an order as having problems before the deadline. The process is identical:
- From within the order, access the Actions -> Change Status menu.
- Select the "Delayed" option and save.
Optimization: Setting a Personalized Home Page
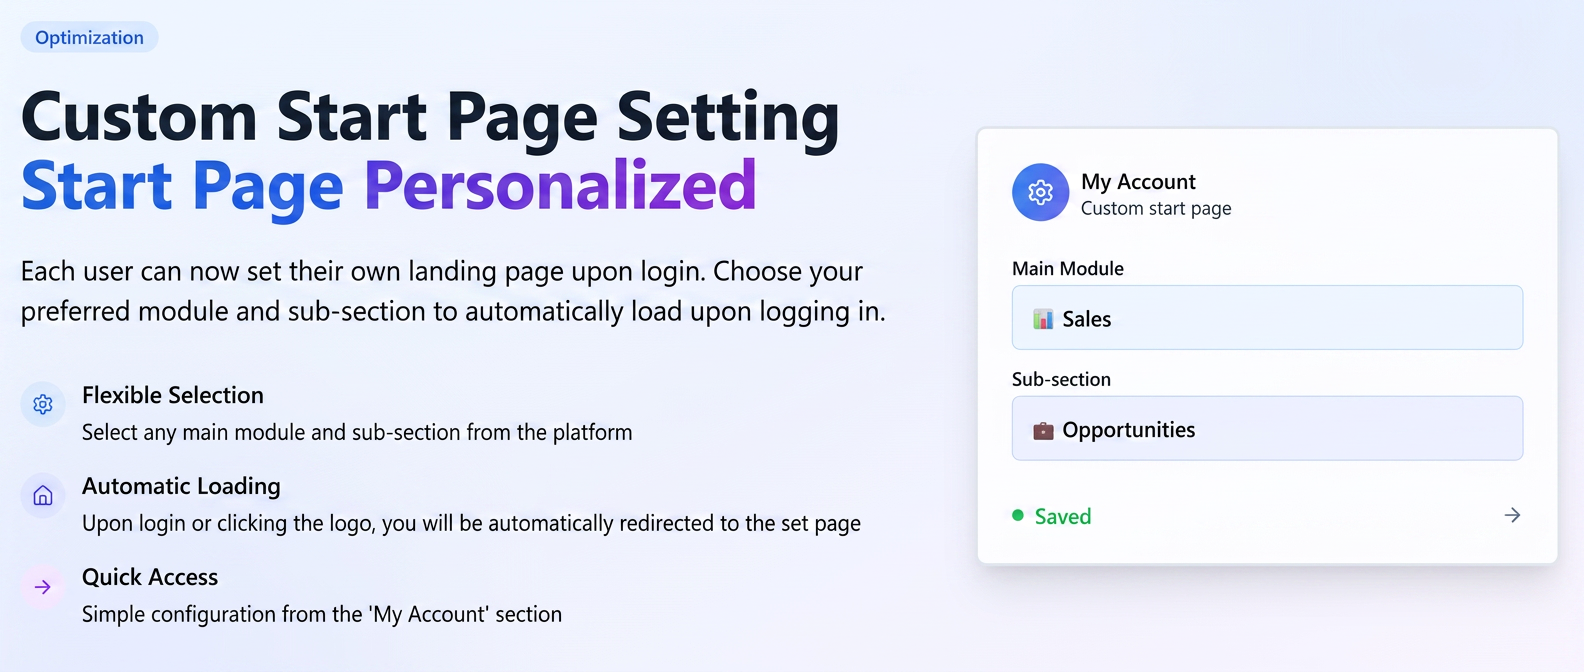
Each user can now set their own landing page upon login or when accessing the platform's main page.
By default, at login, the iFlows platform redirects users to the "Workflow" section. The new functionality allows selecting any main page or sub-page within the platform as a starting point. Thus, if your daily activity focuses on a specific area (e.g., Quotes, Customers, Opportunities, Orders), you can set that section to load automatically when accessing the platform.
How to use it?
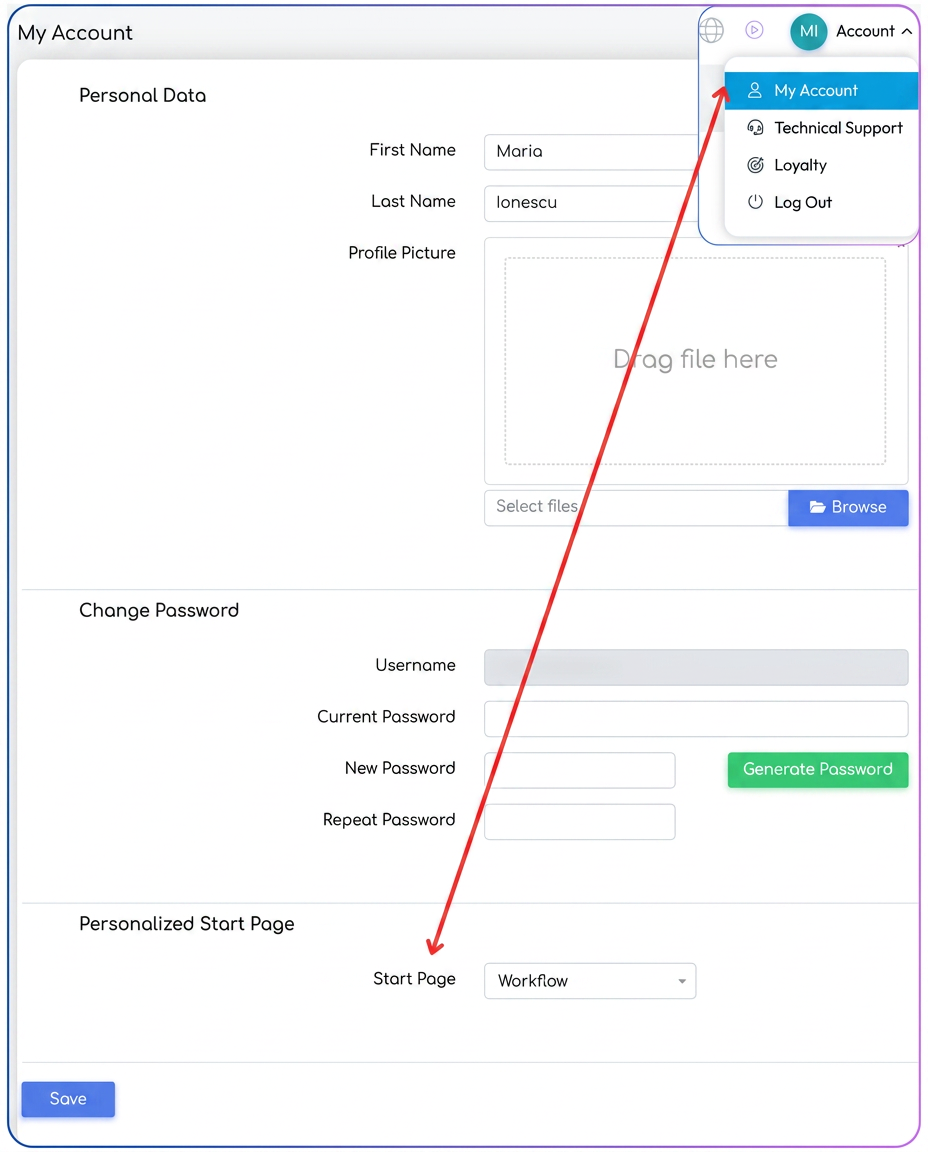
- Access account settings: Click on the profile icon in the top-right corner and select the "My Account" option.
- Locate the personalization section: Scroll down to the section named "Personalized home page".
- Select the desired page:
- You will find two dropdown menus. The first menu allows you to choose the main module (e.g., Sales, Financial, Reports, Customers, etc.).
- After selecting a main module, the second menu will update to allow you to choose a specific sub-section (e.g., Opportunities, Invoices, Executive Summary).
- Save changes: Press the "Save" button to apply the new setting.
Behavior
- Upon your next login to the platform or when accessing the main link (e.g., companyname.iflows.com), you will be automatically redirected to the set page.
- Also, clicking on the iFlows logo in the top-left corner will now take you to your personalized home page, not the default one.
Important: This setting only applies when accessing the basic link of the platform. If you access a direct link to a specific invoice or quote (e.g., a link saved in bookmarks), you will be directed to that specific page, ignoring the home page setting.