
New: eMAG Marketplace Integration
Section 1: Initial Integration Setup
To begin, it is necessary to activate and configure the connection between iFlows and your eMAG Marketplace account.
Configuration steps:
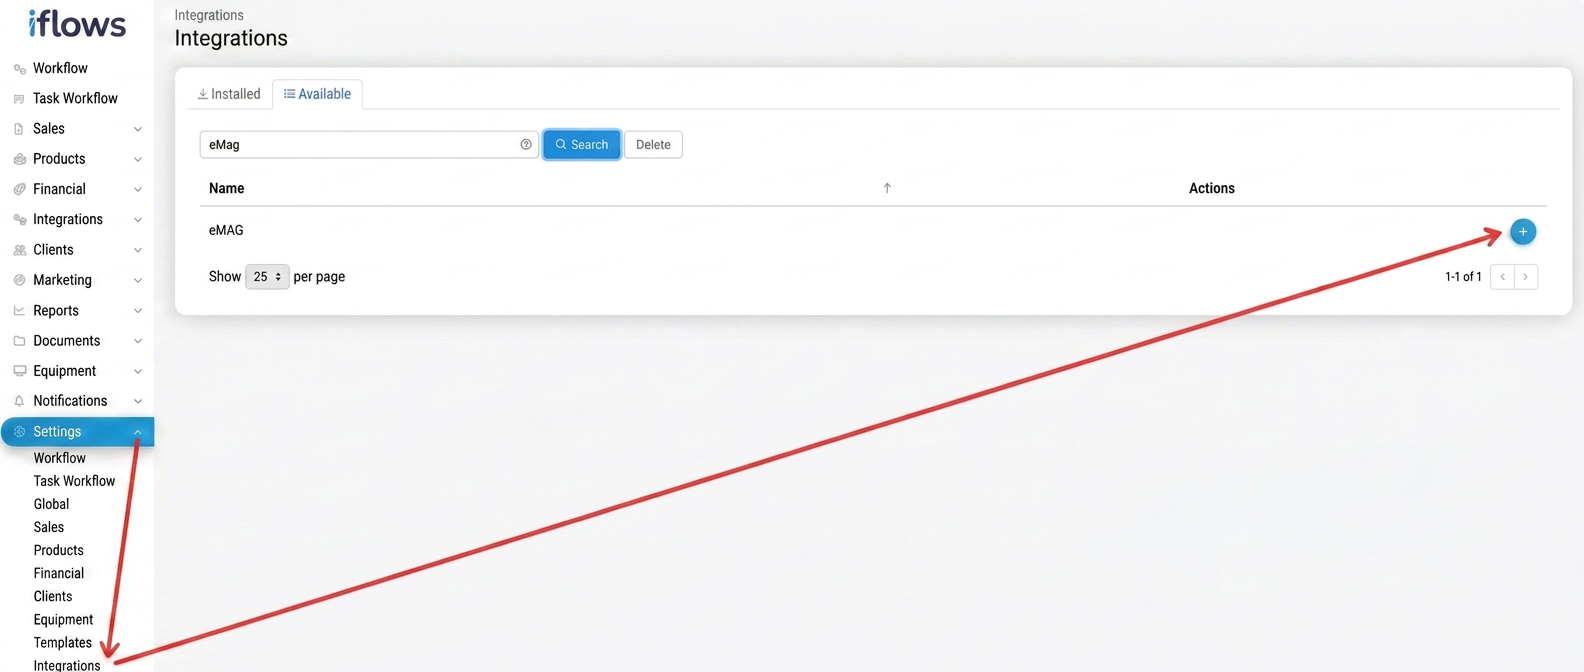
- Navigate to the Integrations section:
From the main menu, access . - Activate the eMAG integration:
- Select the Available tab.
- Find eMAG in the list and click the + install button.
- Technical Configurations in the eMAG Platform:
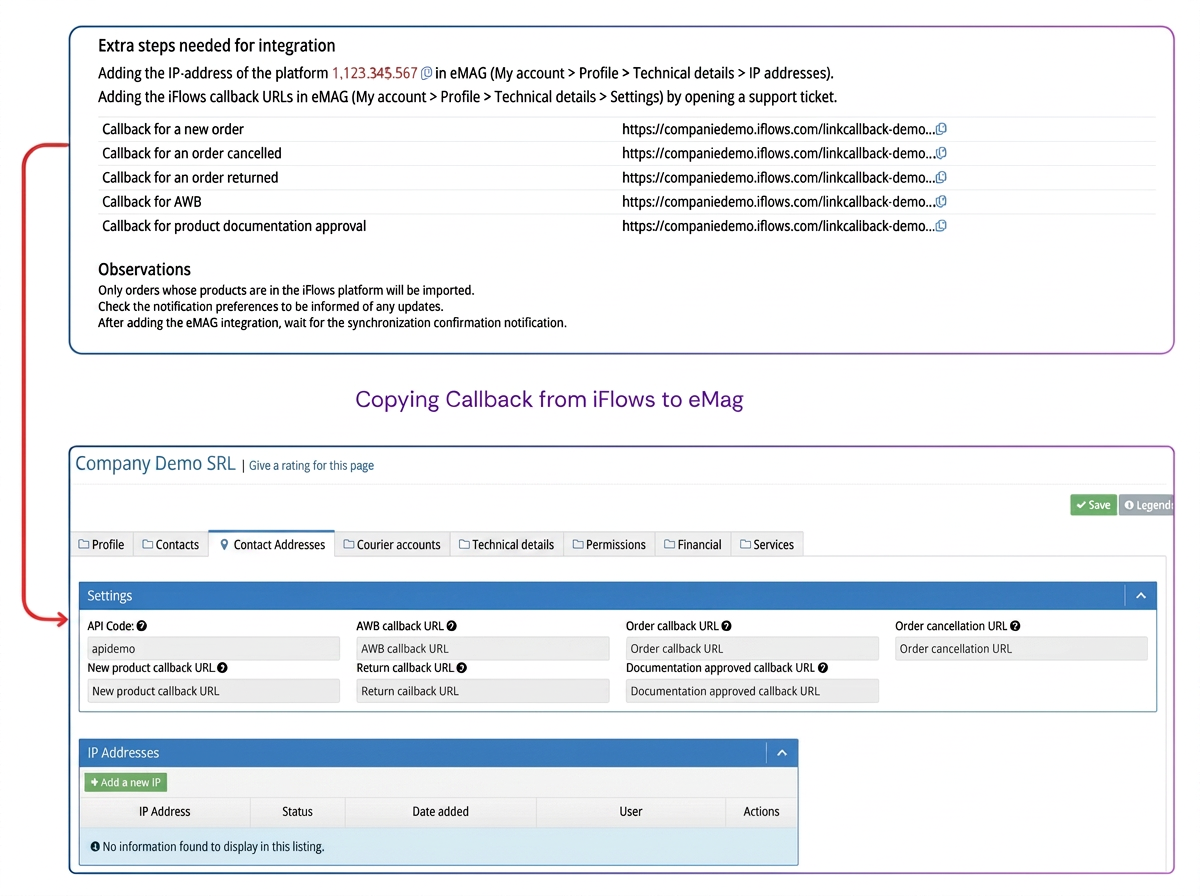
- Adding the IP Address (Mandatory): It is essential to add the iFlows server IP (displayed in the integration form) in the Technical Details section of your eMAG account (My Account menu) to allow initial communication.
- Adding Callback URLs (Mandatory for real-time updates): To benefit from real-time updates (e.g., canceling an order), adding callback URLs is required. This operation is performed by opening a ticket to the eMAG Marketplace team, who will then complete the corresponding fields with the links provided from the iFlows integration form.
- Complete the integration form in iFlows:
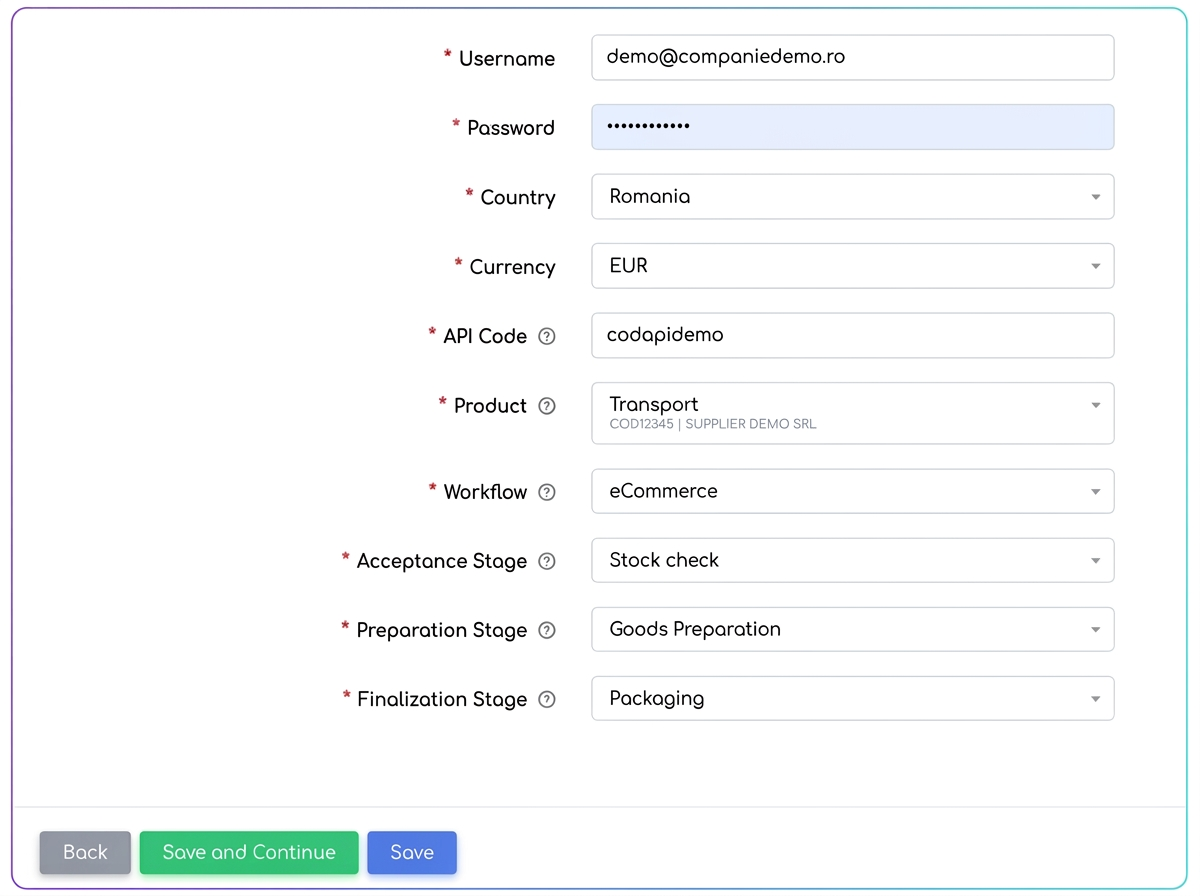
- Username and Password: Enter the authentication credentials used for your eMAG Marketplace account.
- API Code: This is obtained from the eMAG platform, My Account > Profile > Technical Details > Settings section.
- Shipping Product: Select a predefined product in iFlows to be used for adding shipping costs to invoices generated for eMAG orders.
- Workflow: Choose the iFlows workflow where new orders received from eMAG will automatically enter.
- Acceptance Stage: Select the stage in the workflow which, once completed in iFlows, will automatically update the order status in eMAG to "Accepted".
- Preparation Stage: Select the stage in the workflow which, once completed in iFlows, will automatically update the order status in eMAG to "In preparation".
- Finalization Stage: Select the stage which, upon completion, will change the order status in eMAG to "Finalized".
⚠️ Note: After saving the integration, it is not immediately available. Sync time is required, and the status "Syncing" will appear in the integrations list until the connection is fully active. Also, at the end of this process, you will receive a notification in the platform with the message "Synchronization completed successfully".

- Activating Notifications🔔:
- Navigate to .
- Activate the desired notifications to be informed about:
- New orders received from eMAG.
- Canceled or updated orders.
- Completion of eMAG synchronization.
Section 2: Managing Products and Offers on eMAG
After activating the integration, you can add and manage products directly from iFlows.
Linking an Existing Product:
- If the product already exists on eMAG and you only want to link it with the one in iFlows for stock and order synchronization:
- Ensure the Product Code in iFlows is identical to the one on eMAG.
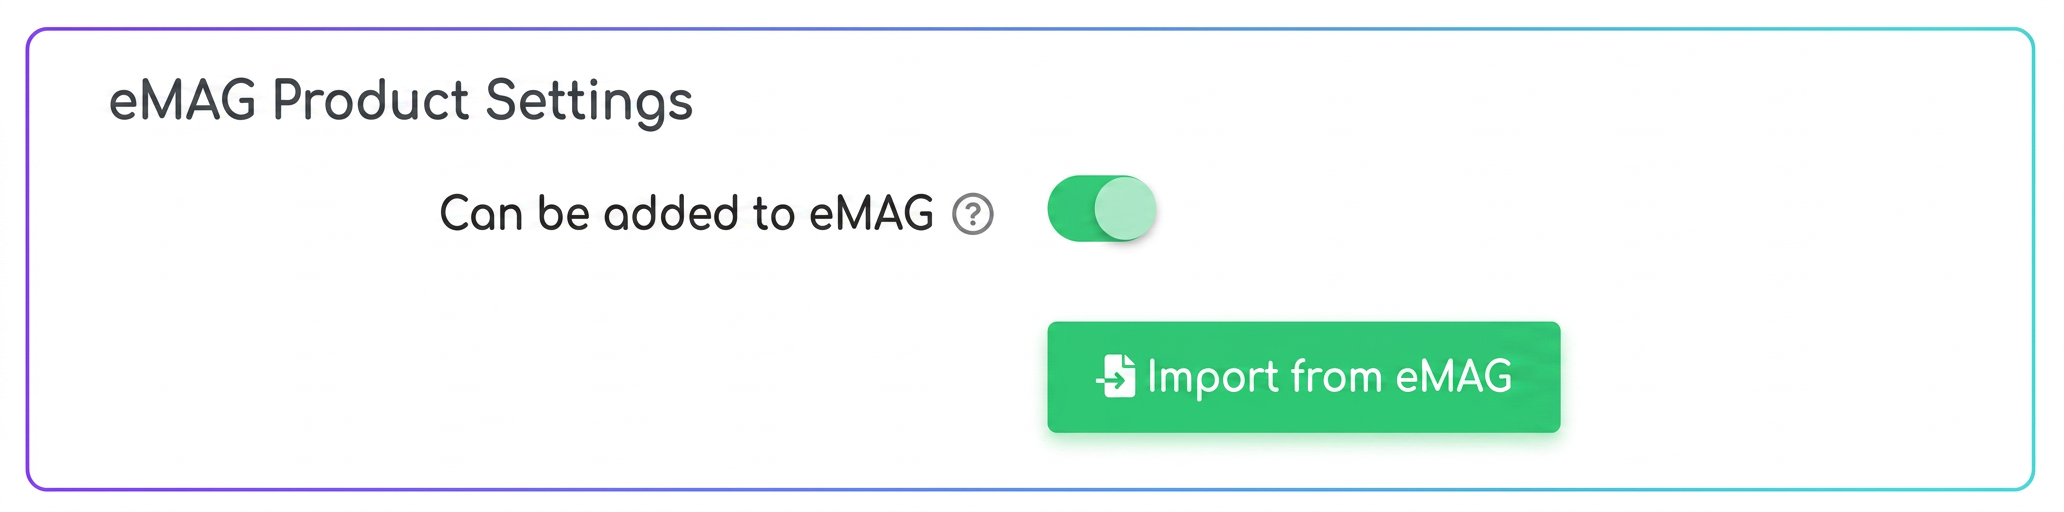
- On the product edit page, click the Import from eMAG button.
Adding a Product to eMAG:
- Navigate to .
- Edit an existing product or create a new one.
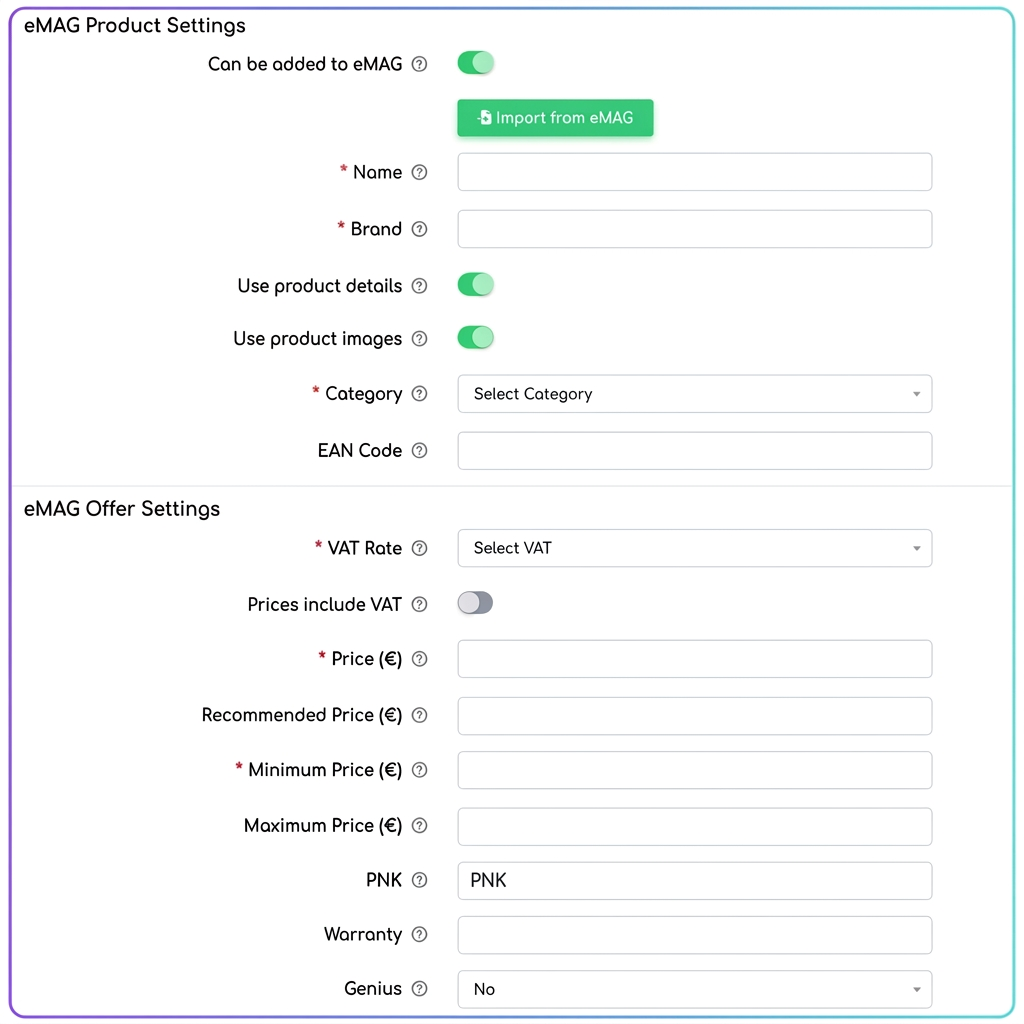
- Activate the product for eMAG: on the product edit page, scroll down to the eMAG Product Settings section and check the option "Can be added to eMAG".
- Complete the following details:
- Name and Brand
- Category (mandatory for displaying specific characteristics)
- EAN Code (mandatory for most categories)
- Price, VAT, Recommended Price, Minimum, Maximum
- Warranty (months)
- Details, Images, Technical Sheet
- PNK:
- Represents the unique identifier for an offer associated with an existing product in the eMAG catalog.
- If the product already exists on eMAG, you have two options:
- Manually fill in the PNK field to attach your offer to that product.
- Use the Import from eMAG option, in which case the PNK will be automatically retrieved from the active offer.
- If adding a new product, leave the PNK field empty. After the offer is processed and approved, you will be notified when it receives a PNK from eMAG.
Updating and Syncing Products:
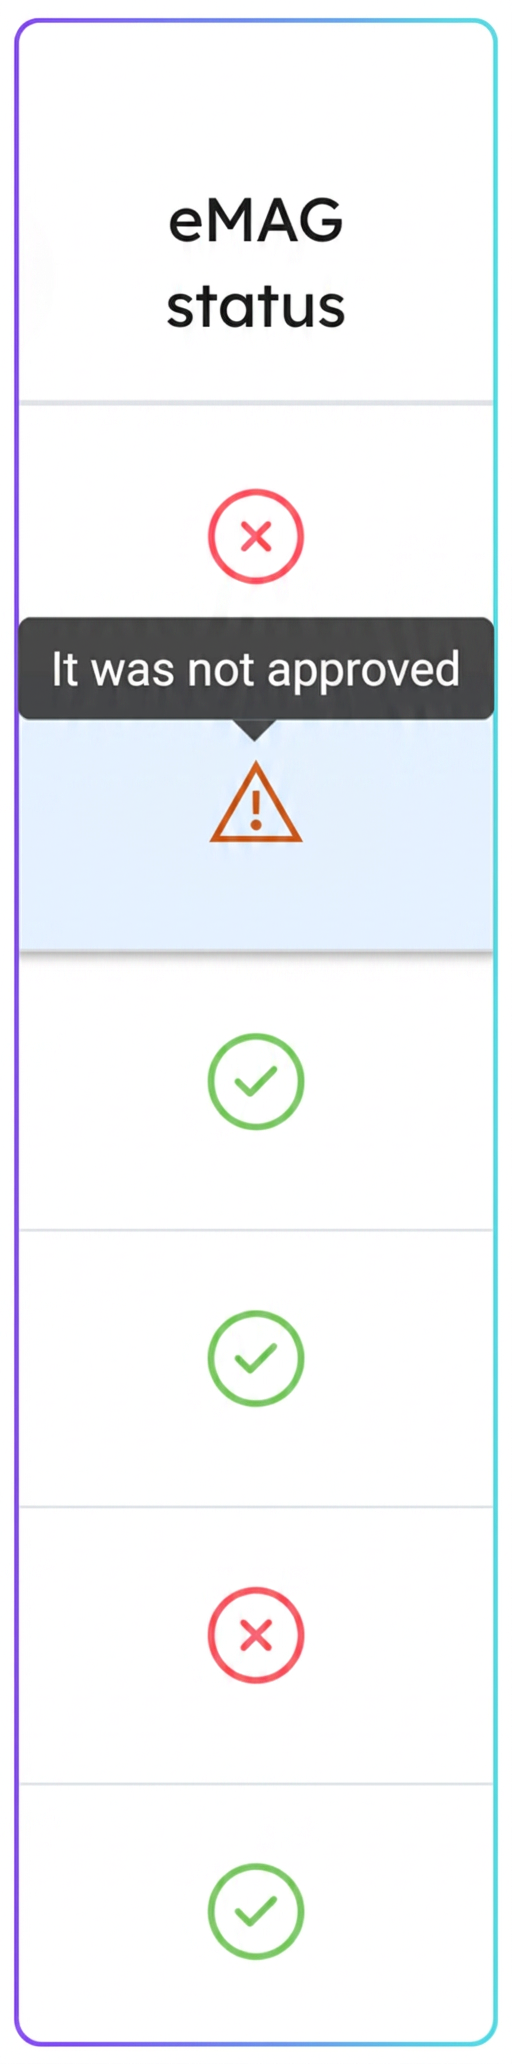
- In the product list, the eMAG status column indicates each product's state:
- "Awaiting approval"
- "Approved"
- "Not approved"
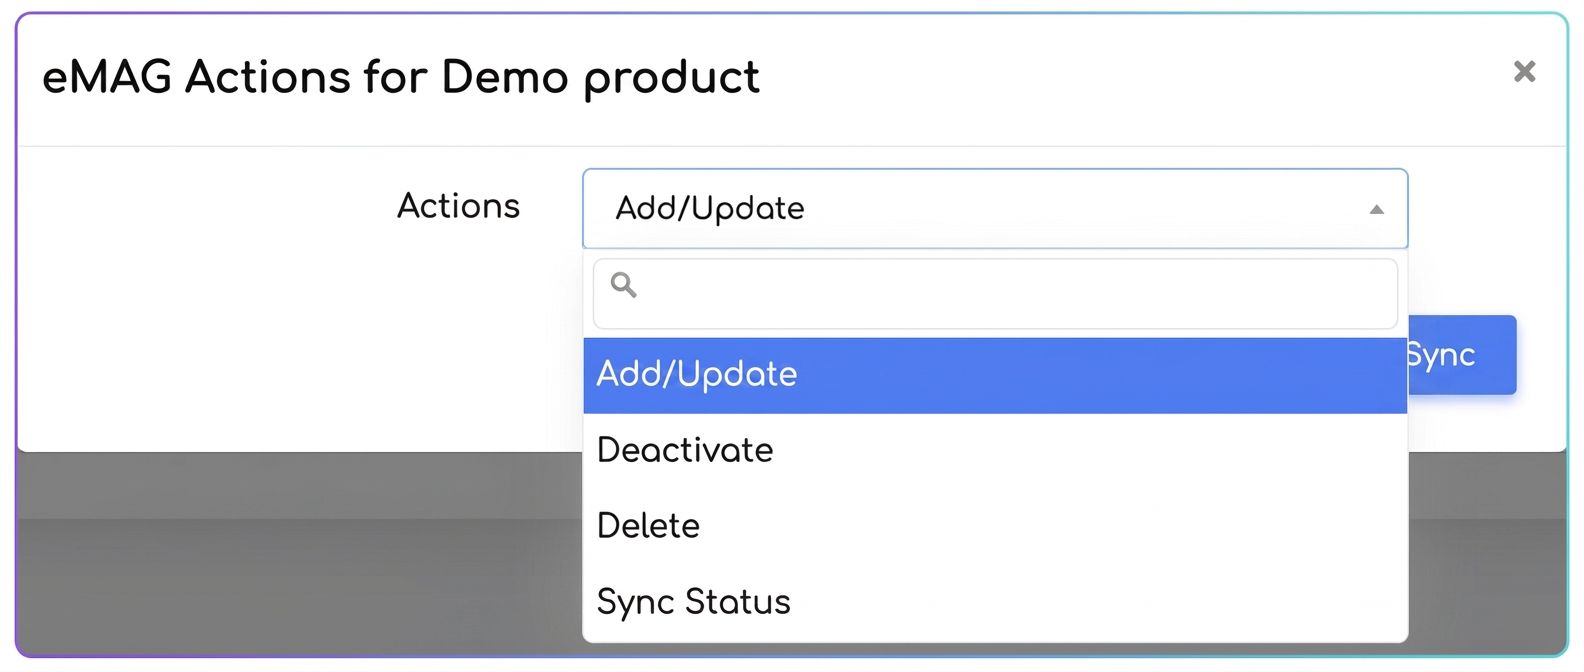
- Available quick actions:
- Add/Update - Adds the product to eMAG Marketplace or updates its information if it already exists on the platform.
- Deactivate - Deactivates the product in eMAG Marketplace – it will no longer be displayed in the public catalog.
- Delete - Completely removes the product from eMAG Marketplace.
- Sync status - Updates the product status in iFlows based on the one in eMAG Marketplace (active/inactive).
Section 3: eMAG Order Management
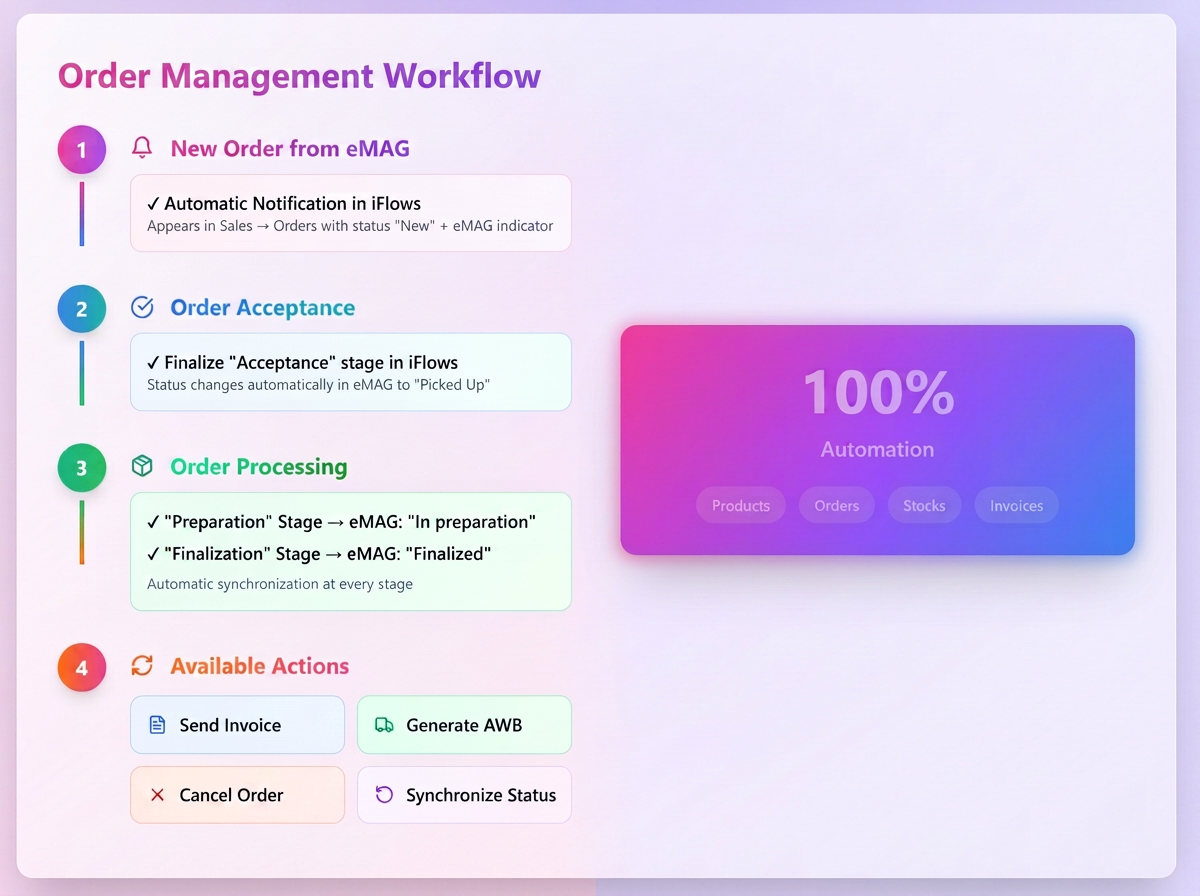
Once the integration is fully functional, orders placed on eMAG Marketplace will be automatically imported into iFlows.
Order Management Workflow:
- Order Reception:
- Upon receiving a new order from eMAG, you will receive a notification in iFlows.
- The order will appear in the section with a "New" status and will have a specific eMAG visual indicator.
- Order Acceptance:
- Once the stage associated with Acceptance is completed in iFlows (stage established during eMAG integration configuration), the order status is automatically updated in eMAG Marketplace as "Accepted".
- Order Processing in iFlows:
- Upon completion of the Preparation stage, the order will be automatically updated in eMAG with the status "In preparation".
- Upon completion of the Finalization stage, the status will change in eMAG to "Finalized".
4. Additional actions available in iFlows
After the order reaches the "Finalized" stage, several additional actions will become available in the iFlows platform, which can be sent to eMAG Marketplace. These actions are accessible from the orders menu and allow full management of the post-sale process:
- Send Invoice
Sends the invoice issued from the platform for this order to eMAG. - Generate AWB
Initiates the process of generating the transport document (AWB) for the selected order. - Move to preparation
Marks the order as being in the preparation stage in the eMAG system. - Move to finalization
Updates the order in the eMAG system as finalized. - Cancel
Sends a cancellation request for the order to eMAG. - Move to credit note
Marks the order as credited in the eMAG system (useful for initiating returns for finalized orders). - Sync
Checks and aligns the order status in iFlows with the current one in eMAG Marketplace to ensure consistency between the two systems.
New: Customer Reputation – Quick Financial Analysis
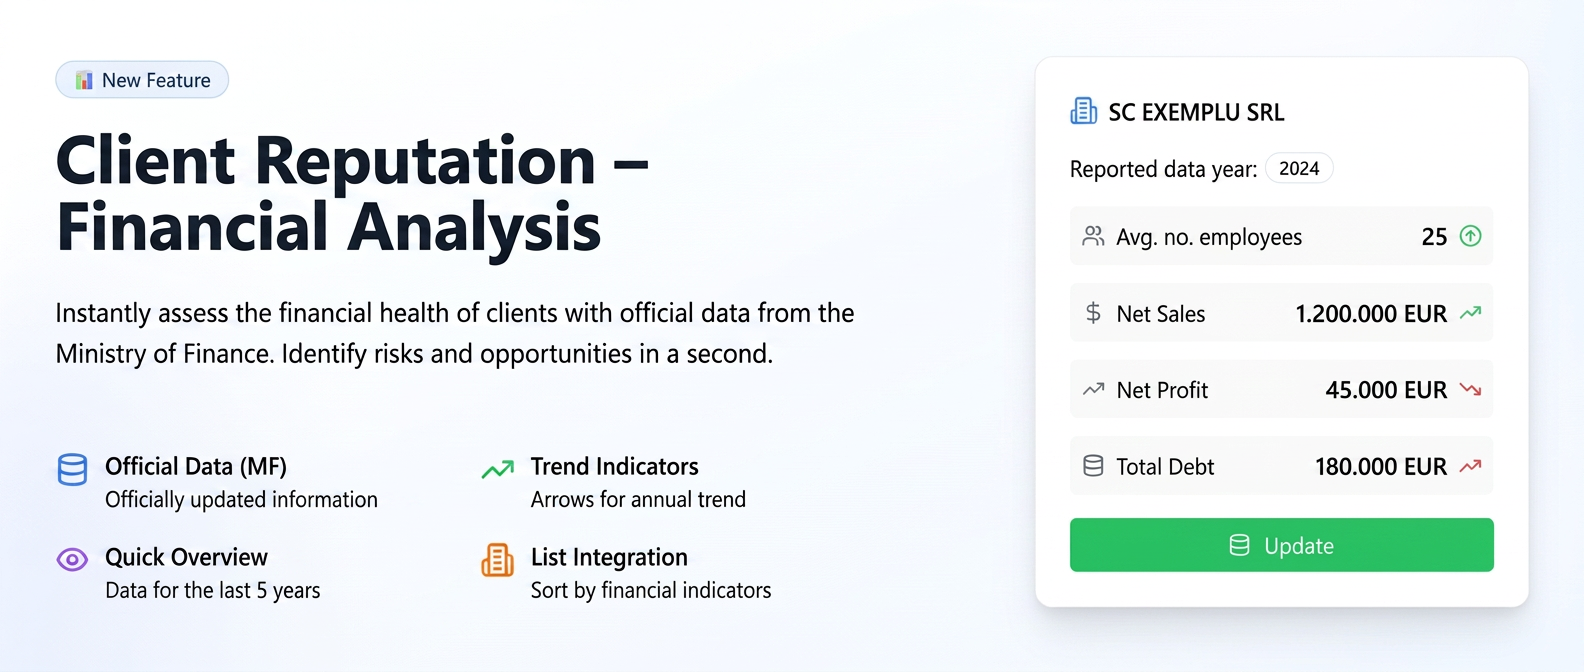
This feature was designed to provide you with a valuable financial perspective on your corporate clients. The "Reputation" tab automatically retrieves data directly from the Ministerul de Finanțe (Ministry of Finance), allowing you to quickly assess the financial health, risks, and opportunities associated with each business partner.
Part 1: Accessing the "Reputation" Section
To view a client's financial information, follow these steps:
- Navigate to the "Customers" section: From the left main menu, select the Customers option.
- Select a Customer: Identify the customer of interest in the list.
- Access Customer Details: Next to the desired customer, in the "Actions" column, click the "Customer Details" view button (eye icon).
- Open the "Reputation" Tab: On the customer details page, you will notice a series of tabs (Details, Account, Documents, etc.). Click on the new tab named Reputation.
Part 2: Exploring Information in the "Reputation" Tab
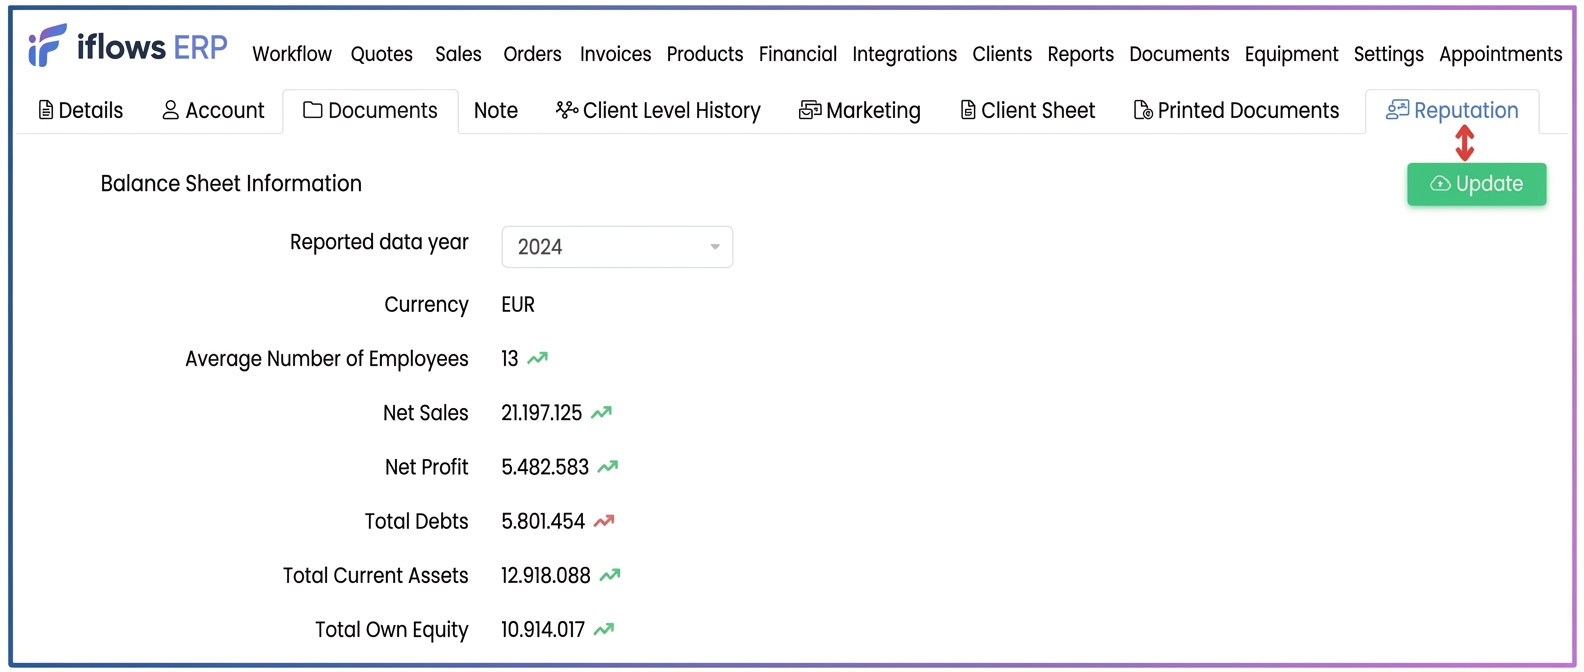
Once you enter the "Reputation" tab, you will have access to a page with "Balance sheet information". Here you find key financial indicators:
- Average number of employees
- Net turnover
- Net profit
- Total liabilities
- Total current assets
- Total equity
Key Functionalities in This Tab:
- Year Selection: You can view the financial data reported for different years. Use the "Reported data year" dropdown menu to select the year of interest. The platform saves data for the last 5 years, depending on availability.
- Trend Indicators (Arrows): Next to each value, you will see a green arrow ( ascending ▲ ) or red ( descending ▼ ). These indicate the current value trend compared to the previous year.
- Green Arrow (▲): The value has increased compared to the previous year.
- Red Arrow (▼): The value has decreased compared to the previous year.
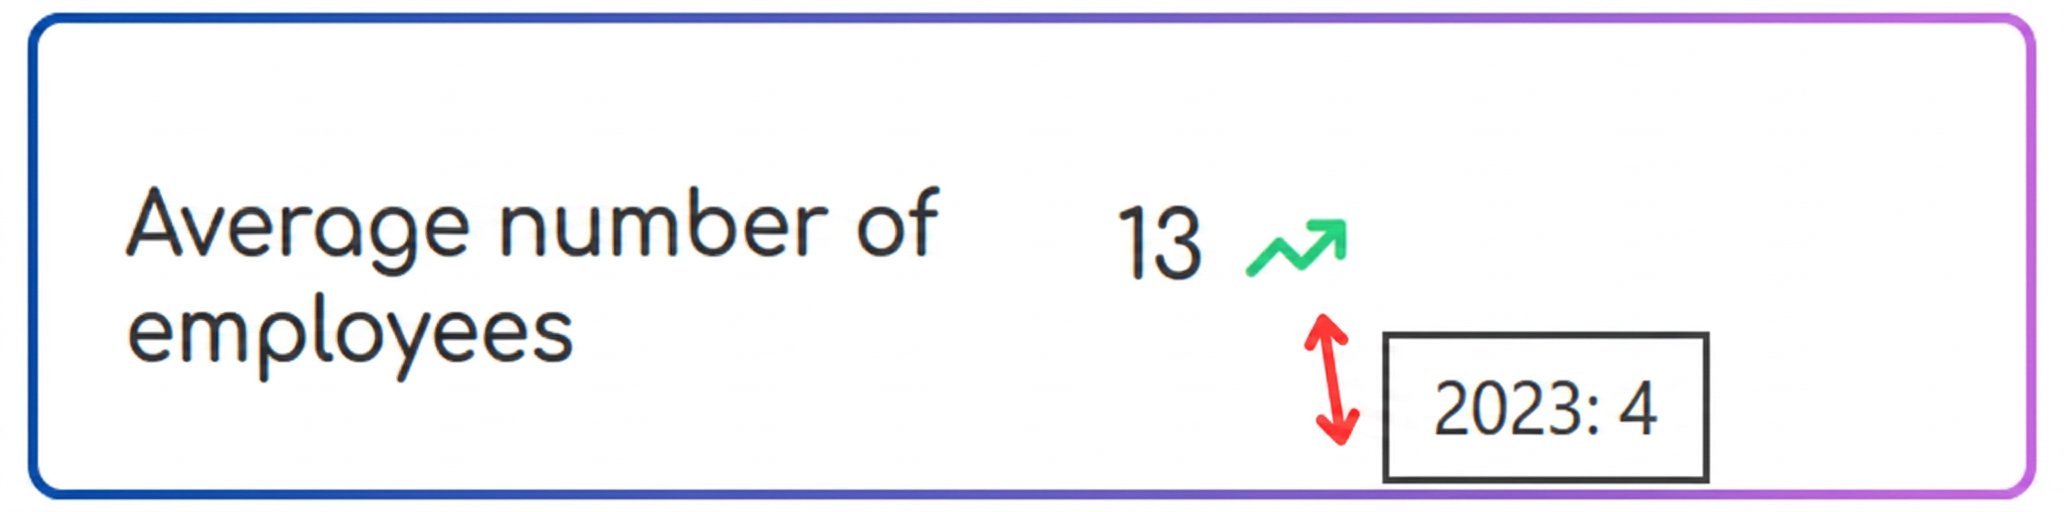
- Quick Comparison (Mouse-Over): To understand the trend context, hover the mouse cursor over the arrow. A small pop-up will appear showing the exact value from the previous year. This allows for an immediate and efficient comparison.
- Data Update: If information is not yet displayed for a client or you want to ensure you have the latest available data, click the green "Update" button. The system will query the Ministerul de Finanțe database again.
Part 3: Integrating Financial Data into the Main Customer List
For an even more efficient comparative analysis, you can add these financial indicators directly as columns in the main table of the "Customers" section.
- Return to the Customer List: Navigate back to the main screen of the Customers section.
- Access Column Display Options: Next to the "Search" button, click on the filters/options icon (the three horizontal lines).
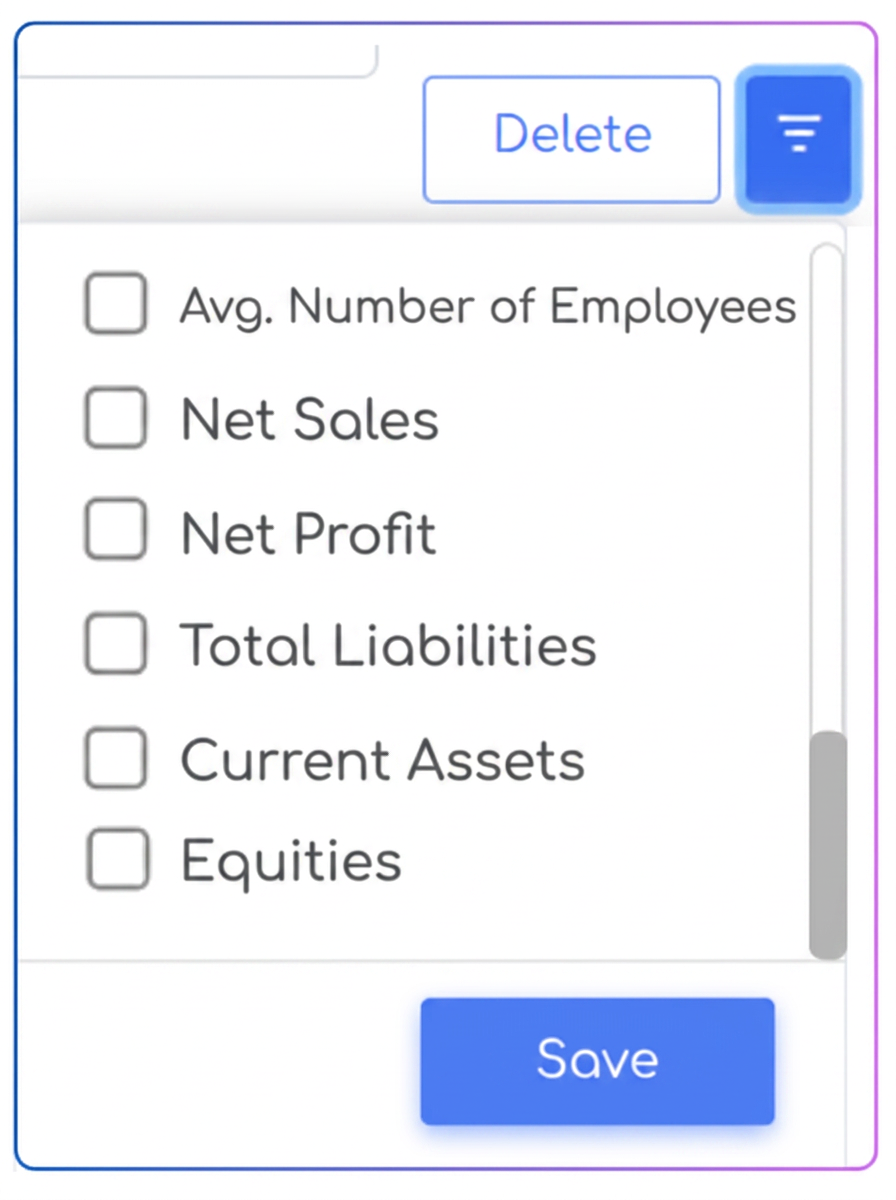
- Activate Financial Columns: In the menu that appears, scroll down and you will find the new indicators. Check the boxes corresponding to the data you want to view in the table (e.g., Net Turnover, Net Profit, Total Liabilities, etc.).
- Save Changes: Click the "Save" button.
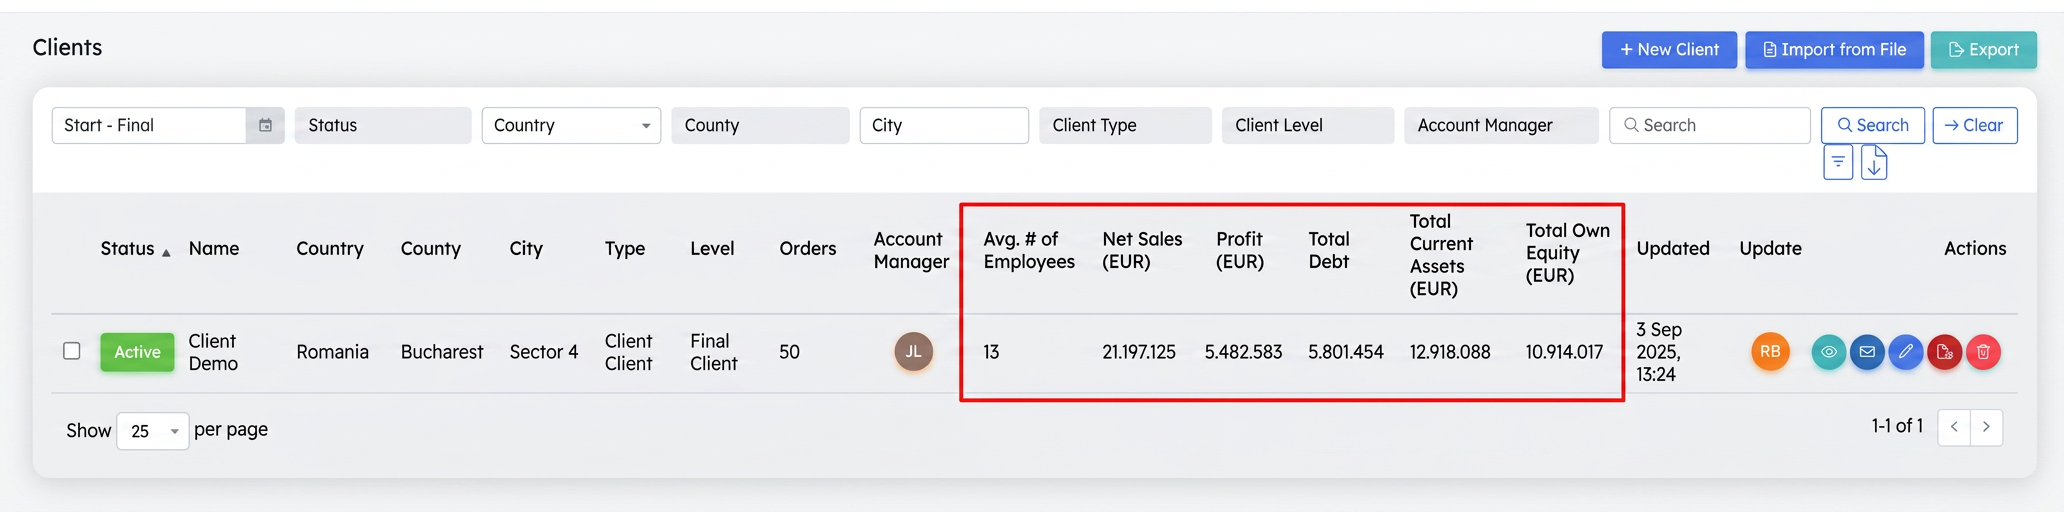
Result:
The selected columns will now appear in the main customer list. This provides you with a major advantage:
- Instant Visibility: See key financial indicators for all customers at a single glance.
- Advanced Sorting: You can now sort the entire customer list by clicking on any new column header. For example, clicking on "Net Turnover" will arrange customers in descending order of turnover, helping you instantly identify your most important clients.
Optimization: New Functions in the Appointments Module
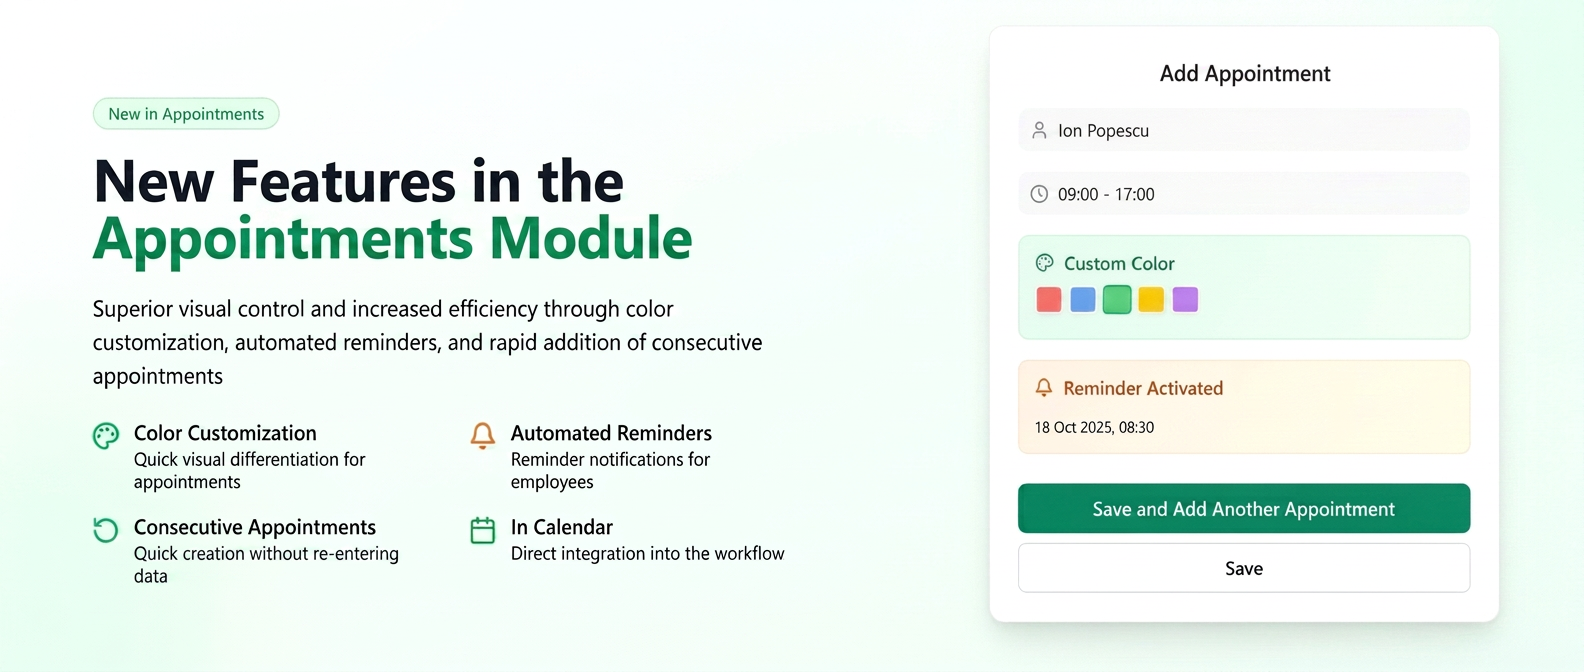
To increase efficiency and provide superior visual control, we have optimized the Appointments module with new features that allow color customization for events, setting automatic reminders, and rapid addition of multiple consecutive appointments.
Starting Point:
Navigate to Workflow in the left menu and select the Appointments tab. You will see the work calendar.
Functionality 1: Color Customization for Appointments
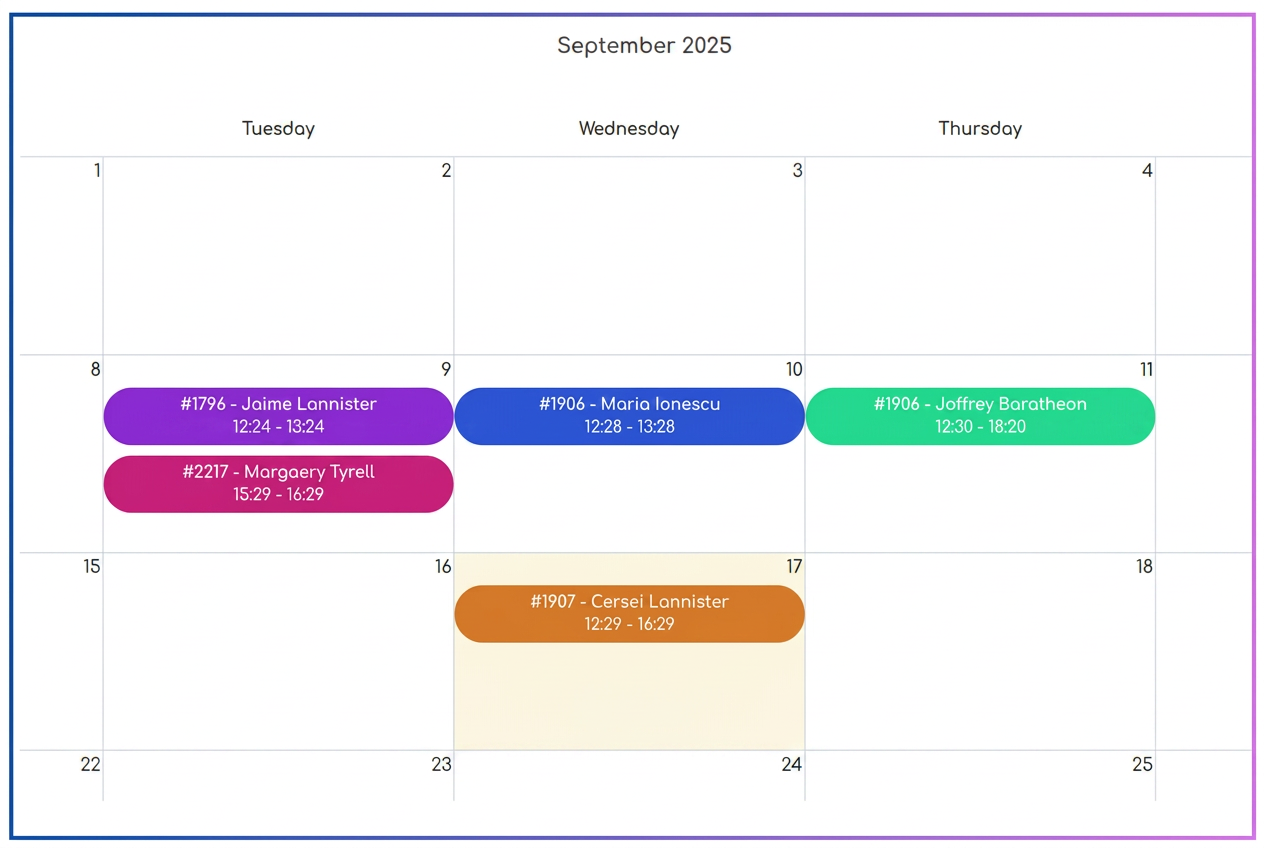
This option allows you to assign specific colors to each appointment, helping you visually differentiate between appointment types.
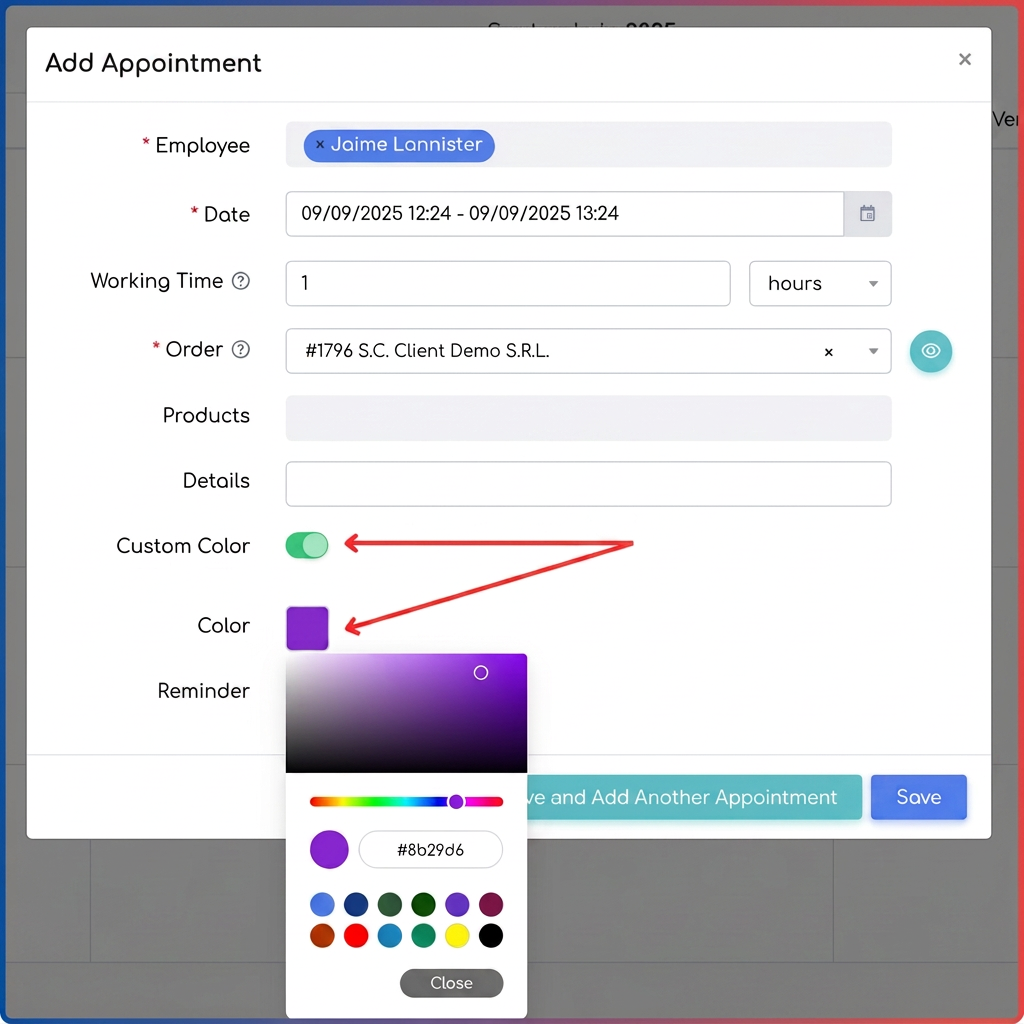
Step 1: Create a new appointment by clicking on a free day in the calendar. The "Add Appointment" pop-up window will open.
Step 2: In the opened window, locate the "Custom Color" option and activate the toggle.
Step 3: Once activated, a new field named "Color" will appear. Click on the colored square to open the color picker.
Step 4: Choose the desired color in two ways:
- Select any shade from the color palette.
- Choose one of the predefined colors at the bottom of the picker.
The saved appointment will appear in the calendar with the background in the color you selected.
Functionality 2: Adding a Reminder (Reminder Notification)
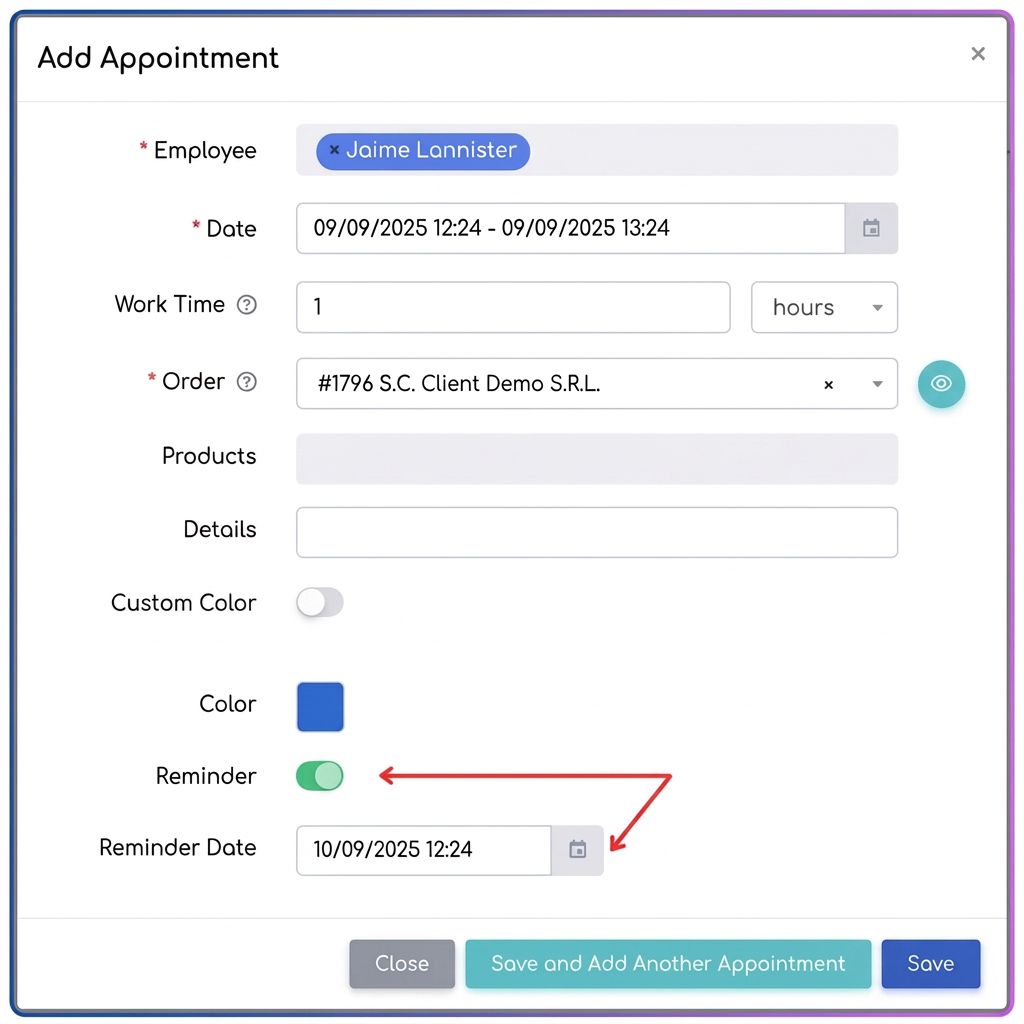
You can now set an automatic reminder for employees assigned to an appointment.
Step 1: In the same "Add Appointment" window, locate the "Reminder" option and activate the toggle.
Step 2: Upon activation, a new field will appear: "Reminder Date". Click on this field to set the exact date and time you want the reminder to be sent.
Important: The reminder notification will be sent automatically to the employee (or employees) you selected in the "Employee" field at the top of the window.
Functionality 3: Save and Add Another Appointment
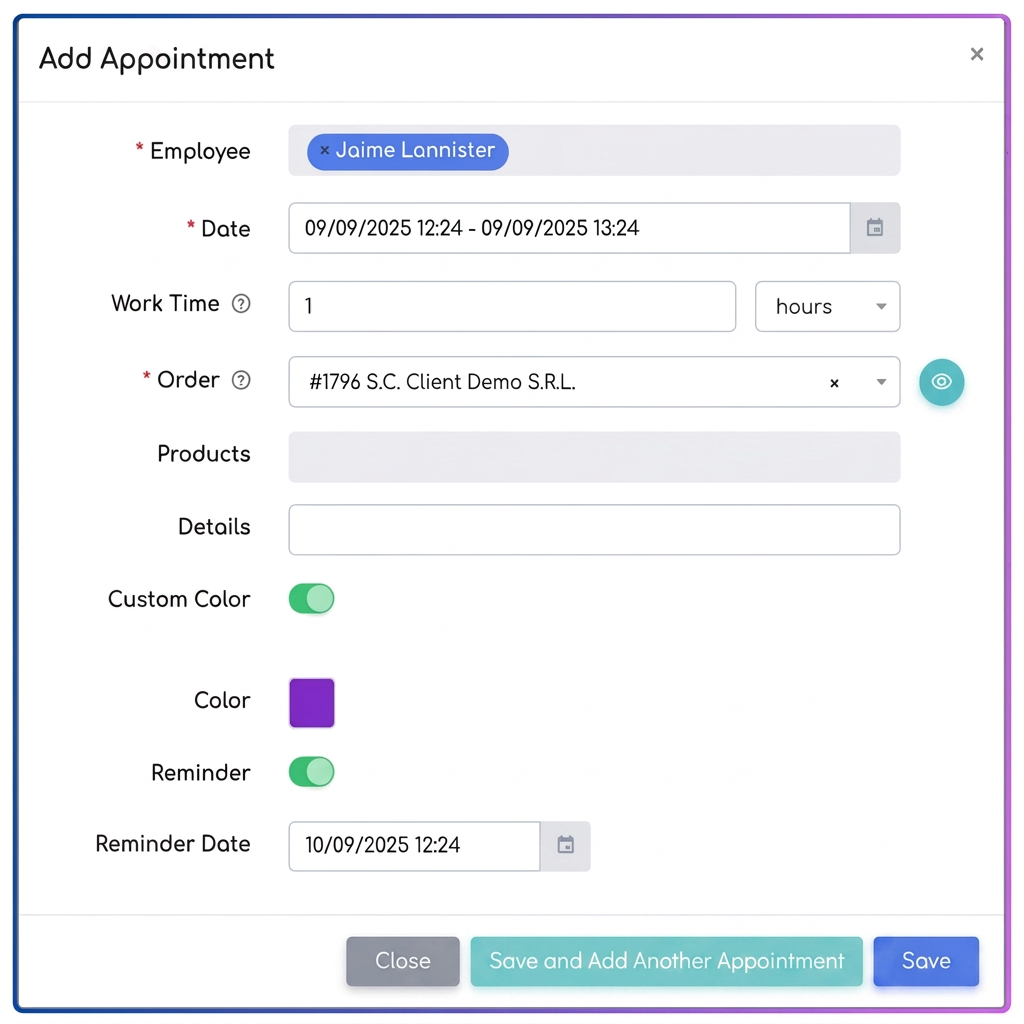
For situations where you need to quickly create several similar appointments (for example, for the same employee or the same order, but on different days), we have added a new button that saves you valuable time.
Step 1: Fill in all the details for the first appointment (Employee, Order, Working Time, etc.).
Step 2: Instead of pressing the "Save" button, click on the new button "Save and Add Another Appointment".
What happens?
- The appointment you just configured is saved and added to the calendar. You will see a confirmation message at the top of the screen ("Appointment saved").
- The "Add Appointment" pop-up window does not close.
- All fields remain filled with the information you previously entered.
Step 3: Now you can modify only the necessary details for the next appointment (for example, the date or the product) and press "Save and Add Another Appointment" again to continue or "Save" to finish. This eliminates the need to re-enter the same data multiple times.
Optimization: Bulk Product Details Import
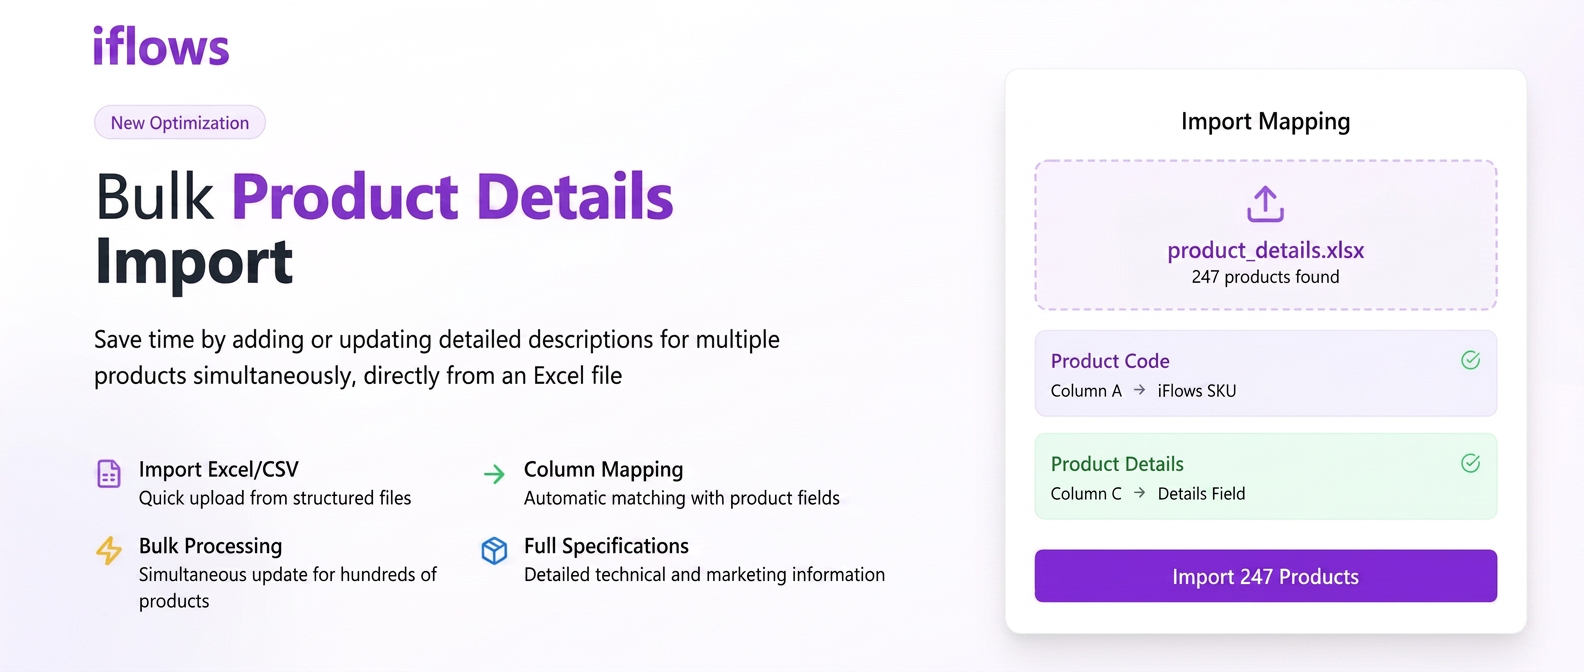
This functionality allows you to save time by adding or updating detailed descriptions for multiple products simultaneously, directly from an Excel file. It is ideal for adding technical specifications, marketing descriptions, or any other relevant information for your products.
Step 1: Preparing the Import File
- Before starting, ensure you have a file in .xlsx (Excel) or .csv format.
- This file must contain the columns necessary for product identification.
- Most importantly, add a new column that you can name, for example, "Details" or "Product Description". In this column, you will write the full descriptions for each individual product.
Useful Tip: To ensure the format is correct, you can go to the Products section in iFlows, click on "+ Import from File" and then on "Download Sample File". You can work directly on that template.
Step 2: Navigating to the Products Section
- From the left main menu on the screen, click on the "Products" section.
Step 3: Initiating the Import
- In the top-right corner of the page, click the blue "+ Import from File" button.
Step 4: Uploading the File and Mapping Columns
- A new window will open. Drag the Excel file prepared in Step 1 into the indicated area or click to select it from your computer.
- After uploading the file, click the green "Continue" button.
- You will reach the mapping page. Here you must tell the iFlows system what each column in your file represents.
- Scroll down until you find the "Details" field in the left column ("iFlows Fields").
- Next to it, in the right column ("File Columns"), select from the dropdown list the name of the column in your Excel file that contains the descriptions (e.g., "Details").
Step 5: Completing the Import
- After correctly mapping the "Details" field (and other mandatory fields), complete the import process.
- The system will automatically retrieve the text from the specified column and add it to the "Details" section of each corresponding product.
Optimization: Adding product descriptions to invoices
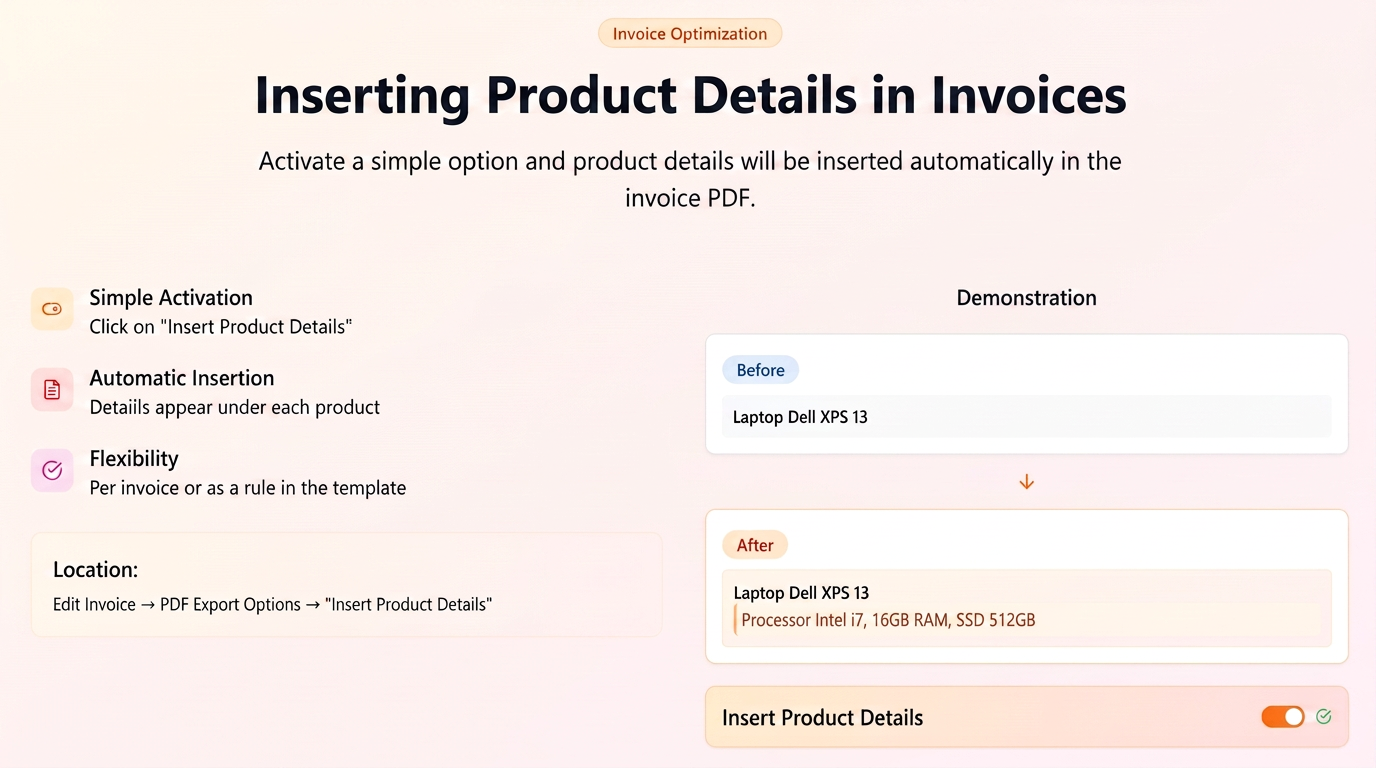
By activating this option, full product details will be automatically inserted into the PDF document under each listed product.
Prerequisite: Ensure that the products for which you want to display details have the information filled in the "Details" field on the product page.
Step 1: Locating PDF Export Options
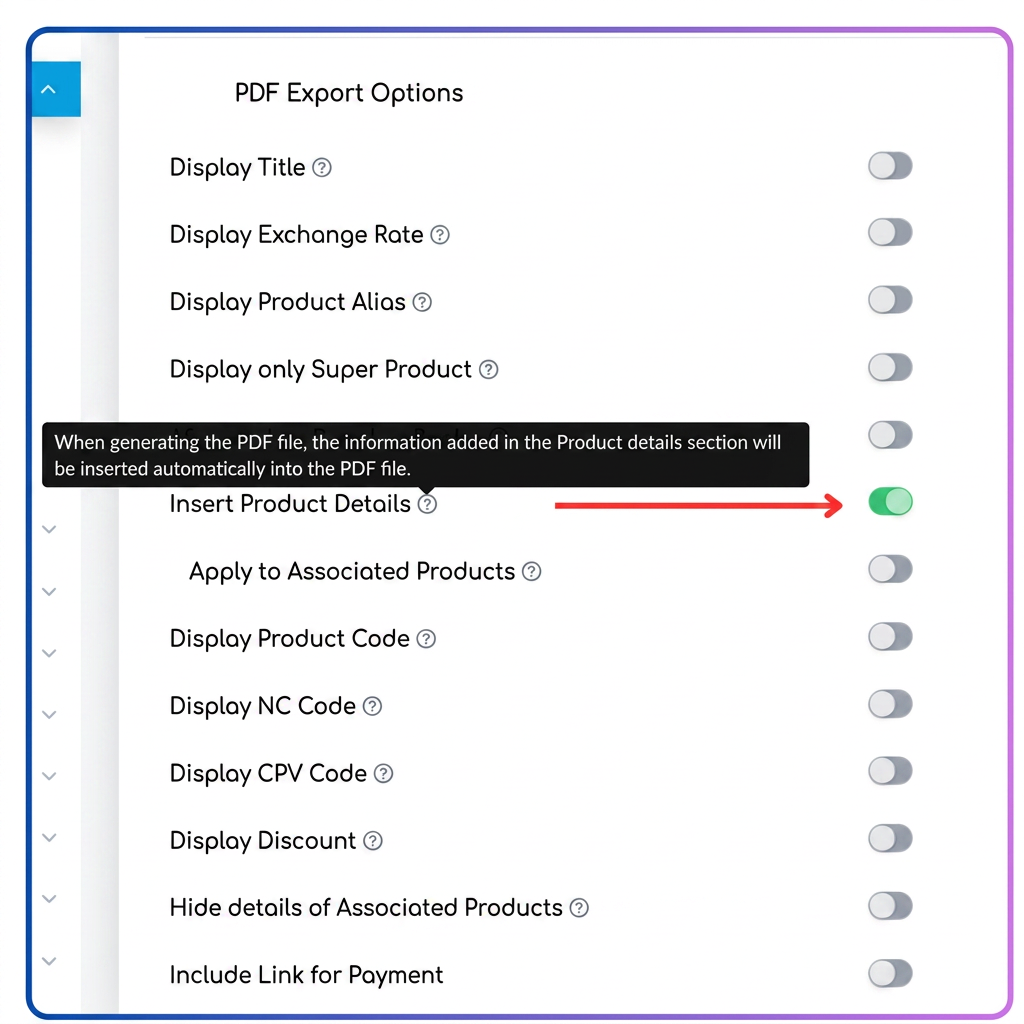
- On the invoice edit page, after the section with the added products, scroll down until you reach the section titled "PDF Export Options".
Step 2: Activating Product Details Display
- Within the "PDF Export Options" section, look for the "Insert Product Details" option.
- Next to this option, you will see a toggle. Click on it to activate it.
Step 3: Saving and Generating the PDF Invoice
- After activating the option, save the invoice.
- Now, when generating the PDF document (either by downloading or sending via email), the iFlows system will automatically insert the full text from the product's "Details" field under the name of each product on the invoice.
Note: This setting can be applied both individually for each invoice and as a rule by editing the PDF template used for invoices.