
New: Objective Management
Strategic plans lose their value if they are not translated into concrete steps.
The Objective Management function links the plan to execution: you set the target, and the platform shows you in real-time the team's progress, who is contributing, and where acceleration is needed.
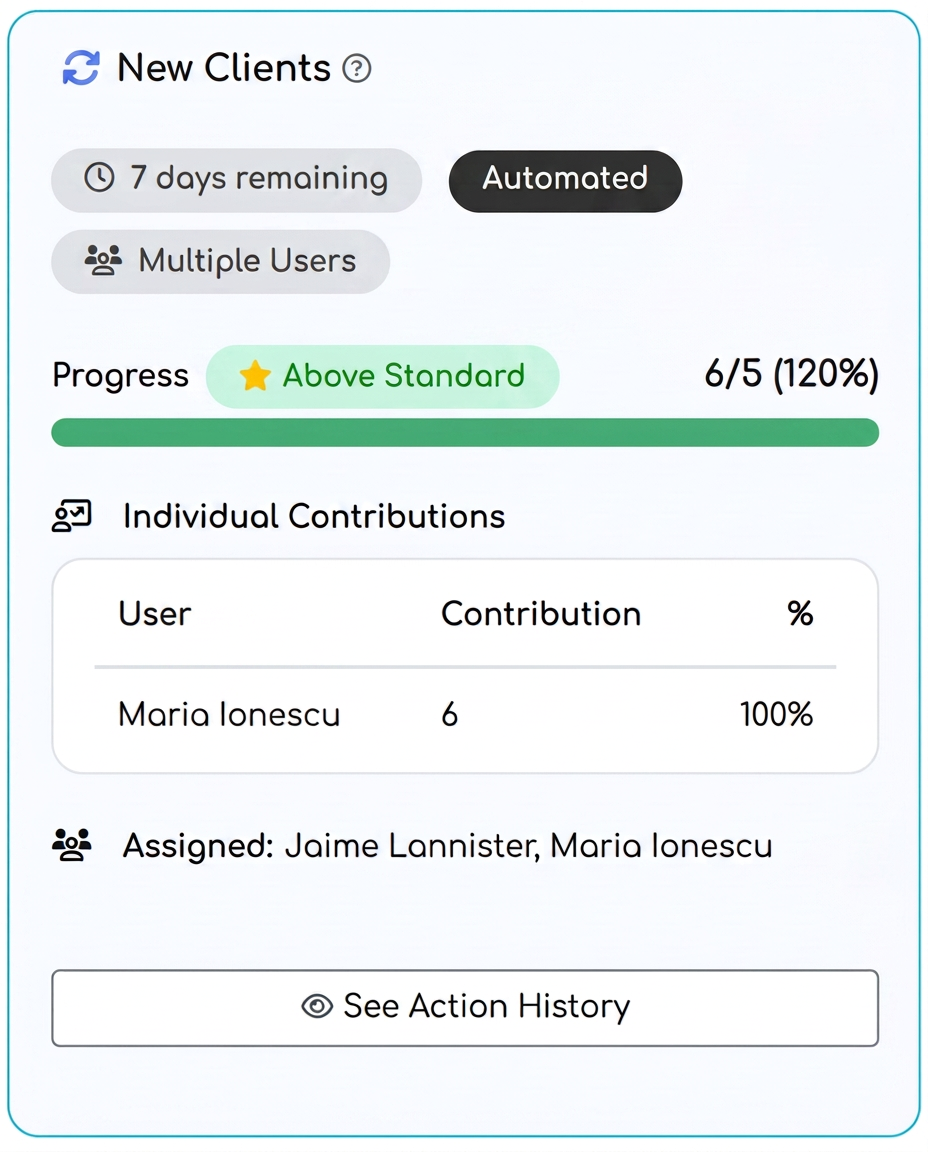
To better understand how it works, let's take an example of a simple objective: acquiring 5 new customers in a week.
There are two types of objectives
- Automated – the platform calculates progress automatically from already recorded events (e.g., new customers, calls, visits, offers, orders). No manual update is necessary.
- Manual – for actions that do not have a data source in iFlows (e.g., "taking 5 photos for social media"); progress is entered manually.
In our scenario, because the goal is to obtain 5 new customers within a 7-day interval. For this scenario, we will create an automated objective.
1) Creating the automated objective
- From the Objectives module, select .
- Objective type:New customers (thus, the system will automatically count each added customer who placed a new order for the first time in the selected interval).
- Target value:5 (represents the desired number of new customers).
- Duration:7 days (the time interval in which the objective must be reached).
2) Setting the assignment level
- Individual – if you want the target to be tracked for a single sales agent.
- Multiple users – if you want a common target for all sales agents, highlighting individual contributions.
- Per company (global) – if the objective is general, and any user who adds a new customer can contribute to its achievement.
3) Configuring advanced settings
- Start date: a future date can be set for activating the objective; until that date, it will appear in the "Pending" section.
- Recurring objective: if you want the target to repeat automatically weekly, the system will generate a new instance of the objective every 7 days.
- Visibility:
- Public – visible to all users.
- Private – visible only to the creator and assigned users. (Note: "Per company" objectives cannot be set as Private.)
- Count only unique contributions: if this option is activated, the system will only count distinct customers; multiple actions on the same customer will not increase progress.
- Completion criterion:
- At the end of the period – the objective remains active for the entire 7-day duration, even if reached earlier, and can exceed 100% (e.g., 10 customers instead of % progress).
- Upon reaching target – the objective closes automatically the moment 5 new customers are registered.
- Filter by customer type: you can choose to count only certain customers in the progress, for example End customers, Resellers, or Public institutions, depending on the company strategy.
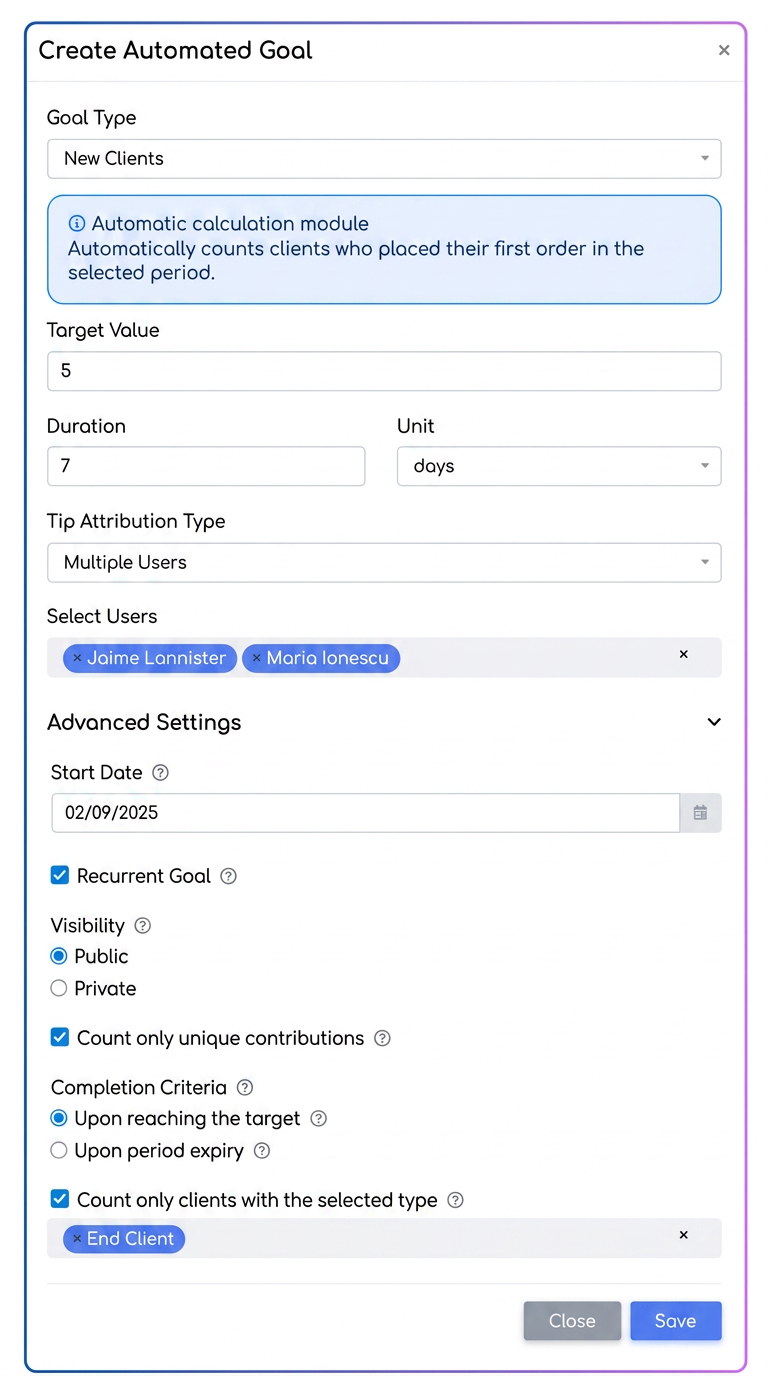
Note that depending on the objective type, there may be more advanced settings, such as: Count only customers with selected tags
4) The Result
After saving, the objective appears in the Active list (or in Pending, if a future date was set).
As the defined actions are completed, progress updates automatically and is visible in two ways:
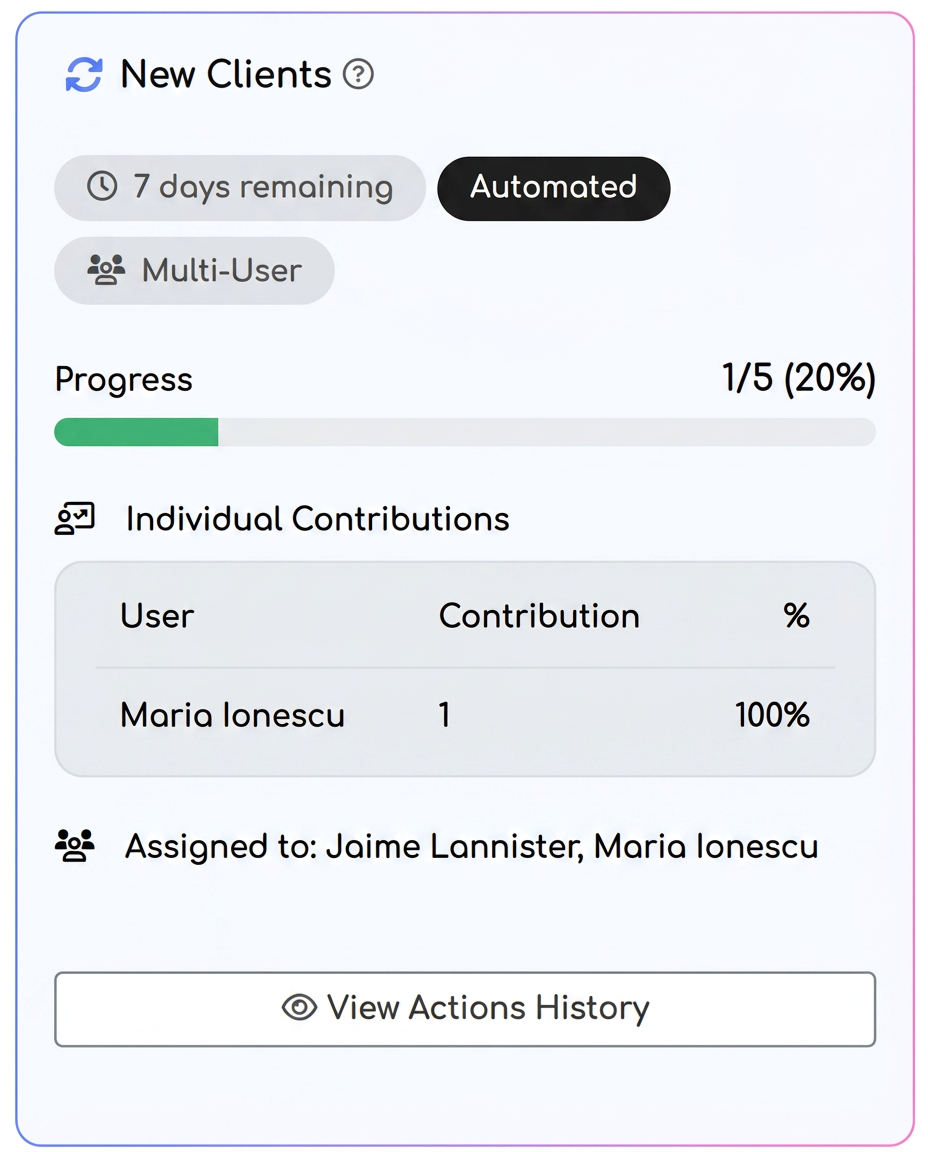
- On the objective card – percentage and numerical progress (e.g., 3/%).
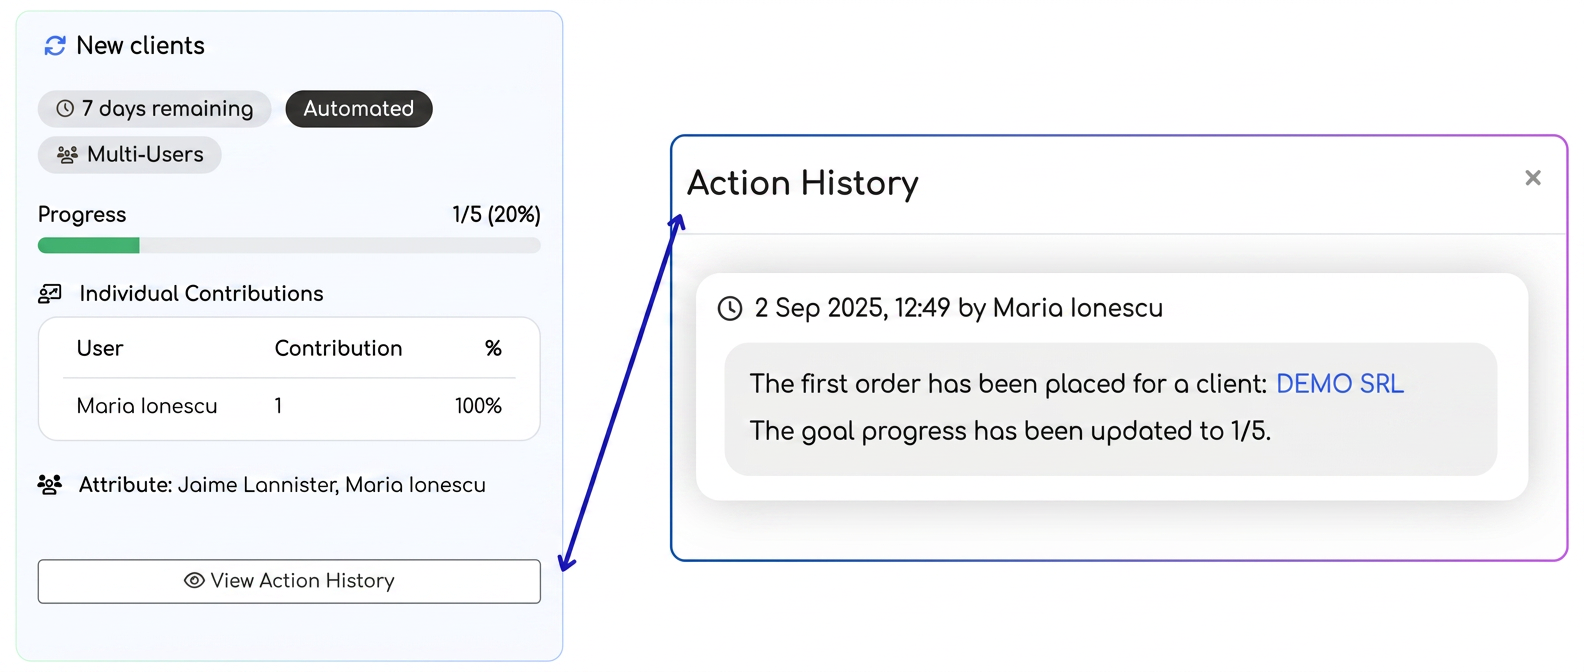
- In action history – detailed list of events that contributed to the objective.
How the objective is finalized
- If the "Upon reaching target" criterion was set: the objective closes automatically as soon as 5 new customers are reached.
- If the "At the end of the period (7 days)" criterion was set: the objective remains active for the entire duration and can exceed the target. If 10 new customers are obtained instead of 5, the card will be visibly marked with the mention "Above standard".
List of automated objectives and calculation method
- Customer visits performed – Calculation method: automatically counts "customer visit" actions entered in customer notes during the set period.
- Phone calls made – Calculation method: automatically counts "phone call" type actions from customer notes in the chosen interval.
- Commercial offers sent – Calculation method: automatically counts commercial offers generated and sent from the Offers module during the specified period.
- Offer → order conversion rate – Calculation method: calculates the ratio between the number of new orders generated from offers and the total number of offers sent, expressed as a percentage.
- New orders obtained – Calculation method: automatically counts orders entered and confirmed in the system during the defined period.
- New prospects – Calculation method: automatically counts how many new customers with the status Prospect were created in the database during the selected period.
- Sales cycle reduction – Calculation method: automatically calculates the average of differences (in days) between the offer generation date and the order date.
- Reactivation of inactive customers – Calculation method: automatically counts inactive customers who placed a new order in the selected period.
- New customers – Calculation method: automatically counts customers who placed their first order in the chosen period.
- Value of finalized orders – Calculation method: automatically calculates the total value of orders finalized in the chosen period.
- Receipts – Calculation method: automatically calculates the total value of receipts in the selected period, converting amounts to the default invoice currency based on the exchange rate set in the platform.
Manual Objectives
What are manual objectives?
Manual objectives are those for which progress cannot be tracked automatically in the platform, because the desired action has no data source in iFlows. In this case, progress is entered manually by users.
Typical examples:
- "Create 5 social media posts"
- "Participate in 3 networking events"
- "Organize 2 internal team trainings"
- "Prepare 4 promotional video materials"
When are they used?
- When the objective relates to offline or creative-process activities that are not automatically recorded in iFlows.
- When monitoring one-off or complementary initiatives to commercial activity (marketing, training, partnerships, etc.).
Creating a manual objective
- From the Objectives module, select .
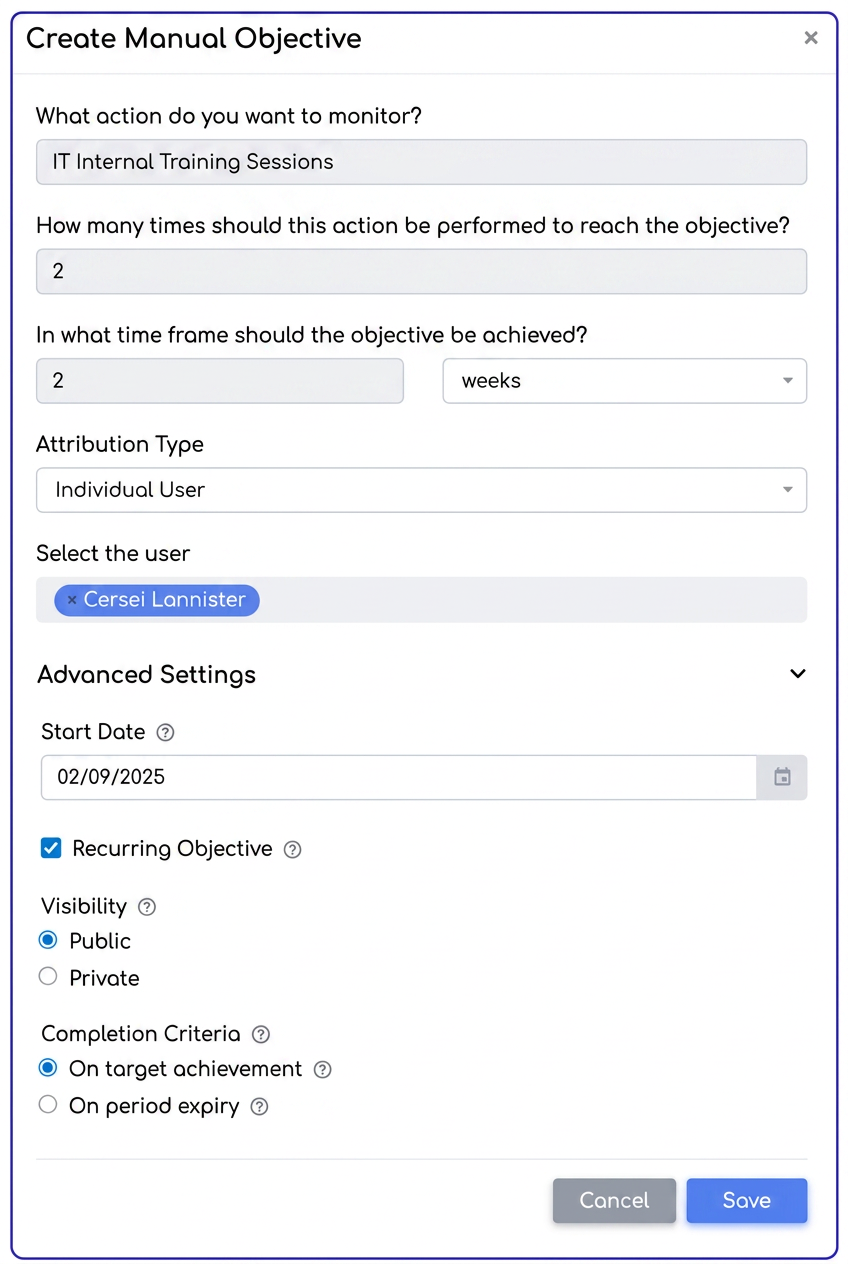
- Fill in the fields:
- What action do you want to monitor? – objective name (e.g., Social media posts).
- How many times must this action be performed? – target value (e.g., 5).
- How long should the objective take? – duration (e.g., 14 days).
- Assignment type:Individual, Multiple users, or Per company.
- Configure Advanced Settings (start date, recurrence, visibility, completion criterion).
Viewing the manual objective
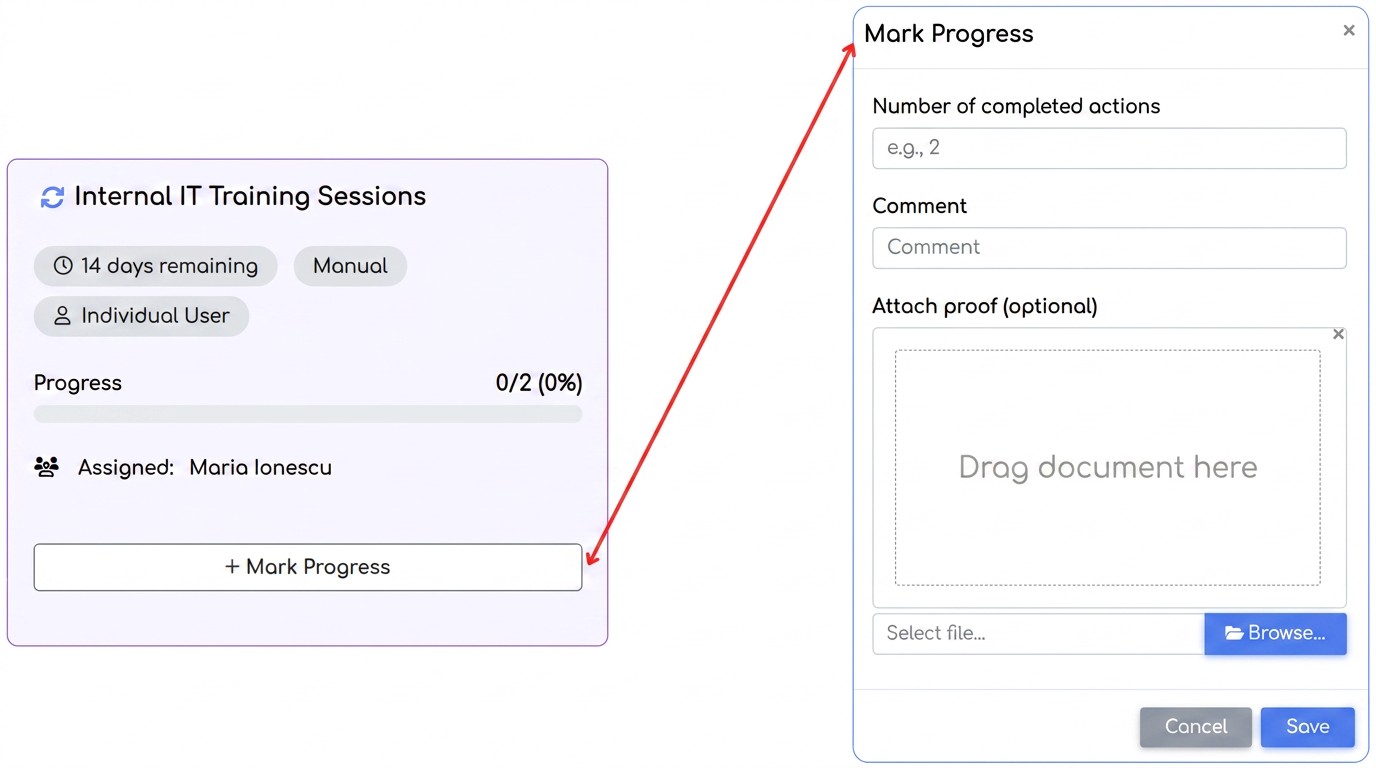
The following information appears on the objective card:
- Type (Manual), remaining period, and assignment level.
- Progress bar and value reached (e.g., 0/%).
- Assigned user or team.
- "+ Mark Progress" button, used to manually update achievements.
Marking progress (manual update)
Pressing the "Mark Progress" button opens a window where you enter:
- Number of completed actions – e.g., 2 posts created.
- Comment (optional) – e.g., Posts were scheduled for Facebook and LinkedIn.
- Attach proof (optional) – files, documents, screenshots, etc., to support the reported progress.
After saving:
- Objective progress updates (e.g., 2/%).
- The update appears in the objective history for traceability (showing who marked progress, when, and what actions were declared).
How the manual objective is finalized
- If the "Upon reaching target" criterion is set, the objective closes automatically as soon as the value is reached (e.g., 5/5 posts).
- If "At the end of the period" is set, the objective remains open until the end, even if the target was reached earlier. Thus, values over 100% can be recorded (e.g., 7/%).
📌 Conclusion: Manual objectives complete the Objective Management module, allowing the tracking of any type of activity, regardless of whether direct data exists in the platform. Progress is entered simply through the "Mark Progress" function, ensuring transparency and visibility over actions that matter to the organization.
Editing objectives
Which objectives can be edited
- ✅ Can be edited: objectives in the Active and Pending tabs.
- ❌ Cannot be edited: Finalized and Missed objectives (these remain only for consultation and analysis).
How to access editing
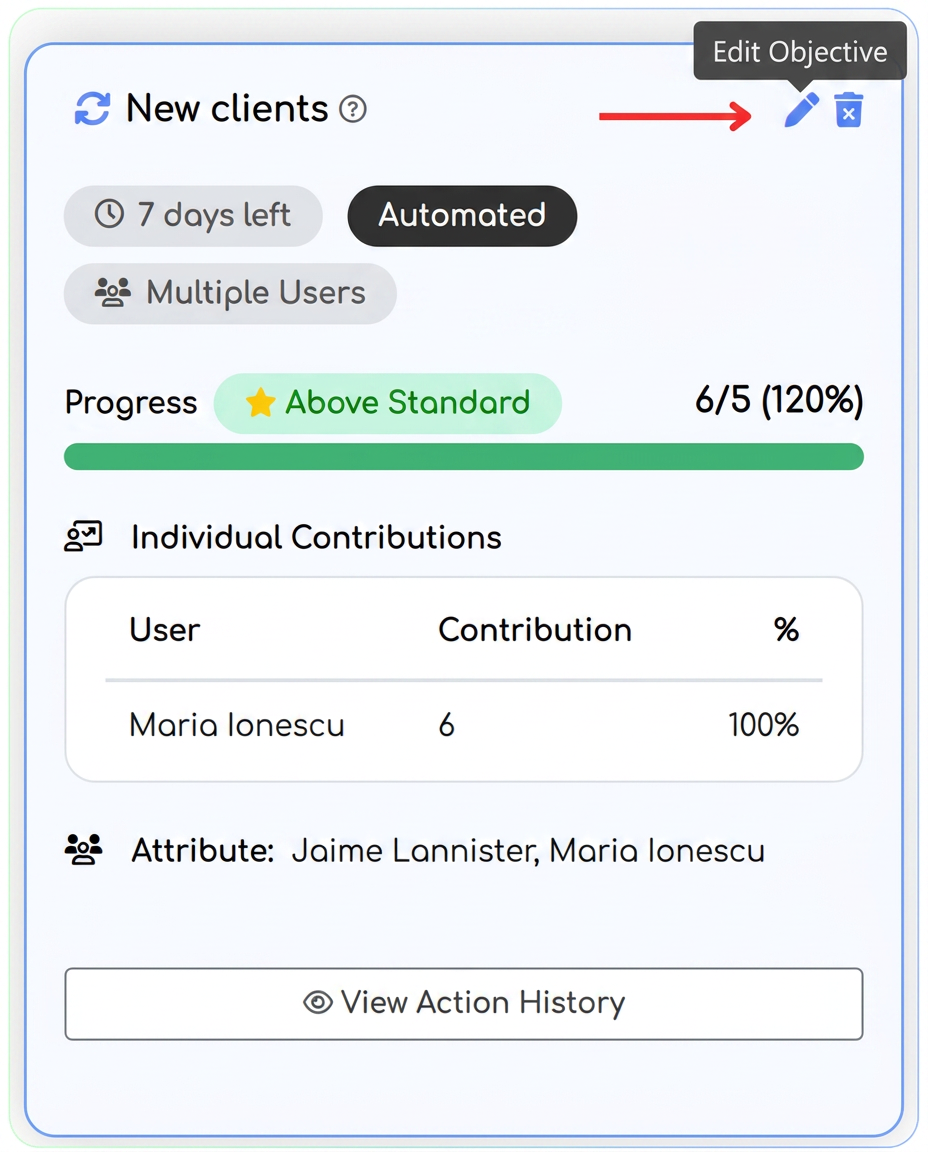
- Position the cursor over the objective card.
- In the top-right corner, the Pencil icon ("Edit Objective") appears.
- Press the pencil → the "Edit Objective" window opens.
What can be edited
In the editing window, the following can be modified:
- Target value – e.g., from 5 to 10.
- Duration + time unit – e.g., .
- Assignment type – Individual, Multiple users, Per company.
- Assigned users (if Multiple users is set).
- Advanced settings:
- Start date (editable ONLY for pending objectives).
- Activating/deactivating recurrence.
- Visibility (Public/Private).
- Count only unique contributions option.
- Completion criterion (Upon reaching target or At the end of the period).
- Additional filters: Customer type (End customer, Reseller, Public institution) or Tags.
ℹ️ Objective type (e.g., "New customers", "Phone calls") cannot be changed during editing.
Editing recurring objectives
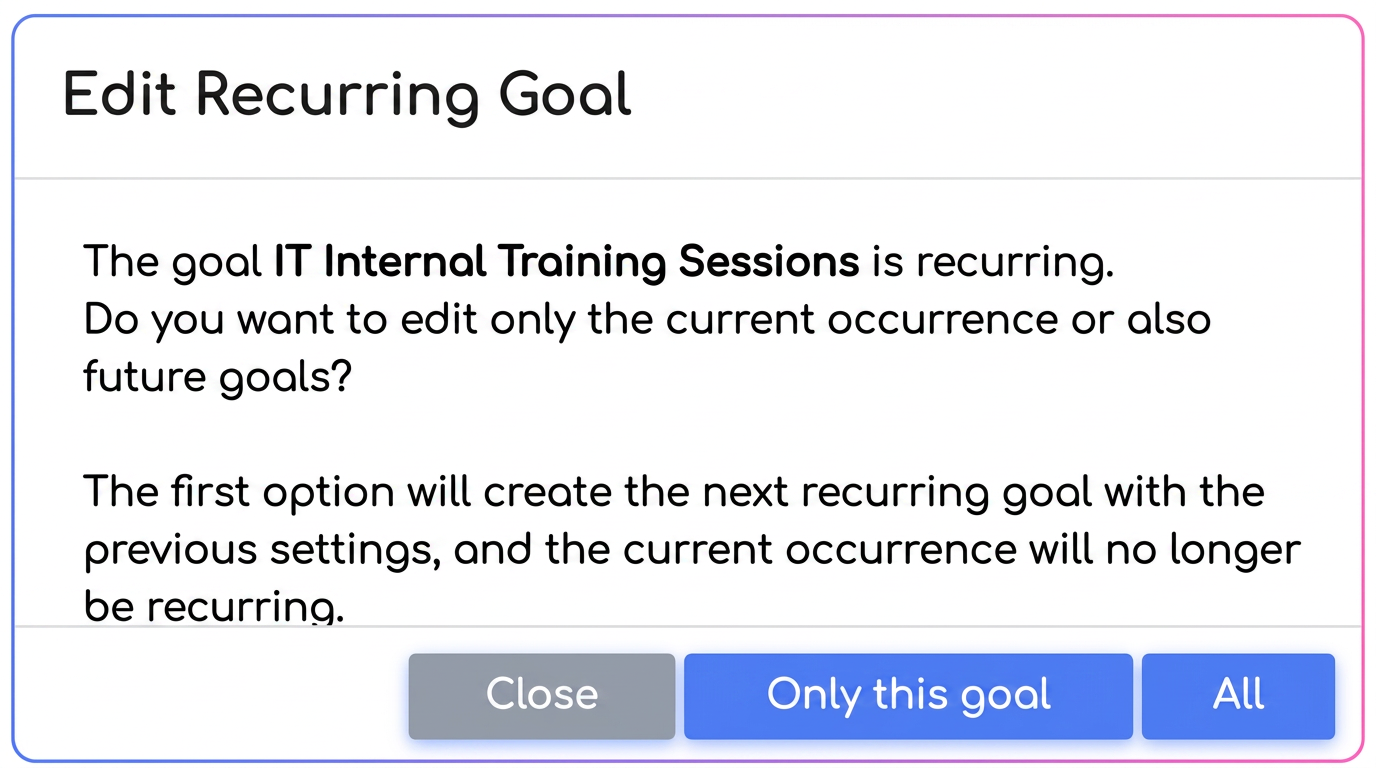
If the objective is recurring, an additional window appears during editing asking:
"Do you want to edit only the current instance or future objectives as well?"
Available options
- Only this objective
- Changes apply exclusively to the current instance.
- It will no longer be recurring, but subsequent instances will be created with previous settings.
👉 Useful for temporary adjustments (e.g., lower target only during a holiday week).
- All
- Changes apply to the current instance and all future instances.
👉 Useful for permanent changes (e.g., new target, team change).
- Close
- Cancels editing without saving changes.
Tabs in the Objective Management module
The module is structured into four tabs, each representing a distinct stage in an objective's life.

1) Active Objectives
- Contains objectives currently in progress.
- Real-time progress is displayed, both as a percentage and numerically.
- Each card displays essential details: objective type (Automated/Manual), remaining period, assignment level (Individual/Company/Team), individual contributions, and the button to access action history.
- For manual objectives, users can add progress via the "Mark Progress" function.
2) Pending Objectives
- Includes objectives that have been created but have a future start date set.
- These are not yet active but are already configured and ready to start on time.
- Upon reaching the start date, they automatically move to the Active tab.
3) Missed Objectives
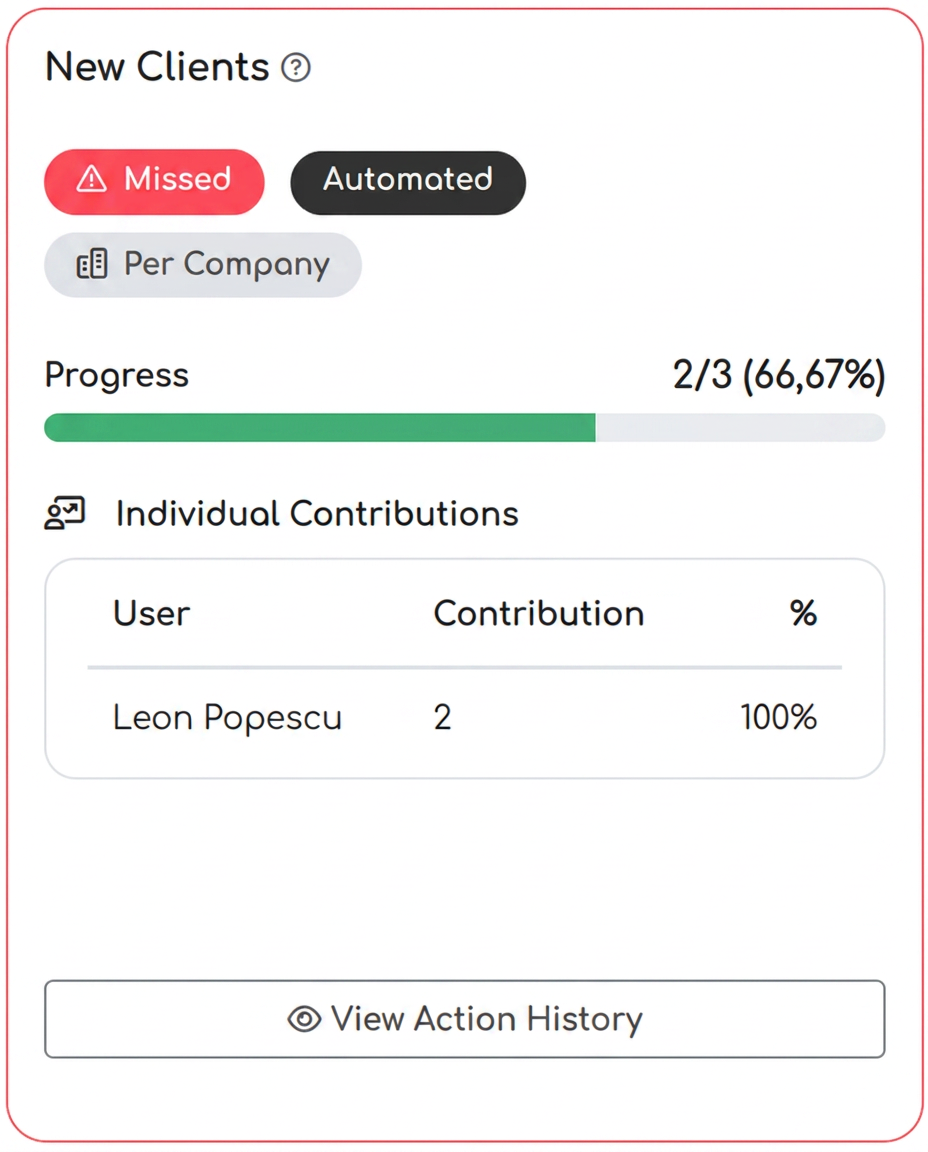
- Objectives that were not completed within the allocated period end up here.
- Cards are visually marked in red and display the final progress achieved (e.g., 3/%).
- Action history remains available for analysis so that reasons for not reaching the objective can be identified.
4) Finalized Objectives
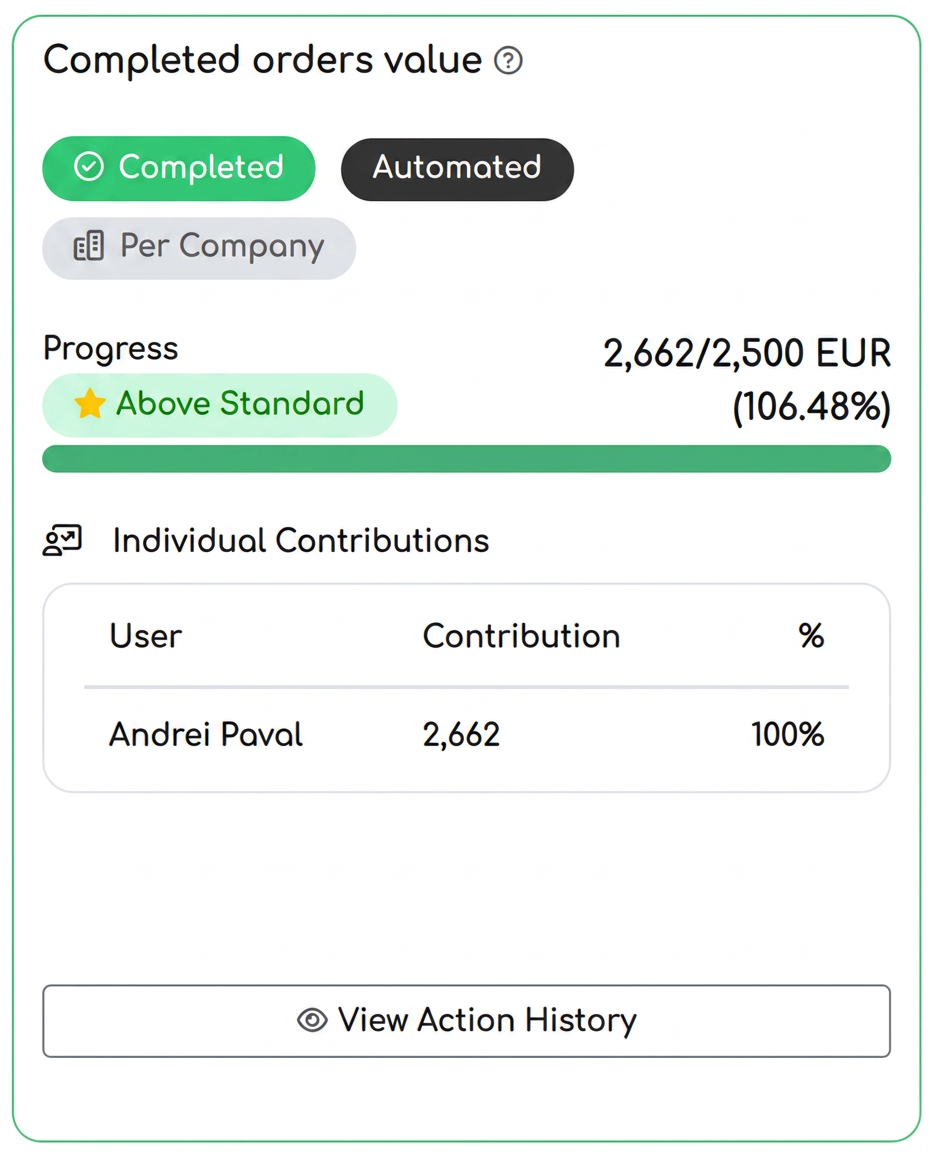
- Includes objectives that were closed either because the target was reached or the period expired.
- Can be of two types:
- Finalized (100%) – objective reached exactly the target value.
- Above standard – objective exceeded the target value in the allocated period (e.g., 10/%).
- Each card remains accessible for later consultation and reporting.
Filter and sorting bar in the Objective Management module
Above the objective lists, there is a dedicated area for searching, filtering, and sorting. This helps users quickly find relevant objectives and order them according to desired criteria.
1) Search
- The "Search..." field allows entering keywords to quickly identify an objective.
- Objectives can be searched by name or description.
2) Filter by responsible party
- The "Responsible Person" field offers the possibility to filter objectives assigned to a specific user.
3) Sorting
The dropdown menu on the right allows sorting objectives by preset criteria:
- Deadline – orders objectives based on the final term (useful for prioritizing the most urgent ones).
- Progress – sorts based on the percentage achieved (e.g., those closest to completion at the top).
- Date added – orders objectives by when they were created (useful for chronological tracking).
Direction button (up/down arrow icon) – allows changing the display order:
- Descending (↓) – objectives closest to the deadline, with highest progress, or most recent appear first.
- Ascending (↑) – objectives with the furthest deadline, lowest progress, or oldest appear first.
Individual contributions
On each objective card, there is a section dedicated to Individual Contributions.
- Displays the list of users participating in the objective and each one's contribution percentage.
- Example: for an objective of 10 calls, if User A made 6 calls and User B made 4, the system will display: A – 60%, B – 40%.
👉 Utility: provides clear visibility on individual performance within collective objectives (Multiple users or Per company).
See Action History
The "See Action History" button opens a detailed progress log.
- Displays: date and time of the action, the user who performed the action, the involved customer, and how progress was updated (e.g. "2//5").
- Available for both automated and manual objectives (where it shows who marked manual progress and what proof was attached).
Integrated statistics and reports
Data from objectives is centralized and displayed in the Executive Summary as widgets:
- Number of Finalized objectives
- Number of Missed objectives
- Number of Above standard objectives
- Comparisons against the previous period (e.g. "+15% finalized objectives vs last month").
Validation of overlapping objectives
When saving a new objective, the system checks if an objective of the same type already exists for the same user during an overlapping period.
- If so, it displays an error message and does not allow saving.
- Example: two "Phone calls" objectives cannot be created for the same agent in the same month.
User roles and access to objectives
Access is controlled via the Objectives permission, configured in:
.
- View – allows viewing objectives.
- Add – allows creating new objectives.
- Edit – allows modifying existing objectives.
- Delete – allows removing objectives.
🔎 FAQ
- Who can create objectives?
- Only users with permission, set in .
- Can I edit an objective after it has been created?
- Yes, if permission exists.
- However, for recurring objectives, the system asks if editing applies only to the current instance or future ones.
- What happens if I delete an objective?
- It is removed from the list and reports.
- Therefore, Delete permission should only be granted to administrators to avoid data loss.
- How are "New customers" and "New prospects" objectives counted? What is the difference?
- New customers – recorded when a customer places their first order.
- New prospects – counted when a customer with Prospect status is added to the CRM database, regardless of whether they placed orders later.
- If the same customer is visited twice, how is it counted?
- It depends on the "Unique contributions" setting:
- Activated → repeated visits to the same customer count only once.
- Deactivated → every visit is counted.
- Can I combine filters (e.g. only "End" customers + with "VIP" tag)?
- Yes, if both the customer type filter and the tag filter are set.
- In this case, progress counts only customers that meet both conditions.
- What happens if a recurring objective overlaps with another?
- The system validates and does not allow overlaps for the same objective type assigned to the same user for the same period.
- Can I mark manual progress in an automated objective?
- No. In automated objectives, progress is calculated exclusively from iFlows data.
- Manual progress is only marked for manual objectives.
- How is "Above standard" calculated?
- If the objective has the completion criterion "At the end of the period" and progress exceeds 100%, the system marks the card with the "Above standard" indicator.
- If an objective is set as "Private", who can see it?
- Only the creator and assigned users.
- Note: for "Per company" objectives, the "Private" option is not available.
- What is the role of the "Comment" and "Proof" fields in manual objectives?
- Comment → explains the progress (e.g.: "2 posts were made on Facebook and LinkedIn").
- Proof → attaches supporting files.
- Can I set objectives for custom periods (not just weekly/monthly)?
- Yes, the duration is fully flexible (in days, weeks, months), depending on what is entered during configuration.
- What happens if the start date is set in the future?
- The objective appears in the "Pending" tab and automatically moves to "Active" on that date.
Optimization: Different Email/SMS based on the chosen delivery method
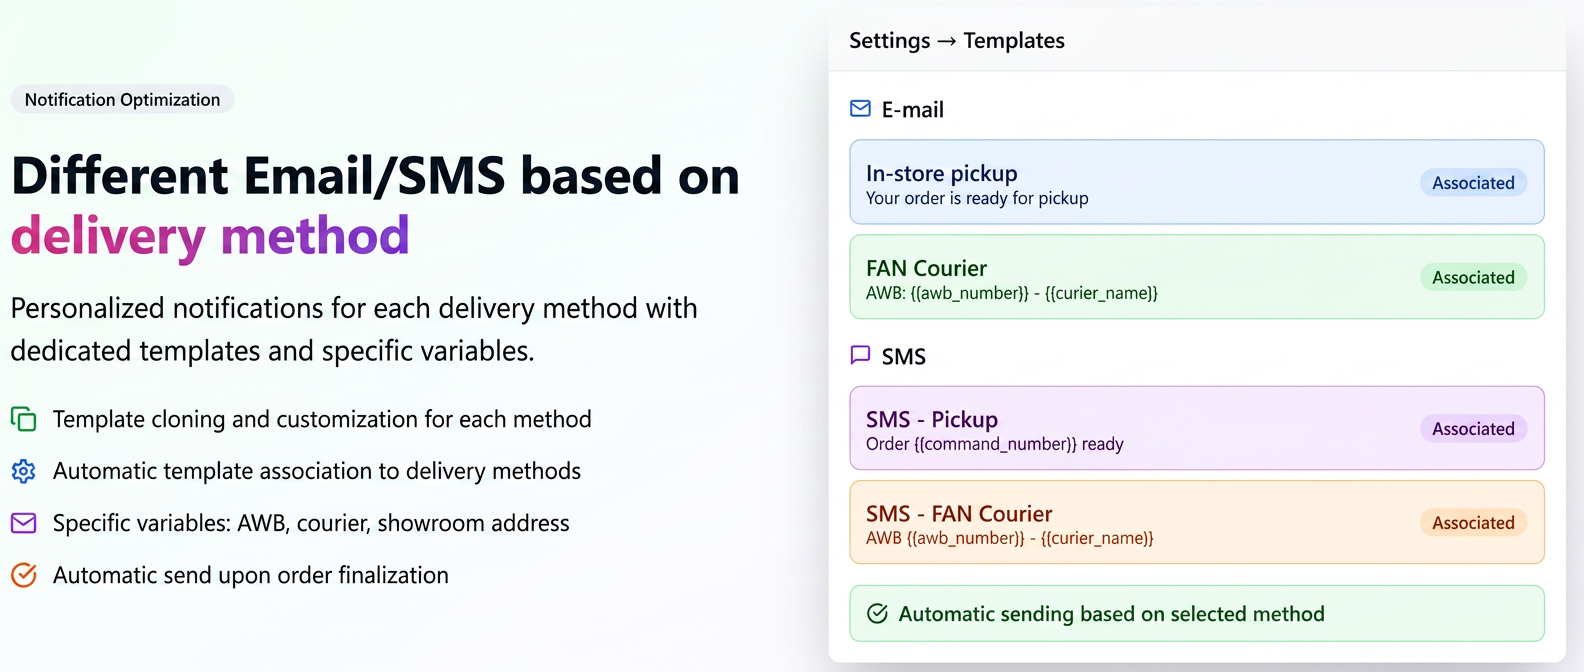
This functionality allows sending personalized notifications (email and SMS) based on the delivery method selected at order completion.
Thus, for each delivery method (e.g.: Courier, Personal pickup), you can create or clone dedicated templates that include specific variables and messages (AWB and courier for shipping, showroom address for personal pickup).
Step-by-step guide:
Step 1. Accessing templates
- Go to .
- Select the Predefined tab.
- Search for the "Order finalized notification" template.
Step 2. Cloning the existing template
- Next to the template, press the "Clone" action.
- An editable copy of the template will open automatically.
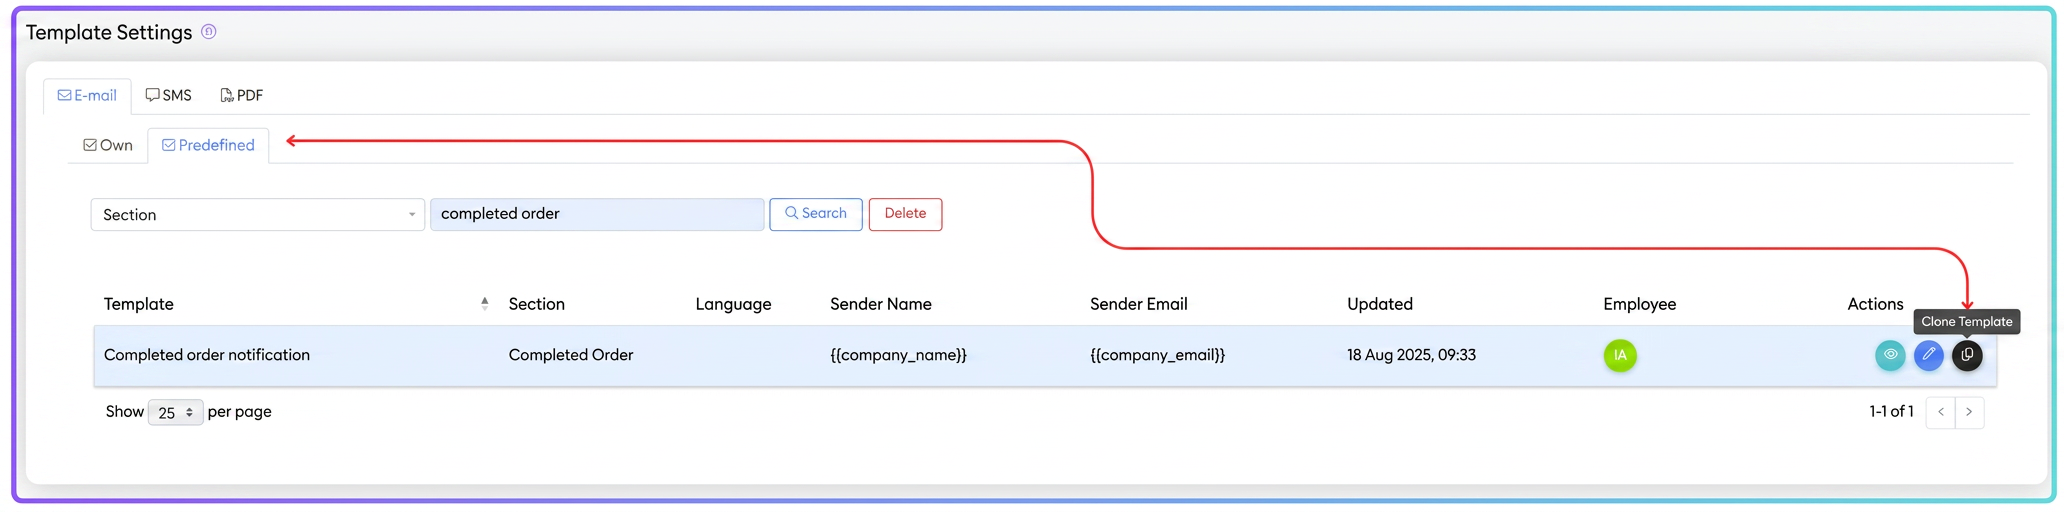
Note: This is the optimal version to keep the basic design and structure (logo, footer, styles). Alternatively, a completely new template can be created.
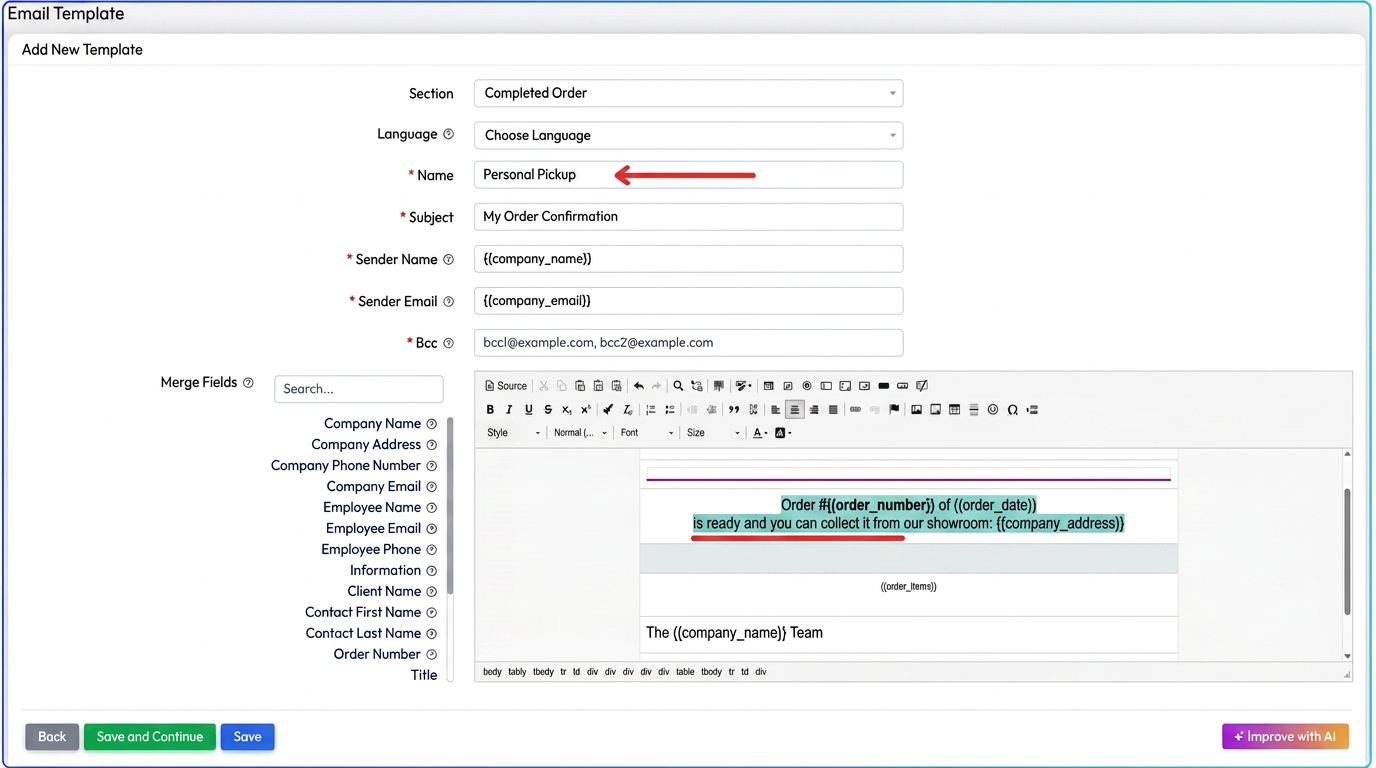
Step 3. Personalizing the template
- Under Name, enter a suggestive title (e.g.: Personal pickup or Delivery via Fan Courier).
- Under Subject, set a clear title (e.g.: "Your order is ready for pickup from the showroom").
- In the email body, modify the text for the respective scenario and use the available variables (e.g.:
- {{command_number}}, {{order_date}}, {{company_address}} for personal pickup;
- {{awb_number}}, {{curier_name}}, {{order_items}} for courier delivery).
Creating / cloning SMS templates
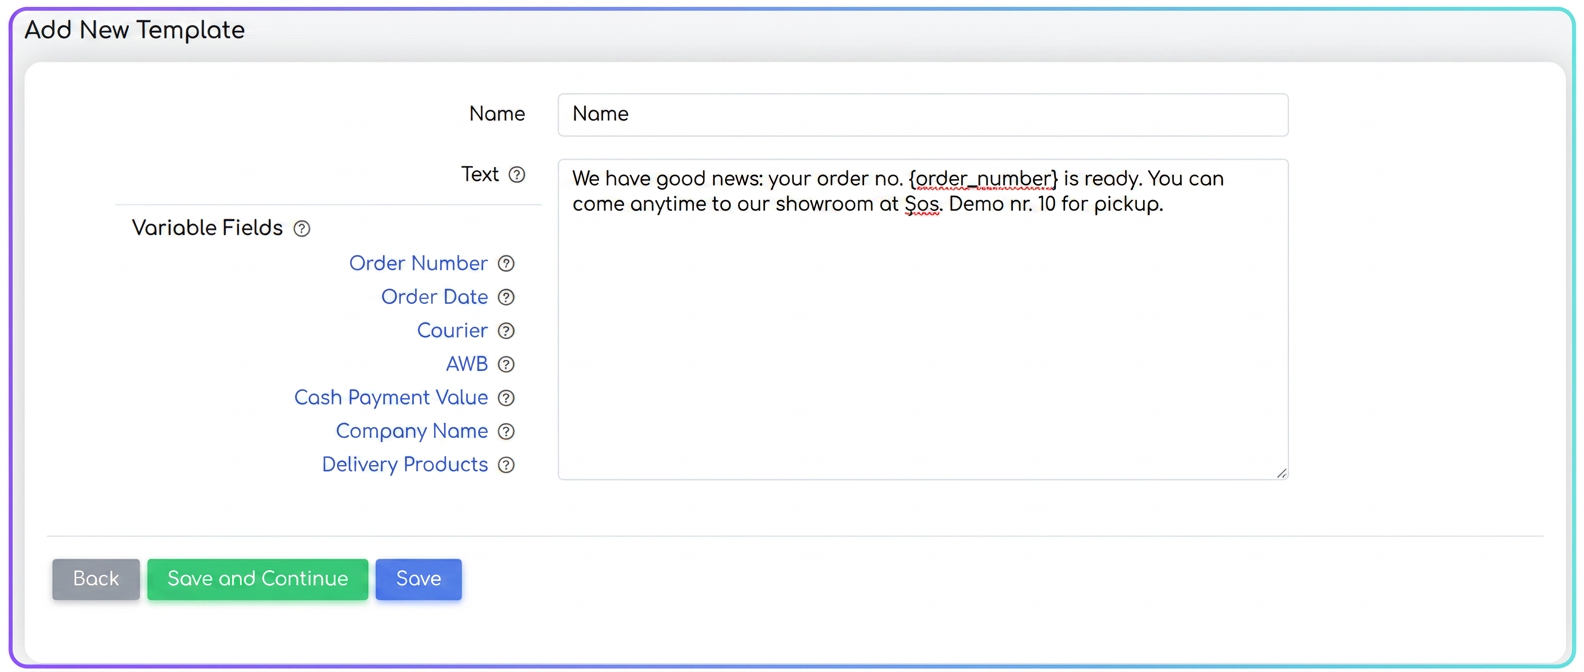
- Access .
- Choose "+ New SMS Template" or "Clone" an existing template.
- Name it (e.g.: "SMS – FAN Courier", "SMS – Pickup").
- Write the concise message (max. 160–306 characters, depending on settings), using available variables (e.g.: Order Number, Courier, AWB).
- Save.
Step 3 — Associating templates with delivery methods
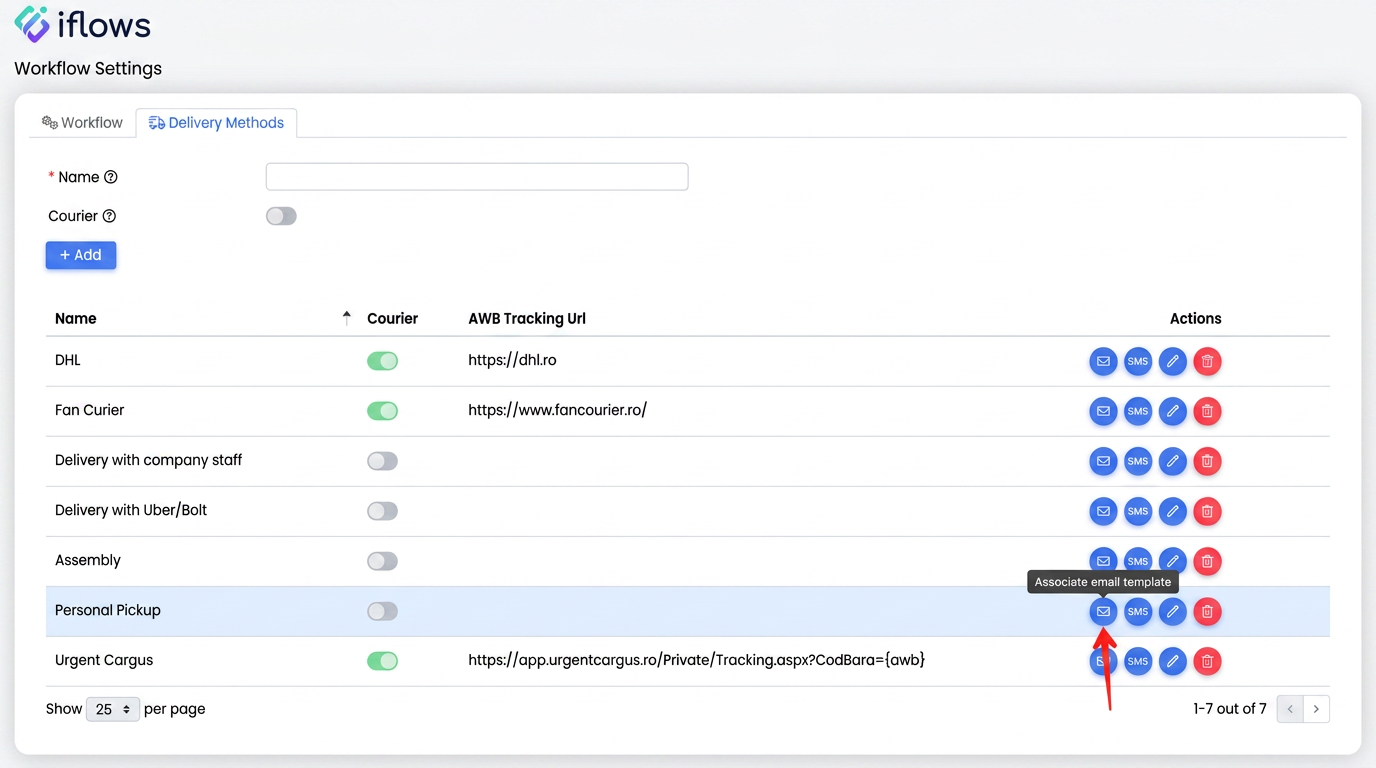
- Go to .
- For each method (e.g.: FAN, GLS, Personal pickup):
- Click "Associate Email template" → select the dedicated template and Confirm.
- Click "Associate SMS template" → select the dedicated template and Confirm.
Sending notifications at the delivery/finalization stage
In the workflow, at the "Delivery/Finalization" stage, the user completes the Delivery Details instruction.
- When the Delivery Method (e.g.: Courier, Personal pickup, etc.) is selected, the system checks the notification template associated with that method.
- When the Finalize button is pressed, the platform automatically sends the client the email and SMS corresponding to the chosen delivery method.
Thus:
- If Personal pickup was selected, the client receives the message with the showroom address and pickup instructions.
- If a Courier was selected, the client receives the message with the AWB, courier, and shipping details.
Clarifications
- Can I still use the default "Order finalized" template?
Yes. If you don't create or associate personalized templates for delivery methods, the system will continue to send the default template. - Can I associate the same template with multiple delivery methods?
Yes, you can use a single template (email or SMS) for multiple methods if the message is relevant to all. - What happens if I choose a delivery method but haven't associated any template with it?
The generic "Order finalized" template will be sent. If, however, you associated a template with a delivery method and then deleted it, the email/sms will not be sent. - Can I activate/deactivate SMS sending?
Yes. Edit the client and deactivate/activate SMS notification. You can also do this in bulk for all clients from the clients menu – select all clients and on the floating menu you have the "Notifications" option. - Can I use images, logo, and HTML design in email templates?
Yes, the template editor allows HTML and images.
Optimization: "Losses" column in offer cost calculation
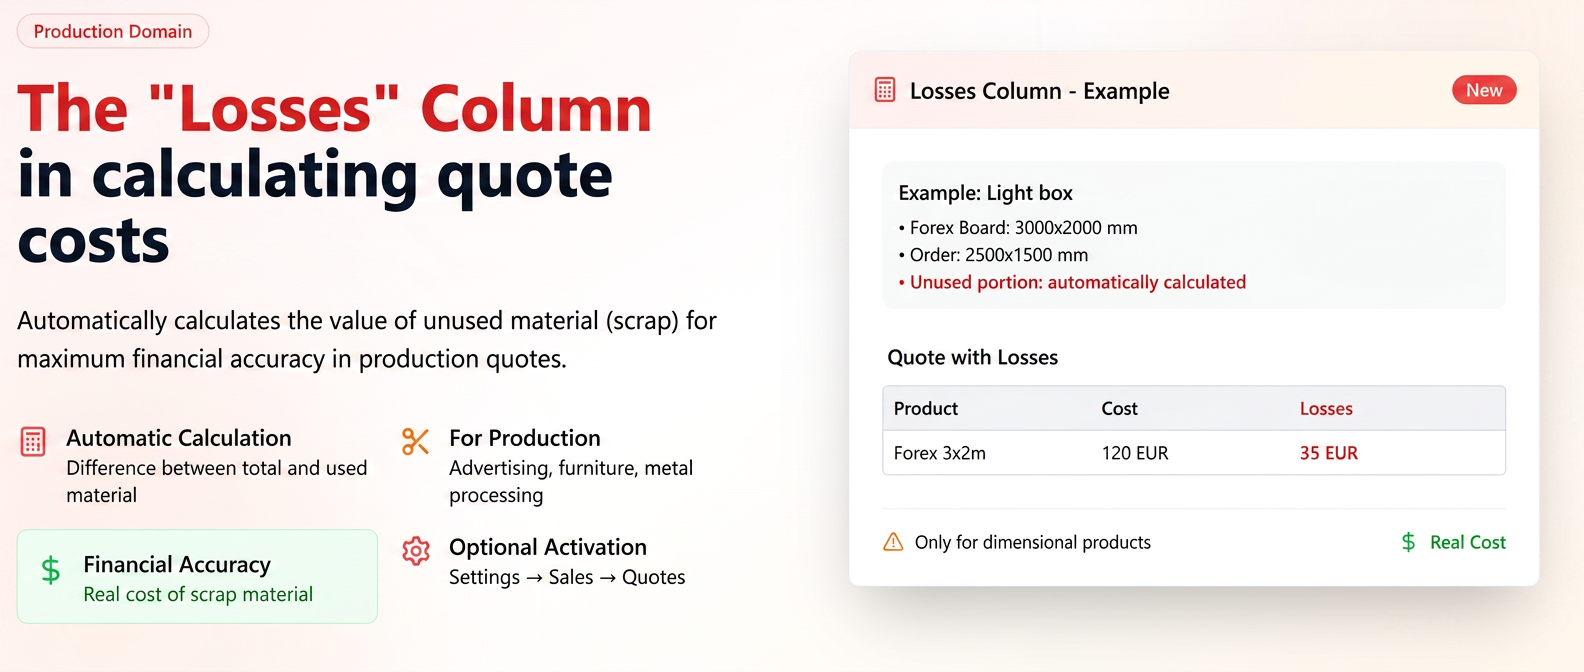
Currently, in the Offers module, the product cost is calculated only for the surface effectively used (dimensions specified in the order). In many production industries (advertising, furniture, metal processing, etc.), raw material may come from fixed-size boards/panels/countertops. When the finished product uses only part of the material, there is a possibility that a remainder will be left that can no longer be reused and becomes scrap.
Utility:
- Dedicated specifically to production companies where remnants cannot be reused.
- Ensures greater financial accuracy when calculating the offer cost.
Application examples:
- Advertising production: Creating a light box. Raw material: Forex board 3000x2000 mm. Order: 2500x1500 mm. The remaining material (500x2000 + 2500x500 mm) can no longer be used, so a loss cost occurs. In the offer, the "Losses" column will show the value of these remnants.
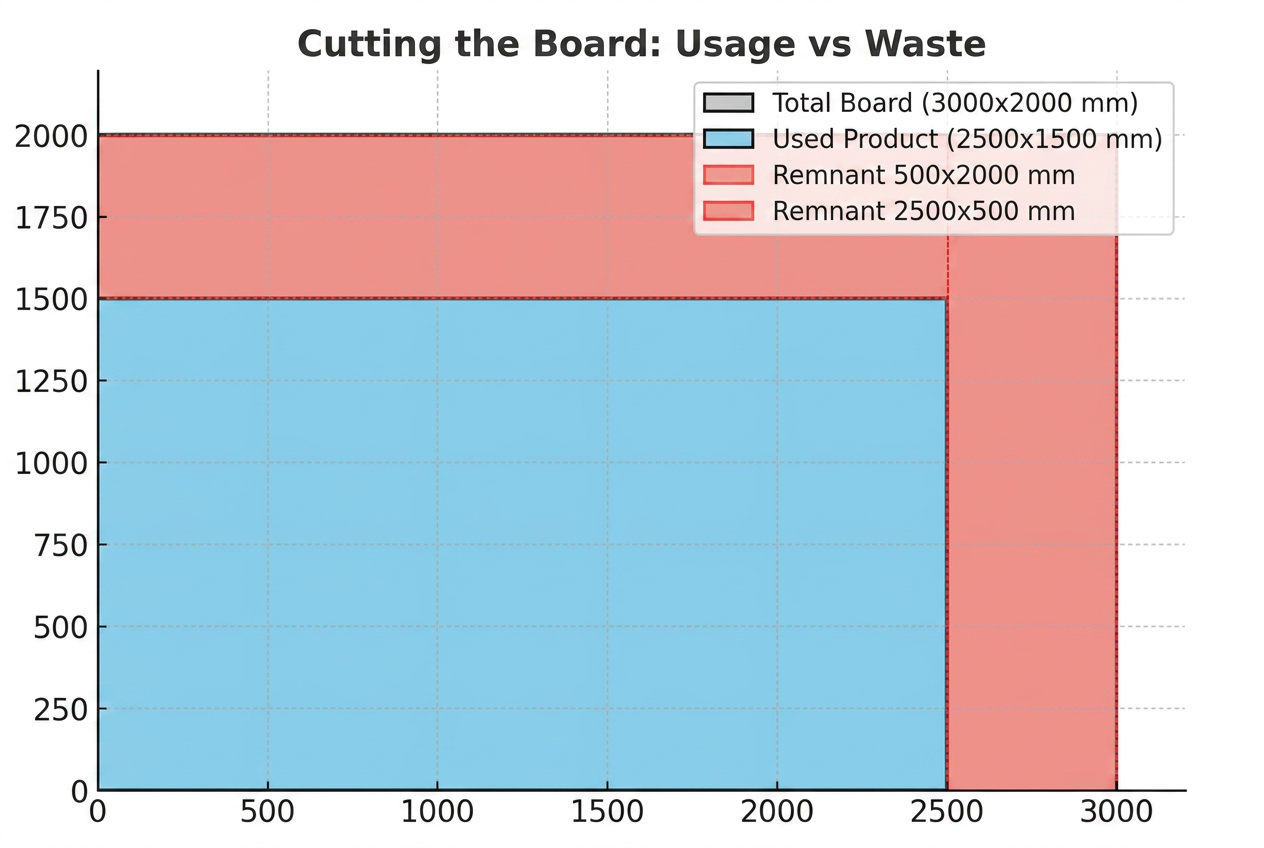
- Furniture production: Making a kitchen countertop from Chipboard 2800x2070 mm. The client orders a 2400x600 mm countertop. The rest of the panel (unsuitable for other jobs) is scrap and will be highlighted in the "Losses" column.
Note: The "Losses" column is intended exclusively for companies that cannot reuse material remnants resulting from cutting and consider them scrap. For organizations that reuse remaining materials, activating this functionality is not necessary, as in their case remnants do not constitute losses. In this situation, it is recommended to use the existing "Usable Remainder" option in the Flow settings, which allows highlighting and valuing the remaining remnants.
Activating the "Losses" function in Offers
To use the "Losses" column in the offer cost calculation, it is necessary to activate this functionality from:
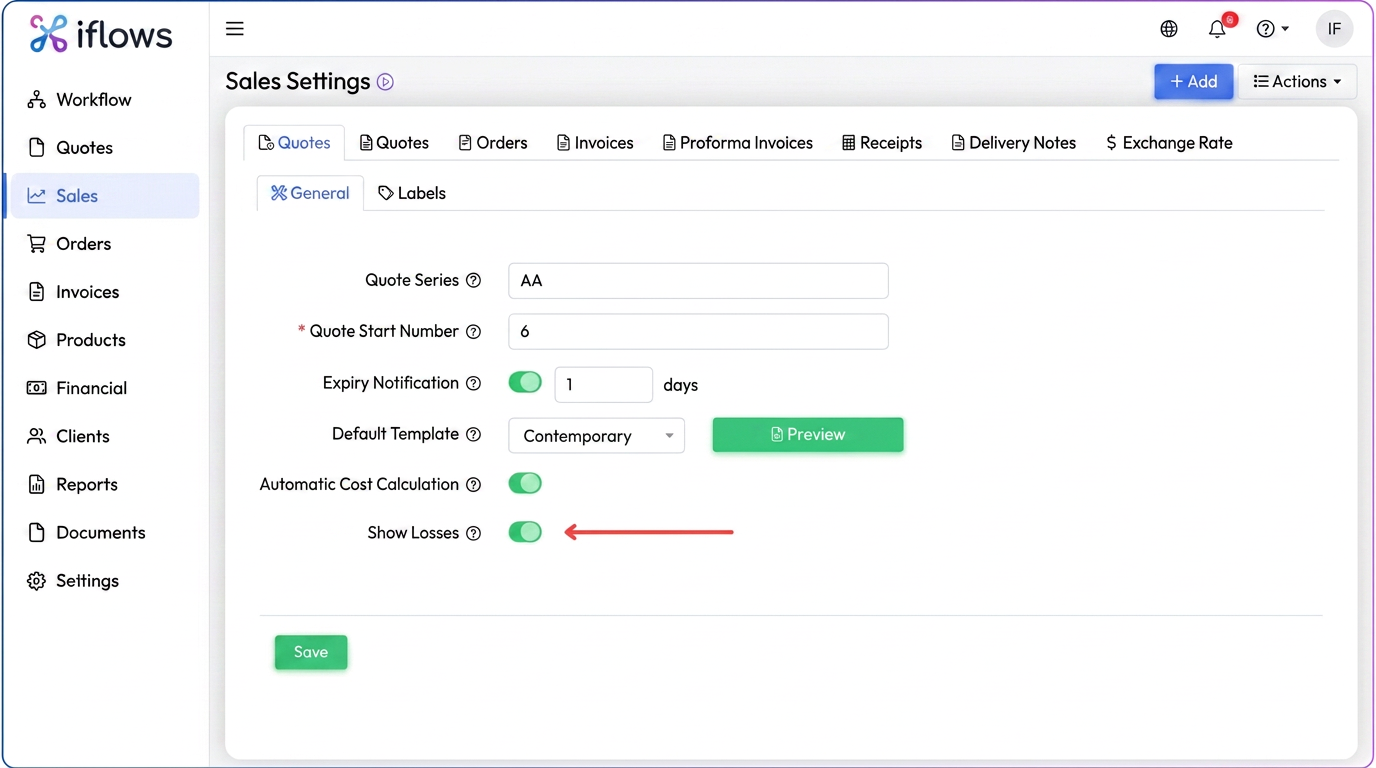
Once the option is activated, when generating an offer, the "Losses" column will automatically be displayed in the calculation table, indicating the value of the unused material (considered scrap).
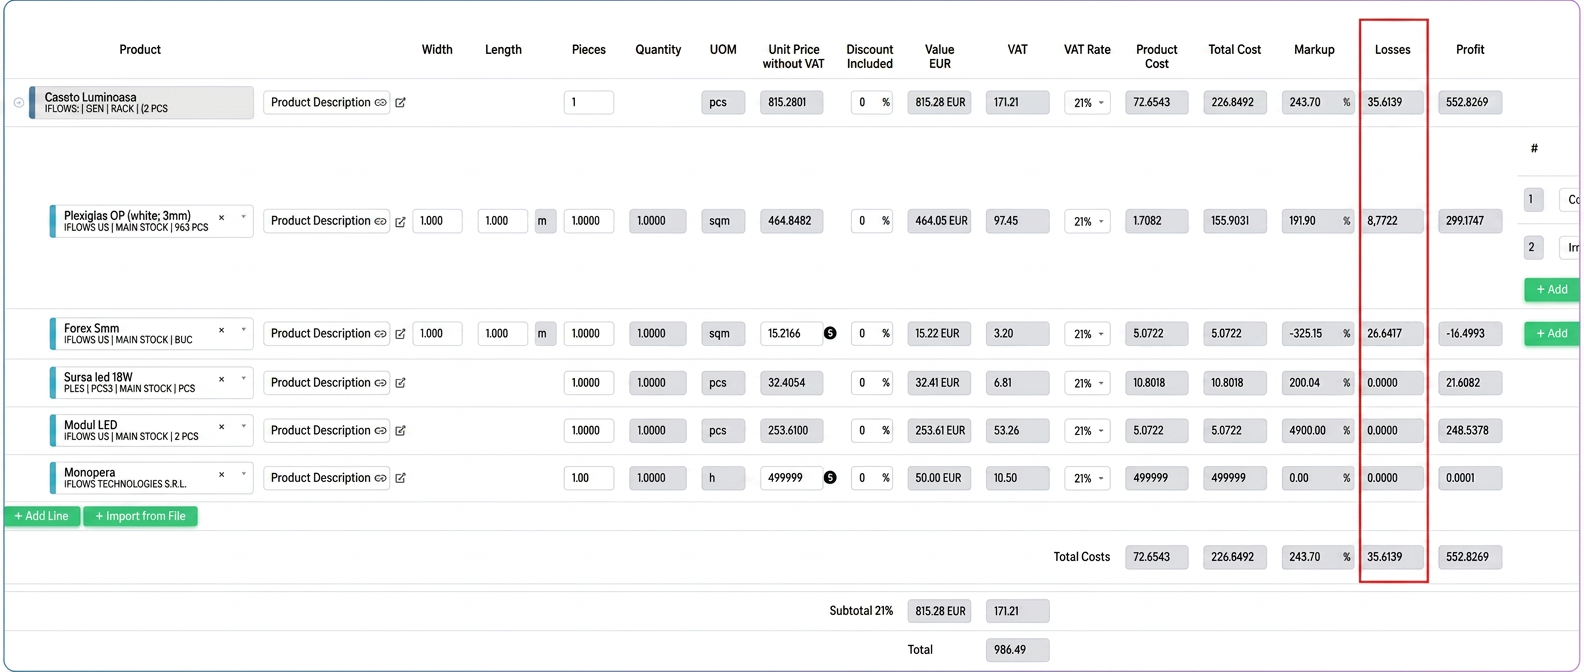
⚠️ Warning:
- Loss is calculated and displayed only for products where stock is kept by "piece" and have defined dimensions (e.g.: boards, panels, countertops).
- For products without dimensions or those where stock is kept in other units of measure (kg, m, sqm), the column will have no effect.
- Does the "Losses" column apply to all products?
No. It only applies to products where:
- stock is kept by "piece";
- dimensions are defined (length, width, thickness, etc.).
- Can I see the "Losses" column in all offers?
Only if it was activated from . By default, it is deactivated. - What happens if the product has no defined dimensions?
The column will display no value, as the loss cannot be calculated. - Is loss automatically calculated for any material difference?
Yes, but only based on the dimensions entered. If the product uses part of a board/panel/countertop, the unused difference will be calculated and displayed as a loss. - What is the loss calculation method?
Losses are calculated automatically as the difference between the total material and the material used.
Optimization: Equipment Display in Offers
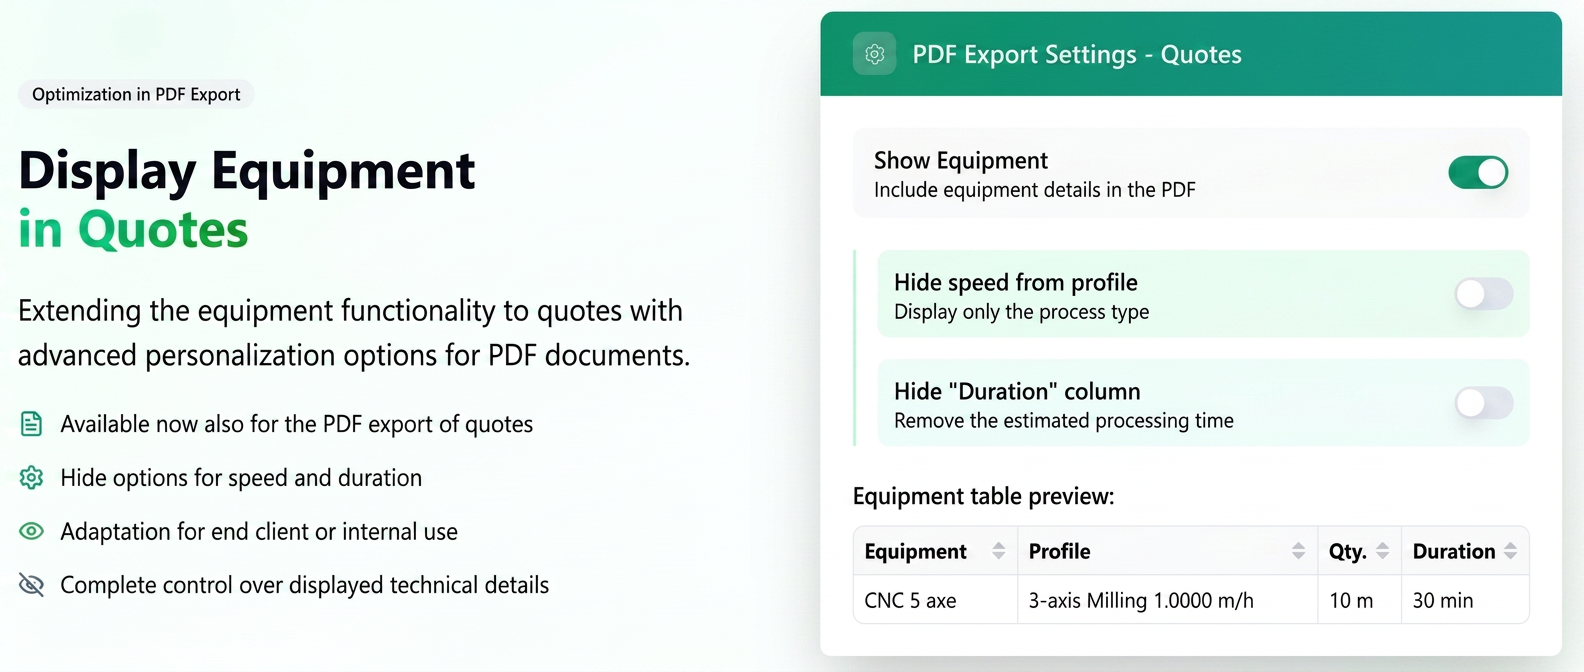
This update is addressed to companies that use equipment.
We have brought improvements for a more flexible presentation of information in the PDF export:
- Extension of the "Show Equipment" option to Offers
– previously available exclusively for Orders, the functionality is now also available in the PDF export for Offers. - Introduction of two additional options for personalizing displayed details:
- Hide speed from profile – displays only the process type (e.g.: "3-axis Milling"), without the working speed.
- Hide "Duration" column – completely removes the column referring to the estimated processing time on the equipment.
Through these options, PDF offers and orders can be adapted based on the audience:
- for the end customer → simplified documents, without technical parameters or production times;
- for internal/technical use → detailed documents, with all operational information.
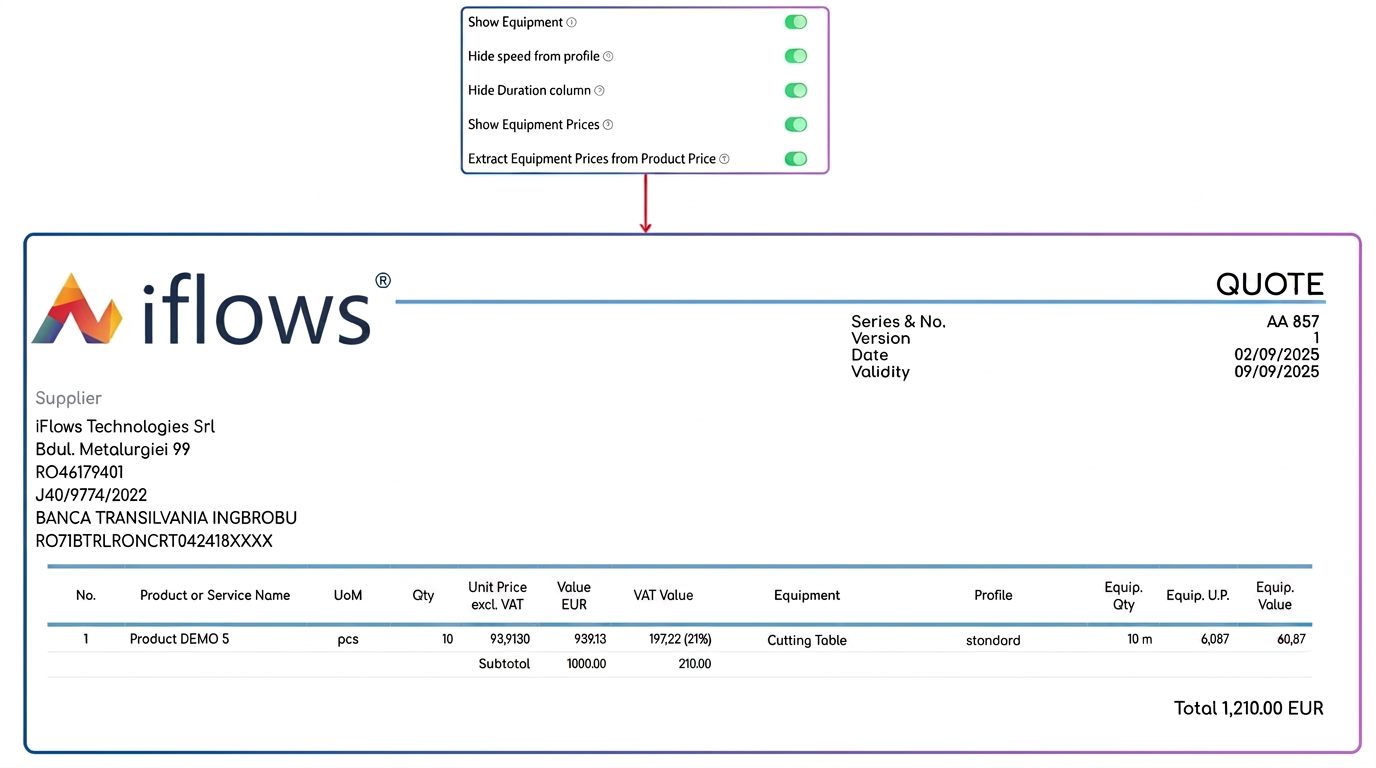
When the "Show Equipment" option is activated, the PDF document will include additional details regarding the processes and equipment used to create the product/service.
In this case, the following new settings become available:
- Hide speed from profile (new)
- Role: controls how the technological profile is displayed.
- If OFF (default): both the profile name and the working speed are displayed (e.g.: "3-axis Milling 1.0000 m/h").
- If ON: only the profile name is displayed (e.g.: "3-axis Milling"), without the speed detail.
- Recommendation: useful when you do not want to expose technical parameters in documents sent to the client.
- Hide "Duration" column (new)
- Role: completely removes the "Duration" column from the table.
- What the "Duration" column represents: the estimated time required to process the indicated quantity on that equipment.
- Example: if 10 m of material is processed at the defined speed on a "5-axis CNC", the calculated time appears in the column (e.g.: "30 min").
- If OFF (default): the "Duration" column is visible in the PDF.
- If ON: the "Duration" column disappears completely.
- Recommendation: ideal when the offer is intended for the end customer, to keep the document simple and not expose production times.
| Setting | ON | OFF (default) |
| Show Equipment | Table includes equipment details: Equipment, Profile, Equip. Qty, Equip. U.P., Equip. Value, Duration. | Equipment does NOT appear in the PDF. |
| Hide speed from profile(new) | In the Profile column, only the process name appears (e.g.: "3-axis Milling"). | In the Profile column, the name + speed appear (e.g.: "3-axis Milling 1.0000 m/h"). |
| Hide "Duration" column(new) | The Duration column is completely removed from the table. | The Duration column is visible (e.g.: "25 min", "0.1 h"). |
| Show Equipment Prices | Columns Equip. U.P. and Equip. Value are displayed, with the rates related to the equipment. | Equipment appears only as a technical list, without prices. |
| Extract Equipment Prices from Product Price | The product price is automatically reduced by the equipment value, which is then displayed next to the equipment. | Product price includes the equipment cost. |
Optimization: Equipment Display in Offers
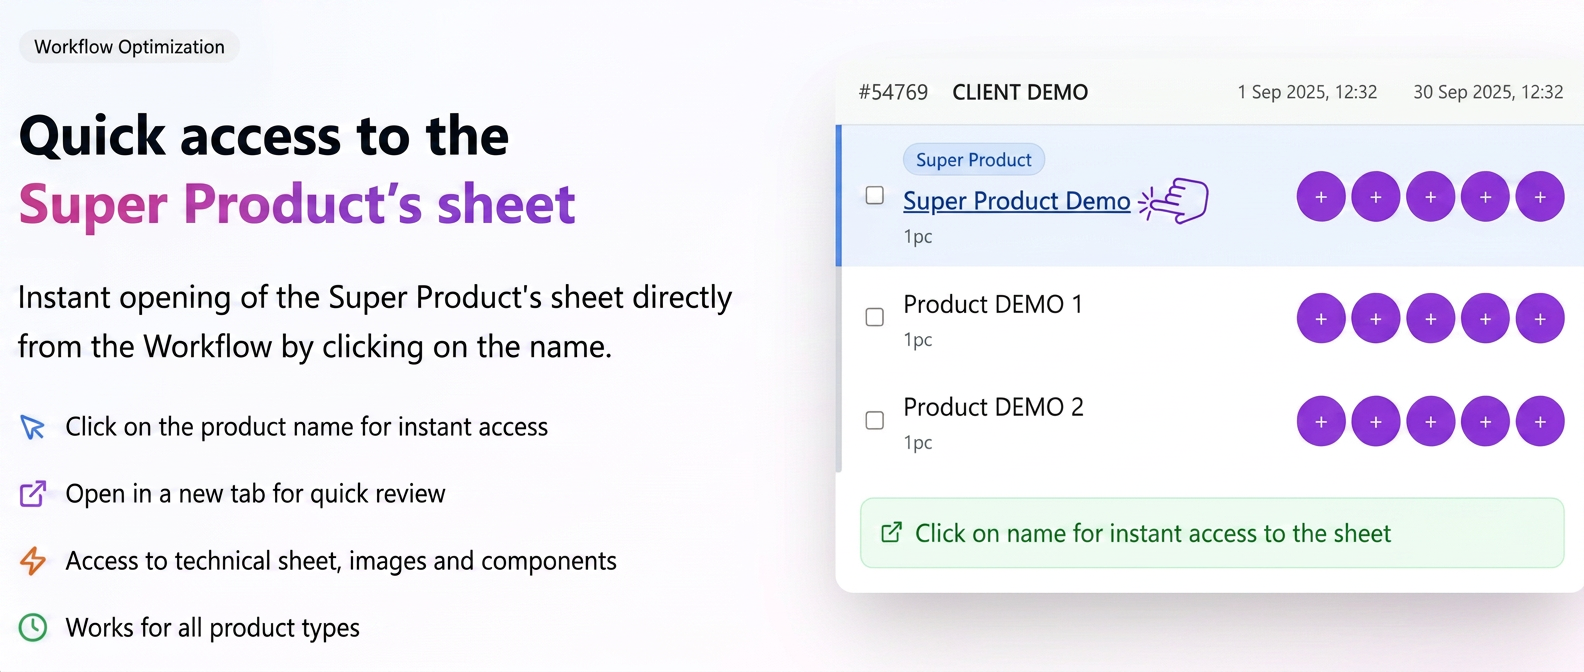
Allows operators to instantly open a Super Product file directly from the order in the Flow, by clicking on the name, to consult the technical sheet, images, components, and processing parameters.
Usage steps (desktop)
- Access the Workflow
Menu: → Workflow and expand the desired order. - Identify the Super Product
In the item list, find the position marked as Super Product. - Open the product file
Click on the Super Product name (text is a hyperlink).
→ The Product file opens (in a new tab/window) - Consult the necessary information, such as the technical sheet: working instructions, tolerances, times, PDFs, images or other information.
Note: The functionality applies uniformly to all product types. Both standard products and superproducts in the flow have interactive names, allowing quick access to the product file by clicking on the title.

Optimization: Autofactura (Self-invoice)
Autofactura (Self-invoice) automates the retrieval into iFlows of invoices issued in your company's name by third parties through ANAF e-Factura (common in the case of energy suppliers). The function automatically creates both an Order (marked finalized, without entering the Flow) and a Sales Invoice identical to the document from e-Factura, for traceability, collection, and reporting.
1) Accessing the function
To use the functionality, navigate to the menu:
→ "e-Factura" tab.
In this section, all invoices sent and received through the ANAF e-Factura system are displayed.
2) Identifying a self-invoice
A Self-invoice type document is differentiated by a visible element in the "Actions" column:
- next to it appears a new orange button, named "Create order".
- this button is available exclusively for self-invoices.
Thus, if you notice this button, it means the respective document is a self-invoice and can be processed automatically in iFlows.
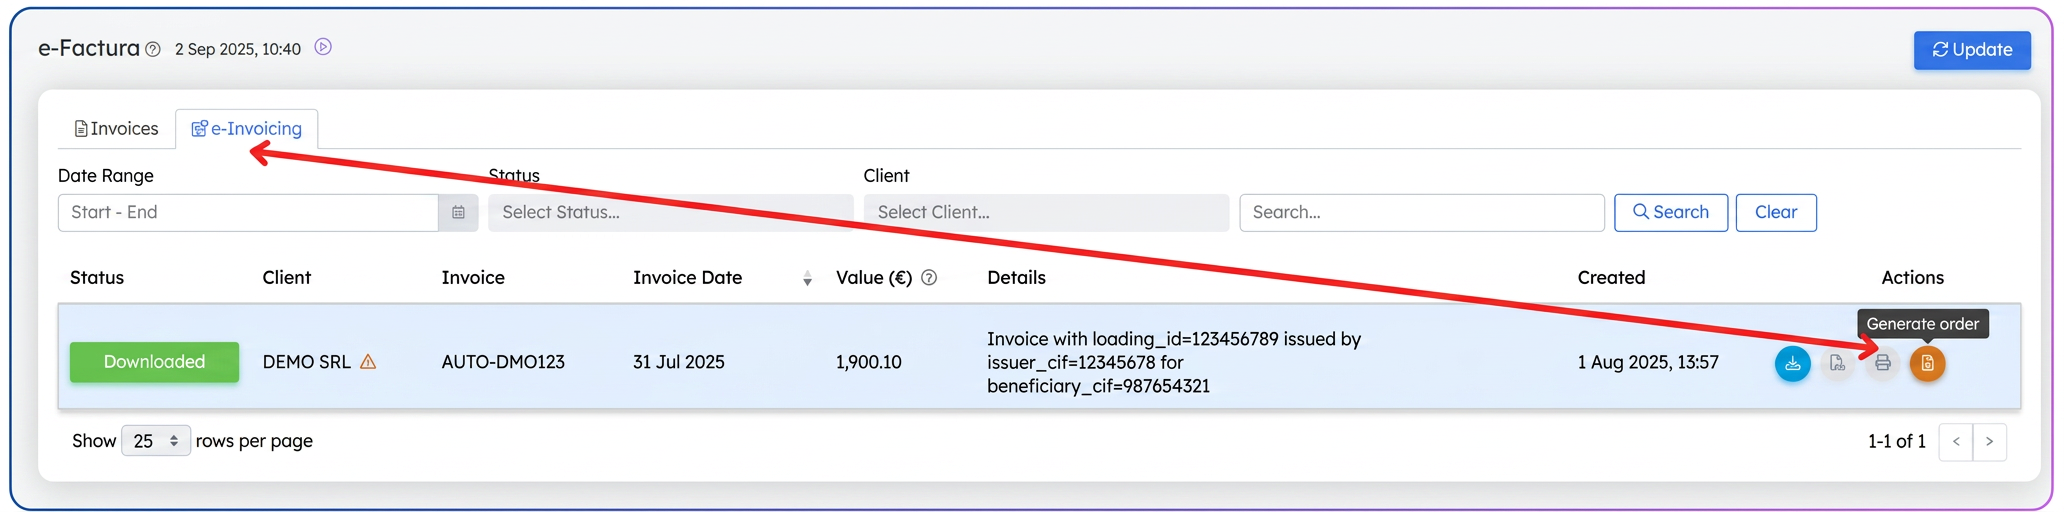
3) Generating the order and invoice
To complete the process:
- Press the orange "Create order" button.
- The iFlows system will automatically generate:
- Order, marked as finalized (does not go through the operational flow);
- Sales Invoice in , taking all data from e-Factura (products/services, quantities, prices, VAT, total value, customer).
4) Benefits
- No manual data entry is necessary;
- Complete traceability is maintained (Order ↔ Invoice);
- The created invoice can be used directly for marking collection and for internal reports;