
New: Electronic Signing of Standardized Documents
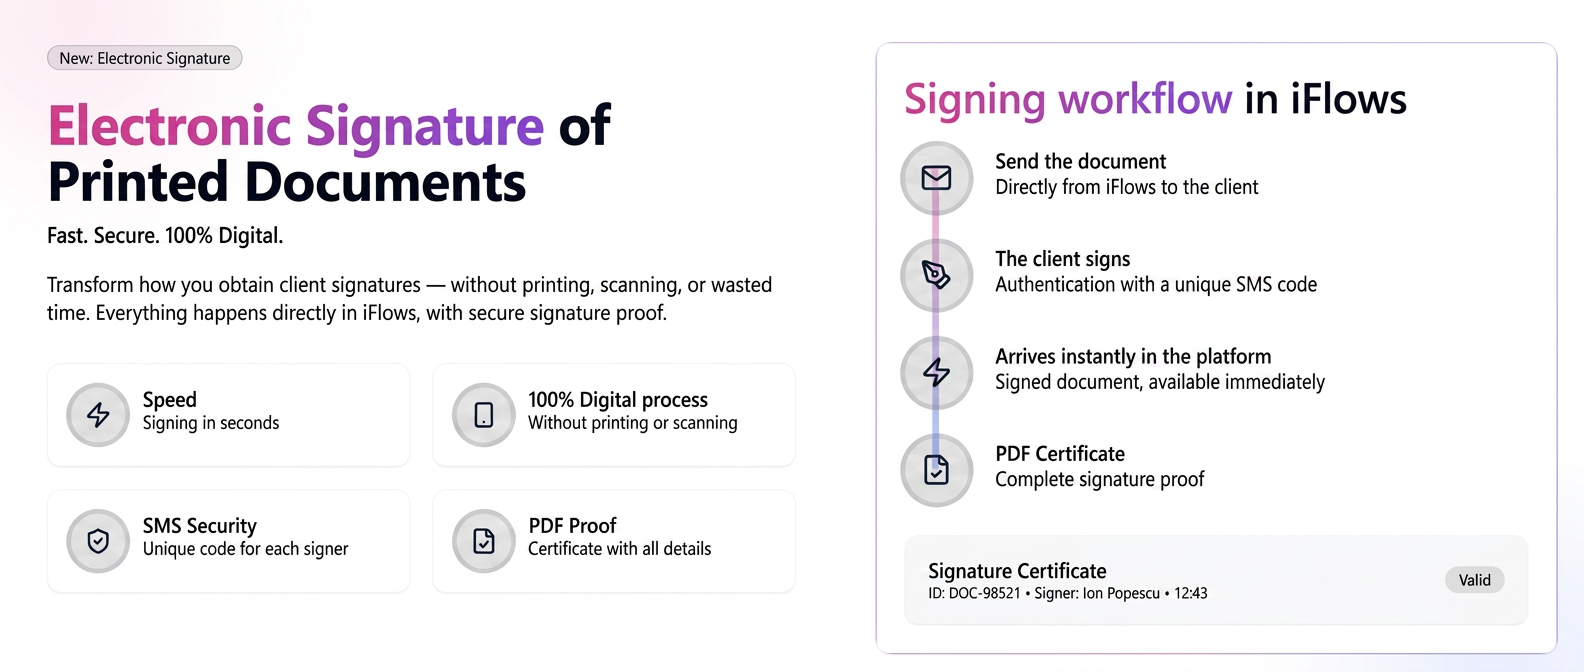
This functionality allows you to request and obtain electronic signatures from customers directly on documents generated within iFlows. This process is secure, fast, and provides proof of agreement, eliminating the need to print and scan documents.
Initial Preparation (One-time setup)
To make the signing functionality available, you must ensure that your templates (both document and email) are properly prepared.
Step 1.1: Adding the Signature Field to the Document Template
First, you must define the exact location where the customer's signature will appear in the final document.
- Navigate to Documents -> Standardized (Documente Tipizate) and access the Standardized Templates tab.
- Create or edit the desired template.
- In the document editor, scroll down to the signature section.
- In the left panel, under Variable Fields, you will find a new special field: Customer Signature.
- Position the cursor in the document at the desired location and then click on the Customer Signature variable.
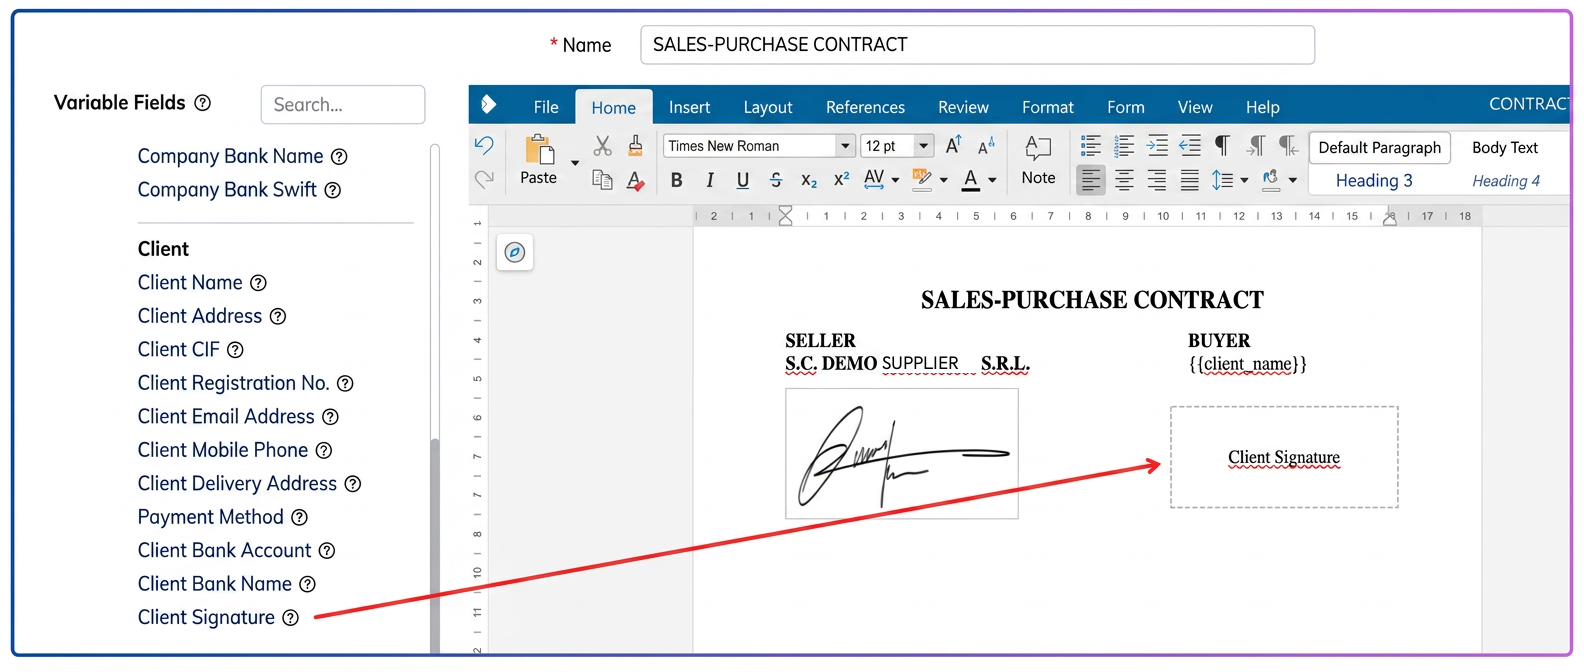
- A special box will appear in the document. You can resize and move this box to fit your document's design perfectly. The size and position of this box will determine exactly where and how large the customer's signature image will be in the final document.
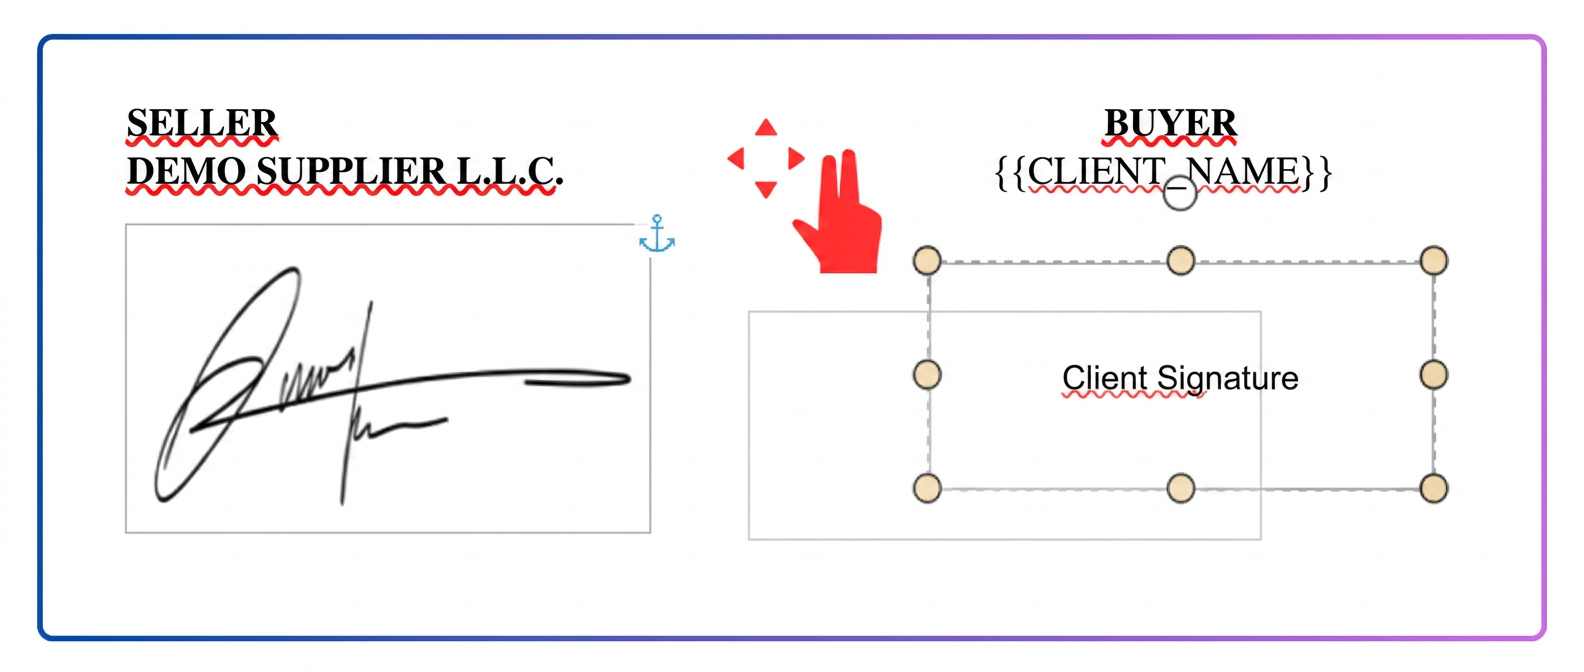
- After correctly positioning the box, press the Save button.
Step 1.2: Adding the Signing Button to the Email Template
For signing to be possible, the email received by the customer must contain a special button that directs them to the signing page.
- Navigate to Settings -> Templates -> Email -> Predefined
- Find and edit the template with the Standardized Document section. This is the standard email sent by the system when you dispatch a standardized document.
- In the email editor, ensure you have the signature variable. Usually, this is already present in the form of a large blue button with the text "View and sign document".
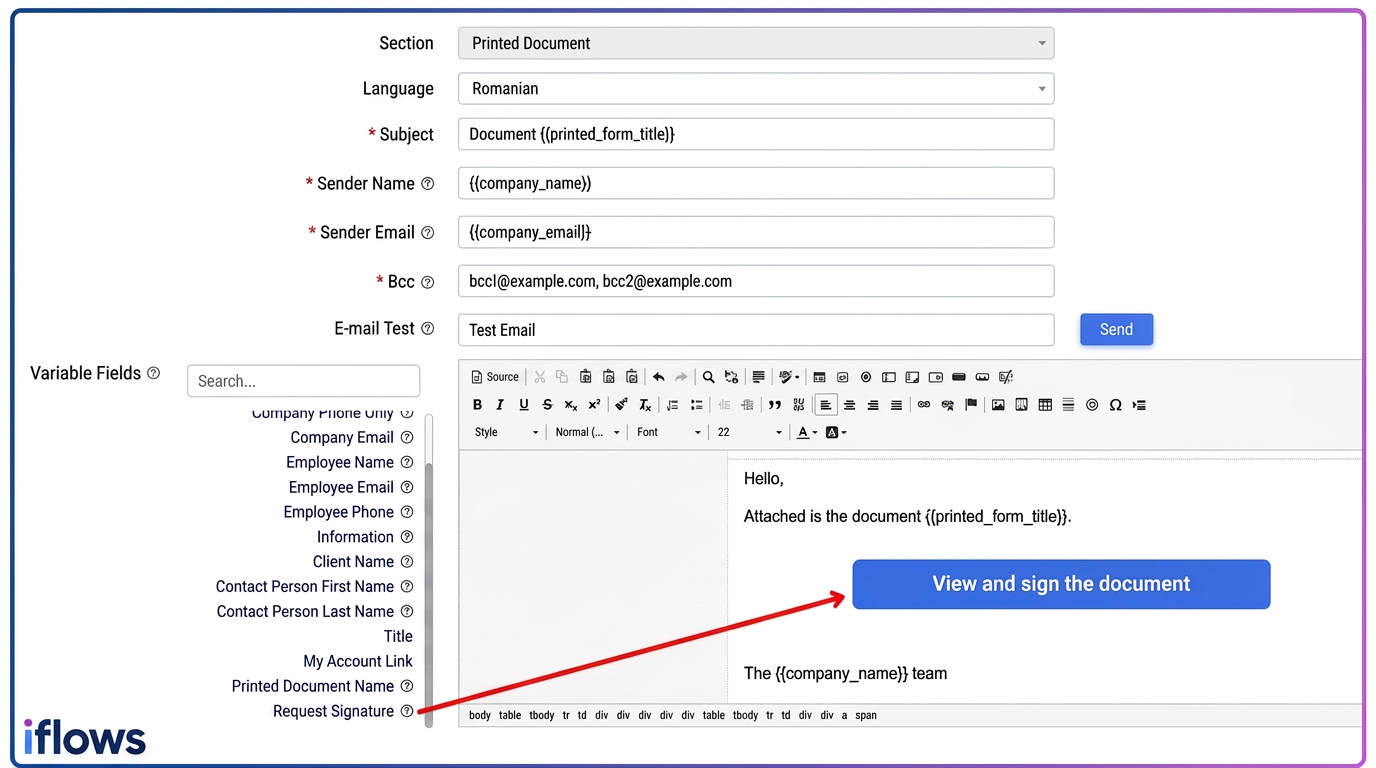
- If it doesn't exist, you can add it manually from the Variable Fields list on the left. This button is smart: it will appear in the email only when you request a signature.
- Save the email template.
Note: you can create multiple templates related to the standardized section, one for each document type. Later, select which template to use upon sending.
Part 2: Generating and Sending a Document for Signing
Now that the templates are configured, the sending process is very simple.
Step 2.1: Generating the Standardized Document
- Go to the relevant section associated with that standardized document (e.g., Sales -> Orders).
- Identify the order for which you want to generate the document and click the Generate Standardized Document icon (red symbol).
- Select the document template you prepared in Step 1.1.
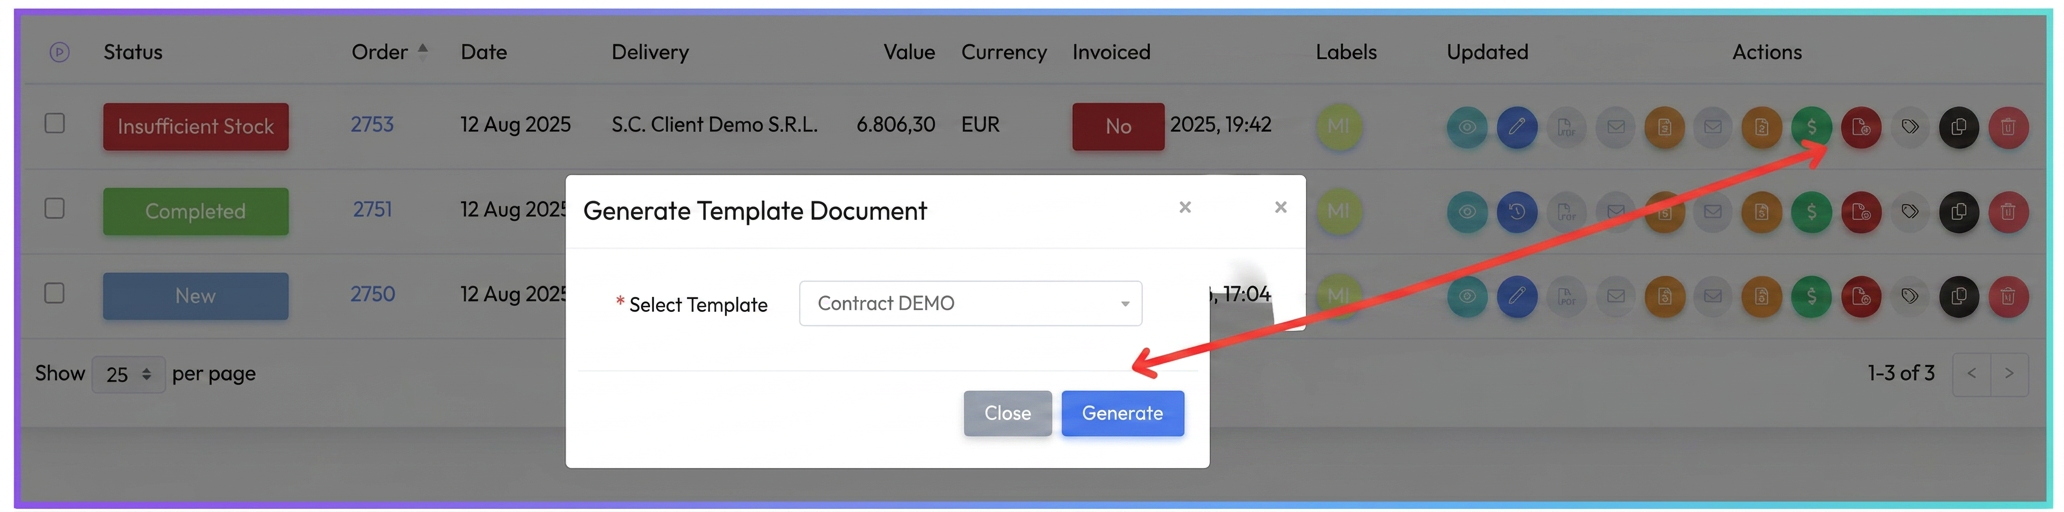
- The system will open the document pre-filled with data from the order. Check the information and manually fill in any necessary custom fields (e.g., registration number, date, etc.).
- Press Save. You will be redirected to the order page, in the Standardized Documents tab, where you will see the newly created document.
Step 2.2: Sending the Email with a Signature Request
- Next to the freshly generated document, click the Send Email icon (envelope).
- The email composition window will open. Here you will notice a new option: Request Signature.
- Toggle the switch for "Request Signature".
- Once activated, a new field will appear: Validity (days). Enter the number of days for which the signing link will be active (e.g., 5 days).
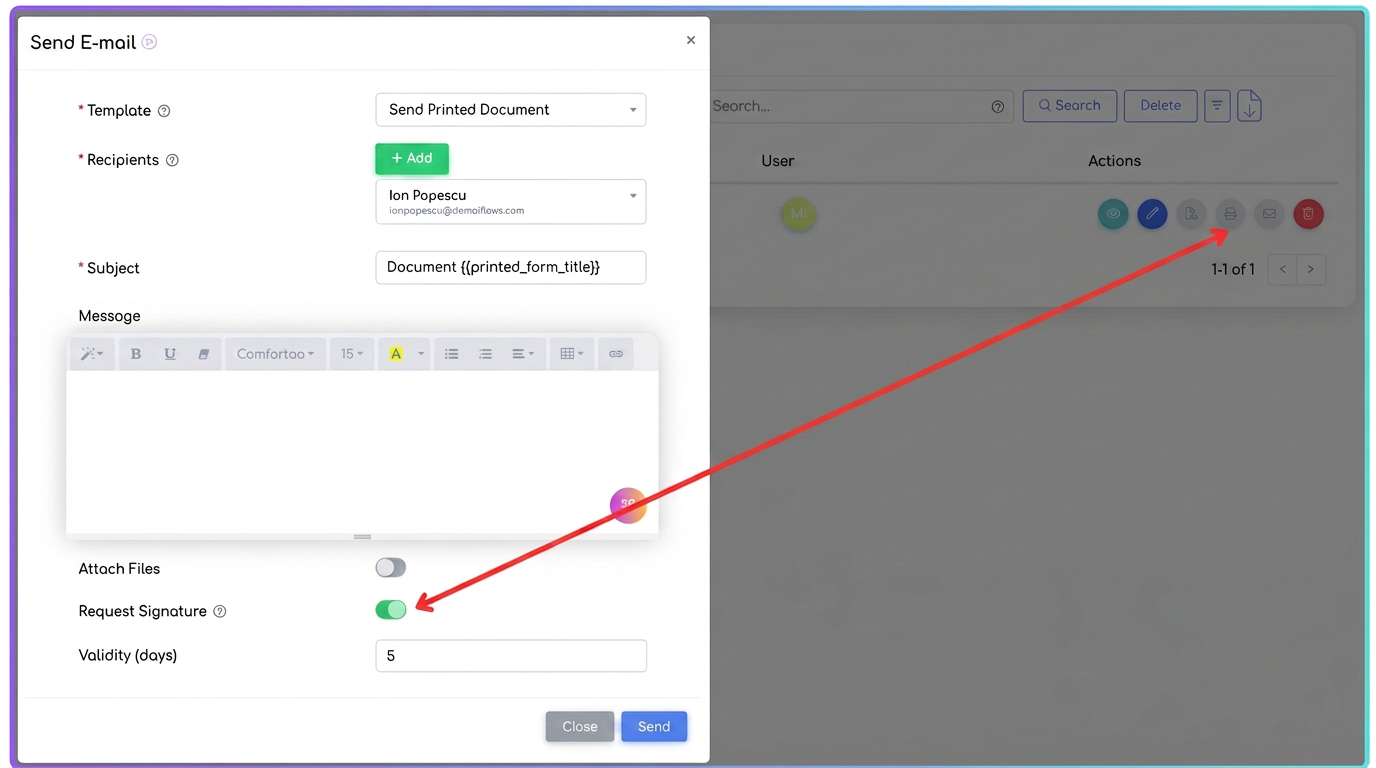
- Press the Send button.
Part 3: The Signing Process (Customer Experience)
Your customer will go through a secure and intuitive process.
- The customer receives an email containing the "View and sign document" button.
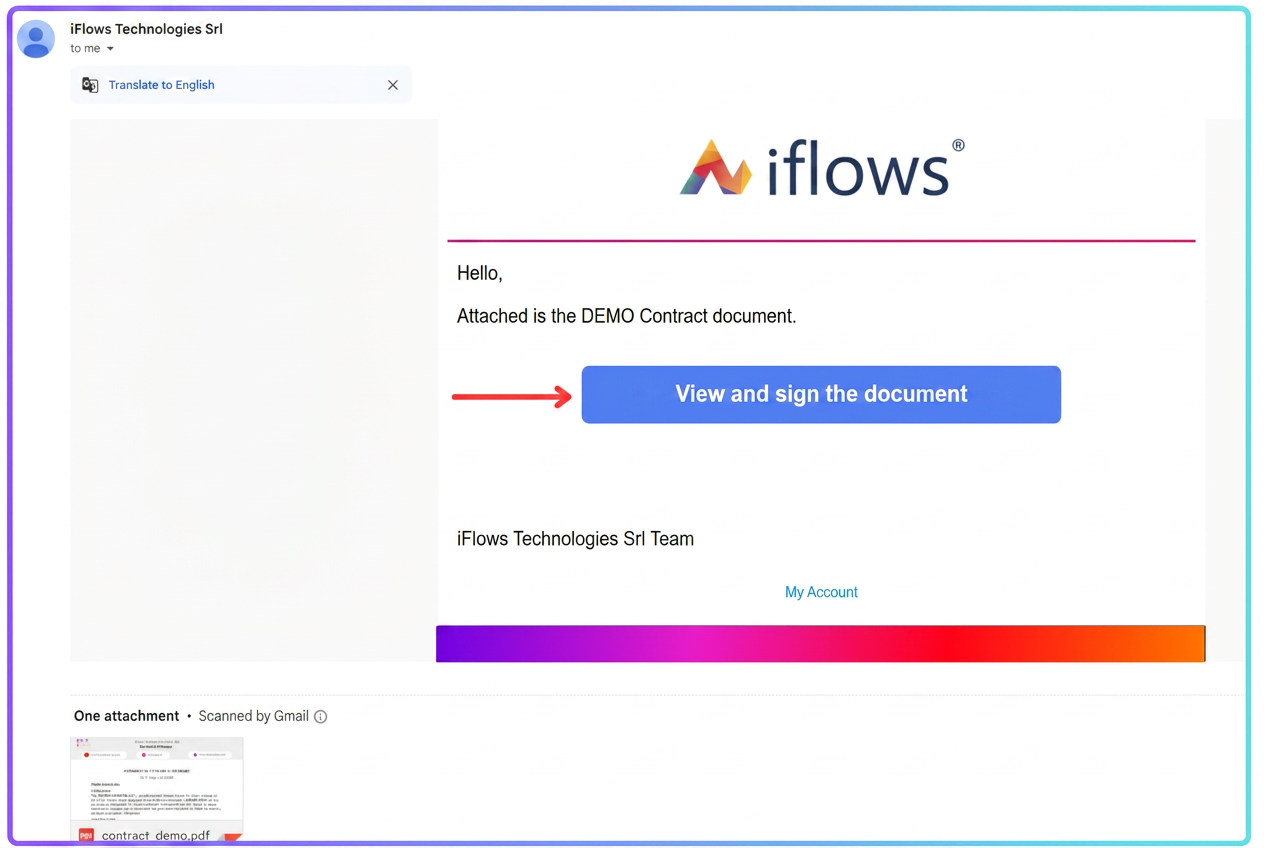
- By clicking the button, they are redirected to a secure signing page.
- On this page:
- On the right side, they will see the full PDF document.
- On the left side, they will have a form to complete:
- Full Name: The name of the person signing.
- Private Code: For security, the customer must click the "Send Private Code via SMS" button. They will receive a unique code on the phone number associated with their account.
- Signature: They have two options:
- Draw the signature directly in the box using the mouse or a touch screen.
- Upload an image (PNG/JPG) of their signature.
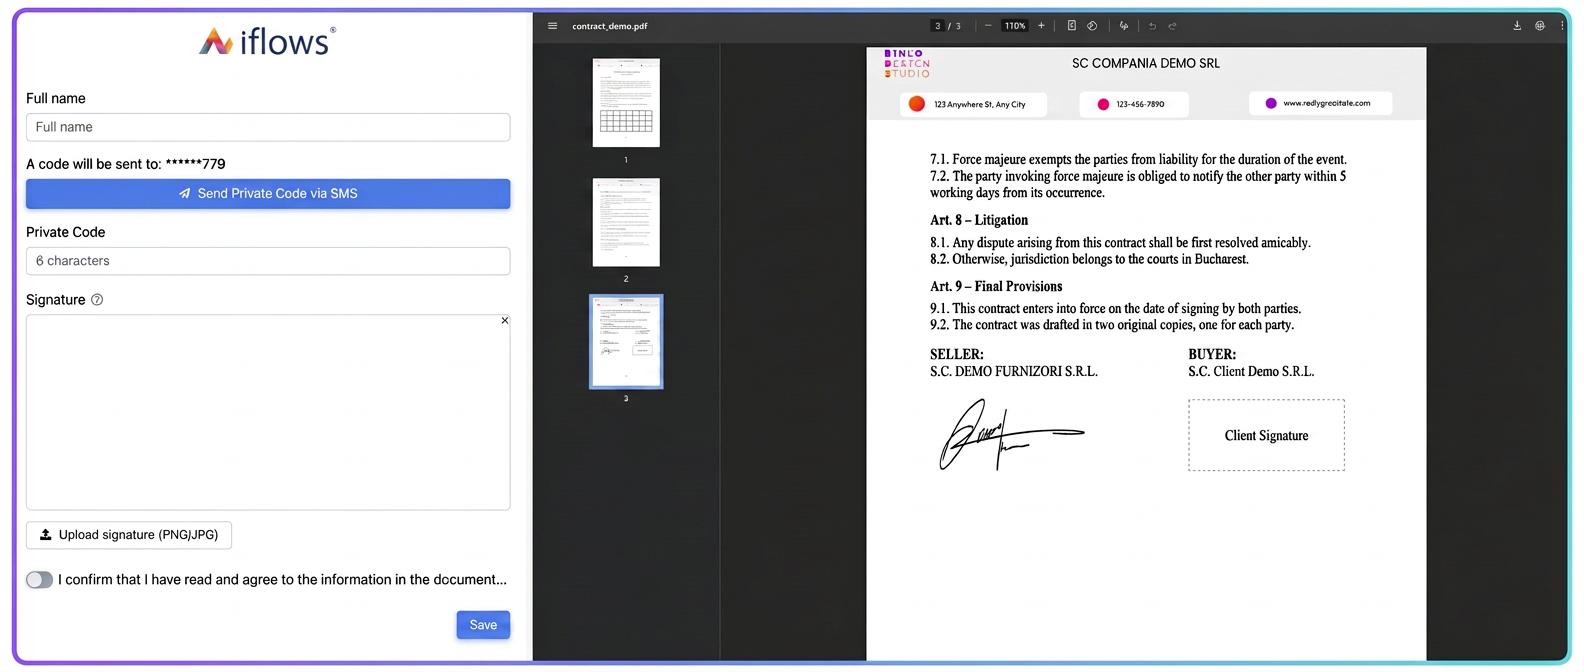
- After completing all fields, the customer checks "I confirm that I have read and agree with the information in the document".
- Presses the Save button.
Part 4: Checking Status and the Signing Certificate
Once the customer has signed, you will have full visibility and proof of the action in iFlows.
- Navigate to Documents -> Standardized and access the Generated tab.
- Next to the sent document, you will notice a green checkmark in the "Signed" column, confirming the document has been signed.
- Click on the row expansion arrow to see signature details: Date and time of signing, Signatory name, and their Email.
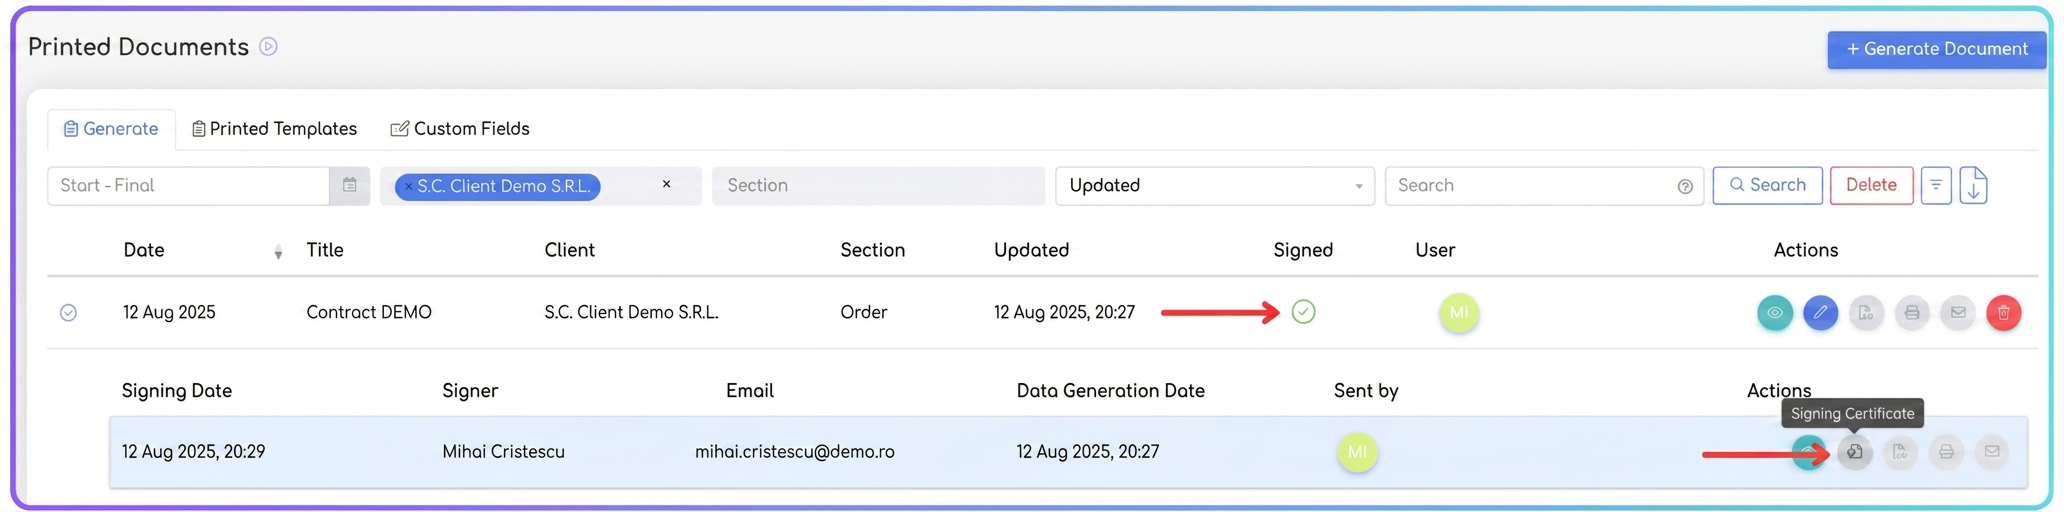
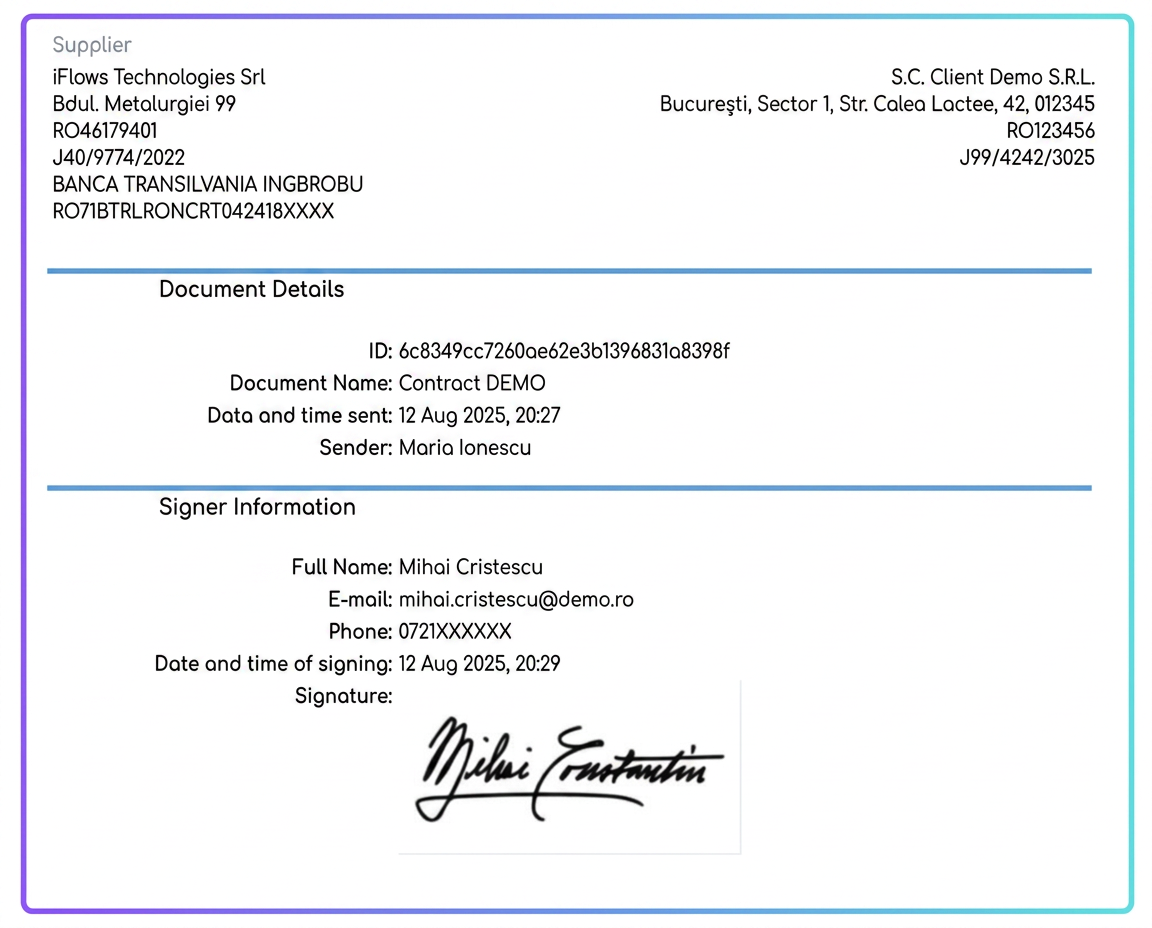
- In the "Actions" column, a new icon will appear: Signing Certificate. By clicking this, you will download a separate PDF document attesting to all details of the signing process (document ID, signatory information, date and time, signature image), serving as legal proof.
New: Disassembly Function for Order Reversals with SuperProducts
A SuperProduct is a finished product composed of a recipe of multiple components (raw materials or other products). Until now, when a customer returned a SuperProduct (for example, a chair) and a credit note (storno) order was generated, the finished product (the chair) was returned to stock. This flow is perfectly logical for production activities, where you wouldn't disassemble the chair into legs, screws, and seat to re-enter them into production.
The Disassembly on Reversal (Dezasamblare la Storno) function was created to provide flexibility in two key situations:
- Production with Recoverable Components: Certain products, although assembled, can be easily disassembled to recover valuable components.
- Example: A company assembles a custom PC system (SuperProduct) from individual components (motherboard, CPU, RAM, case). If the system is returned, it is much more useful to re-enter the separate components into stock, which can be reused in other configurations, rather than having an already assembled PC system in stock.
- Sale of Bundles or Kits: Many businesses use SuperProducts to group items that are not physically modified.
- Example: A "Christmas Gift Pack" (SuperProduct) containing a bottle of wine, a box of chocolates, and a card. Upon return, you can return each individual item to stock, not the "package" as such.
The new function allows you to choose at each reversal whether you want to return the finished product or its components to stock.
Prerequisites: Setting Permissions
To use this functionality, users must have the necessary permissions to generate the related stock documents.
- Navigate to Financial > Employees.
- Access the Permissions tab.
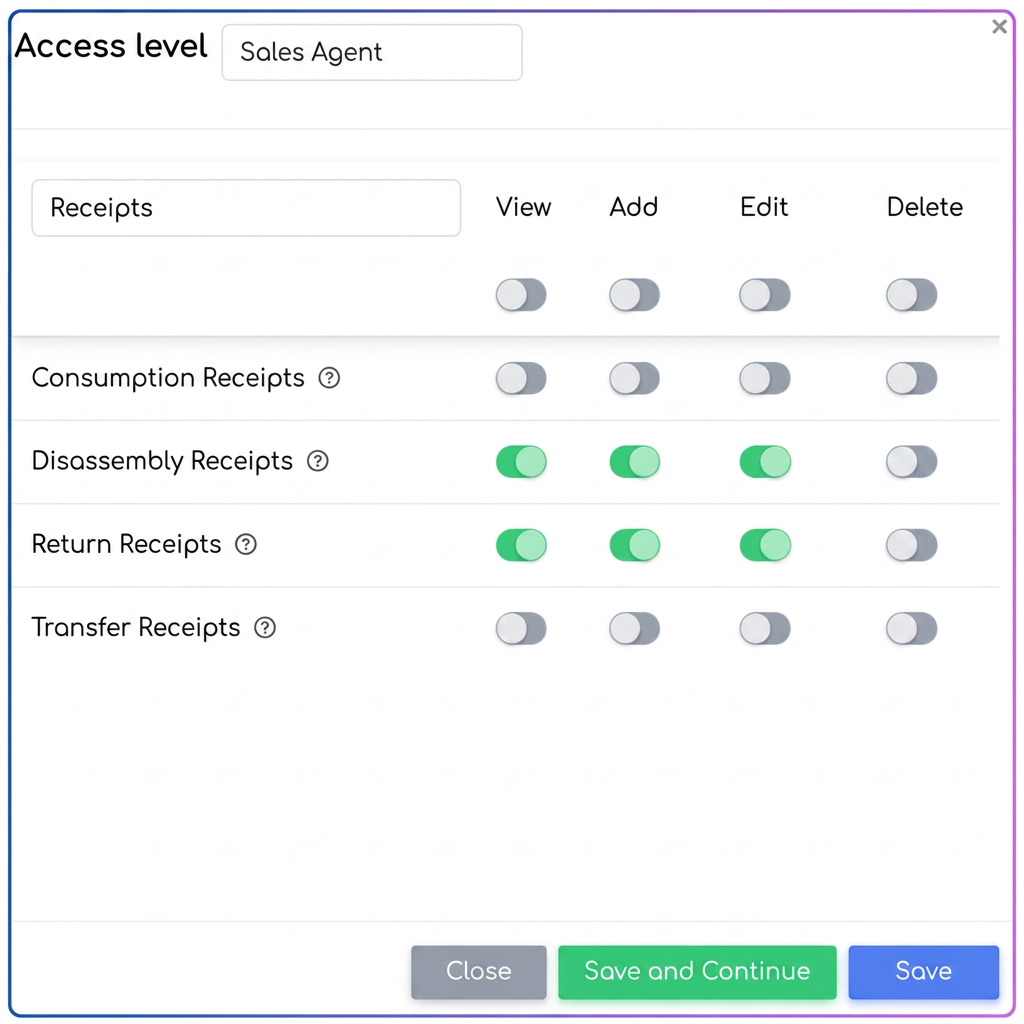
- Identify the Access Level you want to modify (e.g., "Sales Consultant") and click the Edit Access Level icon (blue pencil).
- In the pop-up window, in the search field, type "slip" (bon).
- Ensure you have View, Add, Edit permissions enabled for the following documents:
- Disassembly Slips (Bonuri Dezasamblare)
- Restitution Slips (Bonuri Restituire)
- Save the changes.
Disassembly Process on Reversal: Step by Step
Suppose we have a finalized and invoiced order containing a SuperProduct. The customer wishes to make a return.
Step 1: Generating the Credit Note Order
- Navigate to Sales > Orders.
- Find the original order you wish to reverse (storno).
- Click the Generate Document icon and select Credit Note Order (Comandă Storno).
Step 2: Choosing the Disassembly Option upon Saving
- The system will create a new credit note order with products and quantities in negative.
- Scroll to the bottom of the page and press the Save button.
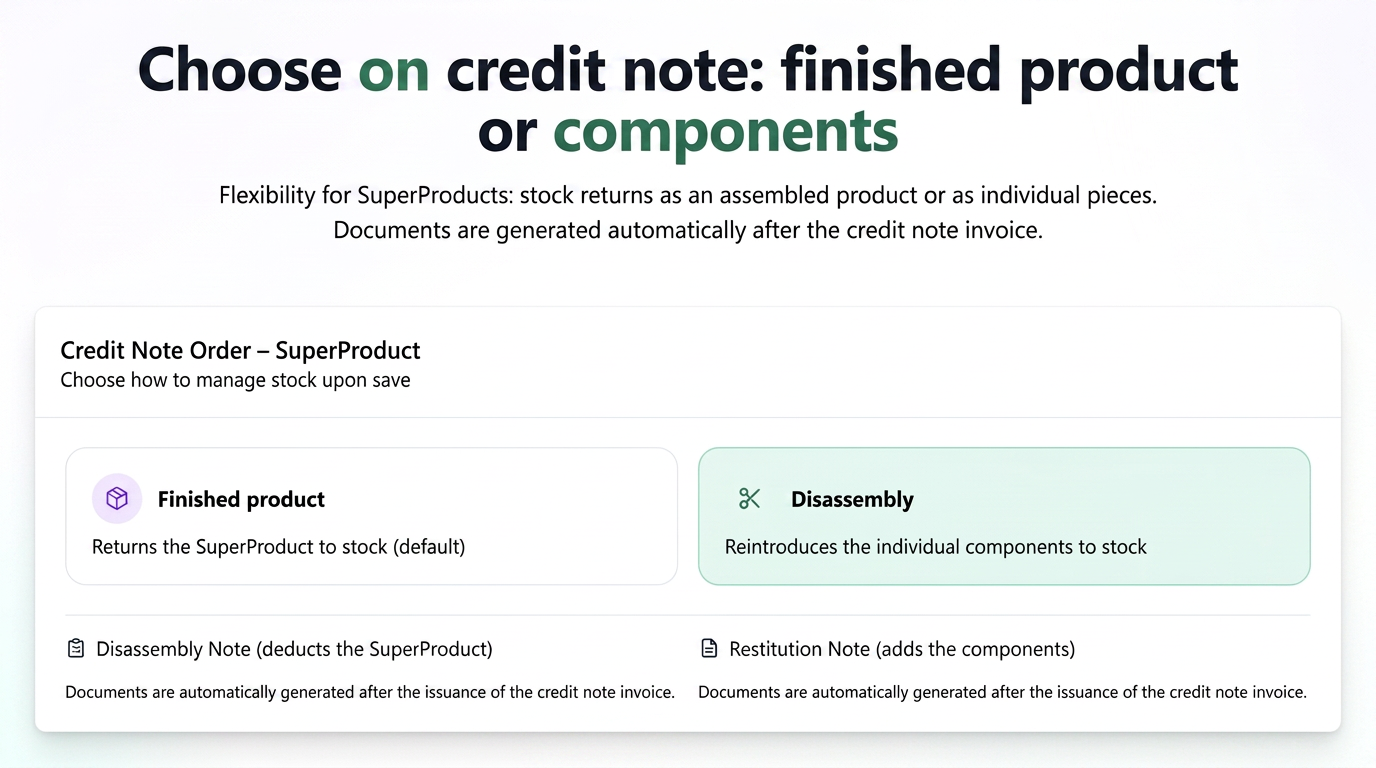
- At this point, a pop-up window will appear asking how you want to manage the stock for the returned SuperProduct.
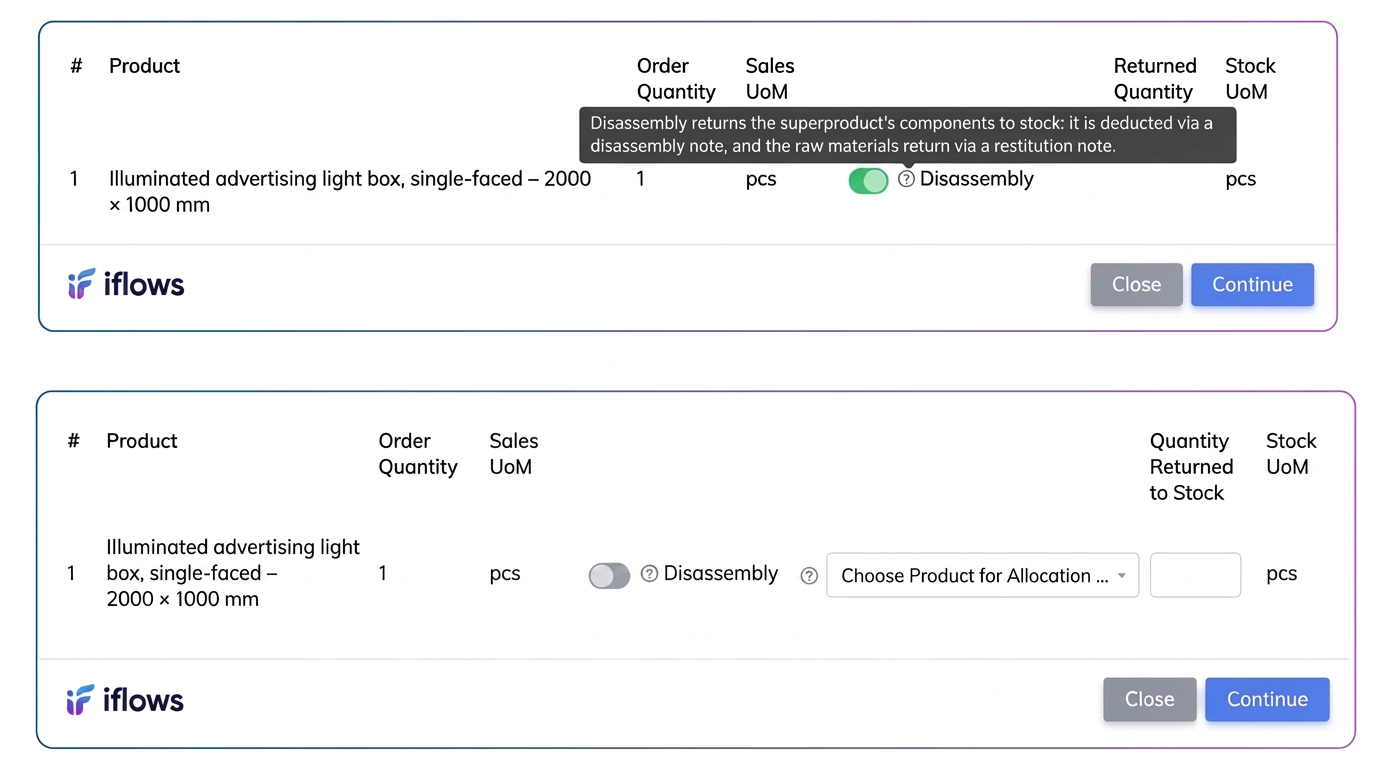
Here you have two clear options:
- Option 1 (Default): Returning the SuperProduct to stock. If you don't check anything, the system will return the finished product to stock. This is the appropriate option for products where disassembly is not possible or desired.
- Option 2: Disassembly. To use the new function, activate the "Disassembly" toggle. Select this option if you want to return the individual components to stock.
- After activating the "Disassembly" option, click the Continue button.
Note: After saving the credit note order: Stock movements (disassembly and component restitution) will not occur until the credit note invoice is generated. Once the credit note invoice has been issued, iFlows will automatically generate the two management documents in the background:
Step 3: Checking Automatically Generated Documents
After saving the credit note order with the disassembly option, iFlows will automatically generate two distinct management documents in the background:
A. Disassembly Slip:
- What does it do? Decreases the SuperProduct (finished product) from stock. It is "disassembled" to release the components.
- Where to find it? Navigate to Products > Stocks and access the Disassembly Slips tab.
B. Restitution Slip:
- What does it do? Re-enters all components that were part of the SuperProduct recipe back into stock.
- Where to find it? Navigate to Products > Stocks and access the Restitution Slips tab.
Step 4: Checking Stock History
To have final confirmation that the process worked correctly:
- Navigate to Products > Stocks.
- Search for one of the components that was part of the SuperProduct.
- Click the history icon on the product line.
- In the movement history, you will see a new entry of type "Restitution Slip", which added the quantity back to available stock.
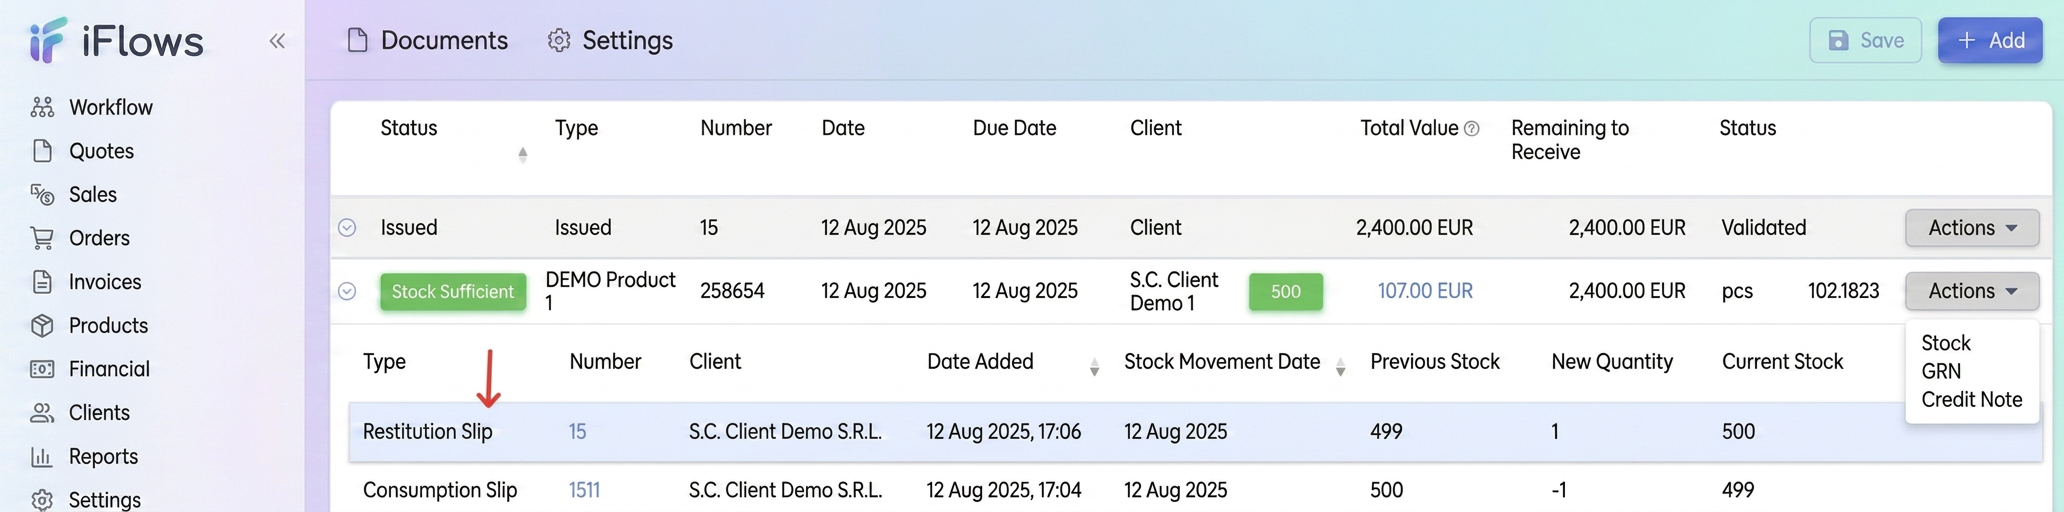
Note: The disassembly function only applies to products for which stock is managed. Therefore, the SuperProduct involved in the reversal process must not be set to "Unlimited Stock". The system must be able to decrease the SuperProduct from stock to be able to add the components back.
Optimization: New Columns in Customer Report
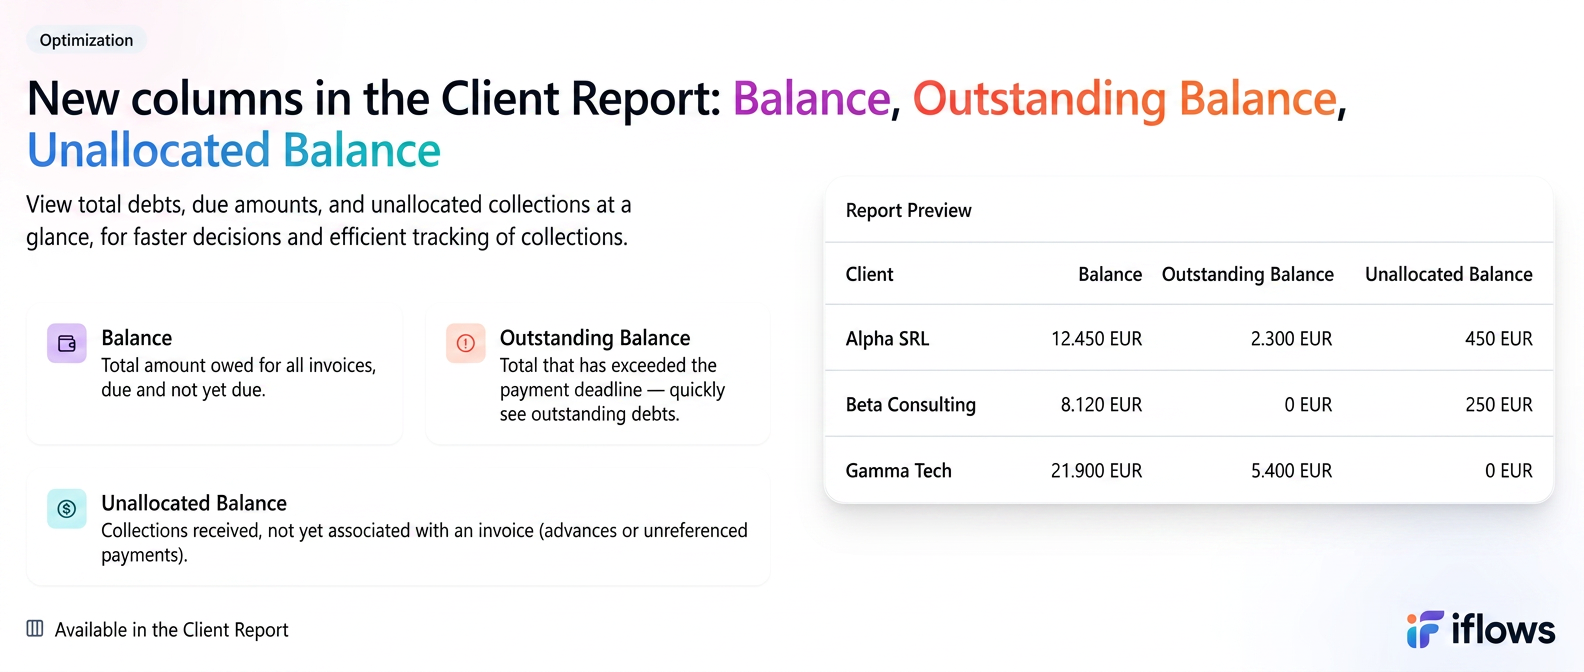
The Customer Report includes three new columns: Balance, Outstanding Balance, and Unallocated Balance.
- Balance (Sold): Represents the total amount a customer has to pay for all invoices issued to them, regardless of whether they are due or not. It is the customer's total debt to your company.
- Outstanding Balance (Sold Restant): Here, the total amount that has already passed the payment deadline is highlighted. This column quickly shows you which customers have overdue debts, allowing you to act promptly.
- Unallocated Balance (Sold Nealocat): This column indicates amounts collected from a customer but which have not yet been associated (allocated) to a specific invoice. These can come from advance payments or from collections where the paid invoice was not specified.
How to Access the Report?
- From the main menu, navigate to Reports.
- Select Customers.
- After configuring the filters, navigate to the bottom of the page where you will see the three columns.

Note: A fundamental characteristic of these columns is that they always display the current balance in real-time, regardless of the period selected in the report filters. Even if you analyze activity from last month, the values in these three columns will reflect the customer's current financial situation, giving you a precise and up-to-date picture.