
Optimization: Inventory
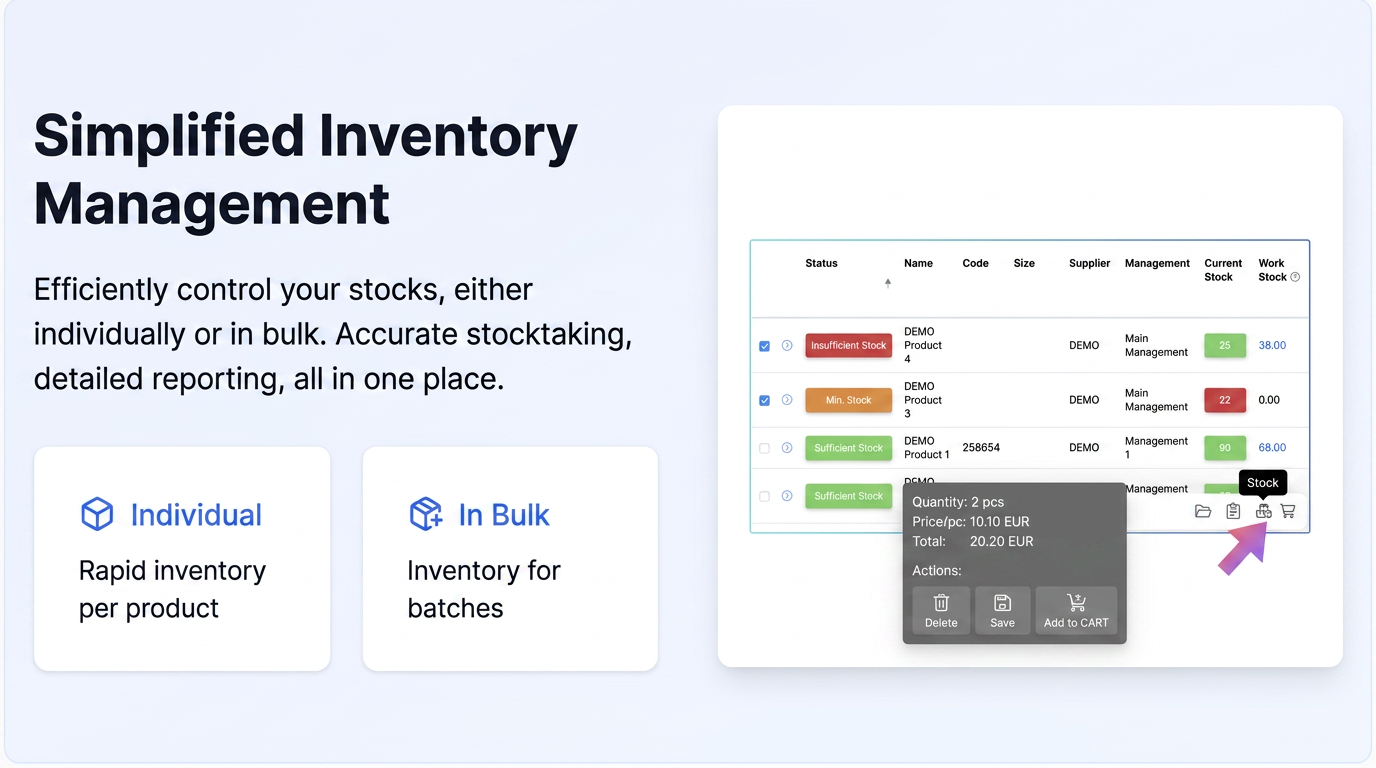
We will cover the two main methods for performing an inventory: individual (per product) and in bulk (for multiple products simultaneously).
Section 1: Accessing the Inventory Function
- Navigate in the main menu to the Products section.
- Select the Stocks section. Here you will see your list of products and current stock levels.
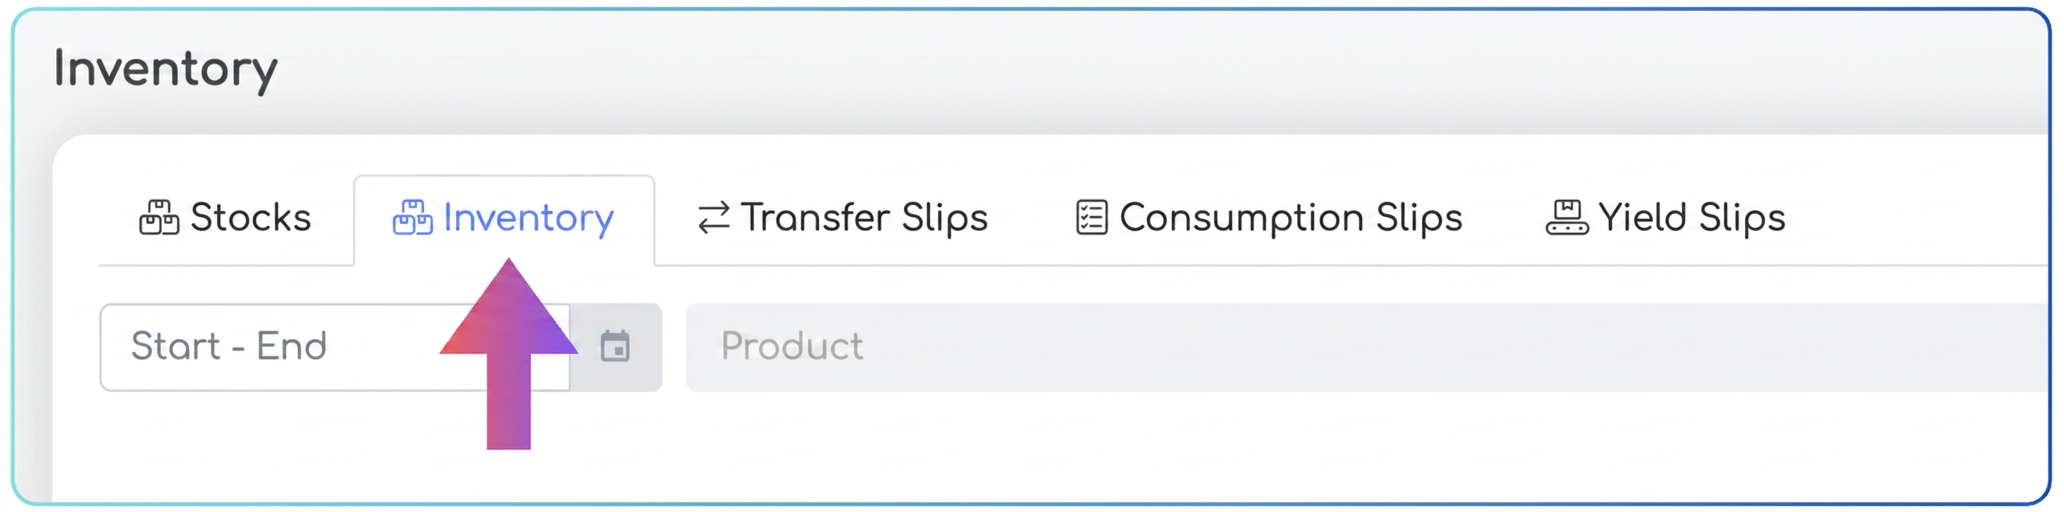
- Note the Inventory tab added at the top of the grid, next to the "Stocks" tab. This will list all created inventory documents.
Section 2: Performing Inventory for a Single Product
This method is ideal for specific stock adjustments for a particular product.
- Identify the Product: Find the desired product in the list under the "Stocks" section.
- Initiate Inventory: On the respective product line, click the "Inventory" icon on the right side.
- Create Inventory Document: A pop-up window named "Create Inventory Document" will open.
- Title: Enter a relevant title for this document ("Product X Stock Adjustment – April 2025").
- Date: Select the date the inventory is being performed.
- Observations: Add any notes or comments related to this inventory (optional).
- Product Details: The window will automatically display the selected product, management unit (warehouse), initial stock (the one existing in the system before inventory), and a field for New Stock.
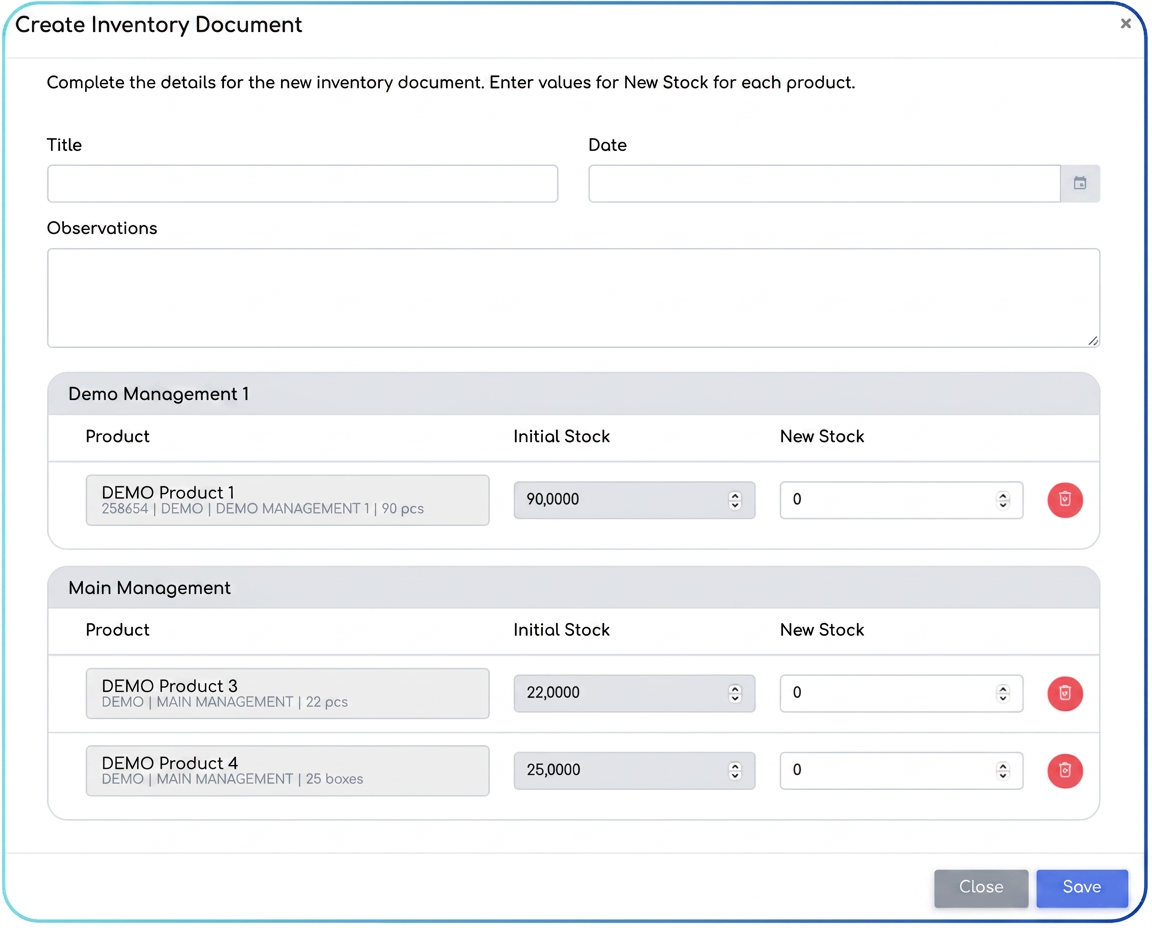
- Enter New Stock: In the "New Stock" field, enter the actual quantity of the product, determined after the physical count. (E.g.: If the initial stock was 3 and you counted 4, enter 4).
- Save Document: Press the "Save" button.
- Confirmation and Update:
- You will receive a confirmation message at the top of the screen: "Inventory [Document Number] has been successfully created."
- In the main "Stocks" grid, the value in the "Current Stock" column for that product will update immediately to the value entered in "New Stock".
- You can expand the product line (by clicking the arrow on the left) to see the movement history. A new "Inventory" type entry will appear, showing the previous stock, the adjusted quantity, and the current stock.
Section 3: Performing Inventory for Multiple Products (Bulk)
This method allows for adjusting stocks for multiple products simultaneously.
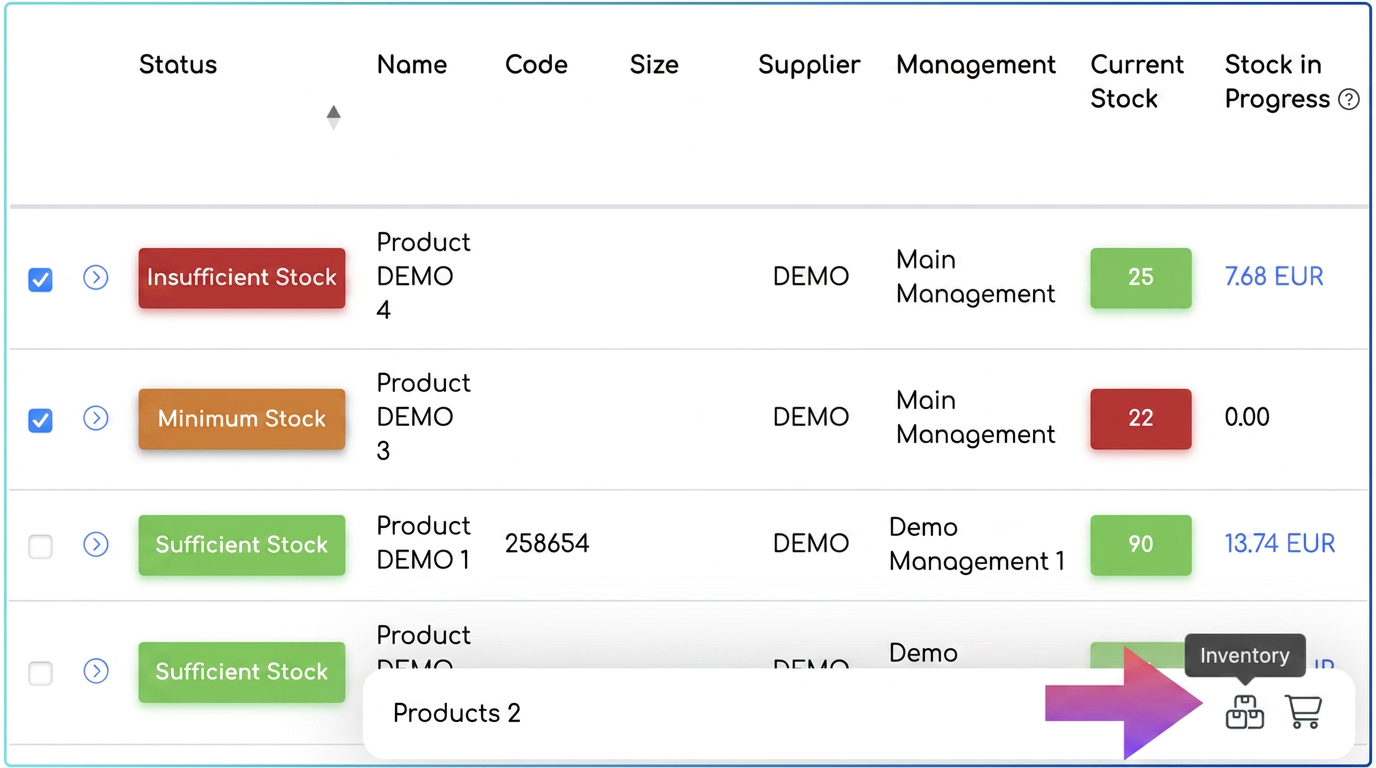
- Select Products: Check the selection boxes to the left of the lines corresponding to the products you wish to inventory.
- Activate Bulk Action: Once you have selected at least one product, a floating action bar will appear at the bottom of the screen.
- Initiate Bulk Inventory: Click the "Inventory" icon in the floating action bar.
- Create Inventory Document (Bulk): A similar pop-up window will open, but structured differently:
- Title, Date, Observations: Fill in these fields as with the individual inventory (e.g., Title: "Bulk Inventory DEMO Supplier - April 2025").
- Products Grouped by Management Unit: Selected products will be displayed grouped according to the Management Unit (warehouse) where they are located.
- Enter New Stocks: For each listed product, enter the actual (counted) quantity in the corresponding "New Stock" field.
- Save Document: Press the "Save" button.
- Confirmation and Update:
- You will receive a confirmation message indicating that the documents (potentially multiple, one per management unit involved) have been created.
- In the main "Stocks" grid, the current stocks for all products included in the bulk inventory will be updated.
Section 4: Reviewing and Managing Inventory Documents
All inventory operations generate documents that can be reviewed later.
- Access Inventory List: Click on the main "Inventory" tab (next to "Stocks"). Here you will find a list of all created inventory documents, sorted chronologically (newest first), with details such as: Document No., Created, Document Title, Document Date, No. of Products Updated, Updated By, Employee.
- View Document Details: Click on a document number (e.g., INV-2025-0048) to open the details page. This displays:
- General information: Date, No. of products updated, General observations.
- Product details: A grid with products included in that inventory, Management Unit, MU (Measurement Unit), Acquisition Cost, Initial Stock, New Stock, Difference Value.
- Update History: A section that records who created or modified the document, what observations they added at that time, and the date/time of the modification.
- Edit Document: From the details page, you can press the "Edit" button. The initial pop-up window will reopen, allowing you to modify the title, date, observations, or the values in the "New Stock" field.
- Delete Document: From the details page, the "Delete" button allows for the removal of the inventory document. Warning: This action may affect stock history and should be used with caution.
- Bulk Inventories and Management Units: Note that a bulk inventory action involving products from different management units (warehouses) will generate a separate inventory document for each management unit. This ensures a logical separation of adjustments per location.
Optimization: Collaboration in Administrative Documents
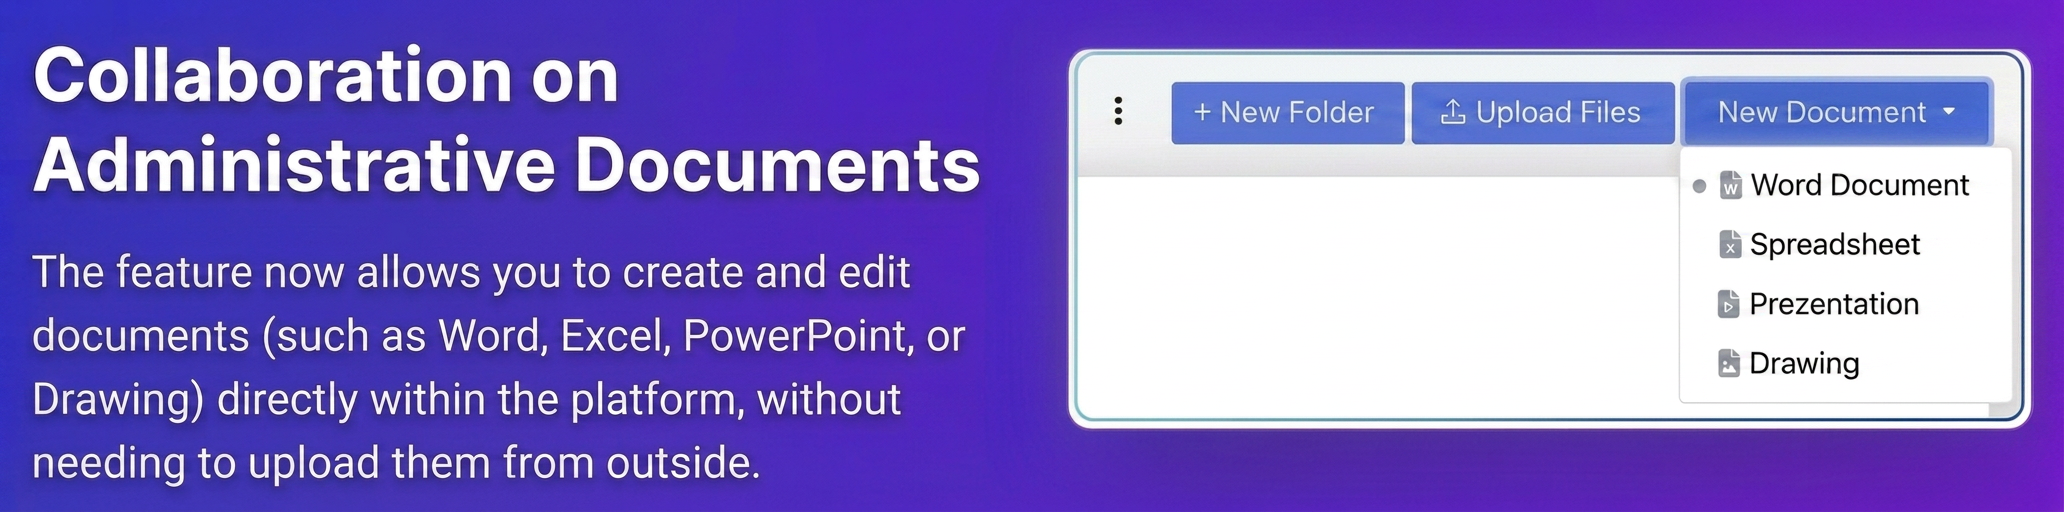
We will explore the advanced features in the Administrative Documents section, which now allow you not only to store and organize uploaded files but also to create and edit Word, Excel (Spreadsheet), PowerPoint (Presentation), and Drawing documents directly within the platform.
Section 1: Accessing the Administrative Documents Module
- From the main menu, navigate to the Documents section.
- Select the Administrative sub-section.
- You will be greeted by an interface displaying previously created folders for document organization. Here you can also create new folders using the + New Folder button.
Section 2: Creating a New Document Directly in iFlows
This is the key new functionality that eliminates the need to create documents in external applications and then upload them.
- Navigate to the Desired Folder: Enter the folder where you want to create the new document.
- Initiate Creation: At the top of the file list in the folder, locate the "+ New Document" button. It has a dropdown arrow indicating multiple options.
- Select Document Type: Click the arrow on the + New Document button to reveal the types of documents that can be created:
- Word Document: For text documents (.docx).
- Spreadsheet: For tabular spreadsheets (similar to Excel, .xlsx).
- Presentation: For presentations (similar to PowerPoint, .pptx).
- Drawing: For diagrams or simple sketches (.odg or similar).
- Choose the Type: Click on the desired document type.
- Naming the Document: A "Create Document" window will appear.
- Enter a relevant and descriptive Name for your document.
- Optionally, you can add Tags for easier classification.
- Press "Save".
- Opening the Integrated Editor: iFlows will automatically open a fully integrated web editor, specific to the chosen document type (similar to Word Online, Google Docs, etc.), directly within the platform interface. The empty, newly created document is ready for editing.
- Editing the Document: Use the editor's functions (text formatting, inserting images, tables, etc.) to create the desired content. Changes are saved automatically as you work.
- Finishing Initial Editing: Once you have finished adding initial content, you can close the editor tab or navigate back to the document list in that folder in iFlows. The newly created document will now appear in the folder's file list.
Section 3: Viewing and Editing Documents Created in iFlows
You can return at any time to modify documents created directly in the platform.
- Locate the Document: Find the desired document in the file list of the corresponding folder.
- Access Options: Click on the three-dot menu (...) next to the file name.
- Select "View": From the context menu, choose the "View" option.
- Note: The "Edit" option in this menu refers to editing the file's properties (name, tags), not the content. To edit content, use "View".
- Reopening the Editor: The integrated web editor will reopen, loading the existing content of the document.
- Modify Content: Add, delete, or modify text, images, formatting, etc.
- Save and Close: Similar to creation, changes are saved automatically. When finished, close the editor or navigate back to iFlows. The document will now reflect the latest changes.
Section 4: Collaboration (Implicit Benefit)
Creating documents directly in iFlows opens up collaboration possibilities:
- Centralized Access: Multiple users with the necessary permissions can access the same document from the same centralized location (the folder in iFlows).
- Concurrent Editing (Potential): It is possible for multiple users to edit the document simultaneously (similar to Google Docs/Word Online).
Section 5: Other Management Actions
The three-dot menu (...) next to each file also offers other standard management options:
- Download: Saves a copy of the file to the local computer.
- Edit: Allows renaming the file or modifying tags.
- Archive: Moves the file to an archive section, hiding it from the active view.
- Delete: Permanently removes the file from the platform (an action to be used with caution).
Optimization: Generating the Delivery Note Directly from the Invoice
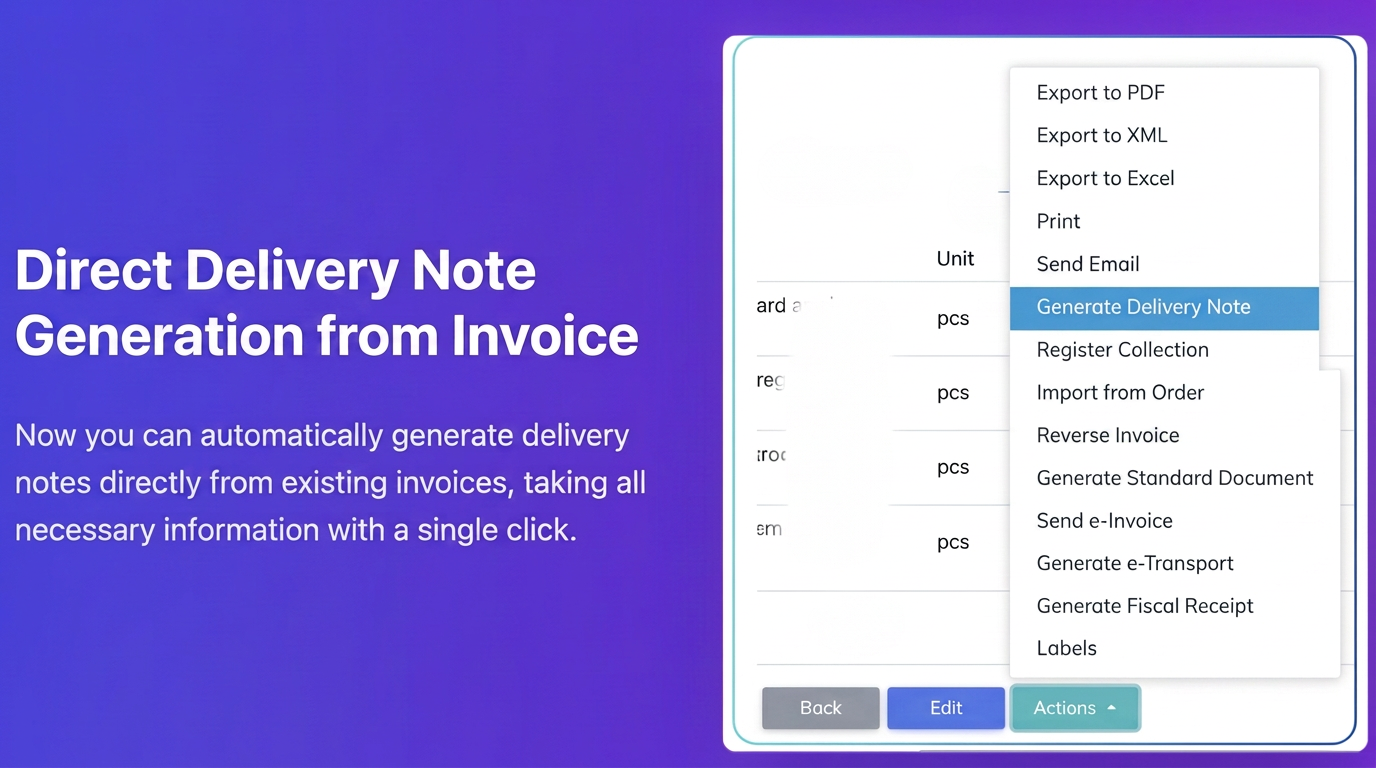
This function allows you to quickly create a delivery note based on information already present in an invoice.
- Navigate to Invoices: From the main menu, go to Sales -> Invoices.
- Select Desired Invoice: Identify the invoice for which you want to generate the delivery note.
- Access Invoice Details: Click the "Invoice Details" icon (eye symbol) next to the respective invoice.
- Locate the "Actions" Button: On the invoice details page, scroll to the bottom and find the "Actions" button.
- Select "Generate Delivery Note": Click the "Actions" button to open the dropdown menu. Select the "Generate Delivery Note" option.
- Create New Delivery Note: You will be redirected to the "New Delivery Note" creation screen. Note that essential information from the invoice (Client, Products, Quantities, Prices) is automatically pulled.
- Verify and Complete: Review the imported data. You can make adjustments if necessary (e.g., modify quantities if the delivery is partial) or fill in fields specific to the delivery note.
- Save Delivery Note: Press the "Save" button.
Confirmation: You will receive a confirmation message, and the new delivery note will appear in the list under Sales -> Delivery Notes.
Optimization: Adding and Transferring the Title on the Delivery Note
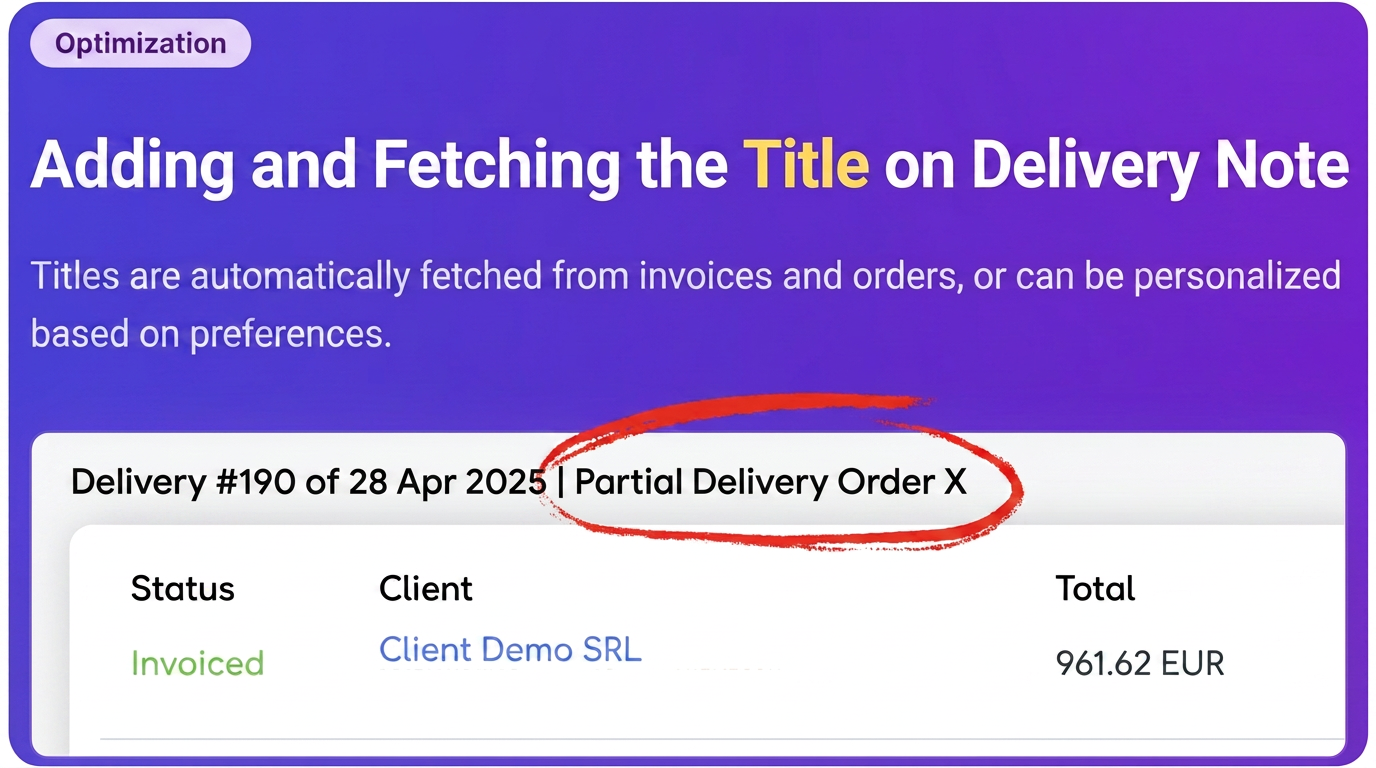
- Manually Adding a Title:
- You can add a custom title to any delivery note, whether it is newly created or existing.
- For an existing delivery note: Navigate to Sales -> Delivery Notes, edit the desired note.
- At the top of the delivery note page, next to its number, you will see an editable field: "Add Title...".
- Click in this field and enter the desired title (e.g., "Partial Delivery Order X", "Goods for Project Y").
- Save the changes to the delivery note.
- Automatic Title Transfer from the Source Document:
- Condition: This function is activated only if the document from which you generate the delivery note (Invoice or Order) already has a completed title.
- Example (Generation from Invoice with Title):
- Ensure the source invoice has a title (open invoice details and fill in the "Add Title..." field).
- Follow steps 1-5 above to generate the delivery note from this invoice.
- On the "New Delivery Note" creation screen, you will notice that the "Add Title..." field will automatically display the title you set on the invoice. The title has been transferred.
- You can keep the transferred title or modify it before saving the delivery note.
- Similarity for Orders: The process is identical if you generate a delivery note from an Order that has a completed title – the order title will be automatically transferred to the new delivery note.
Optimization: Centralized Management of Company Addresses in Global Settings
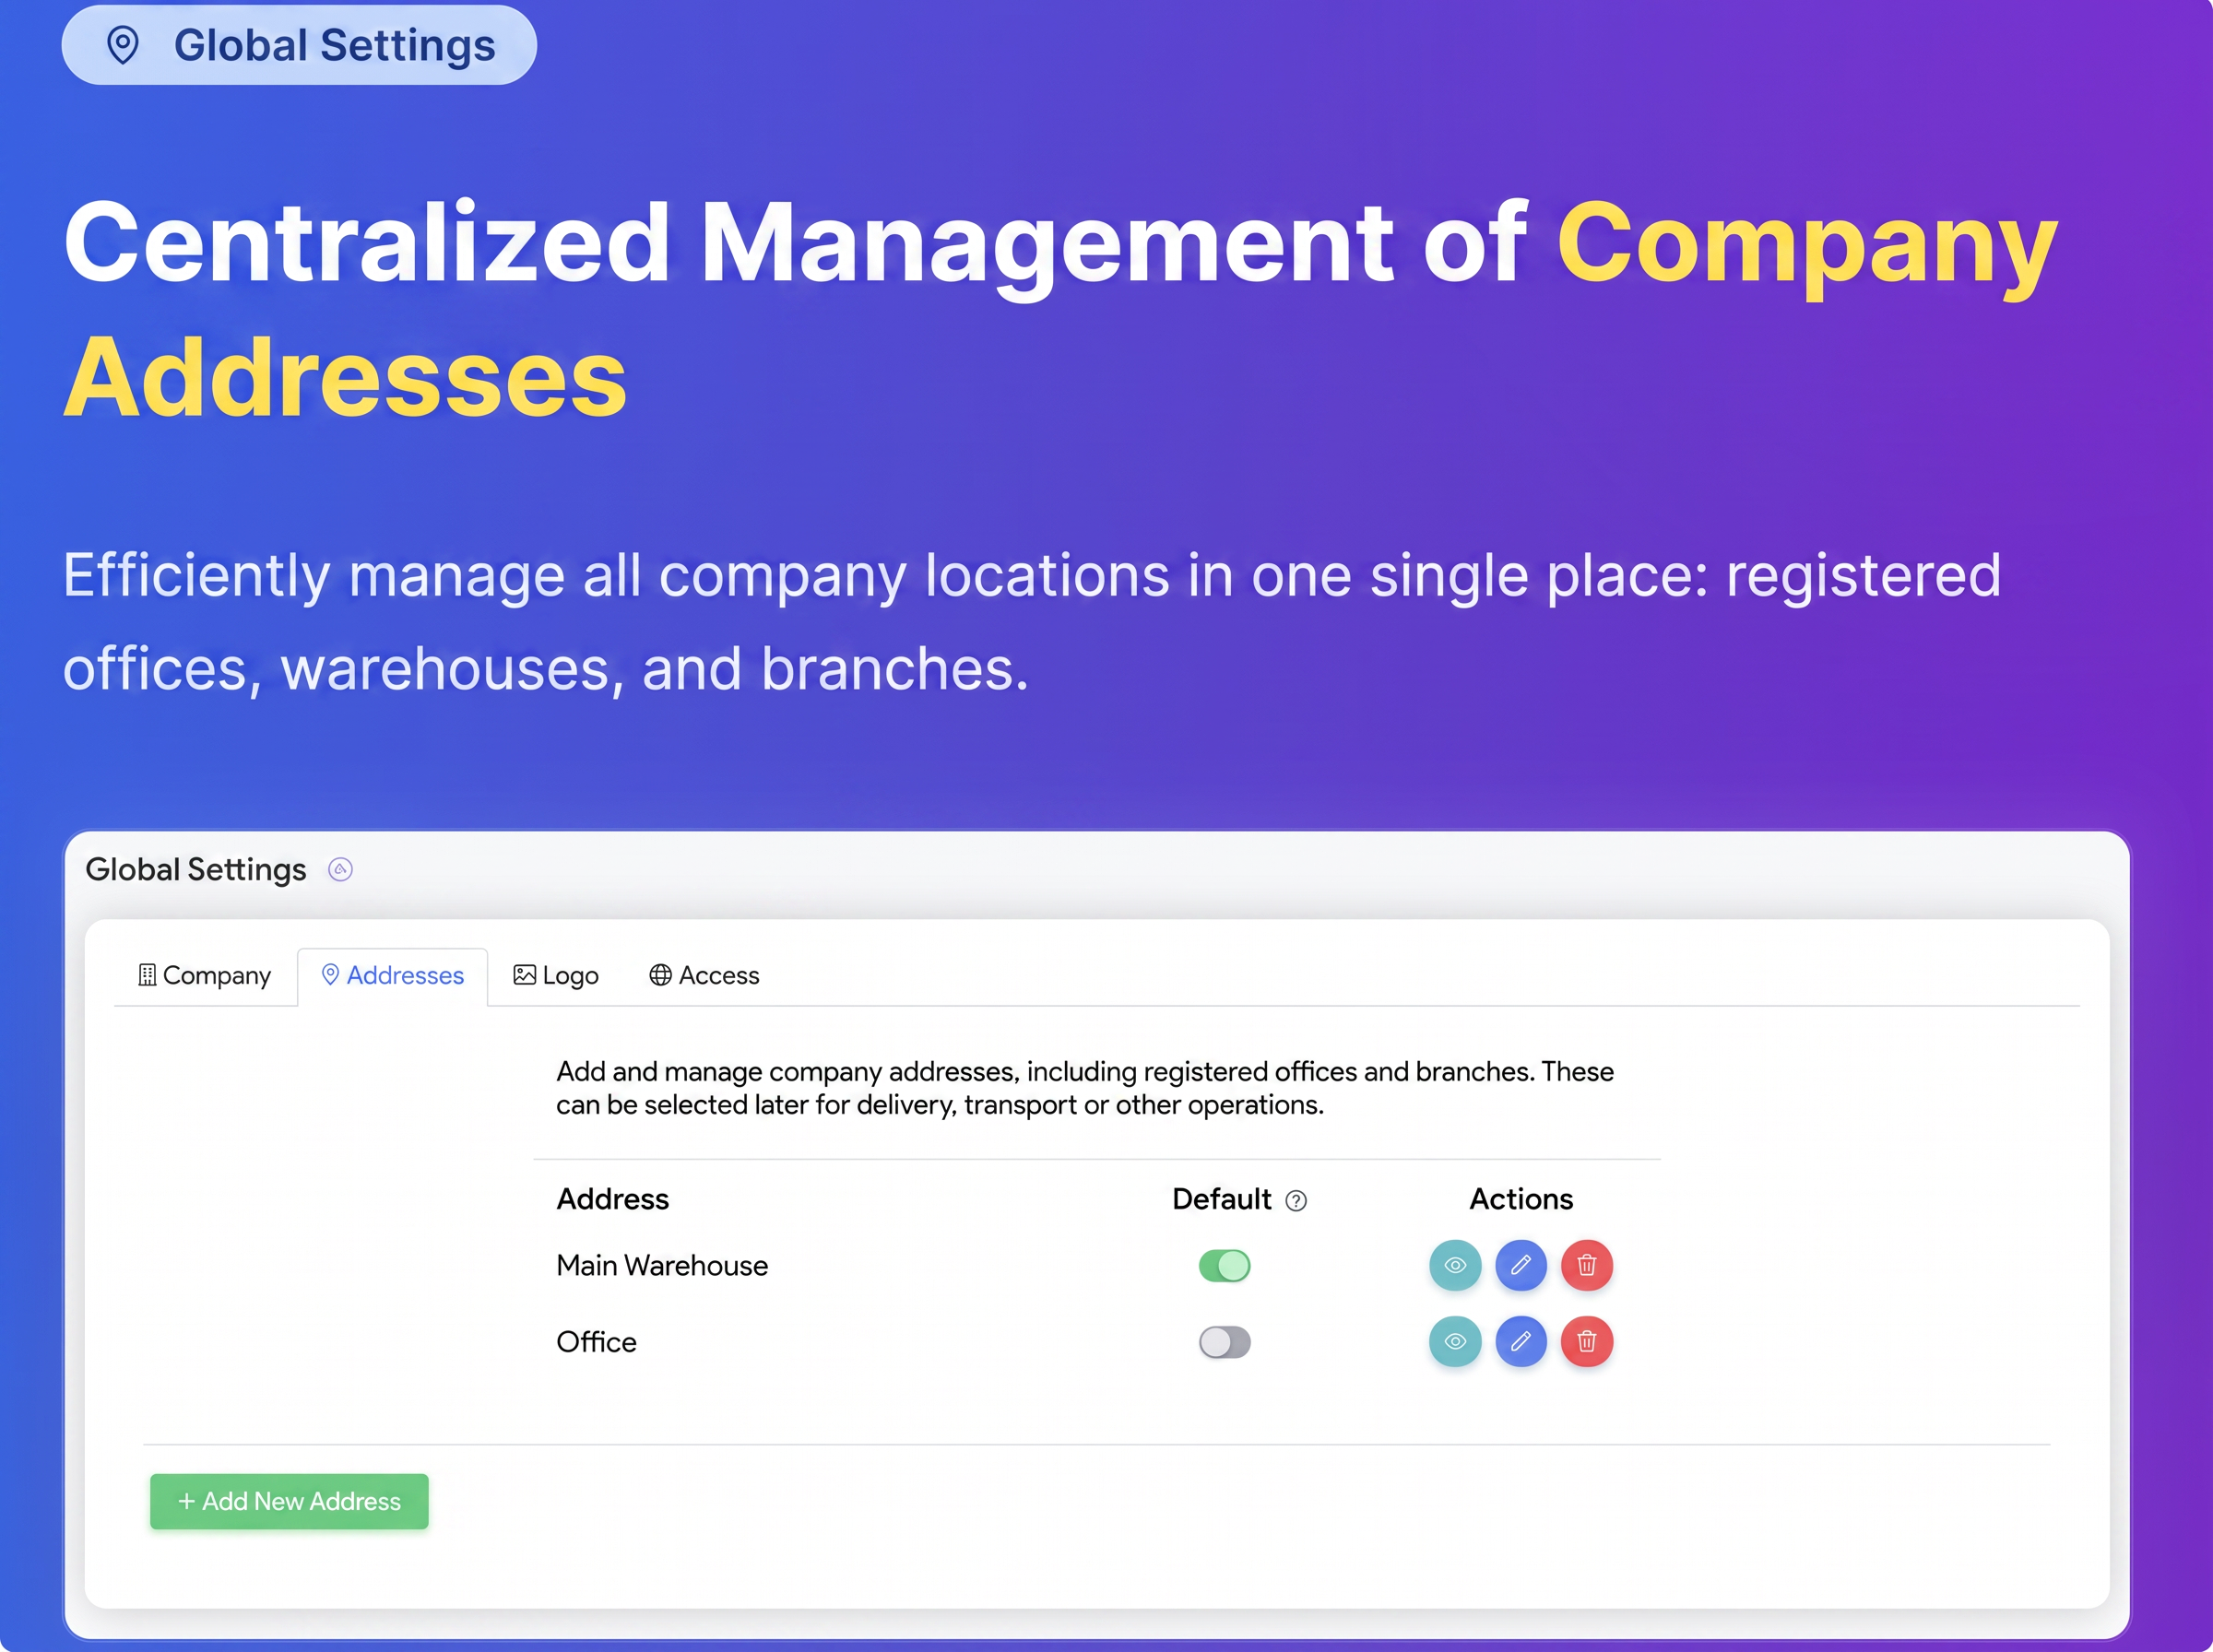
Manage all your company locations. Whether it is the registered office, warehouses, work points, or other locations, this function allows you to add, modify, and organize them centrally, facilitating their subsequent selection in various operations, such as delivery documents.
Section 1: Accessing Address Management
- From the iFlows main menu, navigate to Settings.
- From the Settings sub-menu, select Global.
- On the "Global Settings" screen, click on the Addresses tab (the second tab, after "Company").
Section 2: Understanding the "Addresses" Interface
Once in the "Addresses" tab, you will notice the following main elements:
- List of Existing Addresses: A table displaying previously entered addresses. The main columns are:
- Address: Displays the name you gave the address (e.g., "Main Warehouse", "Headquarters").
- Default: A toggle switch that allows you to designate a single address as the default. The default address will be automatically pre-selected in modules where a shipping/delivery/headquarters address is required.
- Actions: Buttons for managing each address:
- View Address (Eye symbol): View full address details.
- Edit Address (Pencil symbol): Modify details of an existing address.
- Delete Address (Trash can symbol): Remove the respective address.
- "+ Add New Address" Button: The main button for entering a new company location.
Section 3: Adding a New Address
- Click the green "+ Add New Address" button.
- A pop-up window named "New Address" will open.
- Fill in the Details: Enter the required information in the corresponding fields:
- *Address Name: An internal name to easily identify the address (e.g., "Chiajna Warehouse", "Militari Work Point", "Registered Office"). This is mandatory.
- *Company Name: The official name of the company associated with this address. This is mandatory.
- Contact Person: Name of a contact person at that location (optional).
- *Phone: Telephone number of the location/contact person. This is mandatory.
- Email: Email address (optional).
- Country: Select country (default is "Romania").
- *County: Select the county from the dropdown list. This is mandatory.
- City: Enter the city/locality.
- Street, Street Number, Zip Code, Building, Entrance, Floor, Apartment: Complete the full address details.
- Save Address: After filling in the desired information, click the "Save" button.
- The new address will now appear in the list under the "Addresses" tab.
Section 4: Setting the Default Address
- Identify the address in the list you want to set as default (e.g., "Main Warehouse").
- Next to that address, in the "Default" column, click the toggle switch to activate it (it will turn green or show "on").
- The system will automatically save the setting. Only one address can be marked as default at a time. If you activate the switch for another address, the previous one will be automatically deactivated.