
New: Import Purchases Module (Non-EU/Intracommunity)
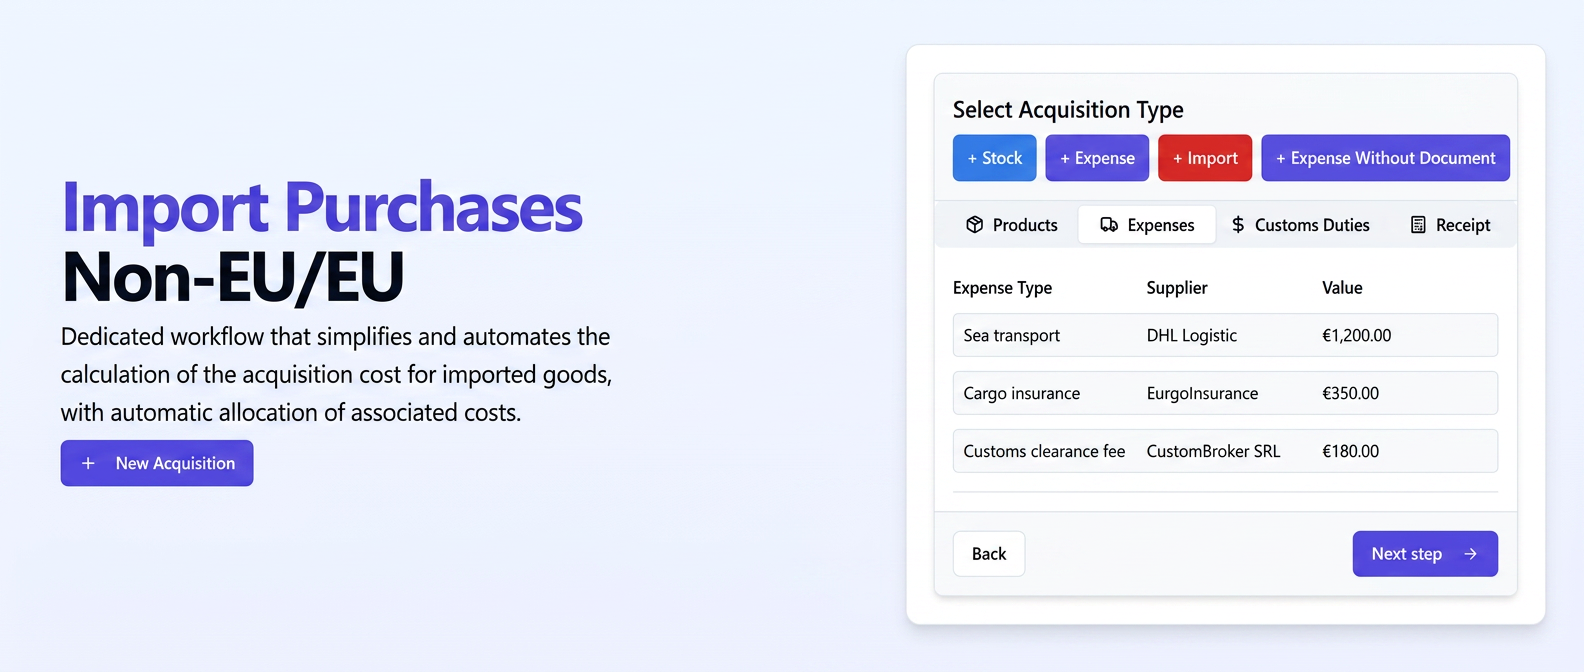
We have introduced a new document type in , specifically dedicated to managing imports (Non-EU and Intracommunity). This new workflow is designed to simplify and automate the complex process of calculating the correct acquisition cost for imported goods by allowing the addition and automatic allocation of various associated costs directly on the purchase document.
The main features of this module are:
- Guided Workflow: The interface guides you step-by-step through distinct sections for: defining products, adding associated expenses (e.g., transport), customs duties, and other additional values.
- Associated Cost Management: You can add various types of expenses (transport, commissions, etc.) and taxes (customs), specifying the supplier, supporting document, currency, and exchange rate.
- Customs Duty Allocation: Allows selective allocation of customs duties to specific products in the purchase.
- Automatic NIR Cost Calculation: Based on the entered information (product price + all allocated associated costs), the system automatically calculates the final acquisition cost per product in EUR and uses it to generate the Nota de Intrare Recepție (NIR - Reception and Inspection Note).
- Integrated NIR Generation: The final section of the flow allows for direct generation of the NIR, with correct stock entry values already pre-calculated, including all additional costs.
This module eliminates the need for complex manual calculations and subsequent adjustments to entry costs, ensuring a correct valuation of imported stocks and accurate accounting records.
User Guide:
- Initiating an Import Purchase:
- Navigate to .
- Press the + New Purchase button.
- In the "Choose Purchase Type" window, select the + Import option.
- Select Import Type (e.g., Non-EU).
- Complete the header data: Supplier, Document Series/No. (import invoice), Document Date, Due Date, Currency (e.g., EUR), Value excluding VAT (value of goods from the external invoice).
- Adding Products:
- In the document lines section (# | Document Product | Management ...), press + Add Line.
- Enter product details: Name/Code, Management, MU, Quantity, Unit Price in the currency of the import document (e.g., EUR). The system will automatically calculate the Value in the currency and the EUR equivalent.
- Add all products from the import.
- You can fill in the DVI (Single Customs Document) No. and DVI Date if available at this stage.
- Press the green "Complete next section" button.
- Adding Associated Expenses:
- Press + Add Line.
- Select the expense Type (e.g., Road Transport).
- Select the service Supplier (can be different from the goods supplier).
- Enter Doc No. (transport invoice), Currency (can be EUR or another currency), Exchange Rate (if the currency differs and is not EUR), Value excluding VAT.
- Add other expense lines if necessary.
- Press "Complete next section".
- Adding Customs Duties:
- Activate the "Customs Duties" section.
- Press + Add Duty.
- Select Duty Type (e.g., Customs Duty).
- In Selective Addition, choose the specific product(s) to which the duty applies.
- Enter the Value of the duty (usually in EUR).
- Select the Allocation method.
- Add other duties if necessary.
- Press "Complete next section".
- Adding Additional Values:
- Activate the "Additional Values" section.
- Press + Add Line.
- Select the Type (e.g., Additional Value), add a Description.
- Select Supplier, enter Doc No., Currency, Exchange Rate, Value excluding VAT.
- Select the Allocation method.
- Press "Complete next section".
- Generating the NIR:
- The "Generate NIR" section becomes visible.
- Note: The table displays the products again, but the Doc Unit Price and Value columns are now calculated in EUR and include all associated costs, customs duties, and additional values allocated previously. Total Value represents the total acquisition cost in EUR.
- Complete the final details of the NIR: Stock Entry Date, Reception Committee (Choose Employee), Delegate, Manager.
- Finalization: Press the Save button. The Import type purchase is saved, and the NIR is generated with the correct stock entry costs.
New: Stock Entry Date per NIR
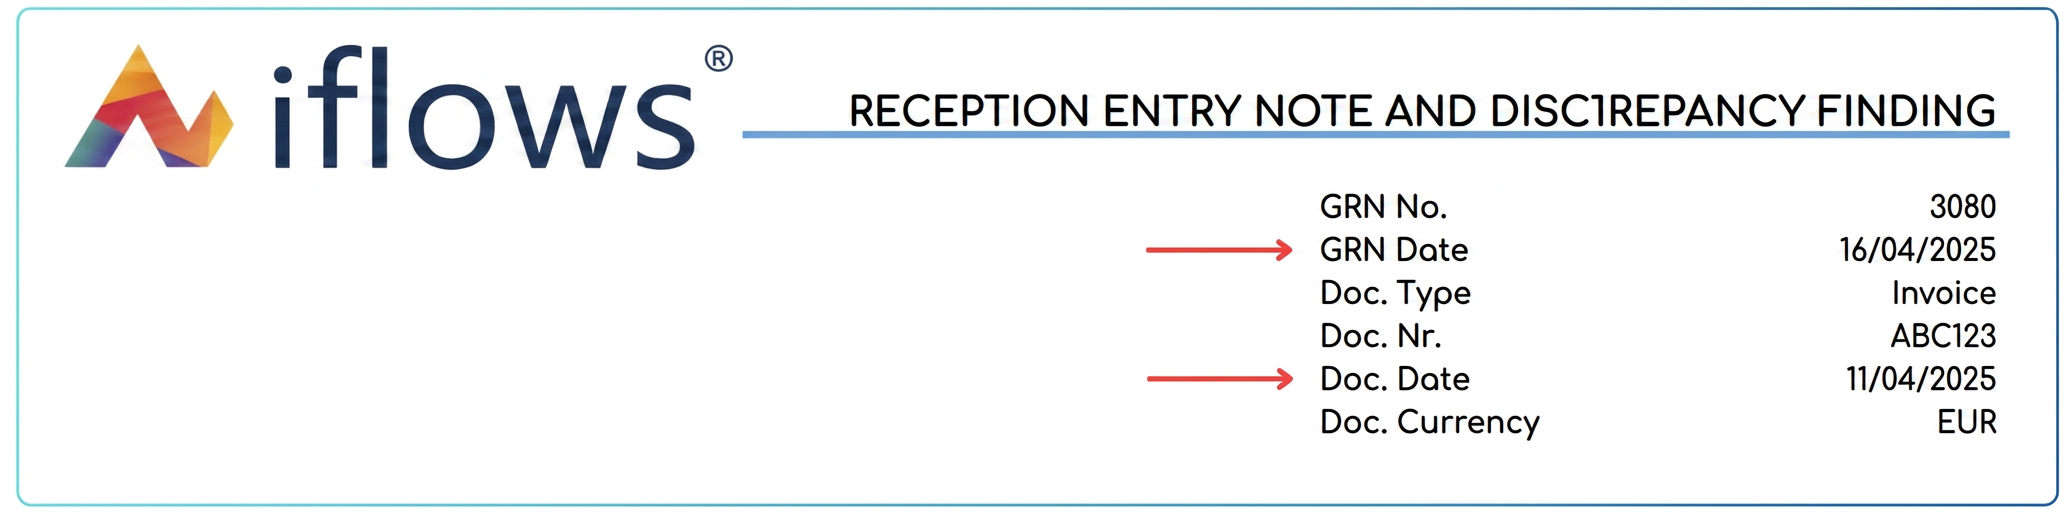
This optimization changes how the actual stock entry date is recorded for received products.
The Stock Entry Date field is now at the level of each associated Nota de Intrare Recepție (NIR). This means that when you generate an NIR from a stock purchase (or manually add an NIR), you can specify a distinct stock entry date for the products included in that specific NIR. The major benefit is the ability to accurately reflect the actual moment of entry into management for each partial delivery, ensuring correct stock valuation and better compliance with operational reality. The date specified in the Stock Entry Date field on the NIR will be the date used to record the stock movement.
User Guide:
- Create or open a Stock type purchase in that the old Stock Entry Date field is no longer present at the purchase level.
- To record the reception of products (total or partial), generate or add a Nota de Intrare Recepție (NIR) associated with this purchase (using the + Add NIR button).
- In the NIR creation or editing window/form:
- Select the Management/Warehouse where the products enter.
- Locate the new Stock Entry Date field. This is now present at the NIR level.

- Enter or select the date on which the products included in this specific NIR actually entered management.
- Complete the rest of the NIR details (received quantities, etc.).
- Save the NIR.
- The stock movement (entry of quantities into management) will be recorded in the system on the date specified in the Stock Entry Date field of that NIR.
- Repeat steps 2-5 for each partial delivery (each new NIR), specifying the correct stock entry date for each individual reception.
Optimization: Advanced Editor for Template Documents
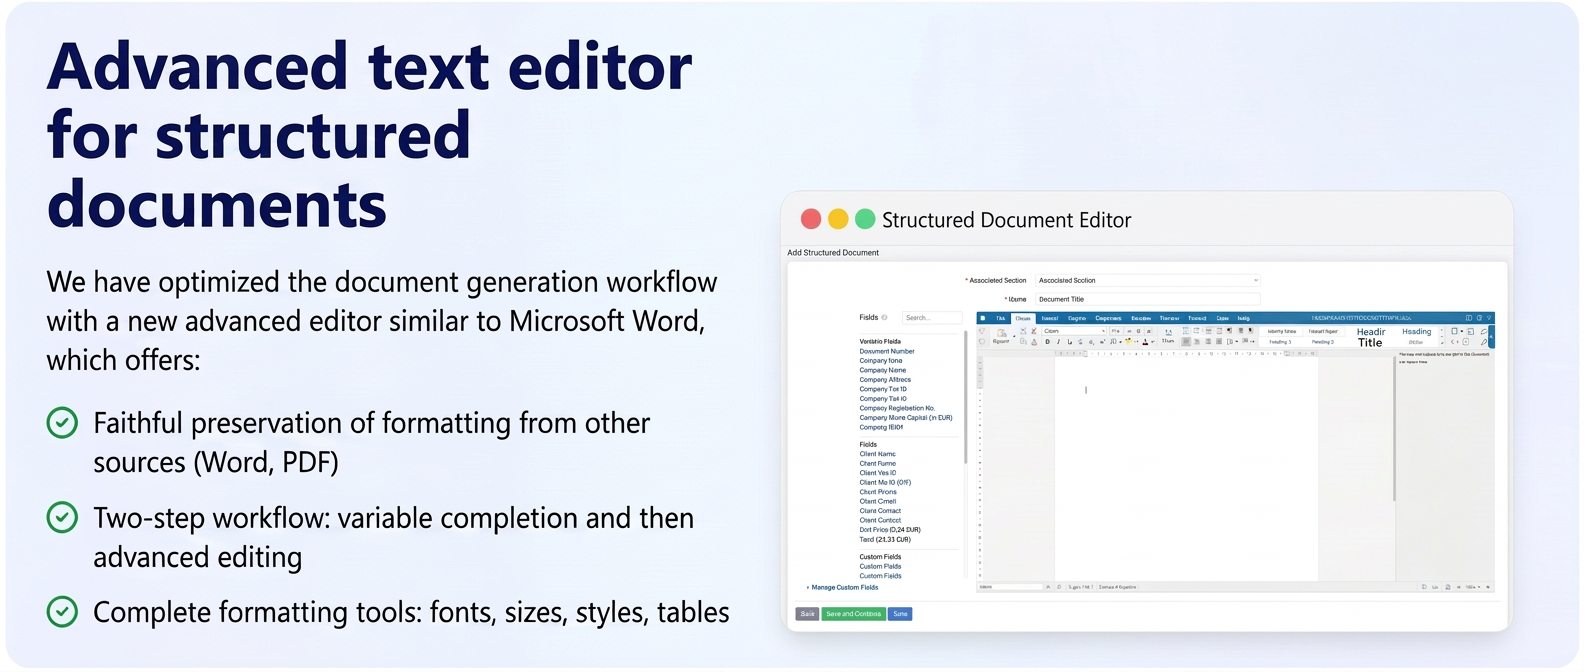
We are introducing a new advanced text editor, similar to Microsoft Word, for when you create a new template (Documents -> Templates -> + New Template). This editor offers much richer formatting options and, very importantly, preserves text formatting much more faithfully when copied from other sources (such as Word).
Additionally, we have optimized the document generation workflow from an existing template. Now, the process takes place in two clear steps:
- After selecting the template and pressing the "Generate" button, a distinct window (Document Tag Values) will appear where you will first complete or verify the variables (tags) specific to the document (e.g., client data, order values).
- After completing the variables and pressing the "Apply" button, the document will be generated and will open in the new advanced editing interface for a final review or final adjustments before saving.
This approach logically separates data entry from the final preview and editing.
User Guide:
- Creating a New Template:
- Navigate to Documents -> Templates.
- Access the Document Templates tab.
- Press the + New Template button.
- Select the Associated Section (e.g., Client, Order, Invoice) – this step remains unchanged and determines the available variables.
- Enter the template Name.
- You will notice the new text editor interface, with a complex toolbar similar to Microsoft Word.
- Use the editor to write the desired text. You can copy and paste text from Word or other editors, with formatting now being much better preserved.
- Use advanced formatting options (fonts, sizes, colors, alignments, lists, tables, etc.).
- Insert the necessary Variable Fields from the left panel, as before.
- Save the template using the buttons at the bottom (Save, Save and Continue).
- Generating a Document from a Template:
- Navigate to the relevant section where you want to generate the document (e.g., Sales -> Orders).
- Identify the specific record (e.g., the desired order).
- Press the specific icon for Generate Template Document (the document icon in the Actions column).
- In the pop-up window, select the desired template from the Choose Template list.
- Press the Generate button.
- NEW: An intermediate window called Document Tag Values will appear. Complete or verify here all variable fields (tags) automatically retrieved or requiring manual entry.
- After completing the variables, press the Apply button.
- NEW: The generated document will now open in the advanced editor interface. The variables completed earlier will already be replaced in the text.
- On this screen, you can make final adjustments directly in the document (modify text, format, etc.) if necessary.
- Finalize the process by saving the generated template document.
Optimization: Extension of Labels to Invoices, Proformas, and Notices
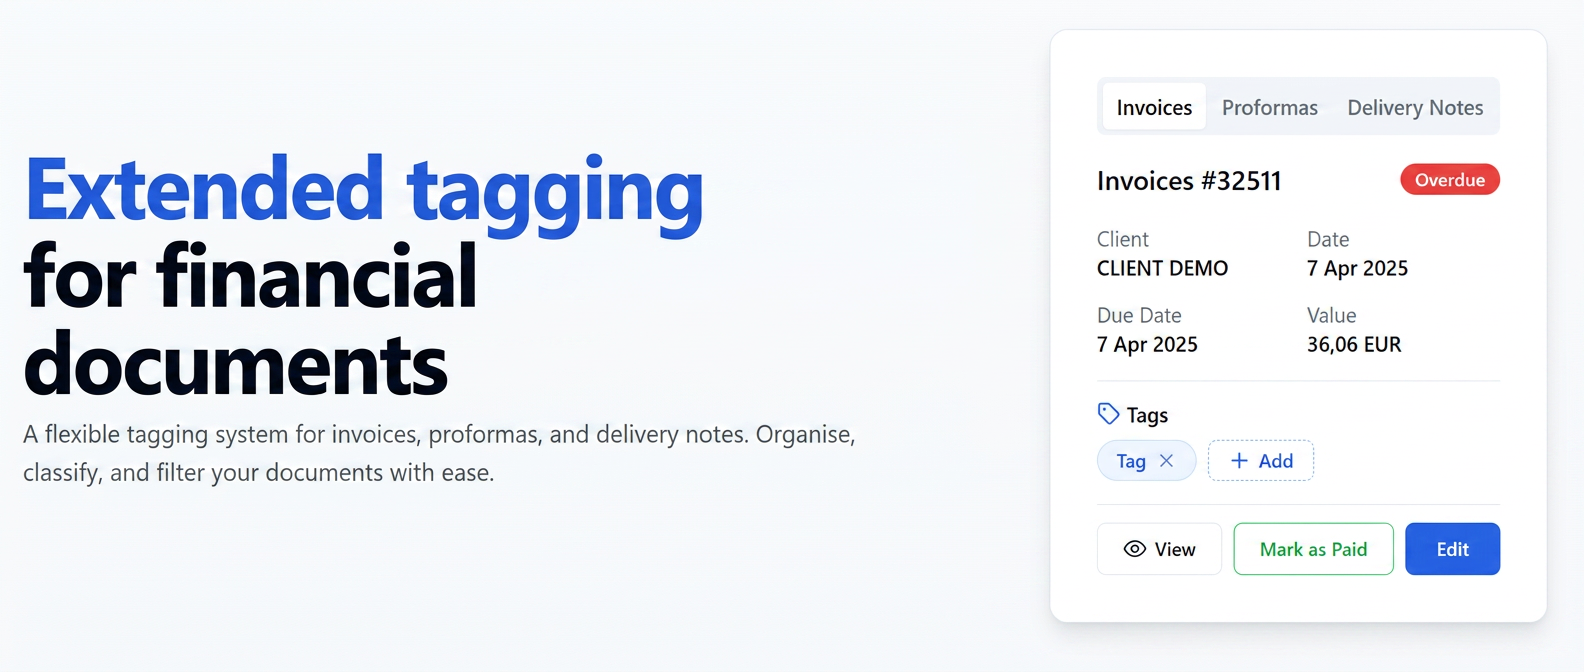
This optimization extends the flexible labeling system to include documents in the Invoices, Proforma Invoices, and Notices (Avize) sections. Similar to how it already works for other entities (e.g., Orders, Clients, Offers), you can now add custom labels to these document types for better organization, classification, and filtering.
Full functionality includes:
- Adding/selecting labels directly on the document (at creation or editing).
- Quick label management via a dedicated button in the actions column of the document list.
- Option to manage labels from the "Actions" menu in the detailed document view.
- Displaying associated labels in a dedicated column in the document list (column must be activated by the user).
- Advanced filtering of document lists based on selected labels.
- Granular permission control for viewing, adding, editing, and deleting specific labels for Invoices, Proforma Invoices, and Notices at the user role level.
- Initial Configuration (Required only once):
- Activate Permissions:
- Navigate to Financial -> Employees -> Access levels.
- Edit the desired access level (e.g., Accounting, Sales).
- Look for the newly added permissions: Invoice Labels, Proforma Invoice Labels, Notice Labels.
- Activate (check) the desired permissions (View, Add, Edit, Delete) for each document type, according to the needs of that role.
- Save the access level changes. Repeat for other access levels if necessary.
- Activate Column in Lists:
- Navigate to the main list for Invoices (Sales -> Invoices).
- Press the Filter/Column Visibility button (icon with 3 horizontal lines/funnel).
- In the Columns section, check the box next to the "Labels" option.
- Press Save (or equivalent button) to apply the change.
- Repeat this step for Proforma Invoices and Notices lists.
Optimization: Quick Display of Client Surplus Balance
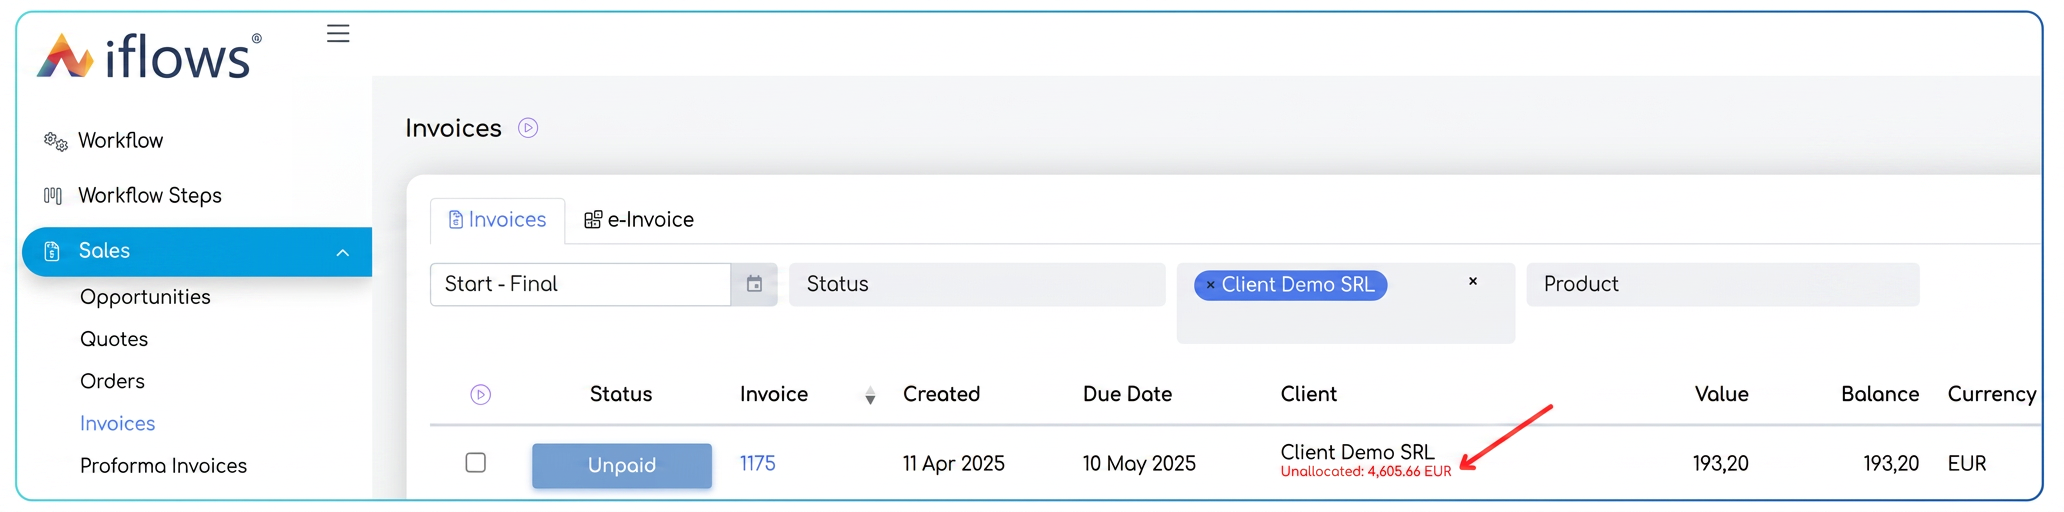
This optimization improves visibility in the section. Now, you can see directly in the invoice list, under each client's name, the unallocated balance (amounts collected from the client that have not yet been associated with a specific invoice or represent a surplus).
This information is displayed distinctly in red text, indicating the amounts available in each currency where such a balance exists.
The main benefit is quick access to this important financial information, eliminating the need to navigate to the client file or the payment allocation screen to check it. The information only appears in this table and does not affect generated documents.
User Guide:
- Navigate in the main menu to the Sales section.
- Select the Invoices sub-option.
- In the table displaying the list of invoices, note the "Client" column.
- Under the client's name, if they have collected and unallocated (surplus) amounts, a new line with red text will be displayed.
- This line indicates the unallocated/surplus balance of that client, in the format: Unallocated: [amount] [currency].
- If there are unallocated balances in multiple currencies for the same client, they will be displayed cumulatively on the line, separated by a vertical bar.
Optimization: SPV Index Column in Invoice Export
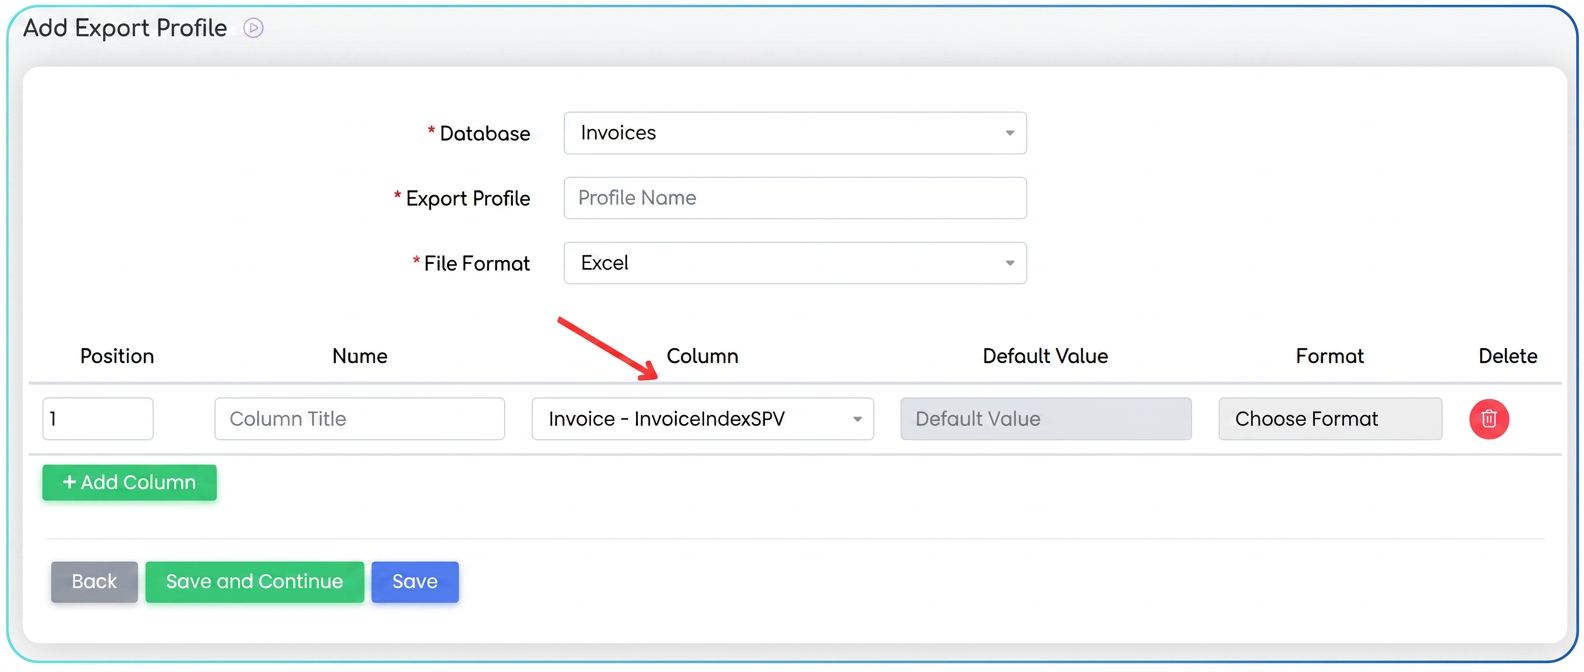
This optimization improves the data export functionality in the section. You now have the option to include the unique upload index of the invoice in the national e-Factura system (SPV) in your exported files. This index, named FacturaIndexSPV in the export settings, is automatically retrieved for each invoice that has been successfully transmitted to ANAF via e-Factura. For invoices that have not yet been transmitted or do not have an associated SPV index, the field will remain empty in the exported file. Configuration is done by editing or creating a specific export profile for invoices.
To include the e-Factura (SPV) index in your invoice exports, follow these steps:
- Navigate in the main menu to Settings.
- Select the Data Export option.
- Access the Export Profiles section.
- Identify the export profile you use to export data from Invoices.
- Press the Edit icon (pencil) next to the desired export profile.
- In the profile editing screen, scroll down to the column definition section.
- Press the green + Add Column button.
- A new row for column configuration will appear:
- Name: Enter the name you want the column to have in your file.
- Column: This is the most important step. Click on the dropdown field and search for and select the option Factura - FacturaIndexSPV. This is the internal variable containing the SPV index.
- After configuring the new row, press the Save button (or Save and Continue) to record the export profile changes.
Optimization: Import Products into Document with Dynamic Mapping
This optimization brings increased flexibility to importing product lines (items) into documents such as Offers and Orders, using the "Import from File" function. Now, it is no longer necessary for your Excel or CSV file to have specific column names or a specific order matching iFlows.
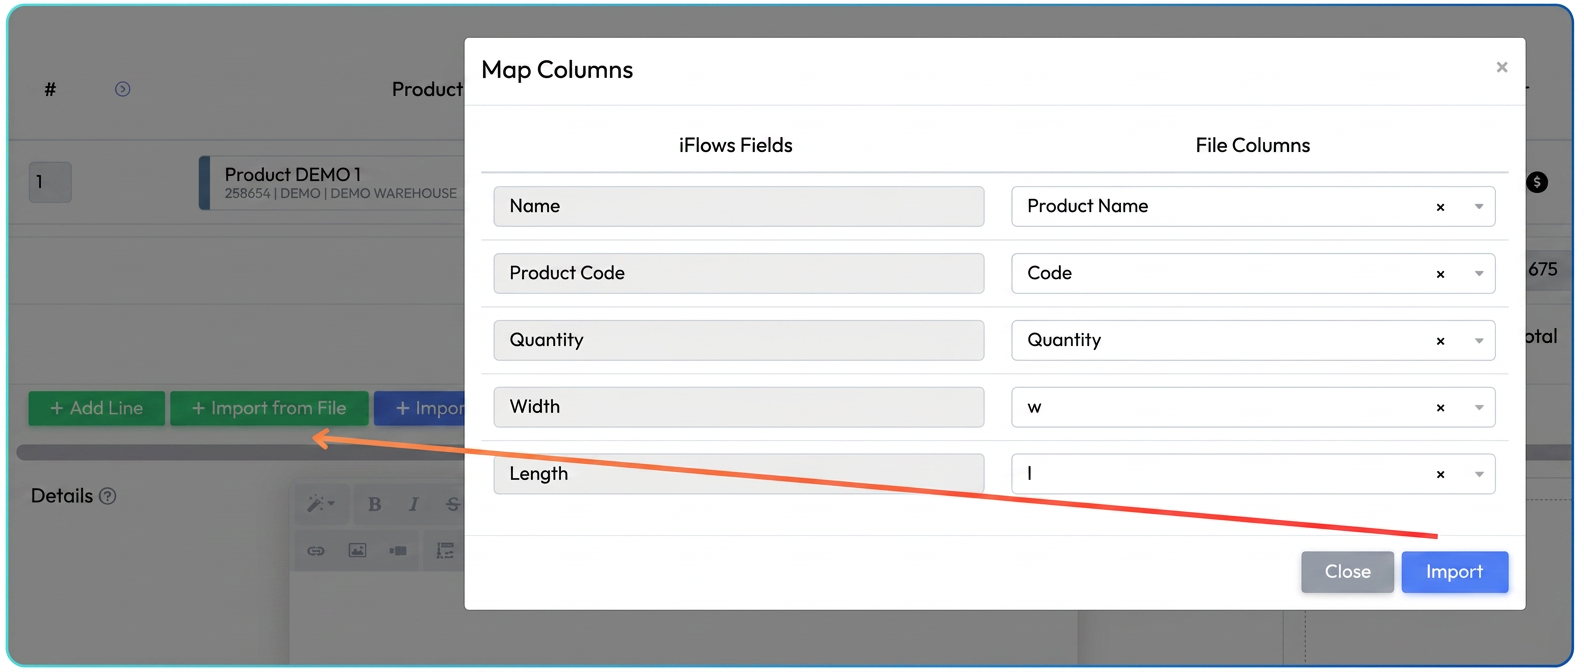
When selecting the file for import, a new intermediate window called "Column Mapping" will appear. Here you can quickly and intuitively associate (map) the columns from your file (File Columns) with the corresponding fields in iFlows.
This eliminates the need to manually edit files before import, saving valuable time and reducing the risk of errors, being particularly useful when working with exports from other software applications (e.g., production programs, configurators).
User Guide:
- Open or create a new document where you want to import product lines (e.g., New Offer, Existing Order).
- In the product/line addition section, locate and press the + Import from File button.
- Select the Excel file from your computer containing the product lines to be imported.
- NEW: After selecting the file, the "Column Mapping" pop-up window will appear.
- In this window:
- On the left column (iFlows Fields), you see the standard and custom fields available in iFlows for document lines.
- On the right column (File Columns), for each relevant iFlows field, select from the dropdown list the corresponding column name from your file. For example:
- If you have a column named "Product Name" in your file, select it next to the iFlows "Name" field.
- After you have finished mapping the desired columns, press the Import button in the pop-up window.
- The product lines from the file will be added to the current document, using data from the columns specified through mapping.
- Verify the imported lines and continue editing/saving the document.
Optimization: Generate Stock Purchase from Supplier Order
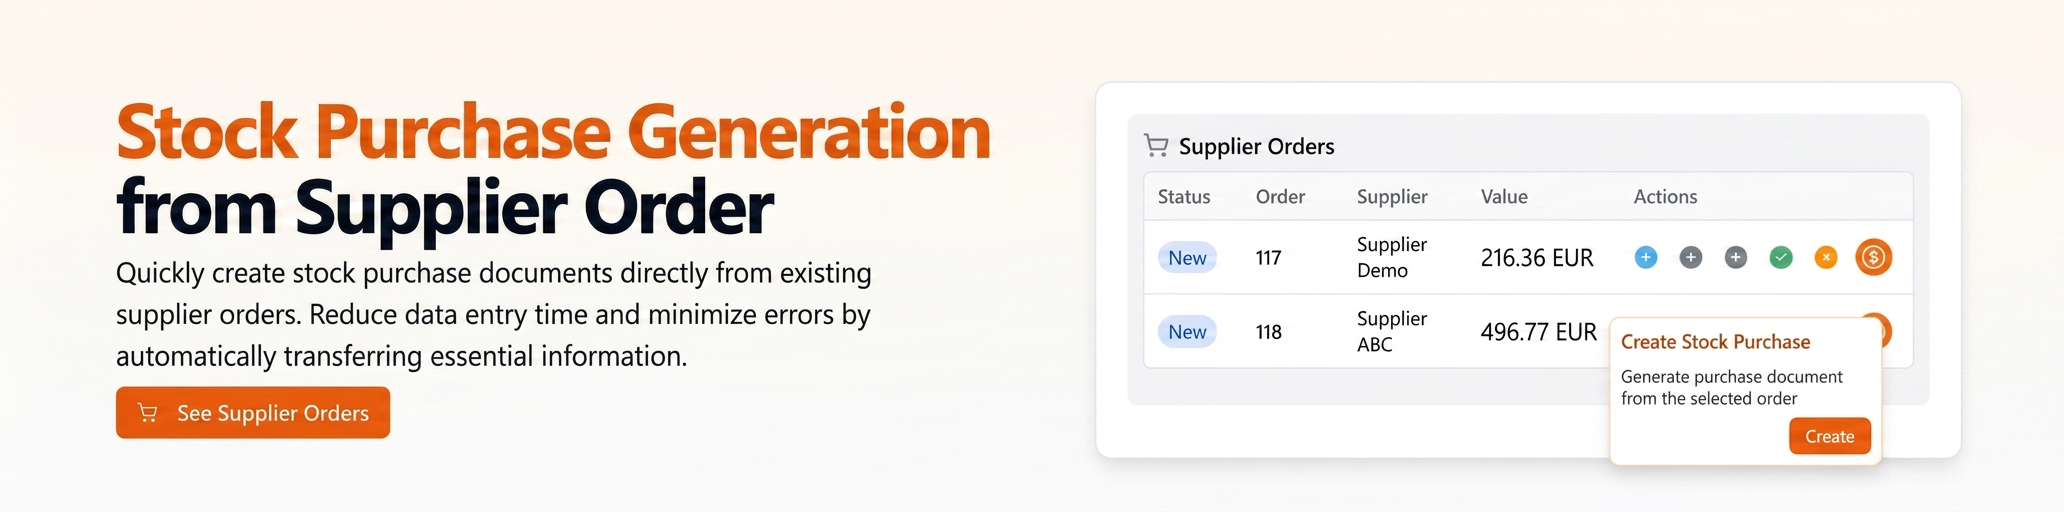
This optimization gives you a quick way to create a Purchase document (stock type, also generating the related NIR) directly from an existing Supplier Order. By adding a new action button in the supplier order list, you can initiate the creation of a purchase that will automatically retrieve relevant information from the selected order.
The main benefit is reducing data entry time and minimizing errors, as essential details are transferred automatically:
- The Supplier is retrieved from the original order.
- Product lines (items, quantities, and possibly prices) are copied from the order directly into the NIR generation section of the new purchase.
You will only need to manually complete information specific to the invoice/document received from the supplier (which did not exist on the initial order), such as: document type (default Stock Purchase), document series and number, date and due date, as well as final financial details (currency, VAT, values).
User Guide:
- Navigate in the main menu to .
- Ensure you are on the "Orders" tab.
- Identify in the list the specific supplier order for which you received the goods/invoice.
- In the "Actions" column next to that order, locate and press the new dedicated icon "Create Stock Purchase" (orange icon).
- When the button is pressed, the form for a new Purchase will open automatically.
- You will notice that the following fields are already pre-filled with data from the selected Supplier Order:
- Supplier.
- Product lines in the "Generate NIR" section (including product, ordered quantity – note: you will likely adjust the received quantity here).
Optimization: Associate Supplier Order with Stock Purchase
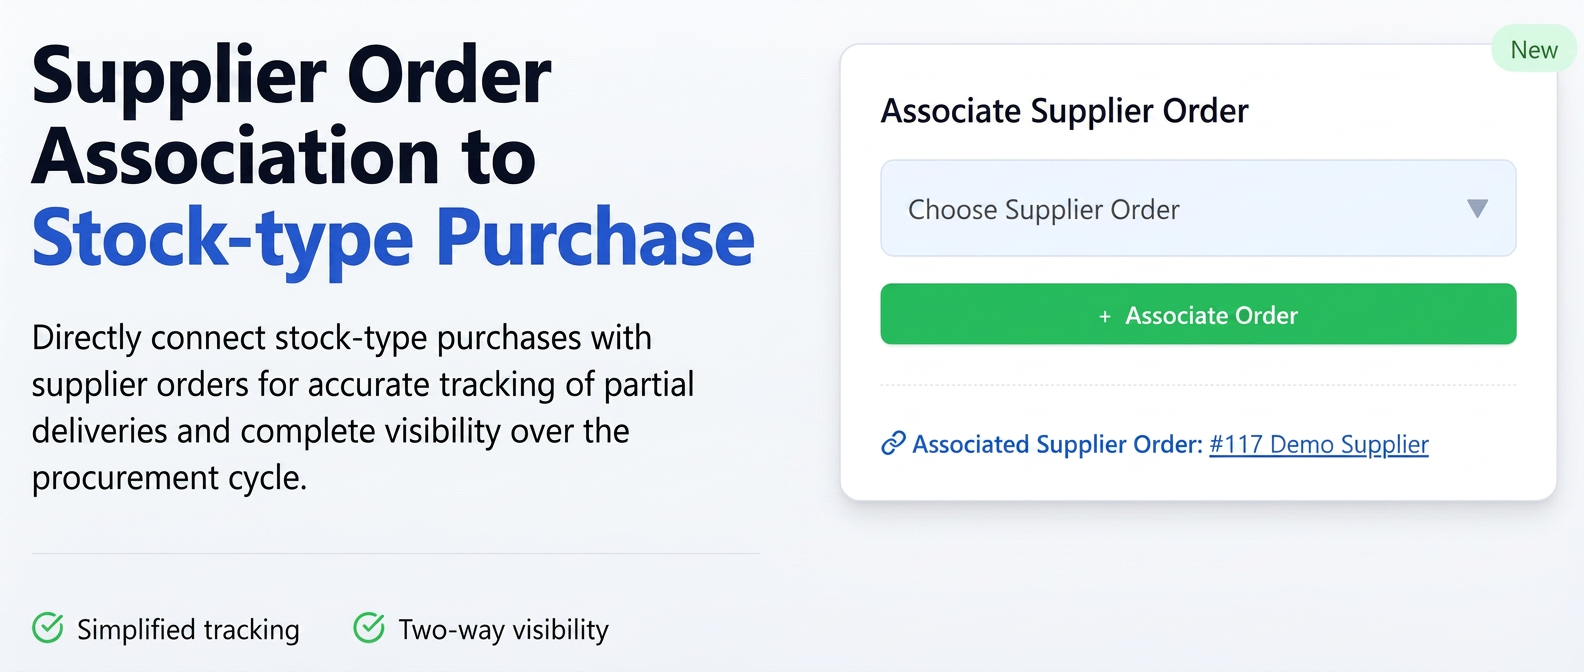
This optimization introduces the possibility to directly link a stock purchase (recorded in ) to the corresponding supplier order. By adding a dedicated "Associate Supplier Order" field in the purchase document, you can select and associate the initial order placed with the supplier.
The main benefit is improved tracking of partial deliveries. For example, if you ordered 10 units of a product via a Supplier Order, but receive and record a Purchase for only 4 units, associating the two documents allows you to quickly see that the Purchase covers only part of the initial Supplier Order, facilitating tracking of remaining quantities to be delivered.
The link is visible in both directions:
- In the Purchase: An "Associated Supplier Order" field is displayed with a direct link to that order.
- In the Supplier Order: In a dedicated section for associated documents, the purchase (or purchases) linked to that order will be listed, including purchase number, creation date, and responsible employee.
User Guide:
- Associating a Supplier Order with a Purchase:
- Navigate to .
- Create a new purchase (+ New Purchase) or open an existing purchase for editing, ensuring it is of the Stock type.
- In the purchase creation/edit form, locate the new section/field "Associate Supplier Order".
- Press the + Associate Order button (if necessary to display the selection field) or click directly on the "Choose Supplier Order" dropdown.
- Search for and select from the list the supplier order you want to associate with this purchase. (The list will likely be filtered to show orders from the same supplier).
- After selection, the order will appear in the field. You can remove the association using the red icon (trash can) next to it if necessary.
- Complete the rest of the purchase details and Save the document.
- Viewing the Link:
- From the Purchase:
- Open the detailed view of a purchase that has an associated supplier order.
- Note the "Associated Supplier Order" field (placed under main details, before product lines). This will display the order number and supplier, functioning as a link you can click to navigate directly to that Supplier Order.
- From the Supplier Order:
- Navigate to the Financial – Suppliers – Orders section.
- Open the detailed view of a Supplier Order to which you associated a purchase.
- Identify the "Documents" section.
- In this section, you will see the purchase (or purchases) associated, along with the Purchase Number, its Creation Date, and the Employee who created it.
Optimization: Attach Files to Supplier Orders
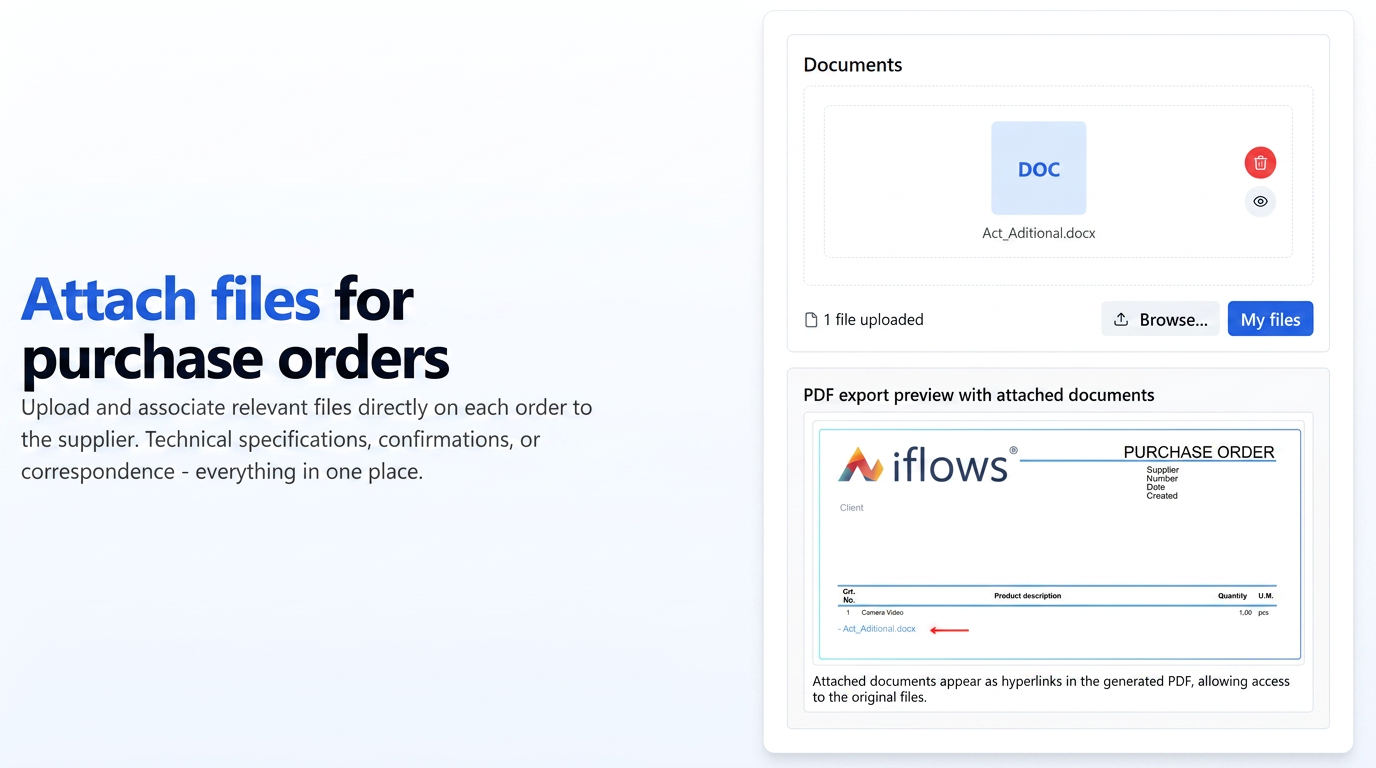
This optimization brings document attachment functionality to the Supplier Orders section. Now you can upload and associate relevant files (e.g., technical specifications from the supplier, external order confirmations, relevant correspondence) directly to each Supplier Order.
The functionality includes a dedicated "Documents" field in the order form, where you can drag and drop files or select them from your computer ("Browse...").
When generating the PDF document of the Supplier Order, you now have the export option "Insert Documents" in the PDF export settings. By activating this option, files attached to the order will be mentioned in the generated PDF either as a hyperlink (e.g., "- Addendum.docx") or directly in the document, allowing access to the original file stored in the iFlows cloud.
Optimization: Export Purchases by Document Date / NIR Date
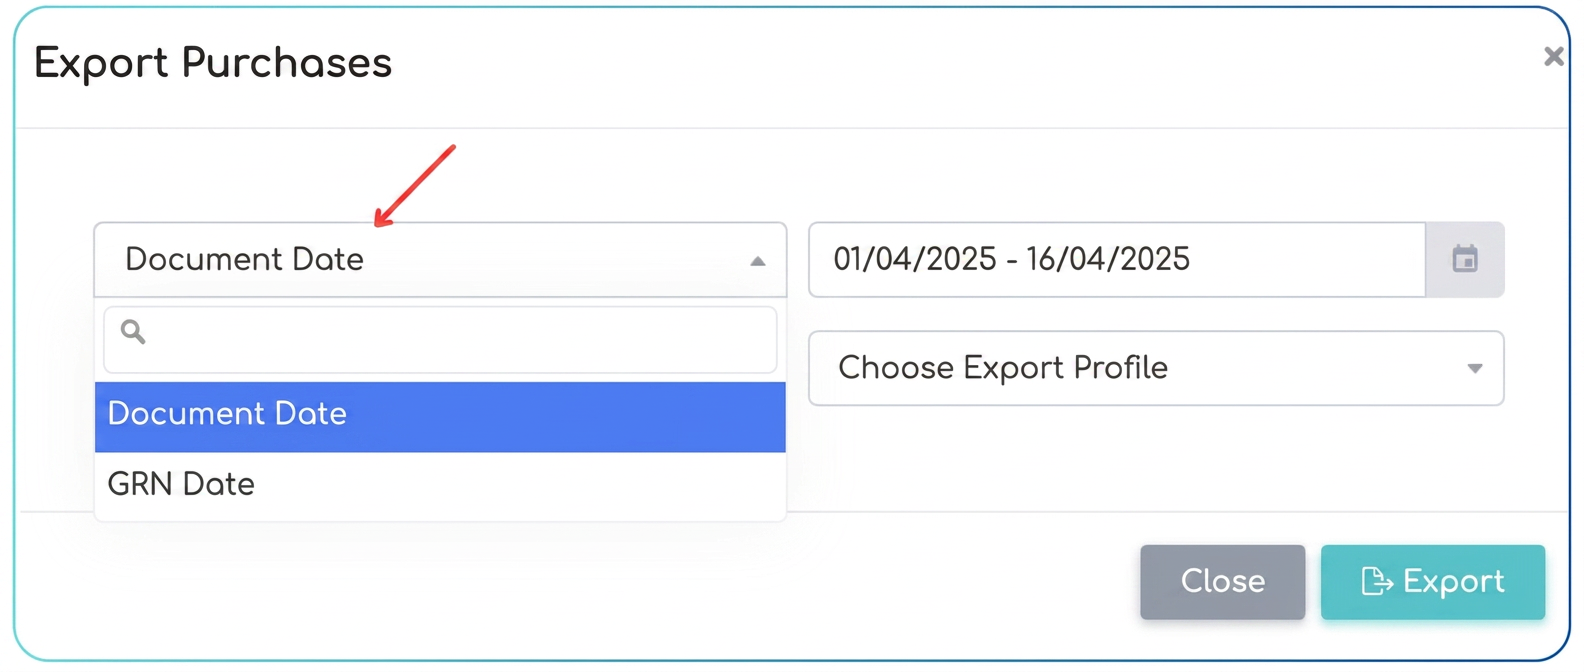
This optimization adds important flexibility to the data export process from the section. When initiating an export, in the "Export Purchases" pop-up window, you now have the ability to choose which date criterion you want to filter records by for the selected period.
A new dropdown field allows you to choose between:
- Document Date: By selecting this option, the date range chosen in the calendar field will apply to the purchase document date (the invoice date from the supplier). The export will include all purchases whose document date falls within the specified range.
- NIR Date: By selecting this option, the chosen date range will apply to the date of the Nota de Intrare Recepție (NIR), which corresponds, in the case of stock purchases, to the actual date the goods entered management (now set at the NIR level, per the previous optimization). The export will include purchases whose NIRs have a date in the specified range.
This option is particularly useful for generating reports tailored to different needs: you can export purchases from a certain financial period (based on the invoice date) or you can export goods receptions from a certain operational period (based on the NIR date).
User Guide:
- Navigate in the main menu to .
- Press the "Export" button (usually located in the top-right of the list).
- The "Export Purchases" pop-up window will open.
- Locate the first dropdown field in this window (located above the date selection field). This is the new selector for the date criterion.
- Click on this dropdown and choose the desired filtering criterion:
- Select "Document Date" if you want to filter the export based on the purchase document date (supplier invoice).
- Select "NIR Date" if you want to filter the export based on the date on the Nota de Intrare Recepție (stock entry date).
- In the calendar field on the right, select the desired date range. This range will now apply according to the criterion chosen in step 5.
- Select the "Export Profile" you wish to use.
- Press the "Export" button in the pop-up window.
- The generated file will contain the purchase records filtered according to the date criterion (Document Date or NIR Date) and the selected range.