
New: Price adjustment in document
In iFlows, each product will have a predefined purchase and sale price. When you add a product to a document (Order, Quote, Proforma Invoice, etc.), the system will automatically populate the "Unit Price excluding VAT" field with the standard sale price configured for that product.
However, situations may arise that require a one-off adjustment of this standard price following a negotiation. In addition to the possibility of editing the price directly in the document, there is a setting that allows you to overwrite the default unit price in several ways:
- You can add the price in another currency (EUR, EUR, USD), and the system will automatically recalculate the value in the document's currency.
- By specifying that the entered price already includes VAT, the system will automatically calculate the price excluding VAT.
- By applying a combination of both methods.
This tutorial will guide you step-by-step through using this price adjustment function.
Step 1: Accessing the Price Adjustment Functionality
- Navigate to the relevant section where you create or edit a document, for example, Sales -> Orders.
- Create a New Order or open an existing one for editing.
- In the products section, add the desired product.
- Notice that once the product is selected, the "Unit Price excluding VAT" field is (normally) automatically filled with the predefined sale price from the product file.
- Locate the small dollar icon ($) that appears immediately to the right of the "Unit Price excluding VAT" field, next to the already completed value. This icon is your tool for modifying the default price.
Step 2: Using the "Unit Price" Recalculation Window
Click on the dollar icon ($). The "Unit Price" pop-up window will open. This allows you to enter data for the price recalculation that will overwrite the default value:
- Currency Selector (top): Choose the currency in which you want to enter the new negotiated/specific price (EUR, EUR, USD).
- Value Field (top): Enter the numerical value of the new price in the currency selected above.
- Document Currency Indicator & Converted/Calculated Value (bottom): Displays the main currency of the current document (e.g., EUR) and the resulting unit price excluding VAT that will actually be written in the document AFTER you press "Apply". It updates automatically.
- "VAT Included" Toggle: Specify whether the numerical value entered above contains the VAT corresponding to the rate in the document or not.
- "Close" and "Apply" Buttons: "Close" cancels the adjustment, "Apply" performs the recalculation and overwrites the unit price in the document line.
Let's exemplify a scenario:
- Situation: The standard price of the product is 180 EUR excluding VAT. You have agreed on a final price with the client, including VAT, of 500 EUR. You want iFlows to calculate the correct unit price excluding VAT in EUR (document currency) starting from this agreed final price.
- Steps:
- Click on the ($) icon.
- Select EUR (the currency of the agreed final price).
- Enter 500 (the agreed final price).
- Activate the "VAT Included" toggle.
- Observe the recalculated value in EUR (bottom). The system:
- Calculates the taxable base in EUR (500 / 1.19 ≈ 420.17 EUR).
- Converts this base (420.17 EUR) into EUR (~84.48 EUR in the video example, where the entered value was likely different, but the logic is identical).
- Click on "Apply".
- Result: The "Unit Price excluding VAT" field in the order is overwritten with ~84.48 EUR. The system will correctly calculate the VAT and the total, so that the final value of the line (price + VAT) reflects the EUR equivalent of the 500 EUR initially agreed upon.
Optimization: Discounts Module
iFlows offers a robust structure for defining sale prices. By default, you have the possibility to set differentiated sale prices directly in each product's file, depending on the Customer Level.

However, we offer additional flexibility to manage special price lists or specific negotiations. This is where the dedicated "Discounts" module comes in. This module allows the creation of price rules, which overwrite standard prices.
Through this module, you can define:
- Various Calculation Types for the Special Price:
- Percentage Discount (%): Applies a percentage discount to the product's standard price.
- Value Discount (Fixed Amount): Subtracts a fixed amount (e.g., 5 EUR, 2 EUR) from the product's standard price.
- Final Price: Enforces a fixed sale price for the product, completely ignoring the standard price or other general rules.
- Specific Customer Targeting: You can choose to whom these special conditions apply:
- A specific Individual Customer.
- A Customer Type (e.g., 'Reseller', 'Final Customer'), thus affecting all customers of that type.
- A predefined Customer Level (e.g., 'Small Business', 'Large Business'), affecting all customers at that level.
- Specific Product Targeting: You can choose what these conditions apply to:
- A specific Individual Product.
- All products in a specific Subcategory.
- All products in a specific Category.
- Or products imported via file.
This tutorial will guide you through the methods of defining these rules: manually and via import.
Part 1: Manually Adding a Discount Rule
This method is suitable for setting a special condition for a single product or product category/subcategory.
- Navigation: Access the Customers -> Discounts menu.
- Initiate Addition: Click the "+ Add Discount" button.
- Choose Product/Product Group (WHAT receives the discount): In the bottom left, select ONE of:
- Product: Choose a specific product. or
- Subcategory: Choose a product subcategory.
- Category: Choose an entire product category.
- Choose Customer/Customer Group (TO WHOM it applies): In the top left, select ONE of:
- Customer: Choose a specific individual customer. or
- Customer Type: Choose a customer type (group).
- Customer Level: Choose a customer level (another group).
- Define the Discount/Price (HOW it applies): In the right side, choose the calculation method and enter the value:
- Percentage: Select and enter the percentage (e.g., 10). or
- Value: Select and enter the fixed amount (e.g., 5). or
- Final Price: Select and enter the desired final price (e.g., 50).
- Choose Product/Product Group (WHAT receives the discount): In the bottom left, select ONE of:
- Save: Click on "Save".
- Verification: The new rule (product-customer combination and discount type) appears in the list.
Part 2: Adding Bulk Discounts via Import (for Multiple Products)
Ideal for quickly setting price rules for an extensive list of products that are not part of the same category/subcategory.
Step 2.1: Preparing the Import File
- Download Example File (Template):
- Navigate to Customers -> Discounts -> + Add Discount.
- IMPORTANT: Select first the Customer/Customer Group (Type/Level) to which all discounts in the file will apply.
- Press the "Import" button.
- In the "Import Discounts (...)" pop-up, click on "Download File Example".
- Completing the Excel File:
- Each row in the file represents a rule for a different product.
- Product Identification (Columns A, B, C...): Identify each product on its row, using at least two of the columns: Product Name, Product Code, Management (Warehouse).
- Defining the Discount (Columns D, E, F): On each row, fill in the value in ONLY ONE column, according to the desired discount type for that product (and for the customer group chosen in step 1):
- Percentage Discount (e.g., 25)
- Value Discount (e.g., 5)
- Final Price (e.g., 3)
- Leave the other two discount columns empty on that row.
- Save File: Save the completed Excel file (.xlsx).
- Upload File: In the "Import Discounts" pop-up, upload the file (drag & drop or "Browse...").
- Validation: Check the validation summary.
- Confirm Import: Press the final "Import" button.
- Verification: Rules for the multiple imported products will appear in the list, all associated with the initially selected customer group.
Part 3: Managing Existing Discounts
- Use the standard options for View, Edit (pencil), Delete (trash can) from the main list.
Part 4: Discount Application Priority
If multiple rules exist for a customer-product combination, the rule that offers the highest discount for the customer is applied.
Optimization: Import and Update Products & Customers
This guide will instruct you how to use the Excel file import function in iFlows to add new products and customers, but also to update information for existing ones in an efficient way.
PART 1: PRODUCT IMPORT
Step 1: Preparing the Excel File for Products
- Download template (Recommended): The easiest way is to download the template directly from iFlows (Products section -> Import from File -> Download File Example) and complete it.
- Essential Columns: Make sure your file contains at least the columns needed for identification and basic information:
- Product Name
- Product Code
- Management (Warehouse)
- Uniqueness Rule: iFlows identifies a unique product through the combination Product Code + Management OR Product Name + Management. You can have the same Product Code (e.g., "LAPTOP-X1") in multiple managements (e.g., "Central Warehouse", "Unirii Store"), each on a separate row in Excel.
- Case of Products Without Physical Stock (Services, Unlimited Stock):
- If you import a service (e.g., "Transport", "Consultancy") or a product with unlimited stock, you can have an Unlimited Stock column in Excel set to Yes.
- Important: For these rows, the Management column can be left empty.
Step 2: Importing the File into iFlows
- Navigation: Access the menu on the left -> Products.
- Initiate Import: Click the Import from File button (top right).
- Upload File:
- Click the Browse... button and select the Excel file prepared in Step 1.
- Alternatively, you can drag the file directly into the indicated area ("Drag the file here").
- Continue: After the file is uploaded, click the Continue button.
Step 3: Column Mapping
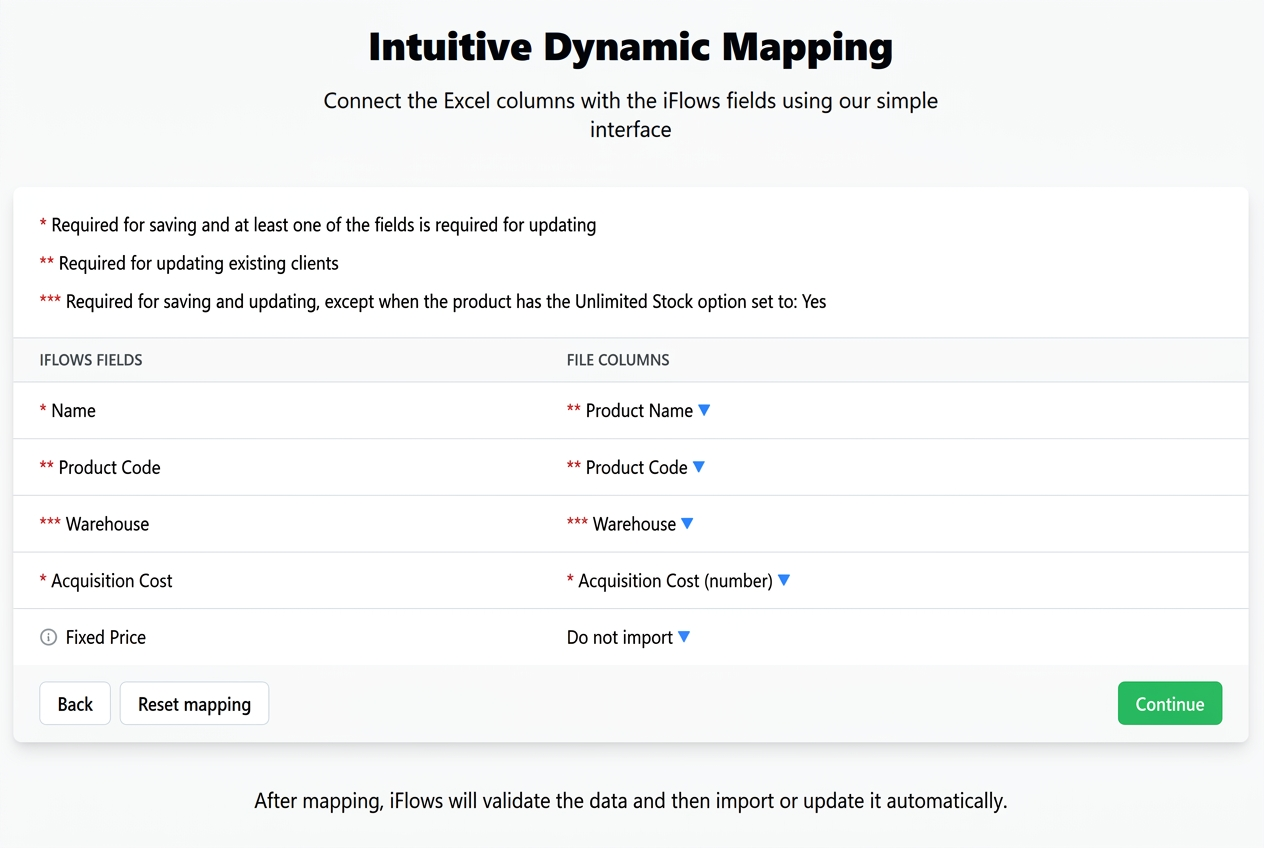
- Mapping Screen: iFlows will display a screen where it tries to automatically match the columns from your Excel file (right column - "File columns") with the standard fields in iFlows (left column - "iFlows fields").
- Verify Mapping: Go through the list carefully and ensure the matches are correct. Pay special attention to the key fields: Name, Product Code, Management.
- Legend: Analyze the legend at the top of the page to understand the meaning of the asterisks (*, **, ***) that mark mandatory fields for saving or updating.
- Non-imported Columns: If you do not want to import data from a certain column in your file, select "Do not import" from the dropdown list corresponding to that column.
- Reset Mapping (Optional): If the automatic mapping is incorrect or you want to redo it, you can use the Reset mapping button. This will set all file columns to "Do not import", allowing you to manually select the desired matches.
- Continue: Once you are satisfied with the mapping, click Continue.
Step 4: Validation and Final Import
- Summary: iFlows will display a summary indicating the number of processed lines and the number of products to be imported. If there are errors (e.g., missing a mandatory mapped field), they will be displayed here and you will need to go back to mapping (click "Back").
- Import: If everything is in order and there are no errors, click the Import button.
- Confirmation: Wait for the process to complete. You will be redirected to the product list, where you will see the newly imported items. Check a few entries to ensure that data (stock, price, management, labels, etc.) has been correctly taken over.
PART 2: UPDATING PRODUCTS (DYNAMIC MODE)
This method is useful when you want to modify only certain information for already existing products (e.g., price, minimum stock, acquisition cost), without reloading all data.
Step 1: Preparing the Excel File for Update
- Unique Identifiers (Mandatory): Your file must contain the columns that form the unique identifier:
- Product Code
- Management
(Alternatively, you can use Product Name + Management, but the Code + Management combination is safer).
- Columns to Update (Only necessary ones): Include in the file only the columns whose values you want to modify. For example, if you want to update only the fixed price, your file will have only 3 columns: Product Code, Management, Fixed Price.
Step 2: Importing the Update File
- Identical Process: Follow exactly steps 2, 3, and 4 from the "PRODUCT IMPORT" section.
- Crucial Mapping: At the mapping step, ensure that:
- The Product Code and Management columns from the file are correctly mapped to the corresponding iFlows fields.
- The column(s) with the data to be updated (e.g., Fixed Price) are correctly mapped.
- The rest of the iFlows fields can remain unmapped.
- Import: Continue and finalize the import. iFlows will identify existing products based on the Product Code + Management combination and will overwrite only the values for the fields you included and mapped in the update file (in our example, Fixed Price).
PART 3: CUSTOMER IMPORT
The process is very similar to that of products.
Step 1: Preparing the Excel File for Customers
- Template (Recommended): Download the template from iFlows (Customers section -> Import from File -> Download File Example).
- Essential Columns:
- Customer Name:
- CIF/CNP: The Unique Registration Code (CUI/CIF) for companies or the Personal Numerical Code (CNP) for individuals. This is the primary unique identifier.
- Uniqueness Rule: iFlows uses CIF/CNP as the primary unique identifier. To avoid duplicates, it is recommended to complete this field.
- Individuals and CIF/CNP:
- With CNP: Fill in the CNP in the CIF/CNP column.
- Without CNP (Option 1): You can leave the CIF/CNP field empty.
- Without CNP (Option 2 - Recommended for e-Factura): Fill in the CIF/CNP field with 13 zeros (0000000000000). This format is recognized by the e-Factura system for individual customers without a specified CNP.
Step 2: Importing the File into iFlows
- Navigation: Access the menu on the left -> Customers.
- Initiate Import: Click the Import from File button.
- Upload and Continue: Upload the Excel file and click Continue.
Step 3: Column Mapping for Customers
- Verify Mapping: Check the automatic matching of file columns with iFlows fields. Pay special attention to the Name and CIF/CNP fields.
- Legend: Check the legend for mandatory/required fields.
- Non-imported Columns / Reset: Use the "Do not import" or "Reset mapping" option if necessary.
- Continue: Click Continue.
Step 4: Validation and Final Customer Import
- Summary: Check the summary and any errors.
- Import: Click Import.
- Confirmation: Check the list of imported customers, including details for a few individuals to see how the CIF/CNP field was taken over.
PART 4: UPDATING CUSTOMERS (DYNAMIC MODE)
Functions on the same principle as for products.
Step 1: Preparing the Excel File for Customer Update
- Unique Identifier (Mandatory): Include the CIF/CNP column with the correct values for the customers you want to update.
- Columns to Update: Include only the columns with the information you want to modify (e.g., Mobile Phone, Email, Label).
- Data: Complete the rows only for the customers to be updated, with the new values.
Step 2: Importing the Customer Update File
- Identical Process: Follow steps 2, 3, and 4 from the "CUSTOMER IMPORT" section.
- Update Mapping: At mapping, ensure CIF/CNP is correctly mapped and the columns to be updated are mapped to the corresponding iFlows fields.
- Import: Finalize the import. iFlows will find customers by CIF/CNP and update only the fields specified by you.
New: Generation of Casa Verde QR Code on Invoices

This functionality is intended for companies implementing projects under the Casa Verde (Green House) program that need to include a specific QR code on invoices issued to beneficiaries, according to AFM (Environmental Fund Administration) requirements.
Step 1: Activating the "Casa Verde QR Code" Integration
- Navigate in the main menu on the left to the Settings section.
- Select the Integrations option.
- Access the Available tab.
- Search for and identify the integration named Cod QR Casa Verde.
- Press the + button (Install integration) next to it.
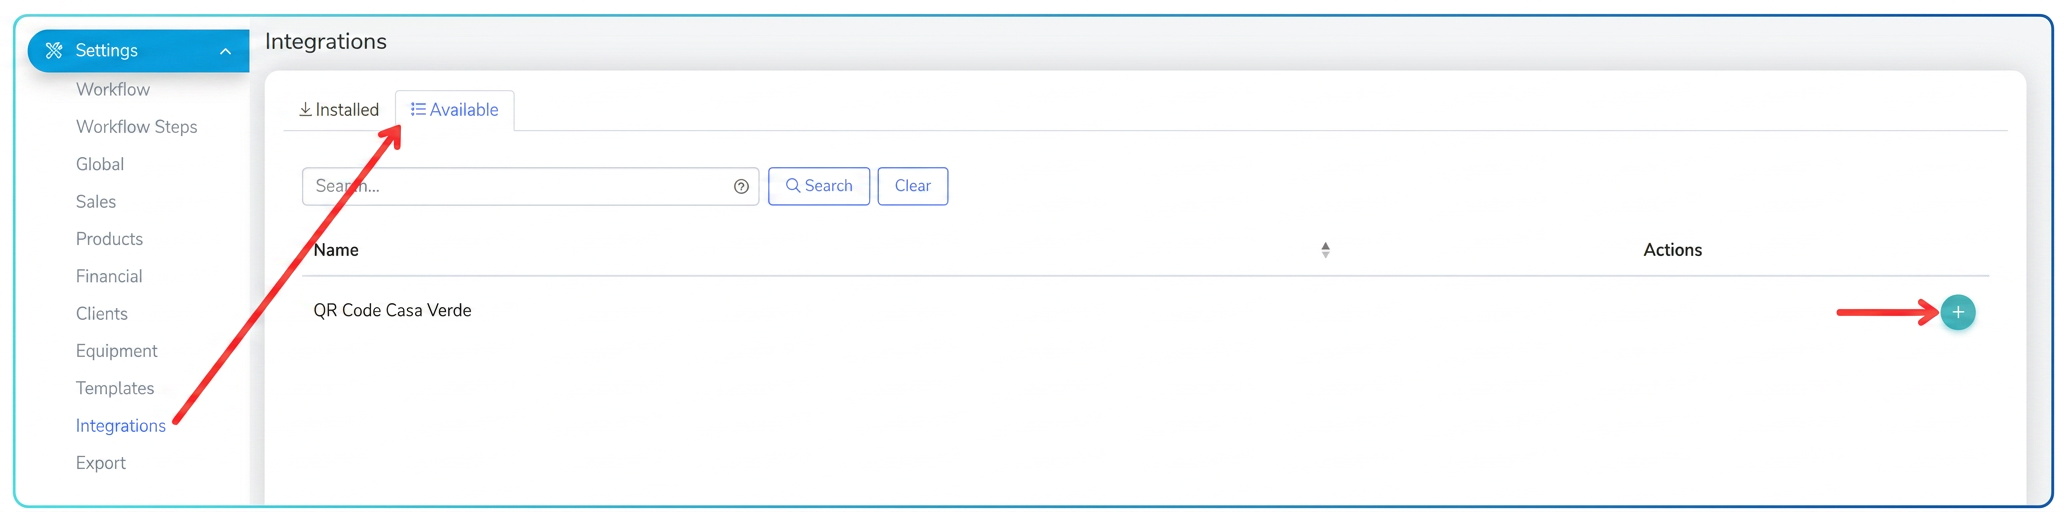
- After installation, the integration will appear in the Installed tab, confirming the functionality is activated.
Step 2: Accessing the QR Code Option on the Invoice
- Navigate in the main menu on the left to the Sales section.
- Select the Invoices sub-option.
- Create a new invoice from an order or edit an existing invoice by clicking the edit icon (pencil).
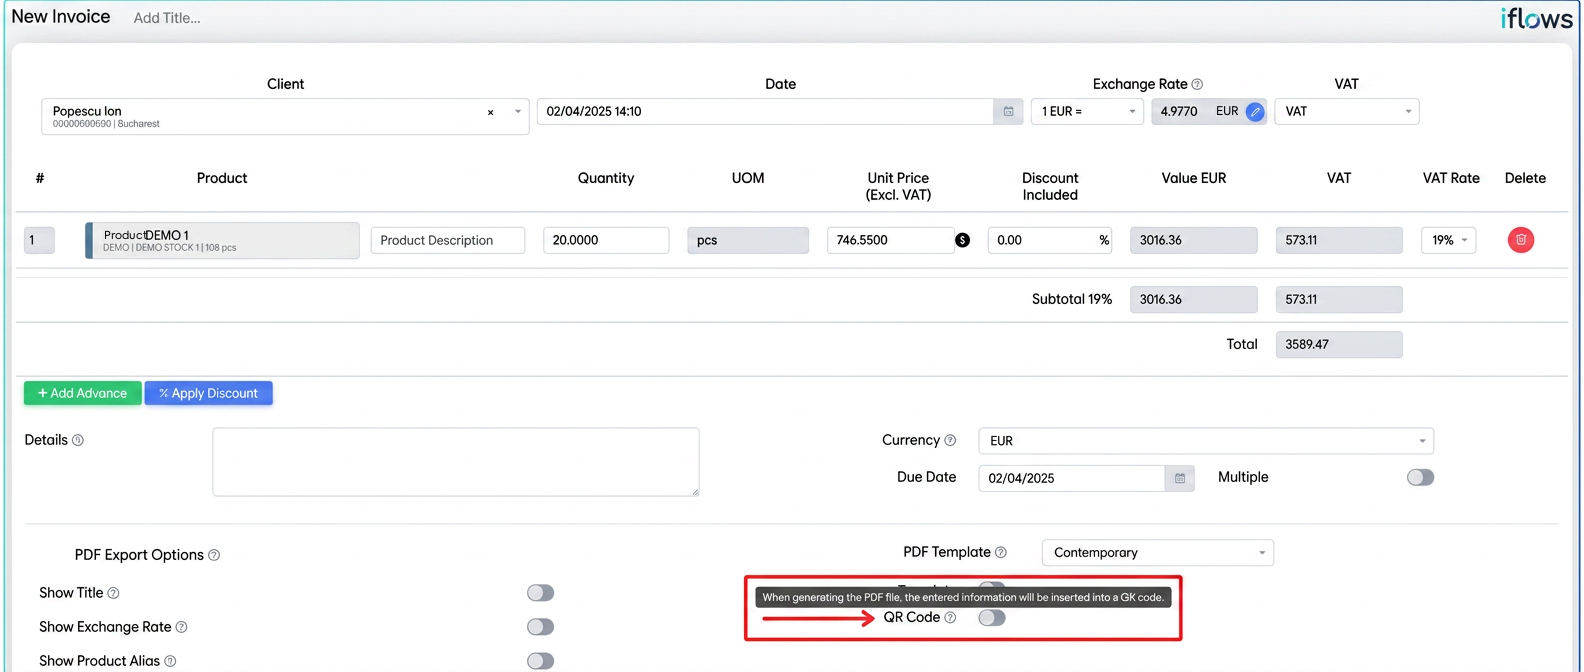
- In the invoice creation/editing screen, scroll down to the new QR Code option.
Step 3: Configuring and Completing Data for the QR Code
- Activate the QR Code option by checking the box (toggle) next to it.
- Select the Session corresponding to the Casa Verde program for which you are issuing the invoice (e.g., 2023 Session or 2024 Session). The set of required fields varies by session.
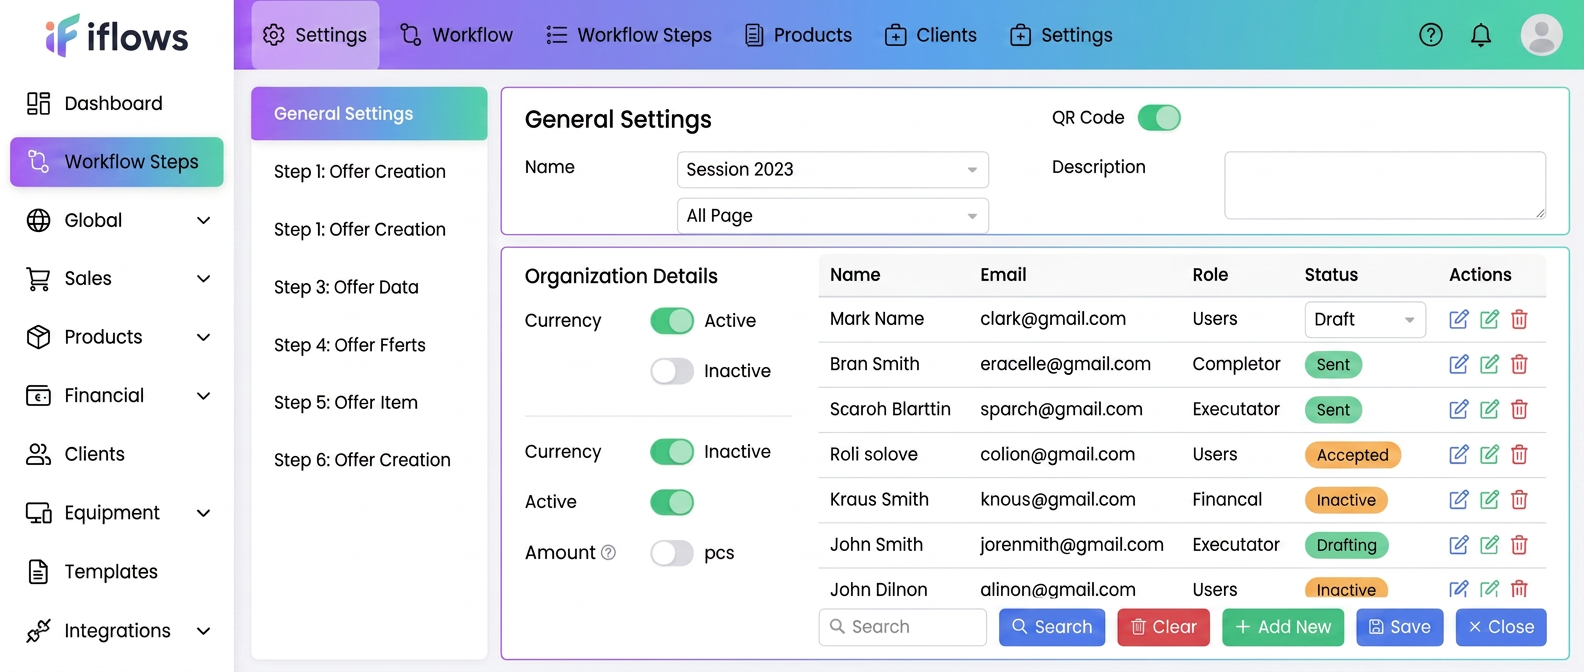
- For 2023 Session:
- Select Applicant Type (Natural person or Unit of worship).
- Verify the automatically pre-filled fields (Invoice No./Date, Beneficiary Name, CIF/CNP, County).
- Complete manually, if necessary, address data that was not previously recorded in the system.
- Must complete:
- Installed Power (e.g., 3kW, 5kW etc.)
- Inverter Serial Number
- Photovoltaic Panel Serials: Enter the serials of all installed panels, mandatory separated by a vertical bar (|). Example: PanelSerial1|PanelSerial2|PanelSerial3
- For 2024 Session:
- Verify the automatically pre-filled fields (Invoice No./Date, Beneficiary Name, CIF/CNP, County).
- Complete manually, if necessary: Commune/City, Street, Street Number.
- Must complete:
- Installed Power (e.g., 3kW, 5kW etc.)
- Grid Connection Certificate Number
- Grid Connection Certificate Date (select date from calendar)
- For 2023 Session:
- A QR Code Content field will display the text that will be encoded as you fill in the data. This is for informational purposes only.
Step 4: Saving the Invoice and Generating the PDF
- After you have completed all the necessary fields for the selected session, press the Save button at the bottom of the page.
- Return to the invoice list.
- Generate the PDF document of the newly saved/edited invoice (by clicking the specific PDF generation icon).
- Open the generated PDF file. You will notice that the specific QR code has been added to the invoice, containing the information entered in Step 3.
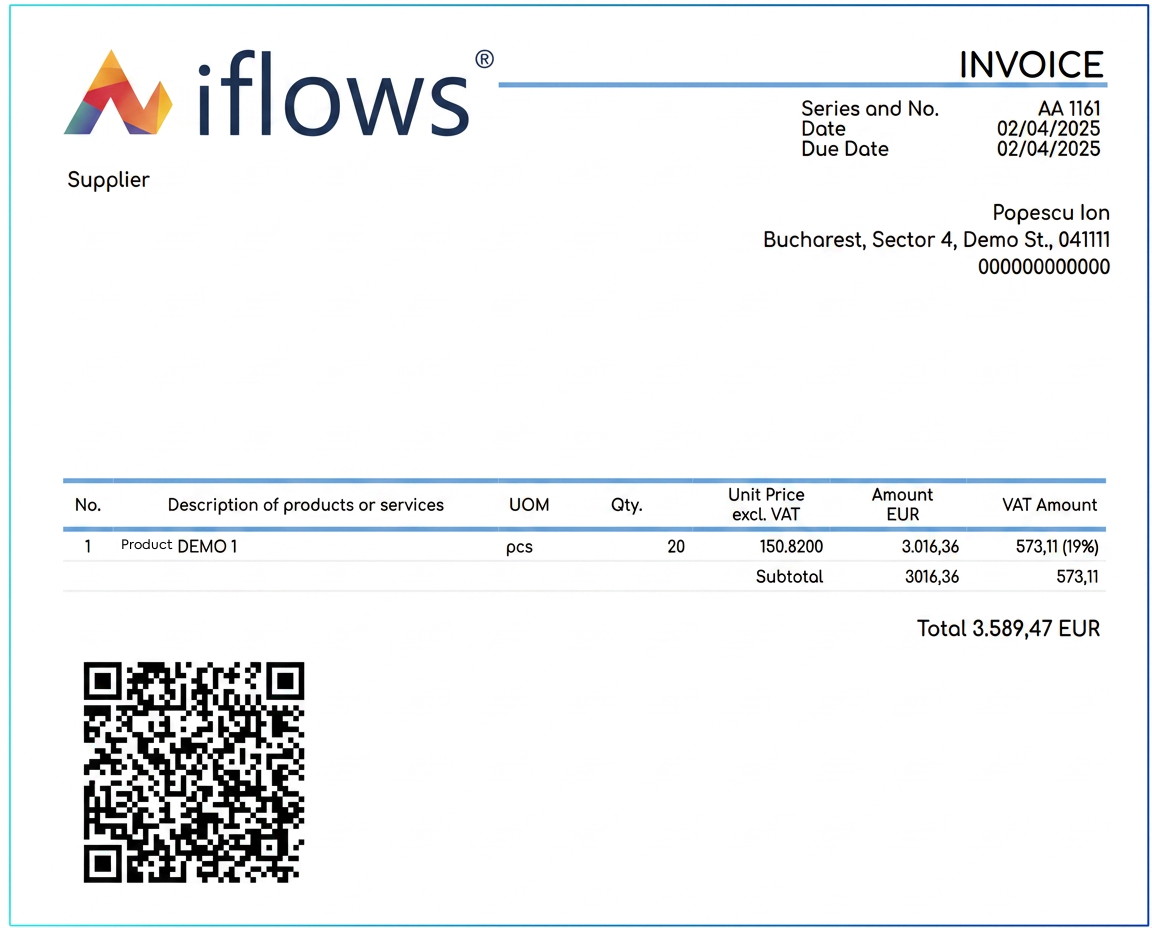
This QR code can be scanned and contains structured data according to the requirements of the Casa Verde Fotovoltaice (Green House Photovoltaics) program for that session.
New: „Export selection” button
A new export button has been implemented in all platform pages containing data tables.
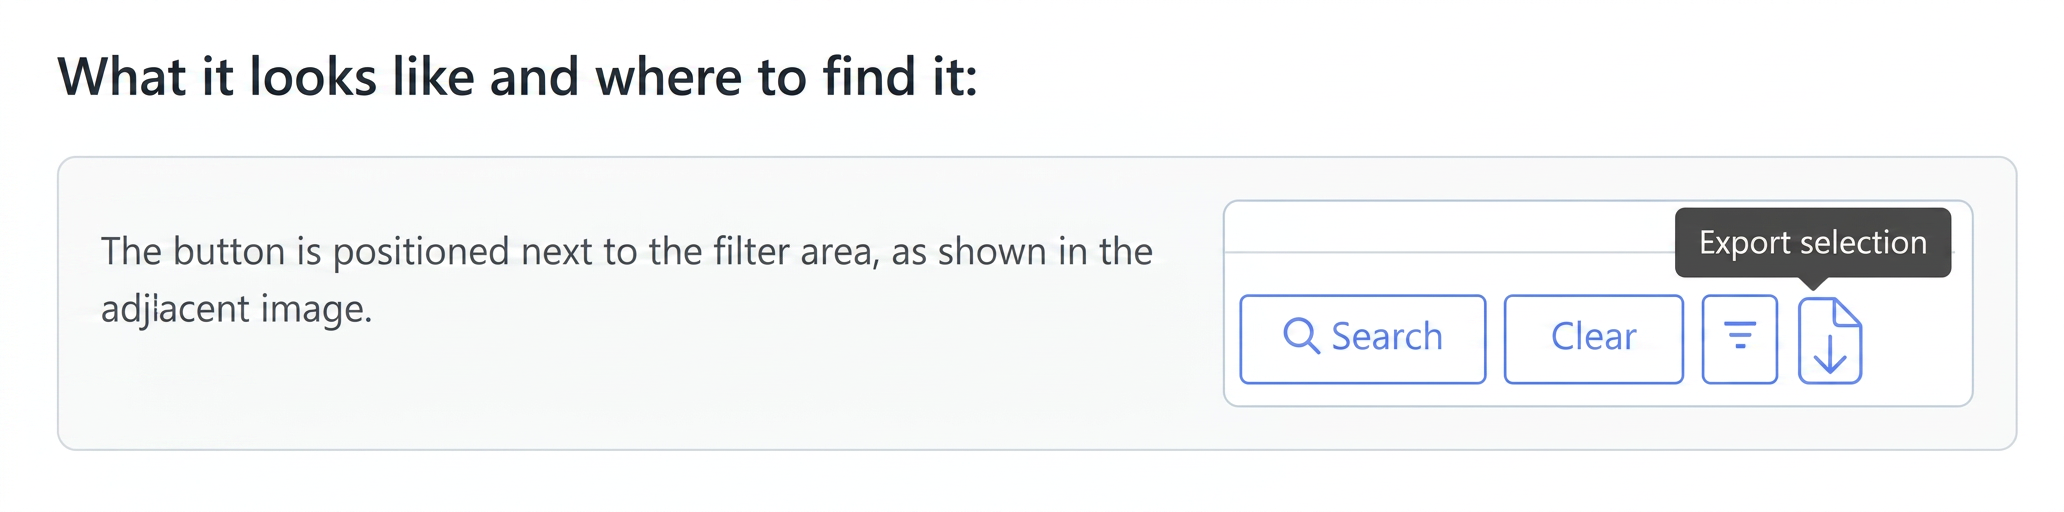
The functionality of this button is simple: it exports to an Excel file only the information displayed in that table, exactly in the form and filtering applied at that moment.
Thus, if you have applied a filter by date, customer, or another criterion, only the data corresponding to that filter will appear in the exported file.
Important: This new button does not replace the classic option of exporting accounting data based on templates defined in the platform. The classic functionality remains available for detailed and personalized exports required in accounting or operational processes.
How to use it?
- Access a data page (e.g.: Invoices, Opportunities, Quotes, Products, etc.).
- Apply necessary filters
- Use the search fields and filters at the top of the table to select the desired records.
- Only data meeting these criteria will appear in the table.
- Identify the „Export selection” button
- Near the filter area, you will find the button labeled „Export selection”.
- Export the data
- Ensure the table displays the information of interest (after filtering).
- Click on „Export selection” to generate and download the Excel file, which will include exactly the records visible at that moment.