
New: Fan Courier Integration
With this integration, you can generate FAN Courier AWBs directly from iflows, and the shipping data is automatically transmitted to your SelfAWB account. Thus, the entire delivery process becomes faster and simpler, without the need to manually enter information into the FAN Courier application.
- Initial Configuration
- Go to "".
Here you will see the list of available integrations, including FAN Courier. - Install FAN Courier integration
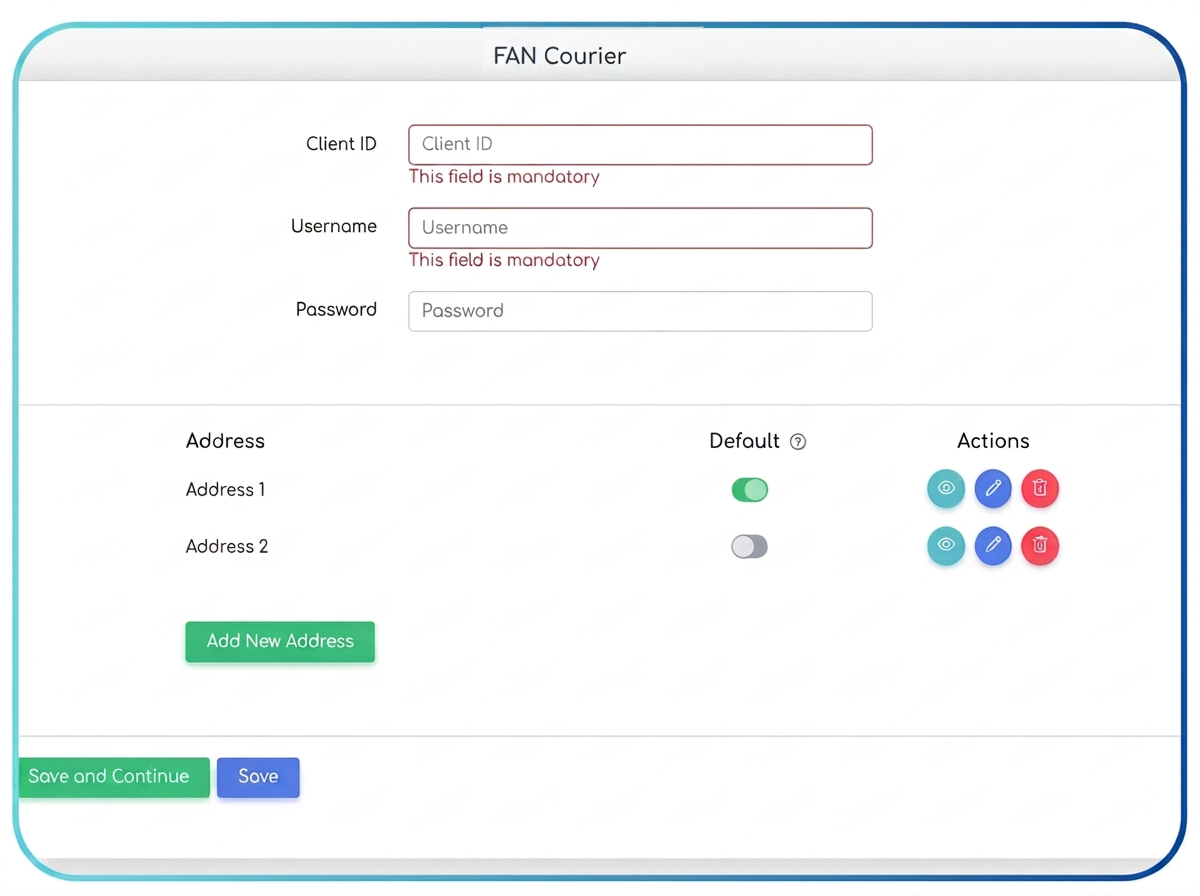
- Next to the FAN Courier integration, press the "+" symbol and fill in the required fields:
- Client ID
- Username
- Password
- Attention! These data are the ones used in the FAN Courier SelfAWB application and you can usually find them in the "Account Settings" section of SelfAWB.
- Next to the FAN Courier integration, press the "+" symbol and fill in the required fields:
- Go to "".
The iflows – FAN Courier integration offers you three ways to generate an AWB:
-
- Checking User Permissions
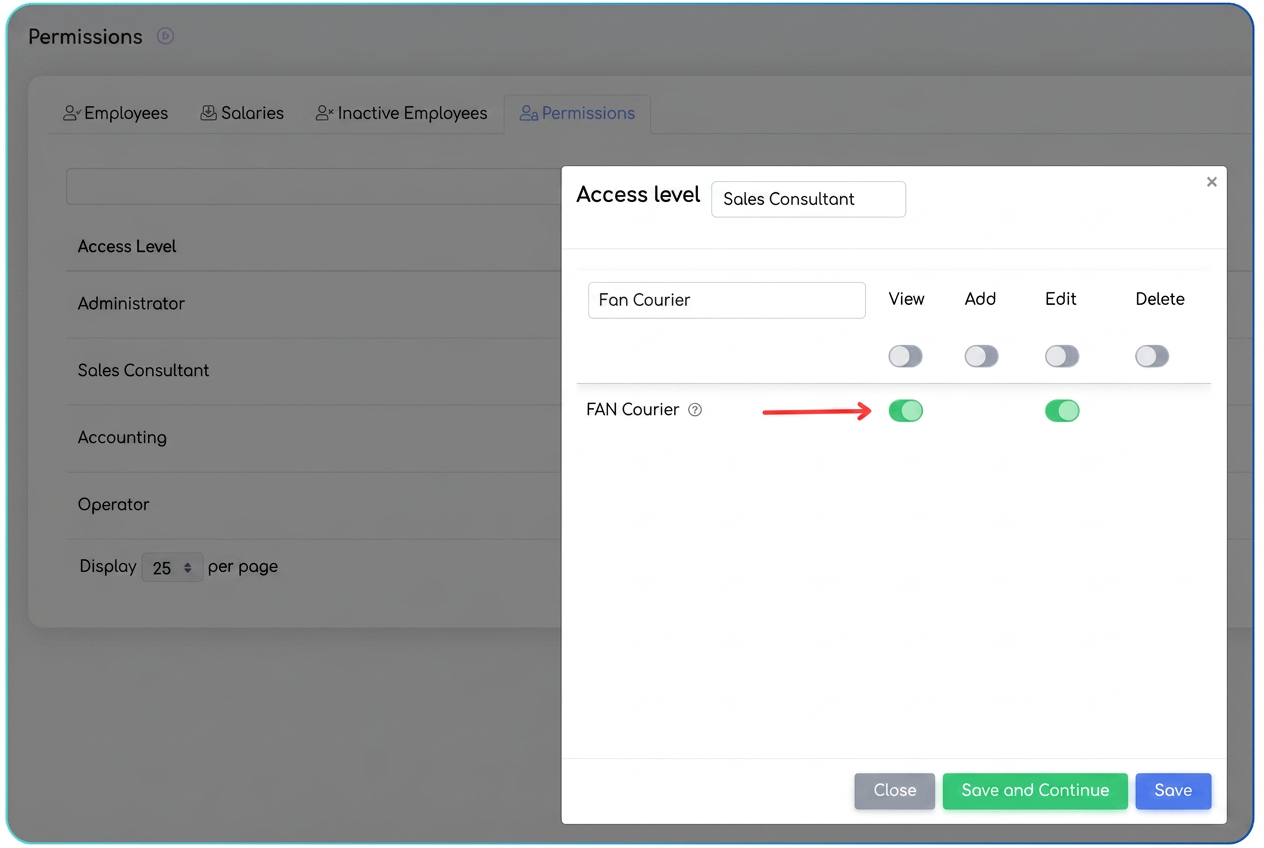
- For certain users to be able to access and edit FAN Courier data, it is necessary to check the permission settings in .
- Ensure that the "View" and "Edit" options for FAN Courier are activated for the desired access level, otherwise employees in that department will not be able to generate AWBs.
- Checking User Permissions
- AWB Generation
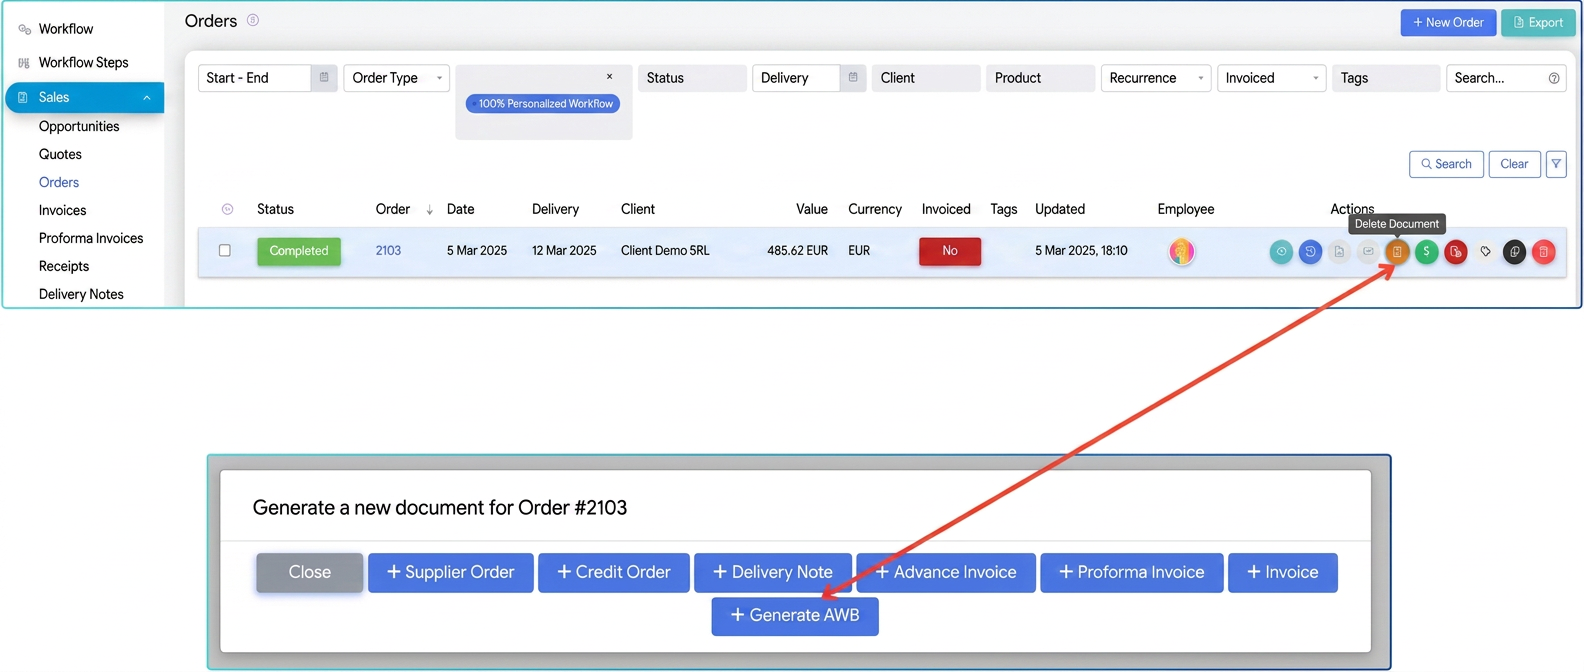
- Access the desired order and press the "Generate document" button.
- Select "Generate AWB".
Note: If the County is Bucharest, for Locality enter Bucharest as well, not the sector.
Also, all pickup/delivery addresses associated with your company will also be found in Settings – Integrations – Edit Settings "Fan Courier"
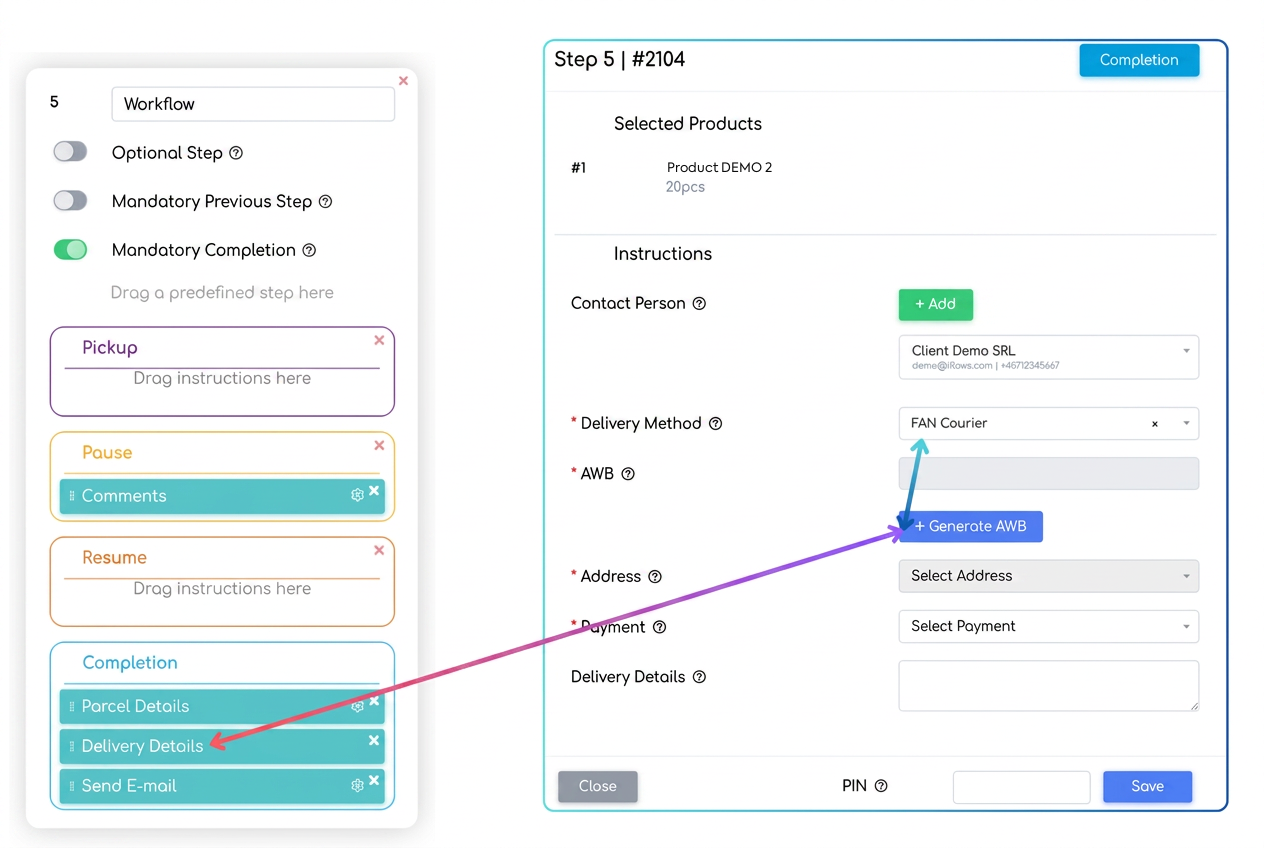
2.2. The next way to generate an AWB is from the Workflow ("Delivery Details")
3.3. Another way to generate an AWB is Manually, from the
-
- Fill in sender details (required only for the first time you use the integration):
- Choose or add a corresponding address for the sender (e.g., Warehouse 1) or you can edit the current address so that it respects the ordering requested by Fan Courier.
- Company Name
- Contact Person, Phone, Email
- County, Locality, Address, Postal Code etc.
- After saving, the address remains available for future delivery requests.
- Choose or add a corresponding address for the sender (e.g., Warehouse 1) or you can edit the current address so that it respects the ordering requested by Fan Courier.
- Fill in recipient details:
- You can use an already saved address or create a new one. It is important to mention that for the first time, you must also edit the existing address so that it is ordered according to the fields requested by Fan Courier. You can add a new address just by typing a name that does not exist in the list.
- Also, in each client's profile, in the "Delivery" section, multiple addresses can be added and managed, and one can be set as default.
- Configure shipment details:
- Shipment type
- Number of packages, Total weight
- Dimensions of the largest package.
- Payment details and observations:
- Choose who pays the shipping costs (Sender or Recipient).
- Activate, if applicable, "Cash on delivery collection".
- Write any additional notes in the observations field.
- Save, and then iflows will upload the data into the FAN Courier system.
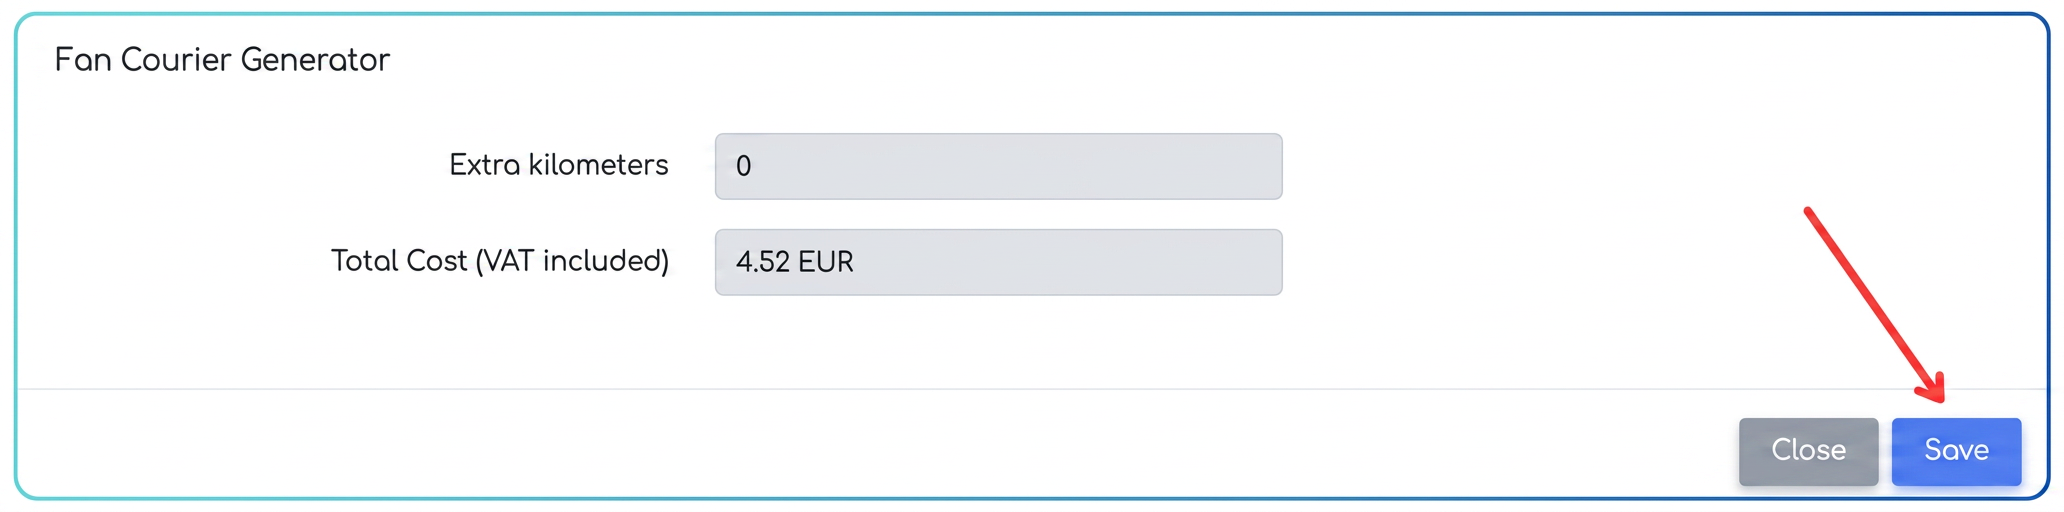
- After saving, a new section generated by FAN Courier will appear in the same window, where you can see the total cost and any additional kilometers.
- Confirm the rate to finalize.
- Viewing the AWB:
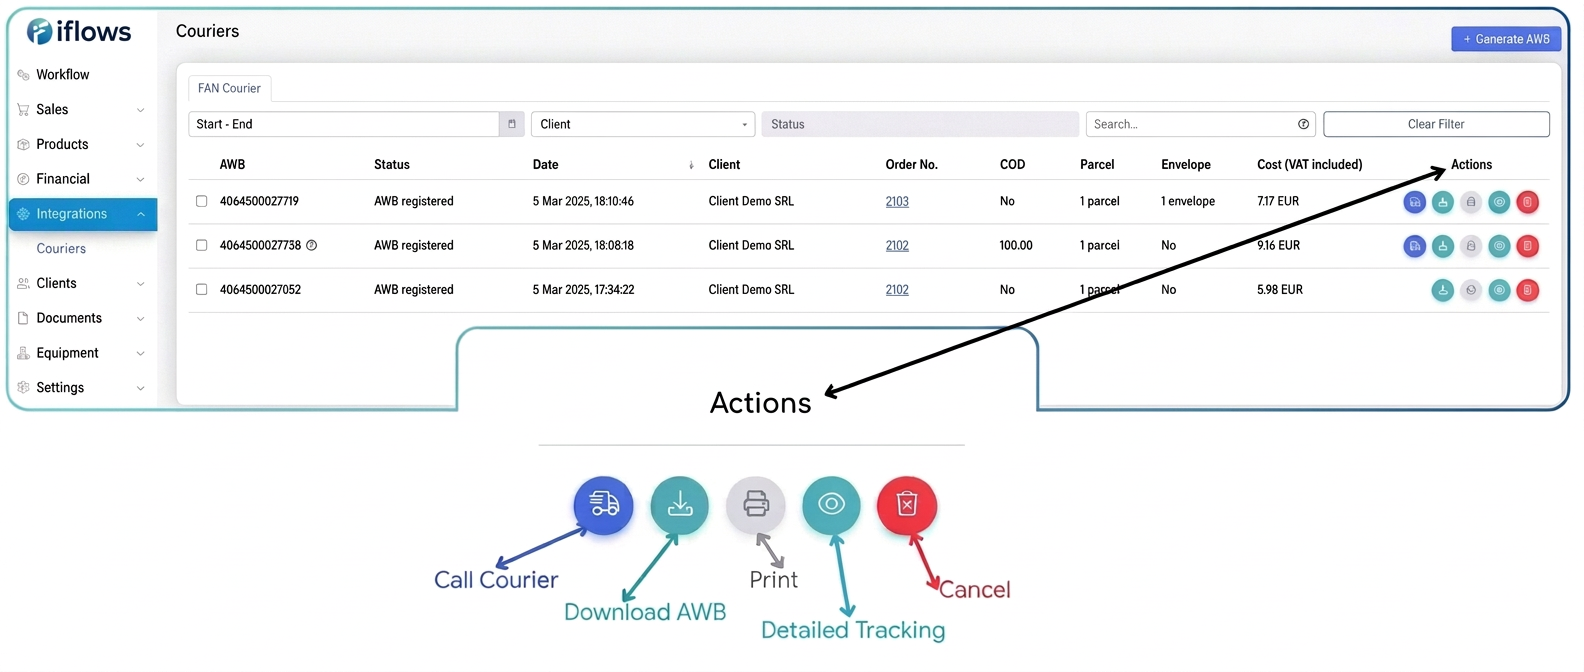
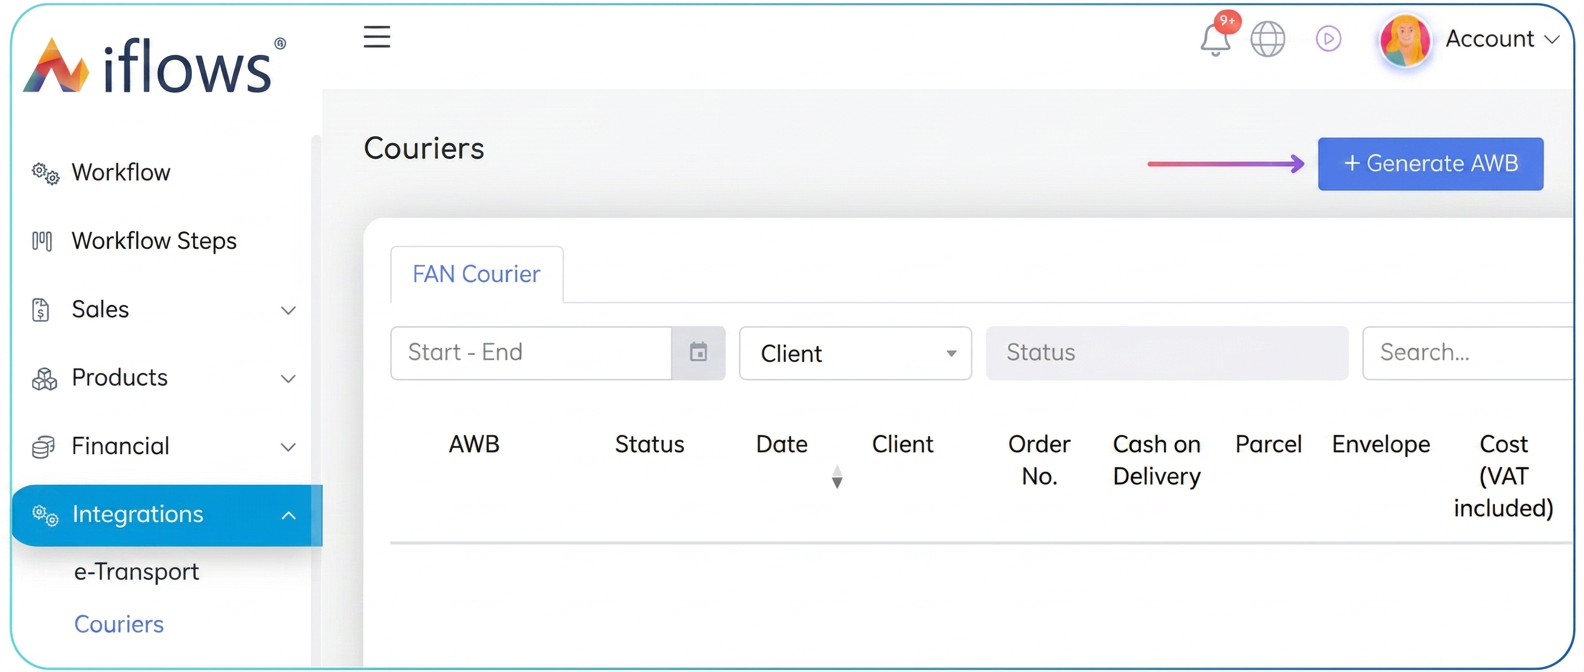
- After generation, iflows redirects you to , where you can see all created AWBs.
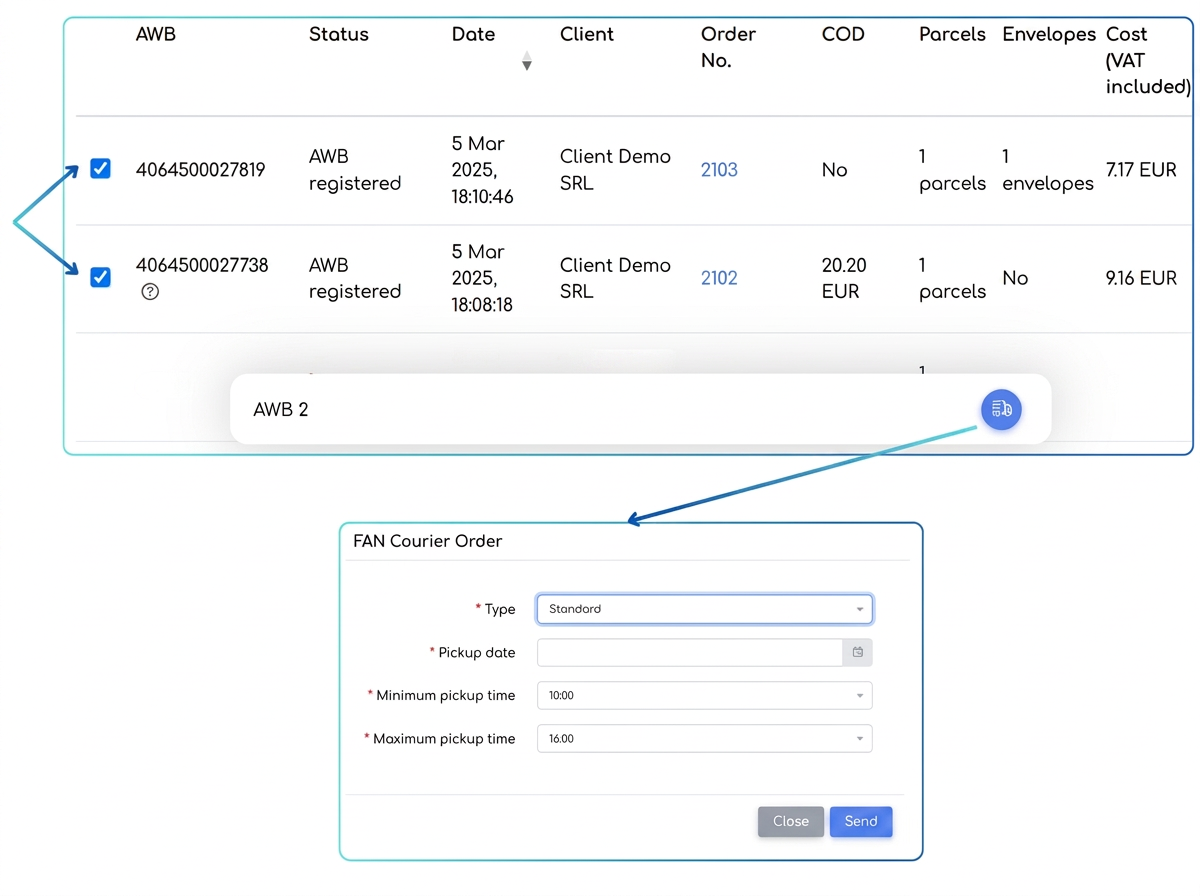
- Here you can "Call the courier" (if the shipment has not been picked up), download or print the AWB, check the status (tracking), or cancel the shipment.
-
- To call the courier for multiple AWBs simultaneously, check them and use the quick menu at the bottom of the screen.
- Include the "Delivery details" instruction in the workflow.
- Select the "FAN Courier" option when you reach the instruction.
- Press "Generate AWB" and follow the same steps as for generating from orders (configuring sender, recipient, and packages).
- .
- Press "Generate AWB".
- Enter complete shipment details, including sender, recipient data, and package dimensions.
- Save to complete the process.
- The AWB will be available later in the AWB list, where you can track its progress or perform other actions.
- Fill in sender details (required only for the first time you use the integration):
Optimization: Credit Note Invoice without Order Reversal
In previous iflows versions, reversing an invoice was done by reversing the related order and then issuing a credit note (factură storno). This approach is correct and useful in situations where the client cancels products/services or you need to substantially update the order (e.g., quantities, prices, products).
However, there are also cases where the order remains valid, and invoicing requires only minor corrections (for example, rectifying a comment). For these situations, iflows has introduced the "Generate Credit Note" option directly from the , which allows reversing the invoice while keeping the order valid.
- Order Reversal followed by credit note – still useful when the client cancels the entire order or substantial changes occur (price, quantities, etc.).
- Credit Note Invoice – for corrections exclusively at the invoice level without affecting the order.
How to Use
- , where the list of issued invoices is displayed.
- Identify the invoice you want to cancel (only at the document level, maintaining the order).
- Press the "Generate Credit Note" button.
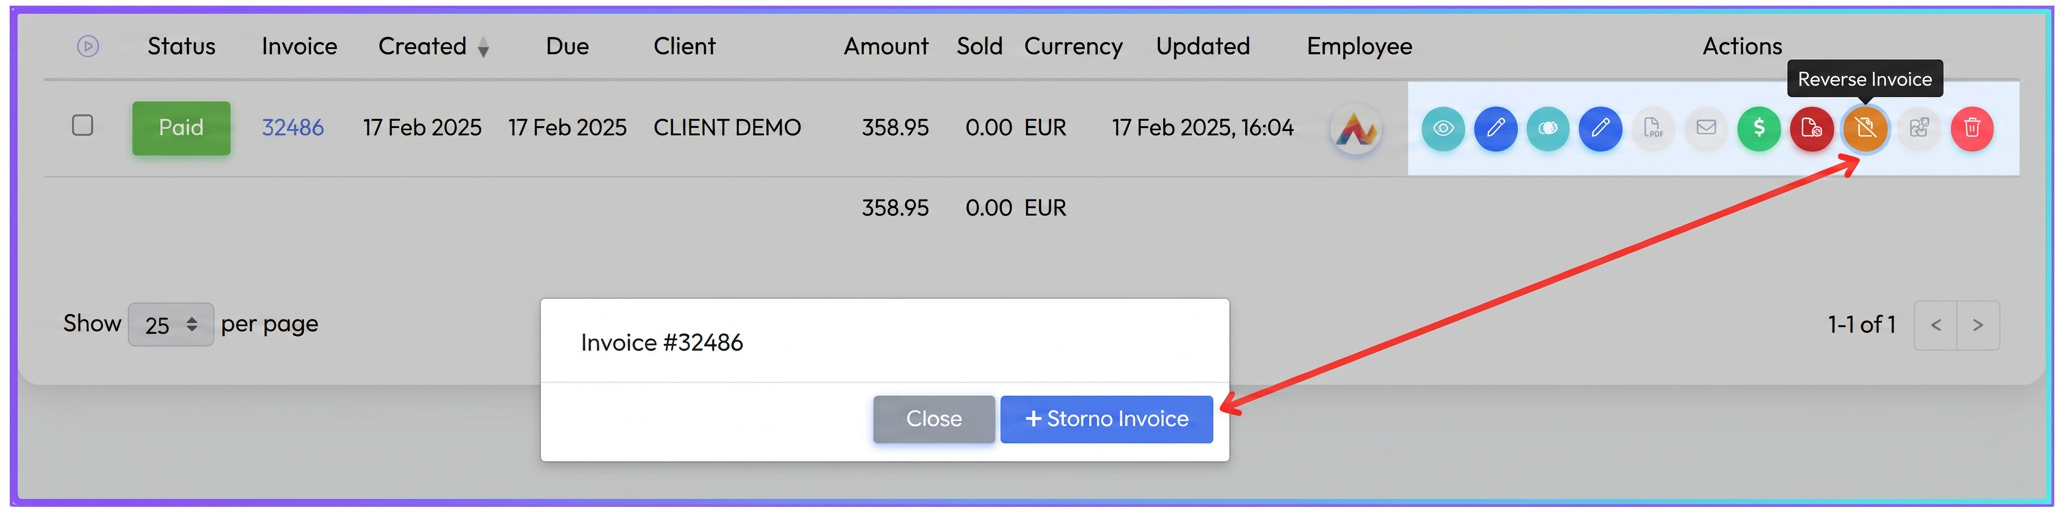
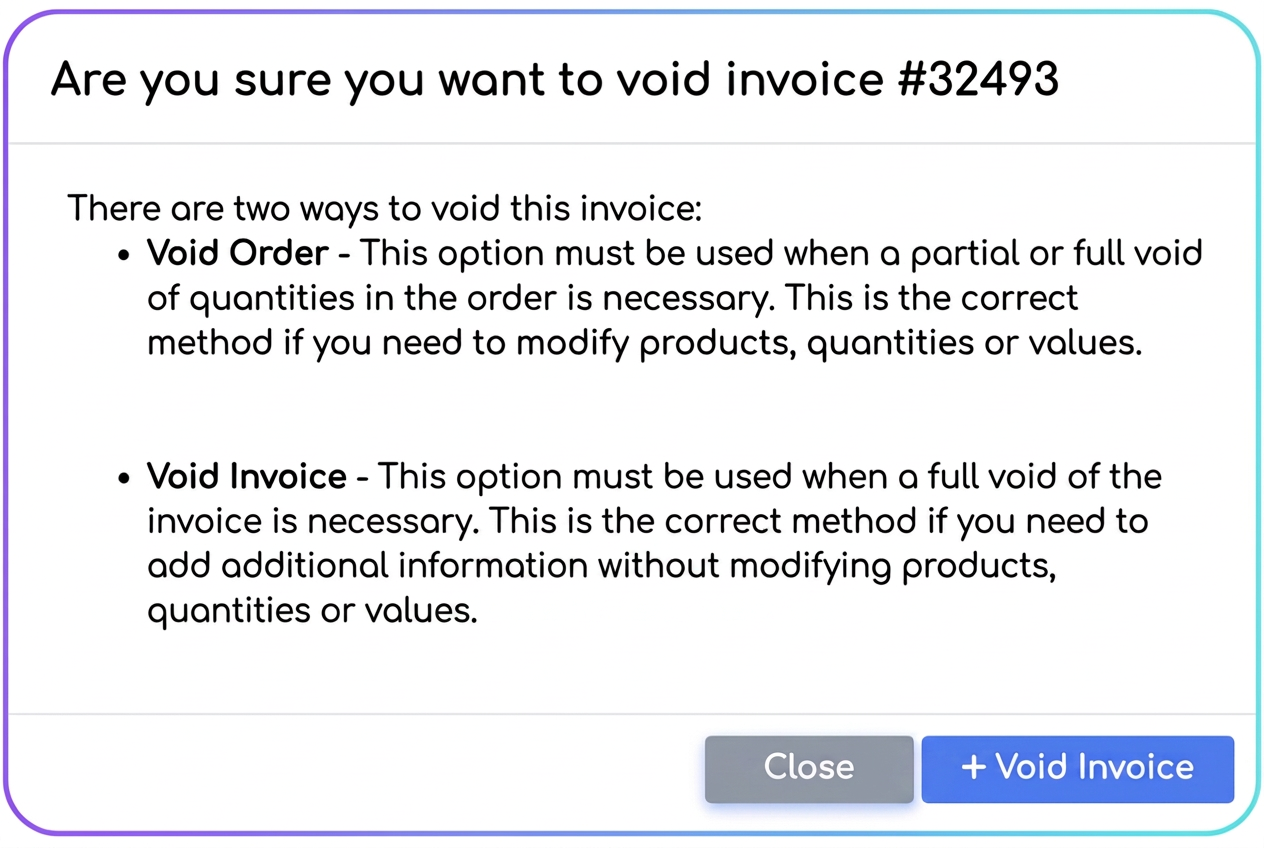
- In the modal window that appears, you will have two options:
- Select "+ Credit Note" to directly generate the credit note.
- Confirm the action and, if necessary, issue the new corrected invoice.
Recommendations: Analyze the impact of changes: If something needs to be changed at the level of quantities or prices, opt for Order Reversal and then Credit Note from the order.
Note: Maintain a coherent history: All documents (tax invoices, credit notes) will be visible in the order details.
Optimization: Clone Product in Purchasing Page – NIR
To optimize product management when preparing a NIR (Nota de Intrare și Recepție - Reception and Inspection Note), iflows introduces the "Clone Product" functionality. This option is particularly useful in situations where a new product has similar characteristics to an existing one but differs by certain specifications (such as dimensions, color, internal code).
How to Use
-
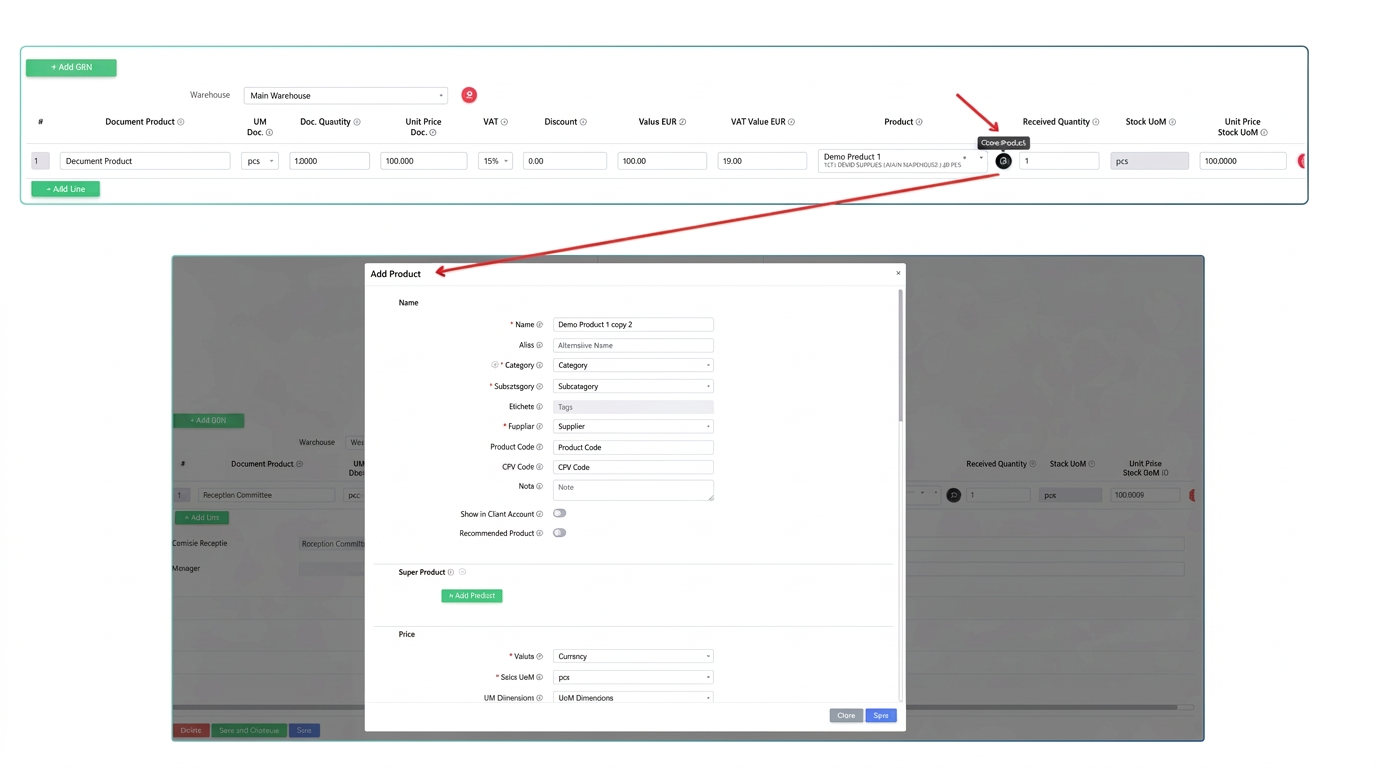
- After adding a product line (manually or imported from e-Factura), you will see a "Clone Product" button next to the product.
Pressing the "Clone Product" button
-
- The Add Product form will automatically open, pre-filled with the selected product's data (name, category, supplier, etc.).
Customizing the cloned product
-
- Modify the necessary data (e.g., name, product code, dimensions) to reflect the new characteristics.
Saving the new product
-
- After you confirm the addition form, the newly created product will automatically replace the product in that line on the NIR.
- If you want to keep the original product on the NIR, you can add a new line before cloning, so each product remains registered separately.
Optimization: Alert for Prices Below Acquisition Cost
The new functionality introduces an automatic verification mechanism for product prices when saving offers, orders, and invoices, aimed at preventing sales below acquisition cost. When a sales price lower than the product cost is detected, the system requests a mandatory justification from the user before the document can be saved.
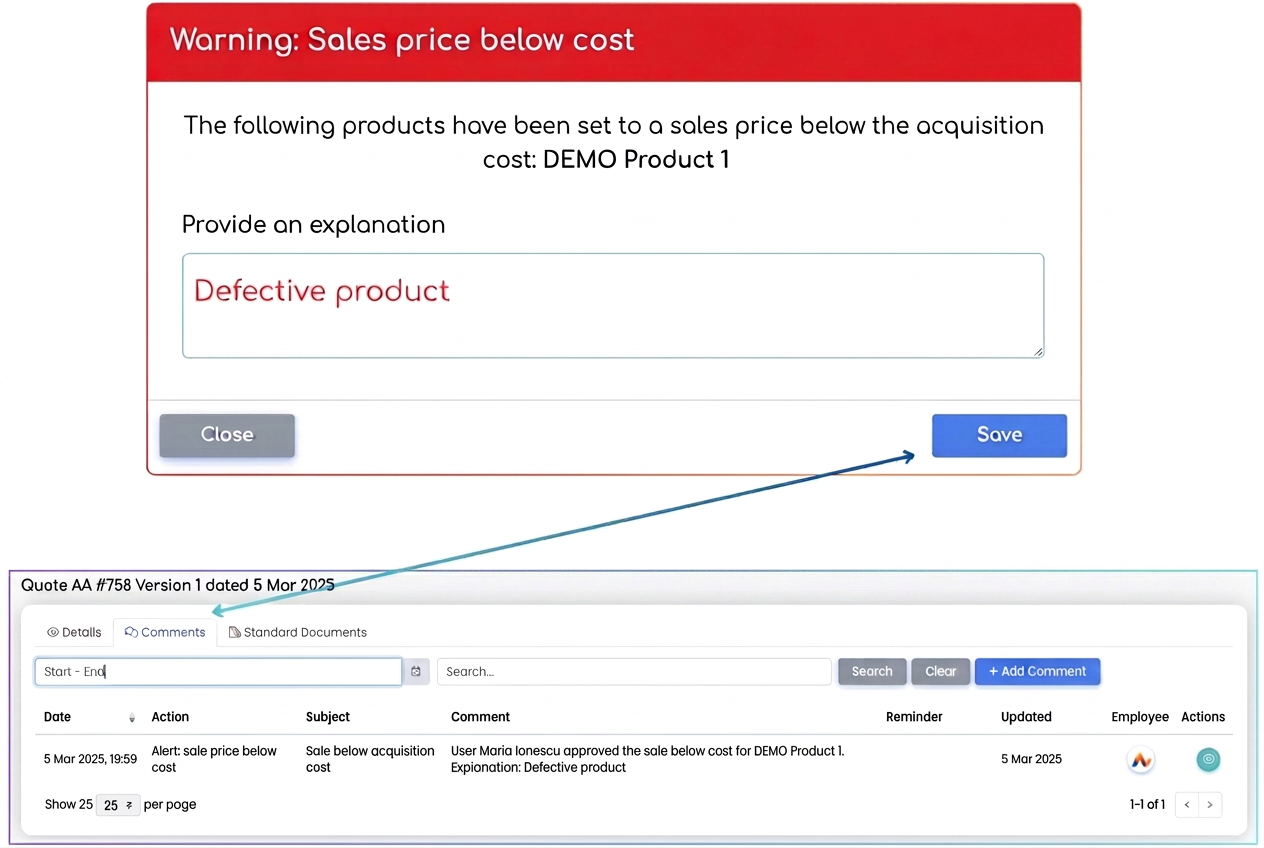
How it Works:
- Detecting prices below cost
- When pressing the "Save" button, iflows automatically checks all products in the document (offer, order, or invoice).
- If one of the products has a sales price below the acquisition cost, an alert pop-up appears.
- Entering justification
- The pop-up lists the products with prices below cost and provides a mandatory field for explanation (e.g., "Defective product", "Stock liquidation campaign", etc.).
- Without completing this justification, the document cannot be saved.
- Saving and viewing the justification
- For offers and orders, the entered explanation is stored in the Comments tab of the document, visible to all users who have access to it. This comment CANNOT BE DELETED.
- Notifications for other users
- If other team members have notifications configured for this alert, they will receive a message in iflows when a document with products below cost is saved.
- The notification includes details about the document (number, type, date) and the products in question.
Note: To activate these notifications, go to and activate the desired notification type (Informative/Priority) in the Orders and Invoices and Payments sections respectively.
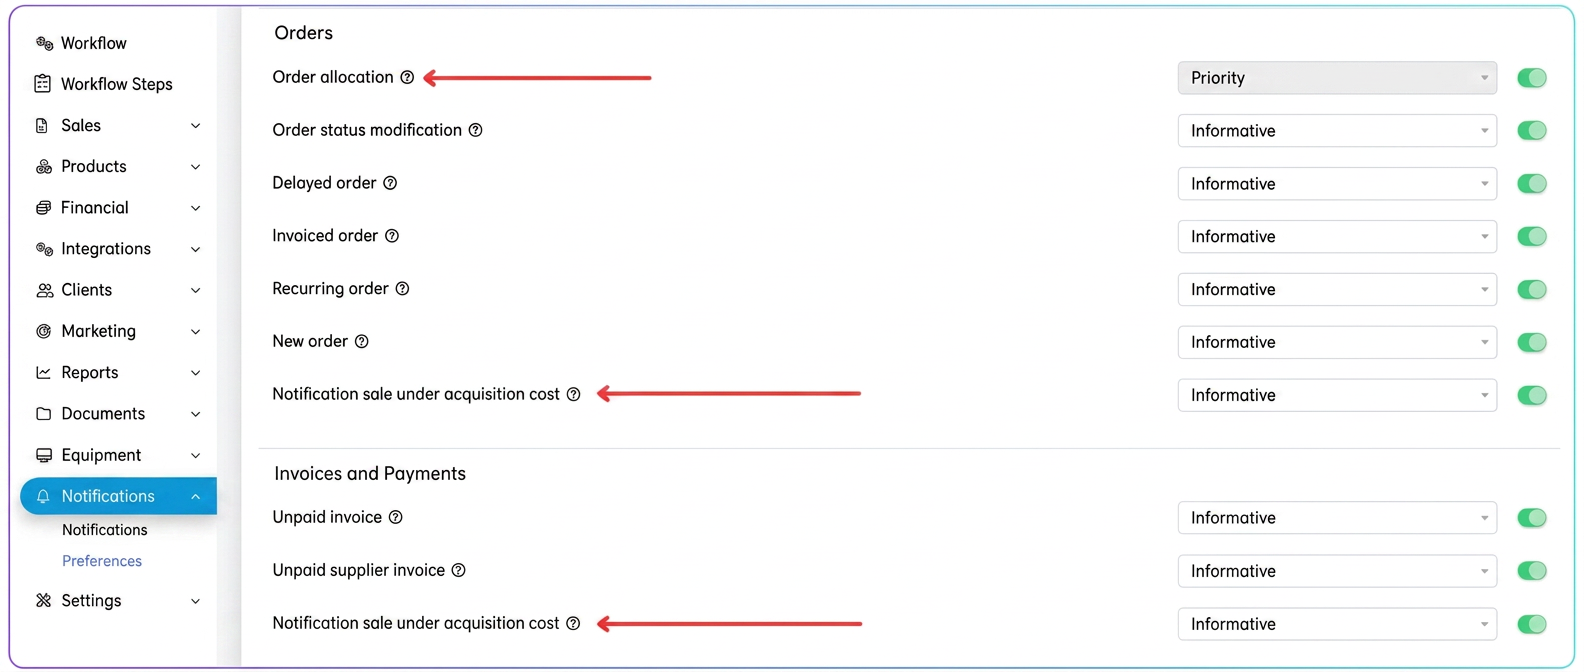
New: Export Templates – Stock Movements
The new feature introduces a specialized template type for exporting stock movements, allowing detailed tracking of products entering and leaving stock. Through this template, you will be able to accurately analyze inbound and outbound documents, quantities and related values for each transaction, obtaining a complete picture of the stock flow.
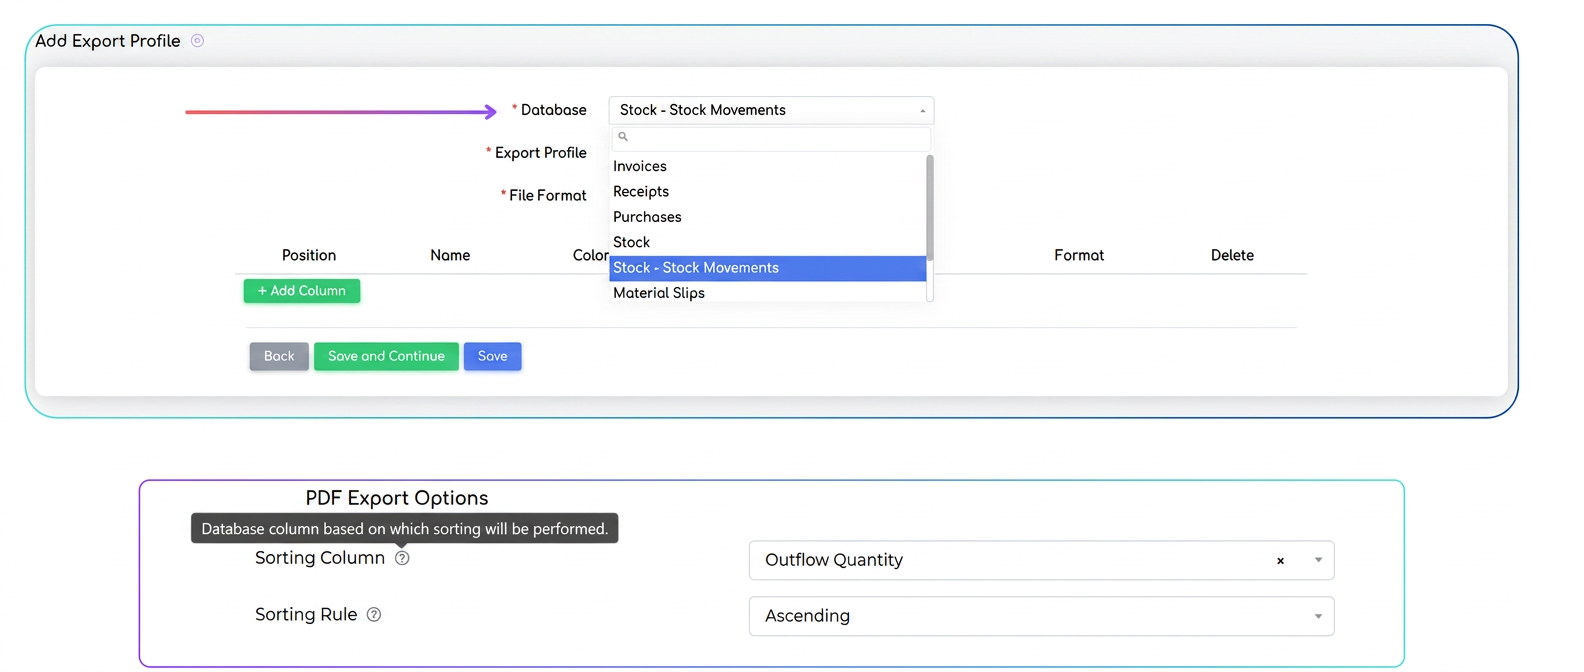
Creating and Configuring a Template
-
- From the main iflows menu, navigate to the "Settings" section and select "Export".
- Click on "New Export Profile" to create a new template.
Select "Stocks – Stock Movements" as the database
-
- In the dedicated field, choose this option to export information about stock entries and exits.
Complete the export profile details
-
- Give the profile a name (e.g., "Stock Movement Report").
- Choose the file format: PDF, Excel, or CSV.
Add and configure columns
-
- Select relevant information: Product Name, Inbound Document/Outbound Document, Inbound Quantity/Outbound Quantity, Value, Date, etc.
- Assign a clear name to each column, which will be displayed in the report.
Sorting Options for PDF Format
If you select PDF format for export, it is mandatory to set a sorting column.
- Why is it necessary?
- Unlike Excel or CSV, a PDF is fixed in a paginated structure. To display data in a coherent order and to group similar elements, the system needs a sorting criterion to determine how to organize information on the page.
- How to proceed?
- In the "PDF Export Options" section, you will find the "Sort Column" and "Sort Rule" fields.
- Select a column from the database (e.g., Product Name, Outbound Quantity) by which the rows in the PDF should be ordered.
- Choose the sort type: Ascending (A-Z, 1-9) or Descending (Z-A, 9-1).
Recommendation:
- If you want to group products, choose "Product Name" as the sorting column. This way, all stock movements for the same product will appear together.
Save the export profile
- After configuring all details, press "Save". The new profile will be added to the list of available templates.
- Later, the template can be used from the Products – Stocks – Export section.
Optimization: Invoicing Restriction for Negative Stock
Through this optimization, iflows automatically prevents the generation of documents that would result in negative stock. When documents implying the exit of products from stock (invoices, notices, consumption slips) are issued or orders requiring quantity reduction from inventory are finalized, the system checks the real availability of products. If stock is insufficient, the action is blocked, and the user receives a notification regarding the impossibility of processing that product.
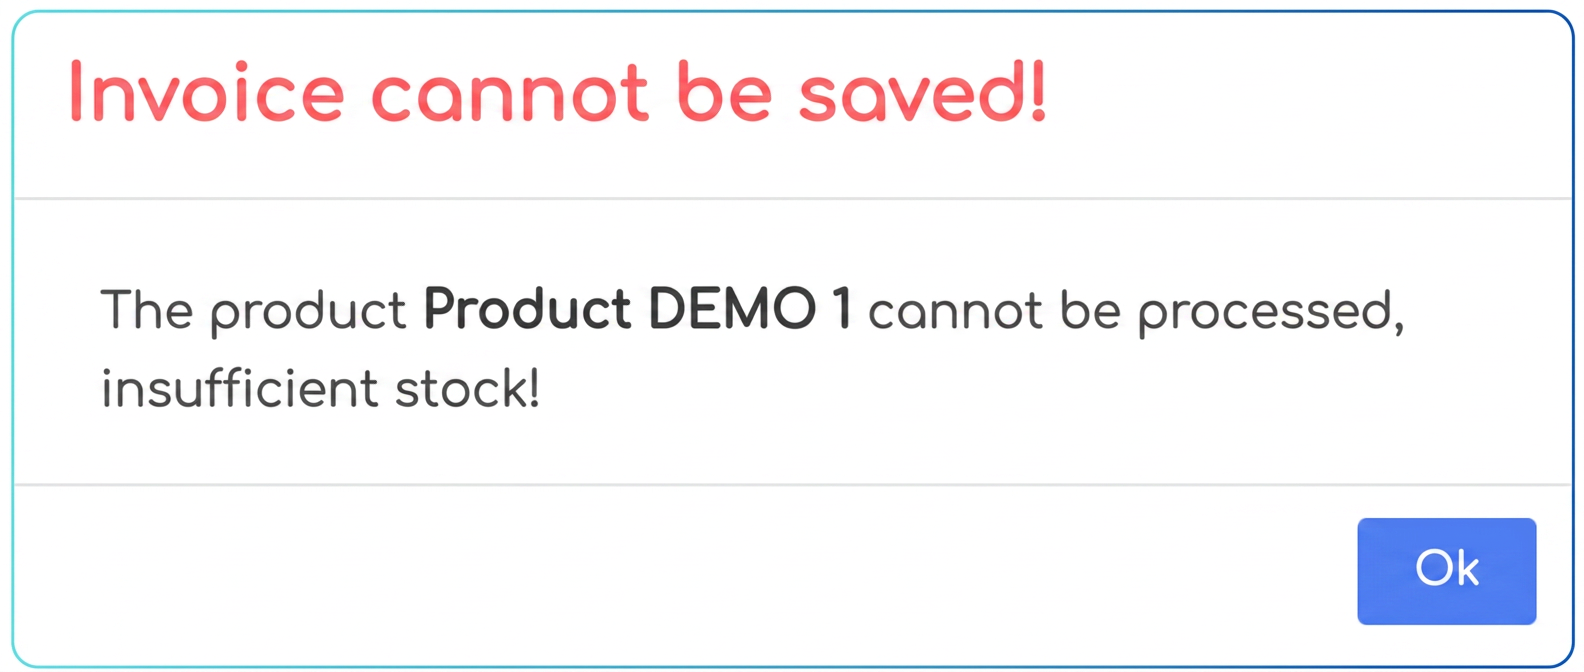
How it Works
- Document Issuance
- When an outbound document (invoice, notice, consumption slip) is initiated or when an order is finalized, the required quantity for that product is automatically checked.
- Stock Check
- iflows compares the requested quantity with the available stock quantity.
- If the current stock is less than the required quantity, the issuance/finalization action is blocked.
- User Notification
- The system displays an alert message:
"The product [product name] cannot be processed, insufficient stock!" - The document remains unsaved until the user corrects the situation (e.g., updates stock, reduces quantity, or replaces the product).
- The system displays an alert message:
Optimization: Client Delivery Addresses – Connection in workflow/couriers
With this optimization, managing delivery addresses for each client becomes simpler and more flexible. In a client's page, in the Delivery section, the user can:
- View all existing delivery addresses.
- Add new addresses
- Set one of the addresses as default
- Edit or delete already registered addresses.
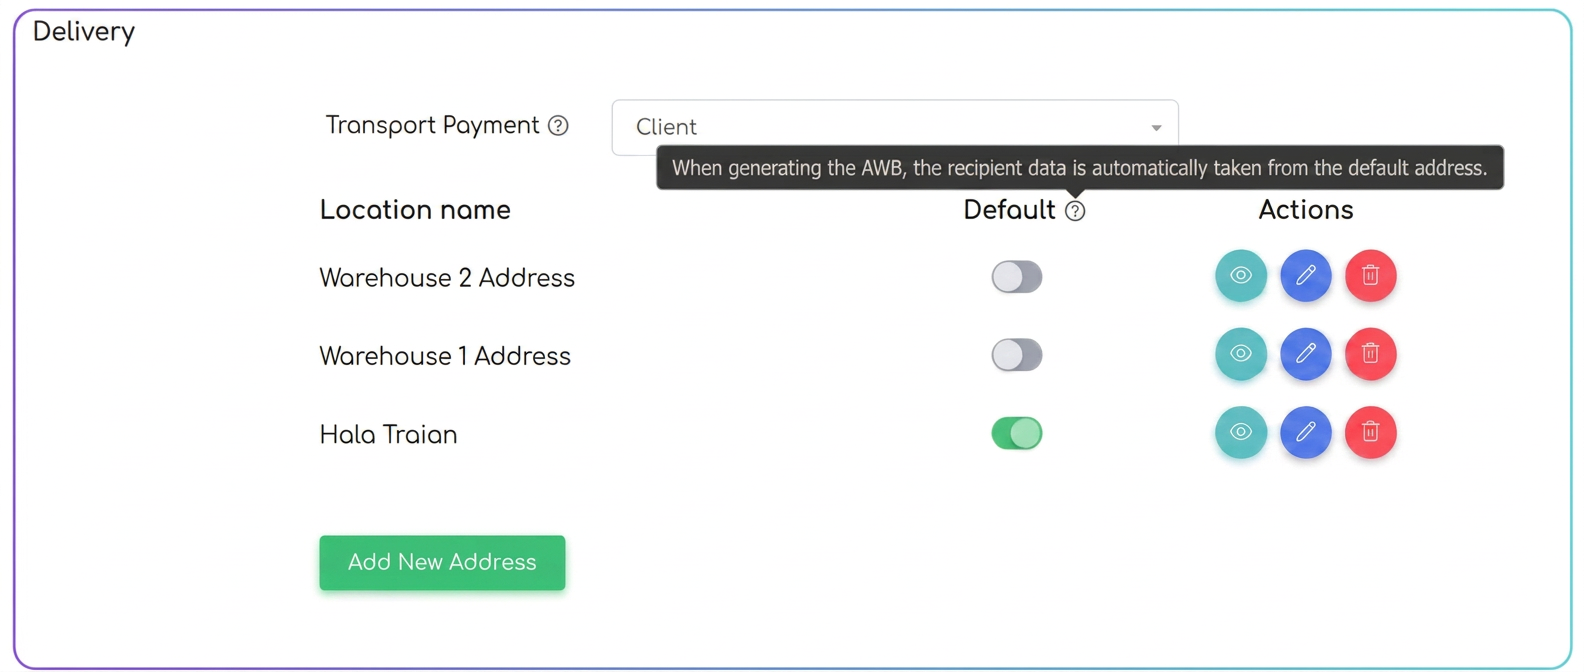
Default Address
- Billing Address: By default, the system automatically adds the billing address as the default delivery address. If this address is not relevant for delivery, it can be removed.
- Default Address: Users can mark any address as default through a dedicated selector. This address will be preselected when generating delivery documents, with the option to choose another address if necessary.
From the Client Page
- Press the "Add New Address" button in the "Delivery" section.
- Fill in the relevant fields (locality, street, number, postal code, etc.), including Location Name (e.g., "Warehouse 2", "Secondary Office").
- Save to complete the addition.
At the Time of Delivery
- When generating an AWB through integration with FAN Courier or using the "Delivery Details" instruction in the Workflow, you can quickly add/edit a new address without returning to the client page.
Optimization: "VAT Rates" Tab
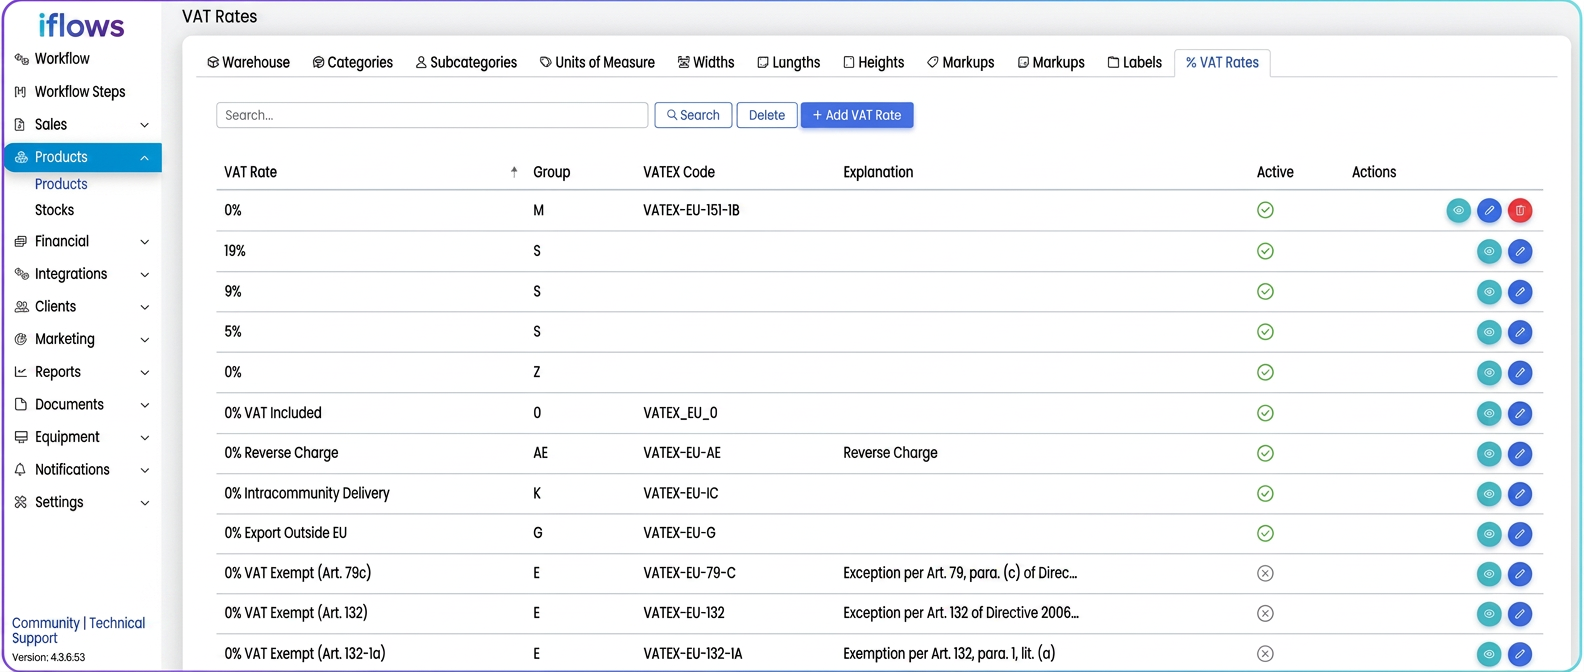
In the menu, the new "VAT Rates" (Cote TVA) tab has been introduced, which allows managing the VAT rates used in accounting documents. Through this functionality:
- You can activate or deactivate predefined VAT rates (e.g., 19%, 9%, 5%).
- You have the possibility to manually add new 0% VAT rates, where legislation requires additional exemptions that are not already found in the system.
How to Use
Accessing and Managing VAT Rates
- .
- In this section, you will find the list of all available VAT rates, along with the Group, VATEX Code, and related Explanation.
- Activating/Deactivating existing rates
- Standard rates (19%, 9%, 5%) are predefined and cannot be modified, but they can be deactivated when no longer needed.
- To reuse an inactive rate, reactivate it, and it will be available in documents.
Adding a new VAT Rate (only for 0%)
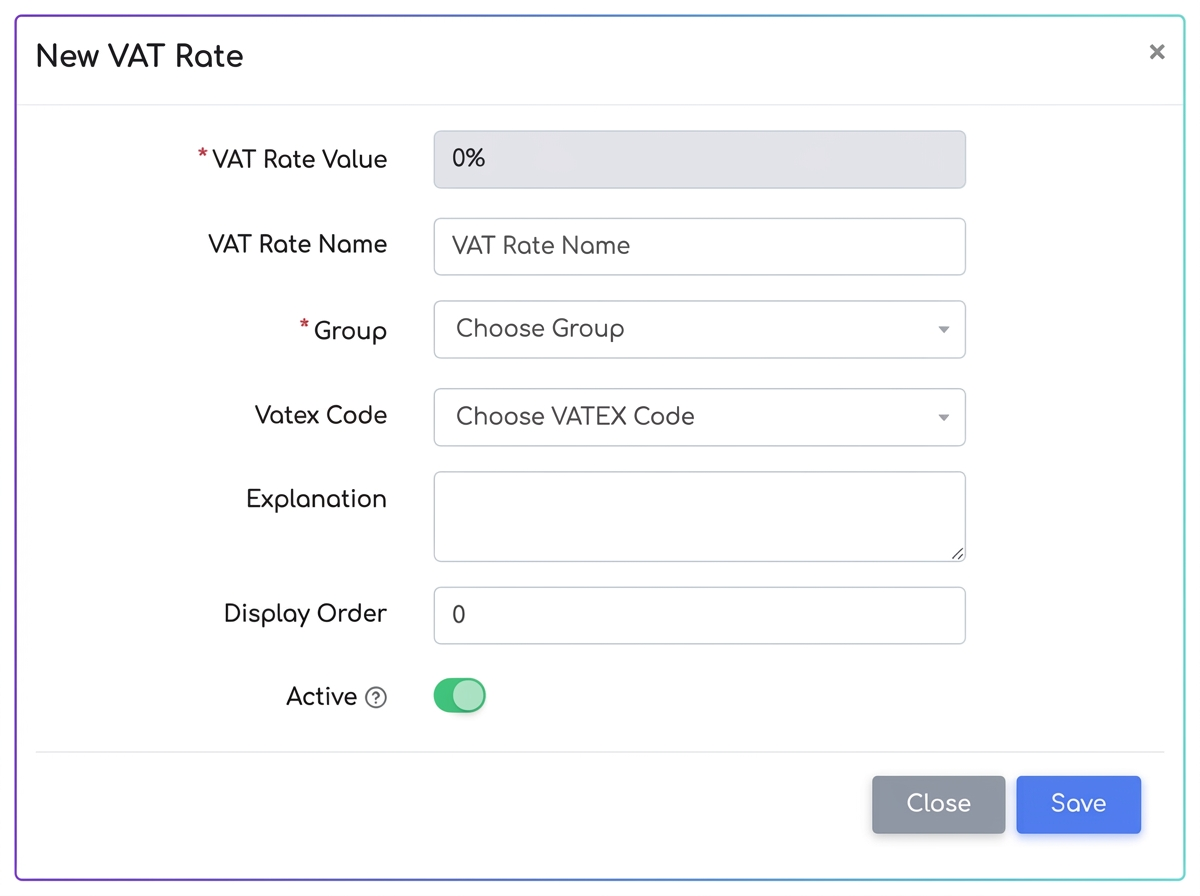
- Press "Add VAT Rate".
- A form will open where you can set the Value (0%), Group, VATEX Code, and an optional Explanation.
- Complete identifying and explanatory information.
- Save changes.
- The new 0% VAT rate will appear in the list under the "VAT Rates" tab and can be selected in documents.
Using VAT Rates in Products and Documents
- Product configuration: When adding or editing a product, you can select from the list of active VAT rates.
- Issuing documents (invoices, notices, proformas, etc.): In the VAT field of the document, you will see only the active rates from the "VAT Rates" tab.
- Once a rate is selected, the related VATEX Code and Explanation will be automatically filled in the document, ensuring correct reporting in accounting and tax systems.
Note: It is mandatory to select the Group and enter either an Explanation or a VATEX Code (or both). If you are not clear which VATEX code or explanation fits your legislative situation, we recommend discussing with your accountant or financial team to ensure you enter the correct information.