
- NEW: Push Notifications
The notification module in iflows ensures rapid and clear information regarding all relevant events within the platform.
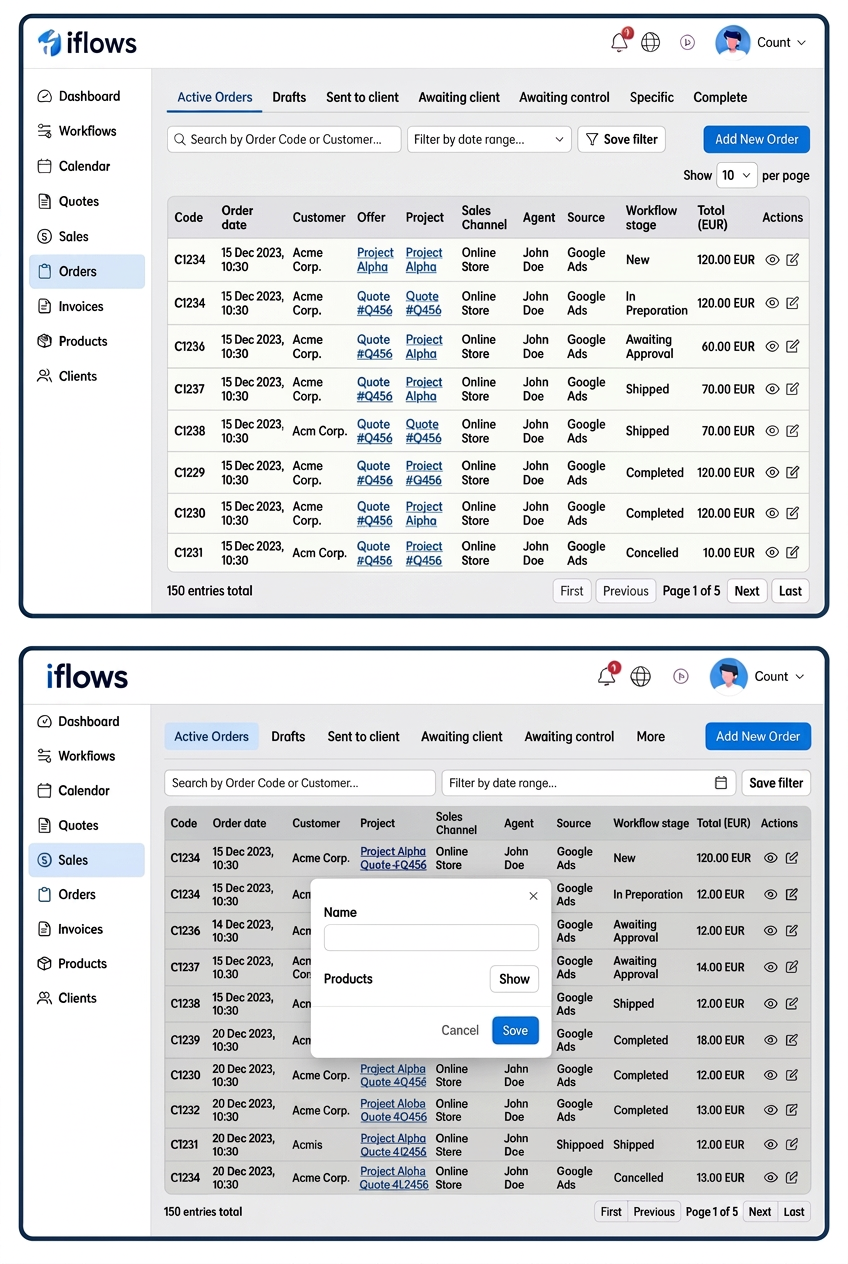
- Locating and displaying notifications
- Bell Icon
- Located at the top right of the interface.
- If there are unread notifications, the bell displays a numeric indicator (e.g., 3, 5, 10).
- Dropdown Menu (first image)
- By clicking on the icon, a window opens with the most recent notifications, listed in chronological order.
- Two tabs are visible: All and Unread, to easily distinguish between notifications already marked as read and those still requiring attention.
- Automatic marking and quick access
- Selecting (clicking) a notification from the list automatically marks it as "read" and redirects the user to the relevant screen (e.g., order details, assigned task, etc.).
- Quick actions
- "Mark all as read": A button located at the bottom of the list that allows setting all unread notifications to read with a single click.
- "More" button: Opens the detailed panel where advanced filtering and administration functions are available (described in section 2).
- Bell Icon
- Advanced notification management
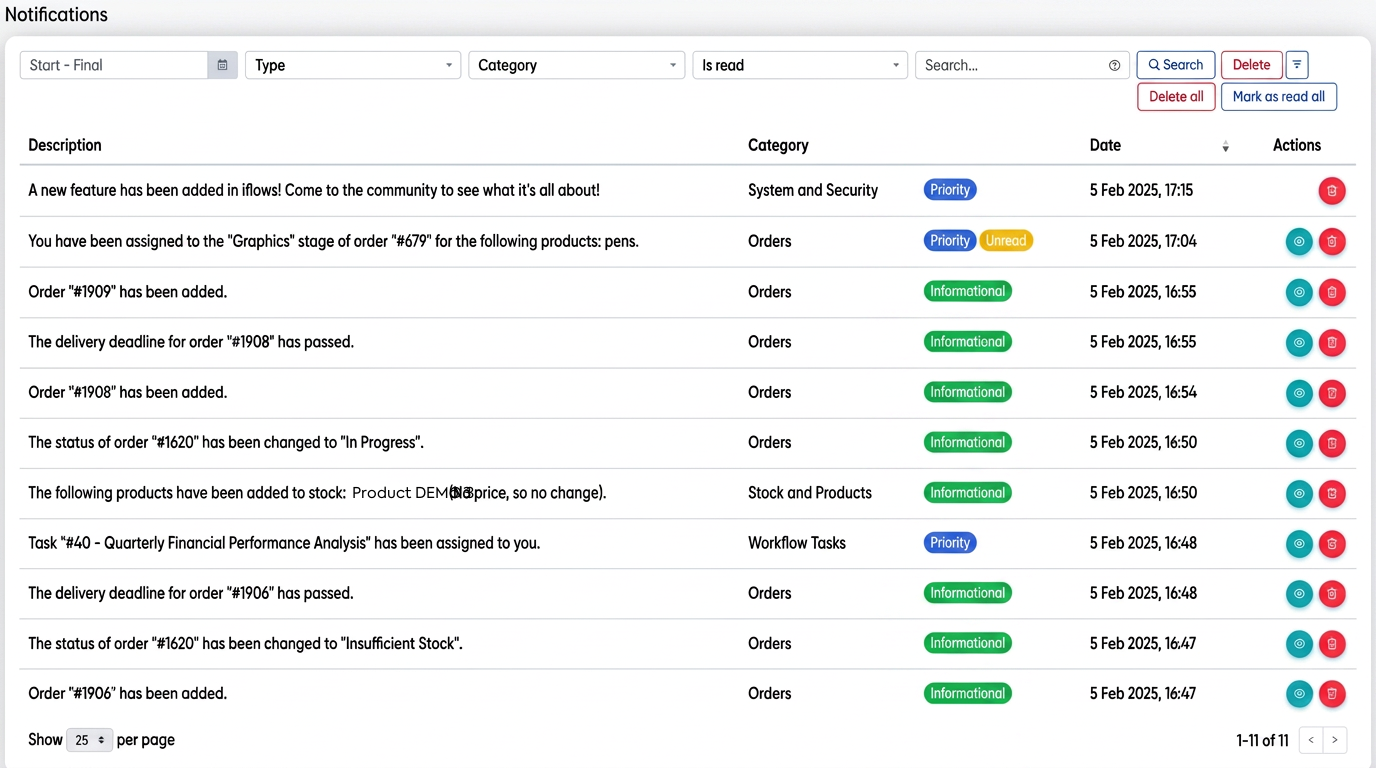
- Detailed panel
- Accessed via the "More" button in the notification window or from the main menu → Notifications.
- Detailed panel
-
-
- Displays all notifications in a table.
- Individual Actions:
- "Eye" icon (for viewing and marking as read)
- "Trash can" icon (for deleting the notification)
- Individual Actions:
- Displays all notifications in a table.
- Filters and search
- On the top bar, there are filtering fields for Time interval, Type, Category, Status (read/unread), and a text Search field.
- These options facilitate the rapid identification of specific notifications (e.g., searching by order number).
- Bulk actions
- "Read all": marks all displayed notifications as read (possible only for the current selection based on filters).
- "Remove all": deletes all notifications displayed in the list (caution, this action is permanent).
- Pagination
- The total number of notifications and page navigation buttons appear at the bottom of the table, useful when there is a large volume of alerts.
-
- Customizing notifications
- Accessing settings
- From the main menu, select .
- Accessing settings
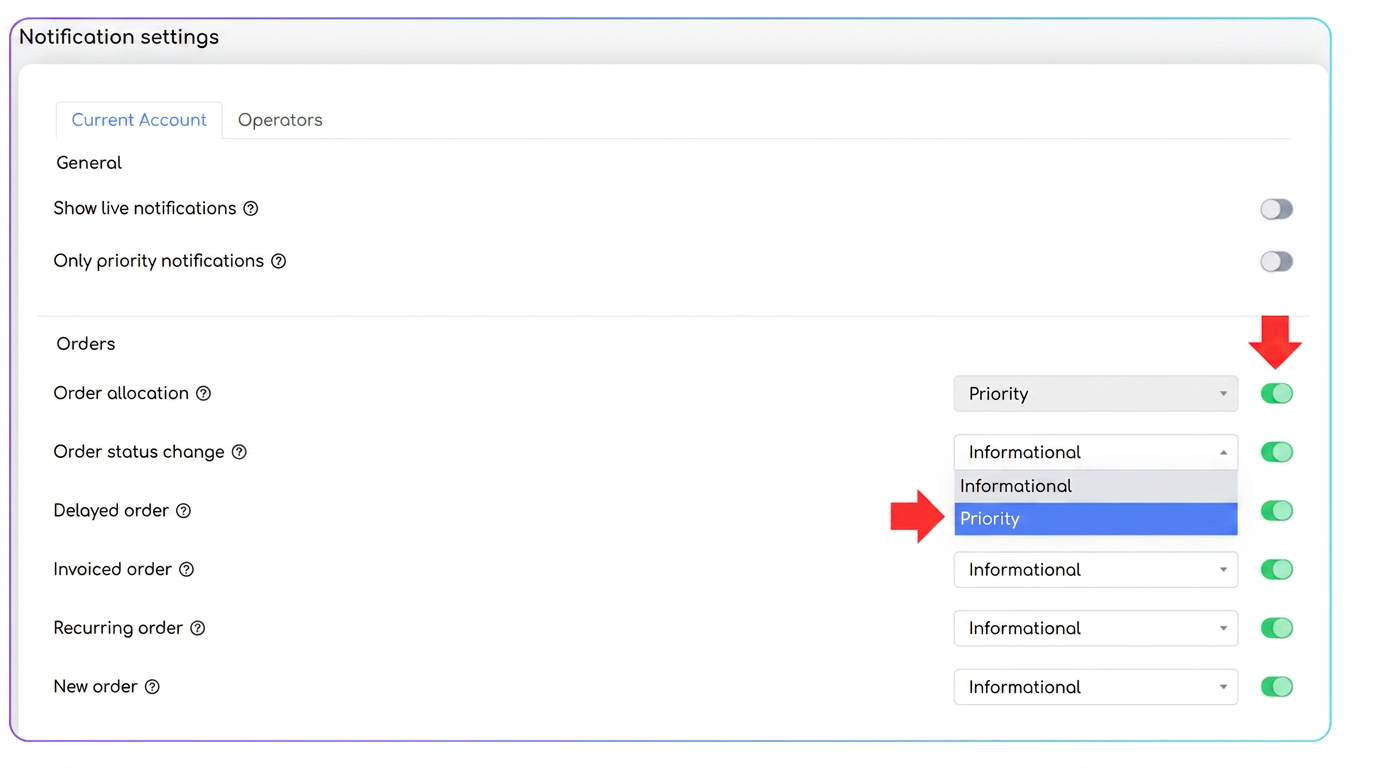
-
- General options
- Show live notifications: if enabled, notifications appear in real-time without refreshing the page.
- Only priority notifications: when enabled, "Informational" type notifications are hidden, leaving only "Priority" ones visible.
- Enable/Disable notification types
- In the relevant sections (e.g., Orders, Invoices and Payments, Work Tasks, Stocks and Products, etc.), there are toggles that allow turning notifications on/off for each event (e.g., "Delayed order", "New order", "Order status change", etc.).
- Setting importance: "Informational" vs. "Priority"
- Each type of notification can be configured individually:
- "Priority": appears highlighted in the list and dropdown menu, signaling the need for urgent action.
- "Informational": is advisory in nature, without necessarily requiring immediate intervention.
- Each type of notification can be configured individually:
- Special roles: Operators can receive only two types of notifications:
- New order in the flow
- System updates or technical issues (to be quickly informed in case of maintenance or errors).
- General options
- NEW: FiscalNet Integration for cash registers
FiscalNet is an integrating solution that, by connecting to the iflows platform, centralizes and automates the management of various cash registers and fiscal printers.
IMPORTANT: For the integration to work properly, its installation and use must be performed on the same computer where the FiscalNet application is running, connected to the cash register.
- Installing the FiscalNet Integration
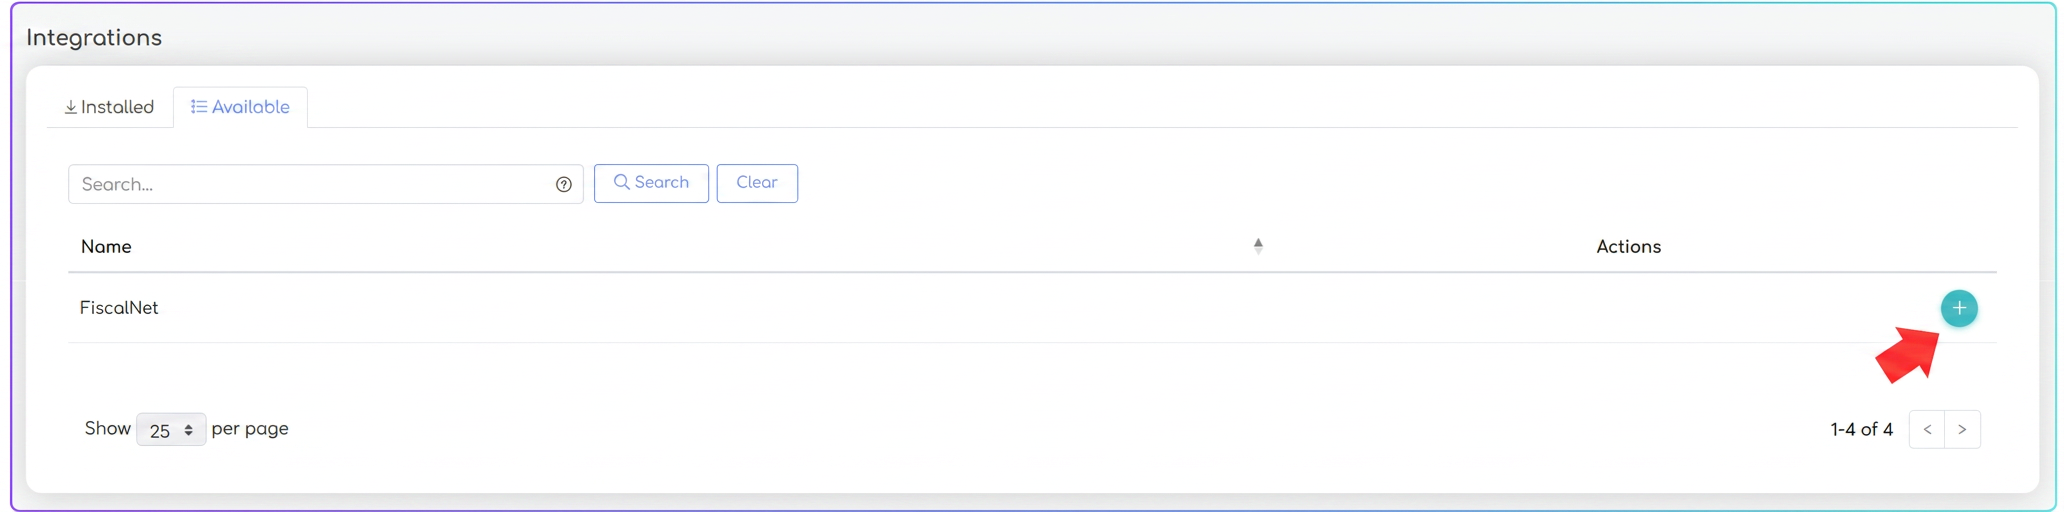
- Navigate to menu: .
- Select the tab "Available".
- Identify the row named "FiscalNet".
- In the Actions column, press the "Install Integration" button.
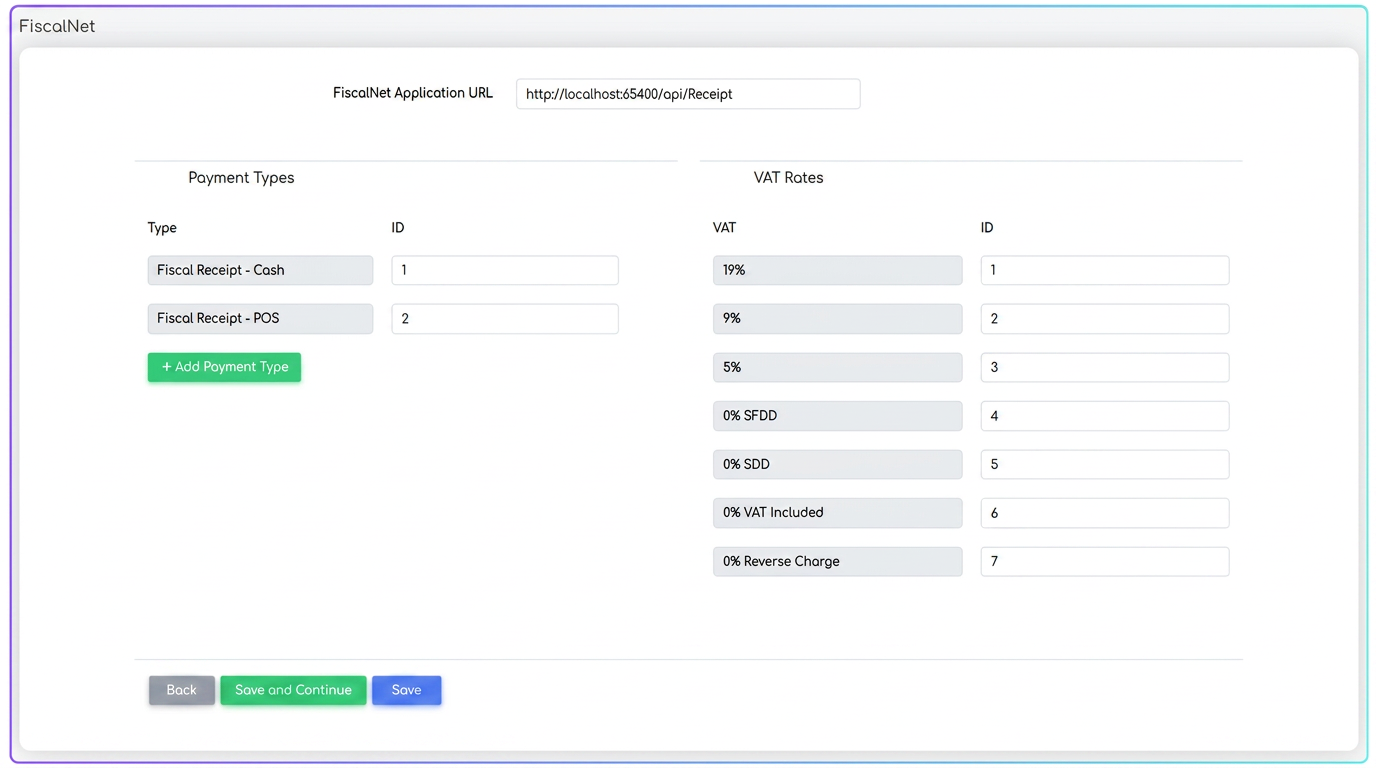
After installation, a page with predefined settings will be displayed for:
- Payment Types (e.g., Cash Fiscal Receipt, POS Fiscal Receipt) each with an associated ID.
- VAT Rates (e.g., 19%, 9%, 5%, etc.), each with an associated ID.
- Verifying and Adjusting IDs
Important: Ensure that the ID values in iflows correspond to those configured on the cash register/fiscal printer. For example, if the ID "3" is required for the 5% VAT rate in the cash register, then in iflows, within the FiscalNet configuration, the ID must also be "3".
- Payment Methods for Fiscal Receipts
The iflows platform offers two preset and non-editable payment methods for fiscal receipts:
- Fiscal Receipt – Cash: Payments are allocated to the petty cash register.
- Fiscal Receipt – POS: Payments are allocated to the bank register.
If you wish to use other types of collection (e.g., "Voucher", "Meal tickets", etc.), you must first define them in:
- .
Once these additional payment methods are created, they can also be associated with the FiscalNet integration using the "+ Add Payment Type" button on the configuration page.
- Associating a Bank Account for the "Fiscal Receipt – POS" Method
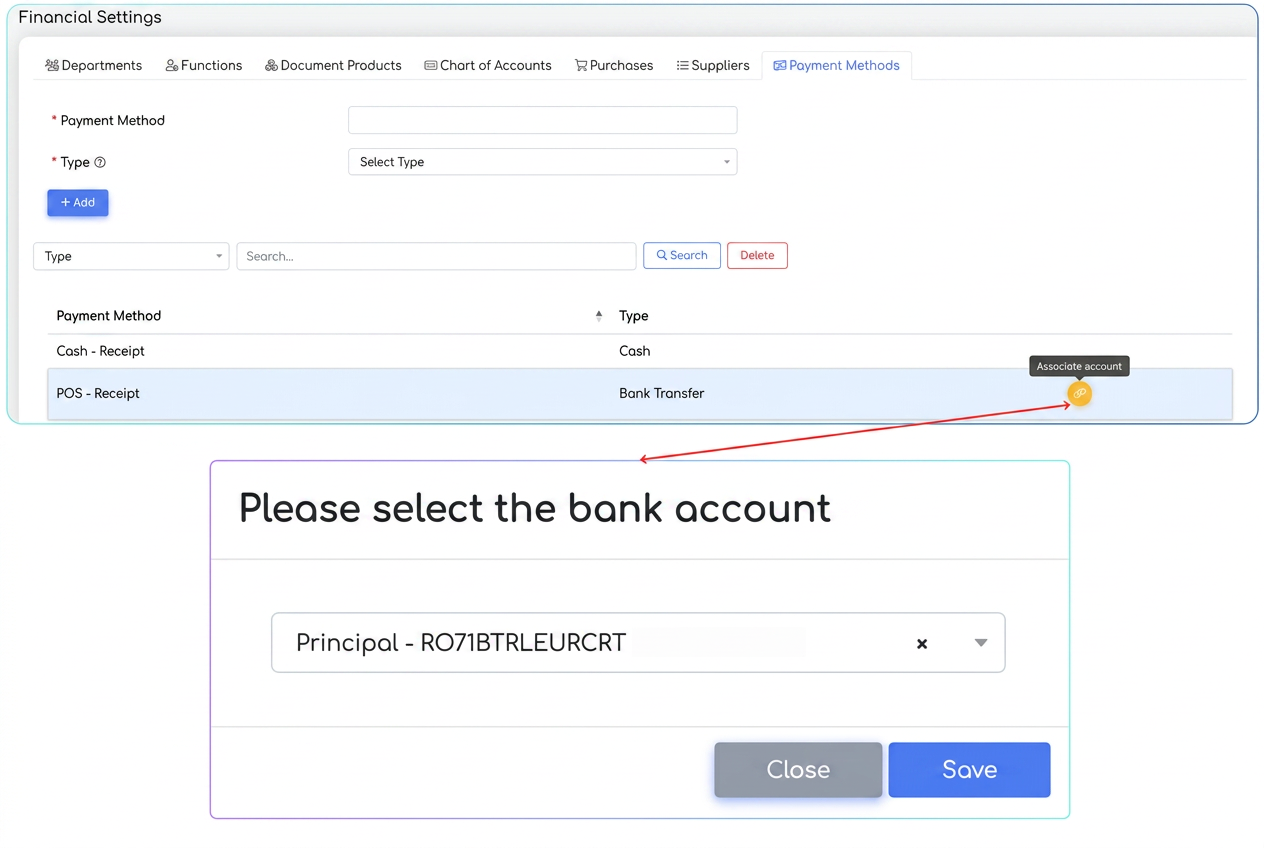
For the "Fiscal Receipt – POS" payment method to be functional, it is necessary to associate a bank account:
- .
- In the list of payment methods, identify the row for "Fiscal Receipt – POS".
- In the Actions column, press the "Associate account" button.
- Choose the bank account dedicated to the POS from the displayed list.
- The list of displayed accounts comes from the , where bank accounts are previously defined.
- To facilitate identification, accounts are displayed in the format ACCOUNT NAME – IBAN.
Note:
- The association button symbol will be blue before an account is associated.
- After association, the symbol will change its color to orange, signaling that the payment method has an assigned bank account.
- Generating the Fiscal Receipt
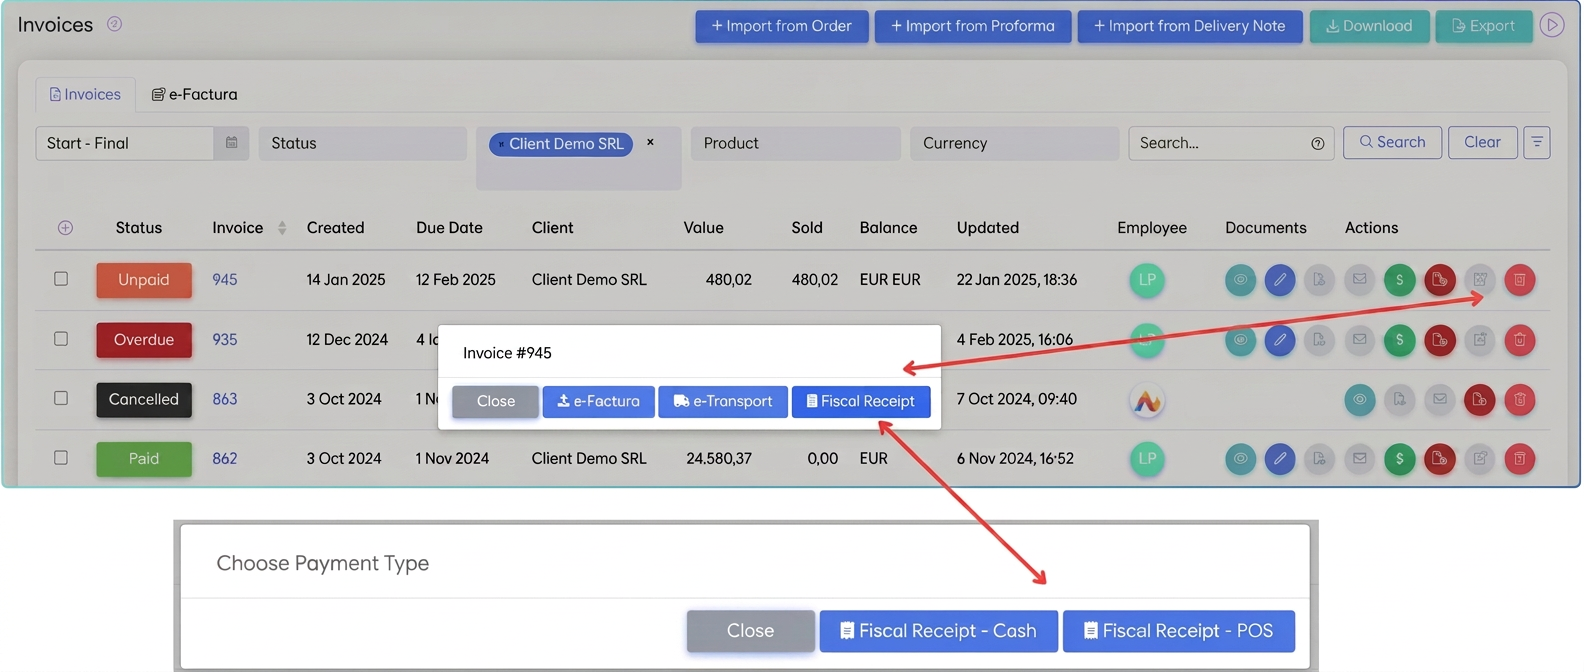
- .
- Identify the invoice for which you want to generate the receipt and, in the Actions column, press the "Integrations" button.
- In the pop-up window that appears, select the desired fiscal receipt type:
- Fiscal Receipt – Cash (cash collections, go to the petty cash register)
- Fiscal Receipt – POS (card collections, go to the bank register)
After confirmation, iflows will automatically generate the fiscal receipt and record the payment.
- Viewing Payments and the Fiscal Receipt
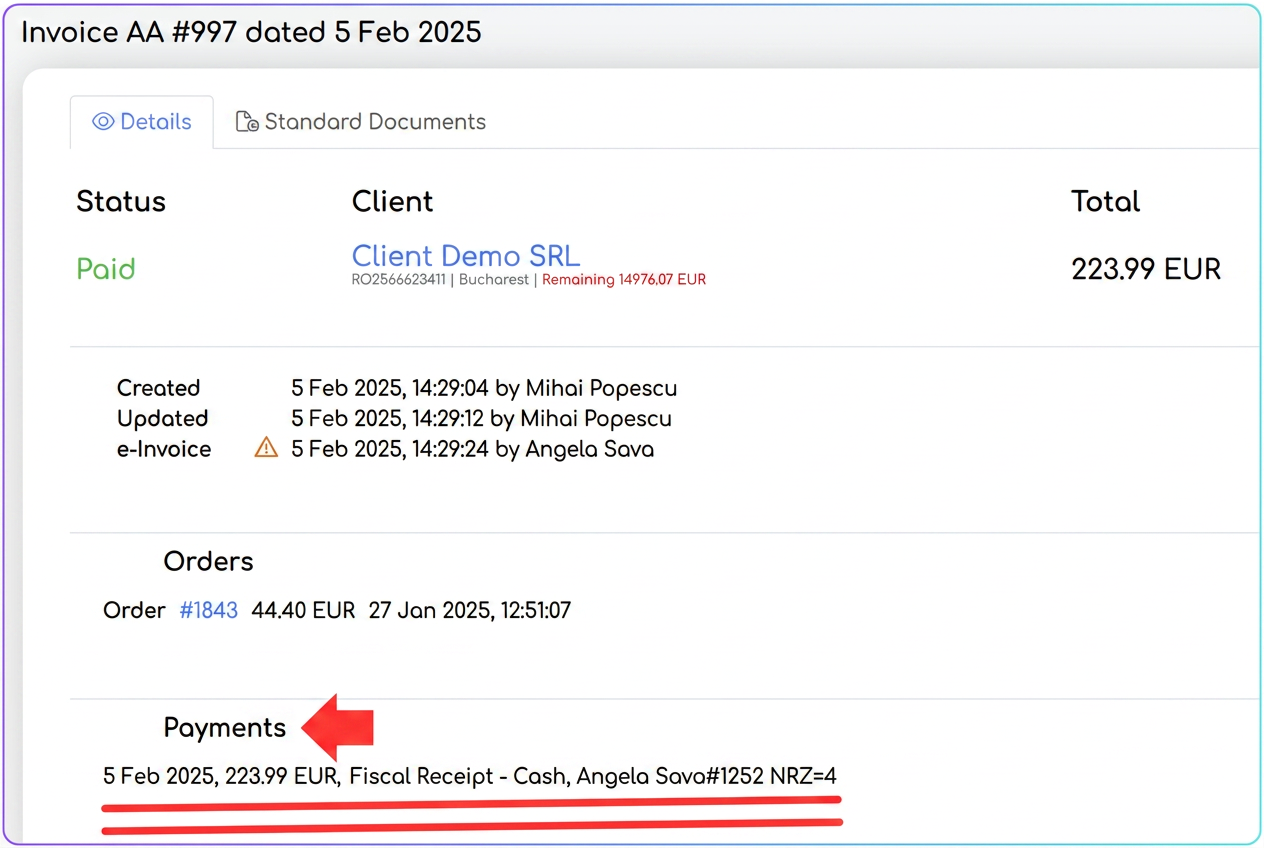
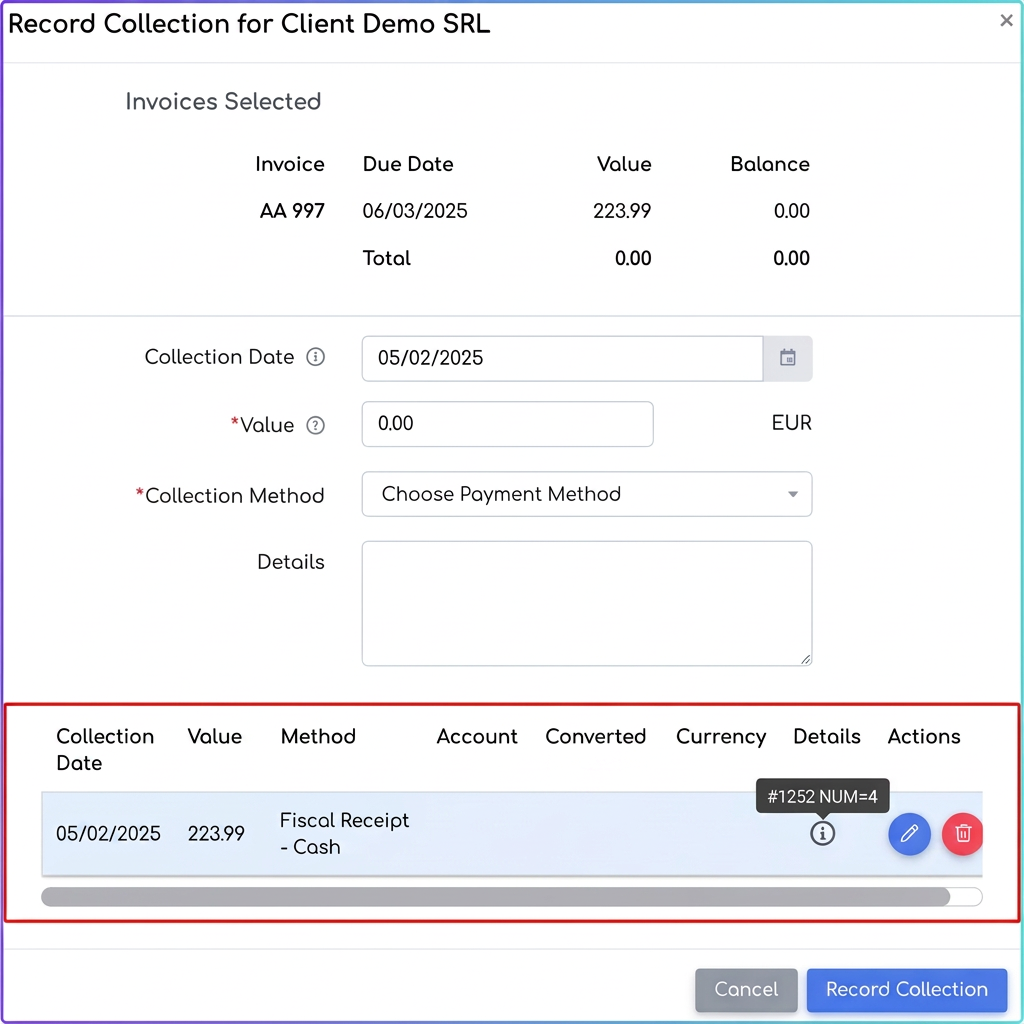
- On the Invoice page:
In the "Payments" section of the invoice view mode, transaction details are displayed (date, amount, fiscal receipt type, etc.).
- On the "Record payment" button
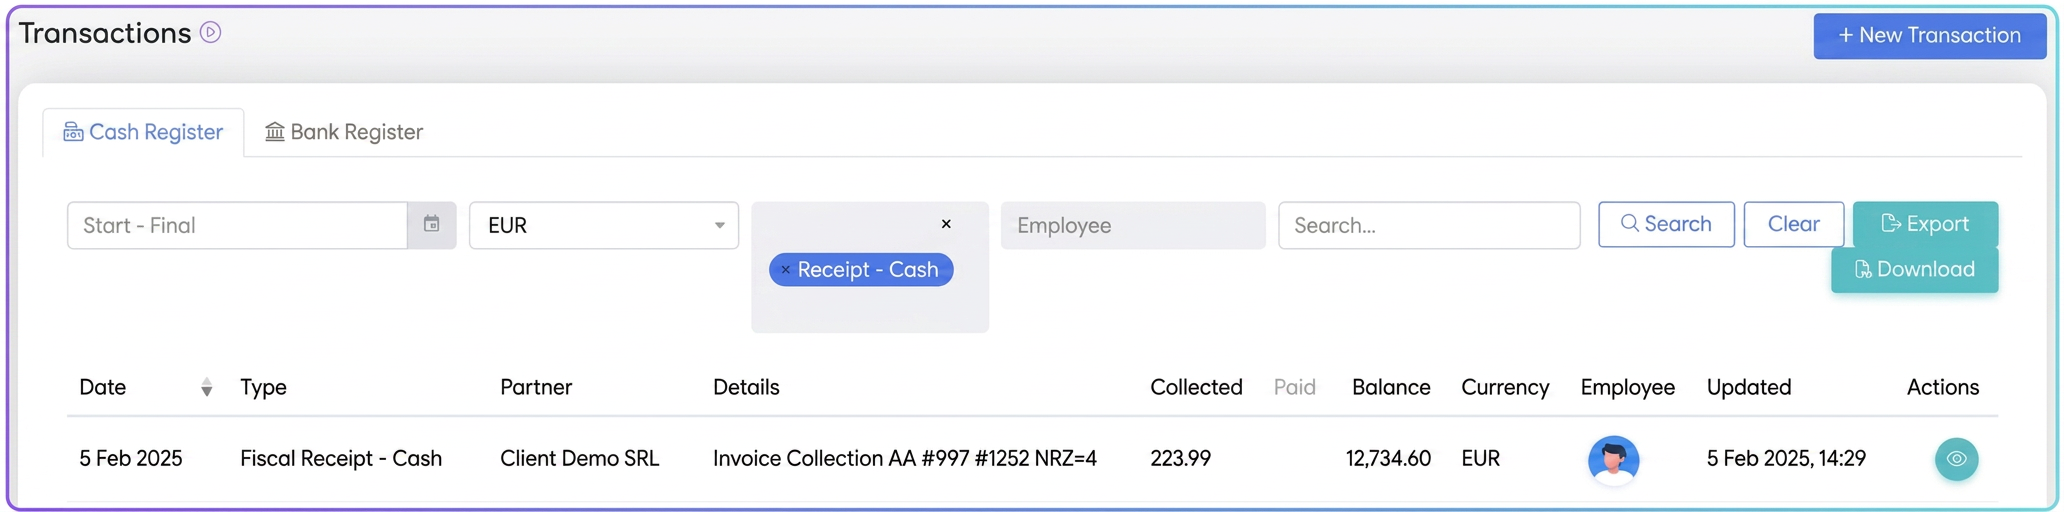
- In the Petty Cash Register / Bank Register:
, select the corresponding register type (cash or bank) and filter by payment method (Fiscal Receipt – Cash or Fiscal Receipt – POS).
This will display all recorded fiscal receipt type collections.
- Important Aspects
- e-Factura:
An invoice already sent to e-Factura can no longer generate a fiscal receipt. - Manual Payment ≠ Automatic Receipt Generation:
Note: The invoice can also be collected manually with the "Fiscal Receipt" method set for payment, but this will not actually generate a fiscal receipt. Generation only occurs by following the steps described above. - Warning: Regardless of whether the invoice has a manually recorded fiscal receipt associated or if the receipt is generated through the platform (FiscalNet integration), the invoice code will automatically change from "380" to "751". Thus, the information transmitted to the SPV (Private Virtual Space) will reflect that the respective invoice has an associated fiscal receipt.
- NEW: Netopia Integration
Integration with NETOPIA Payments offers the possibility of including a payment link directly in the PDF invoice issued through iflows, facilitating online card payments for customers. Below are the steps required for activation and configuration, as well as the usage method.
- Required conditions for activation
- Active NETOPIA Payments account
- Point of sale
- After creating the account, it is necessary to add a point of sale in the NETOPIA platform, according to their instructions.
- Security keys and digital signature
- You will receive the authentication data (Signature, Username, Password, etc.) necessary to connect iflows to NETOPIA.
- How to activate the integration in iflows
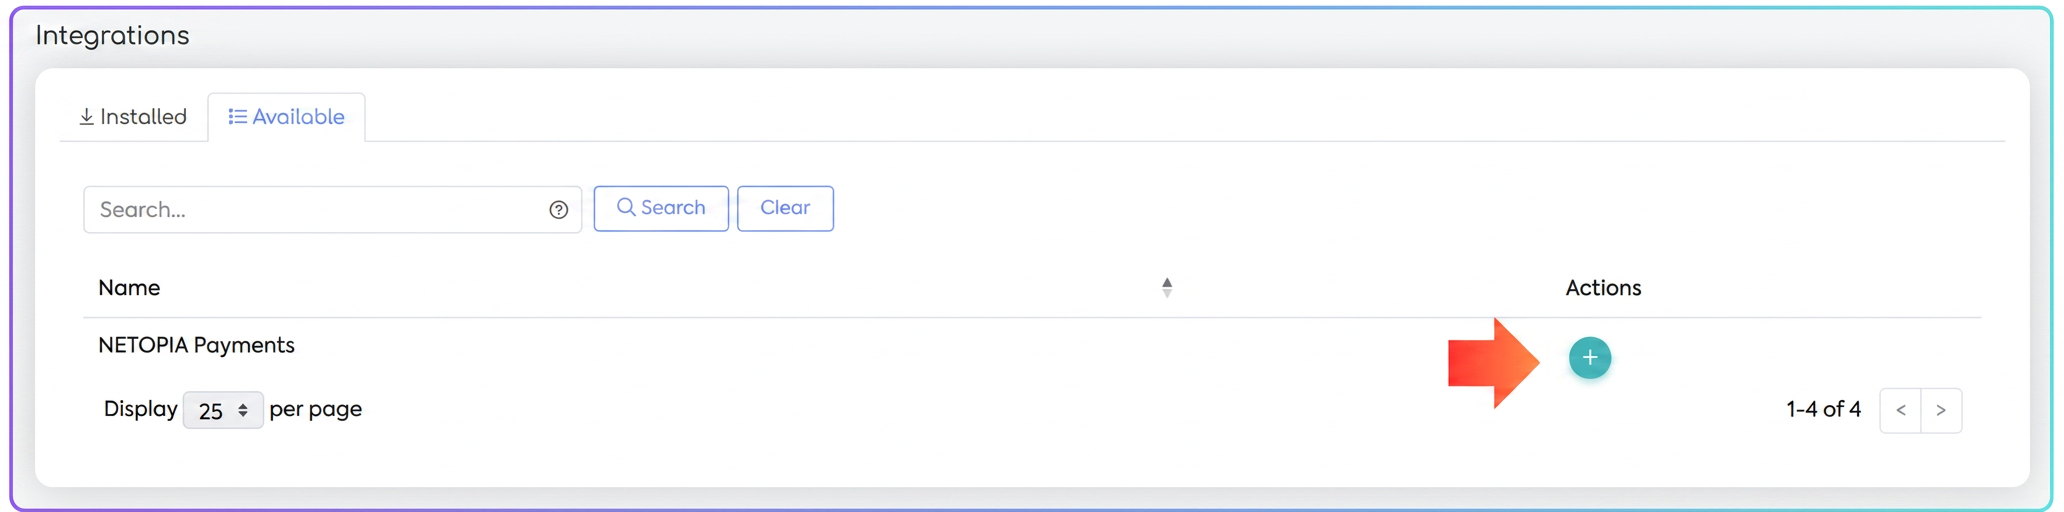
-
- Press the "+" button to install the dedicated module.
-
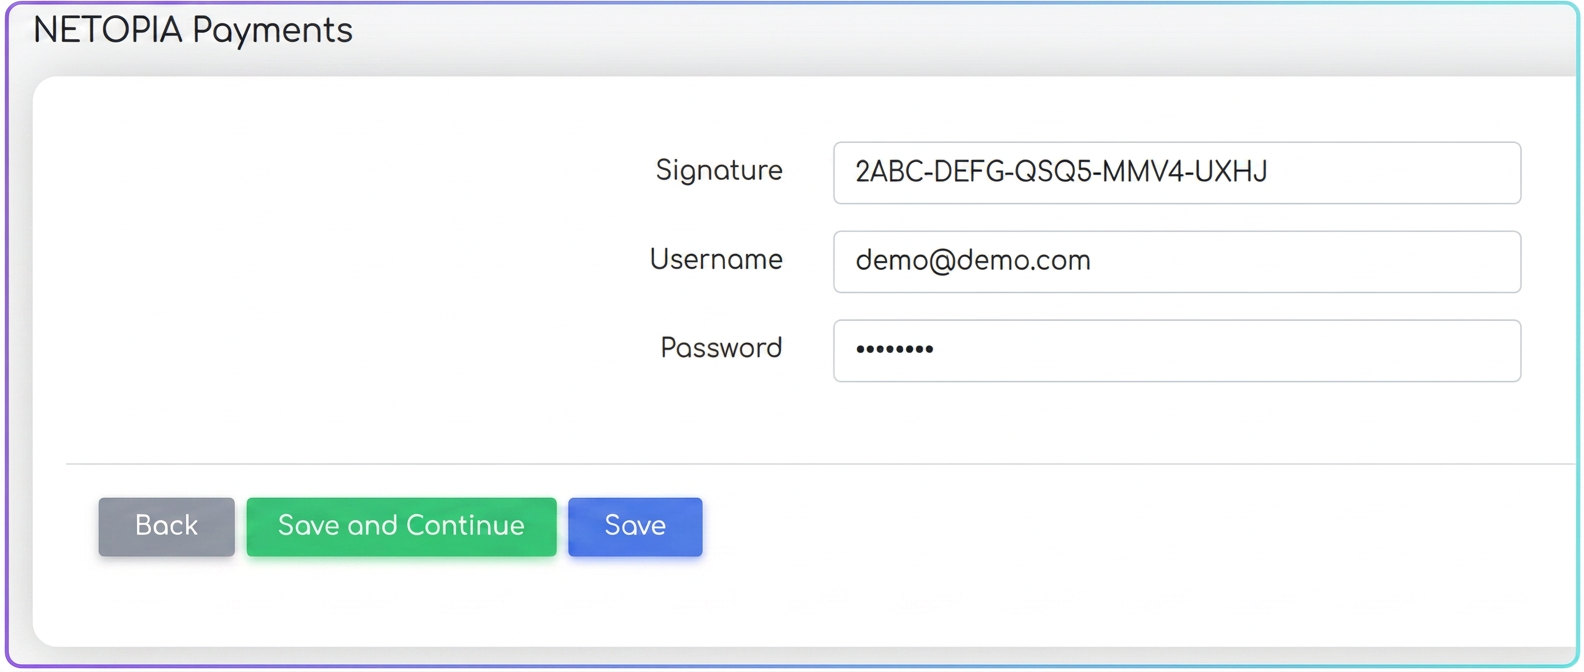
- Enter authentication data
- Complete the Signature, Username, and Password fields exactly as they appear in the NETOPIA account.
- Enter authentication data
-
- Save changes
- Press the "Save" button to confirm the integration.
- Activating the payment option in invoices
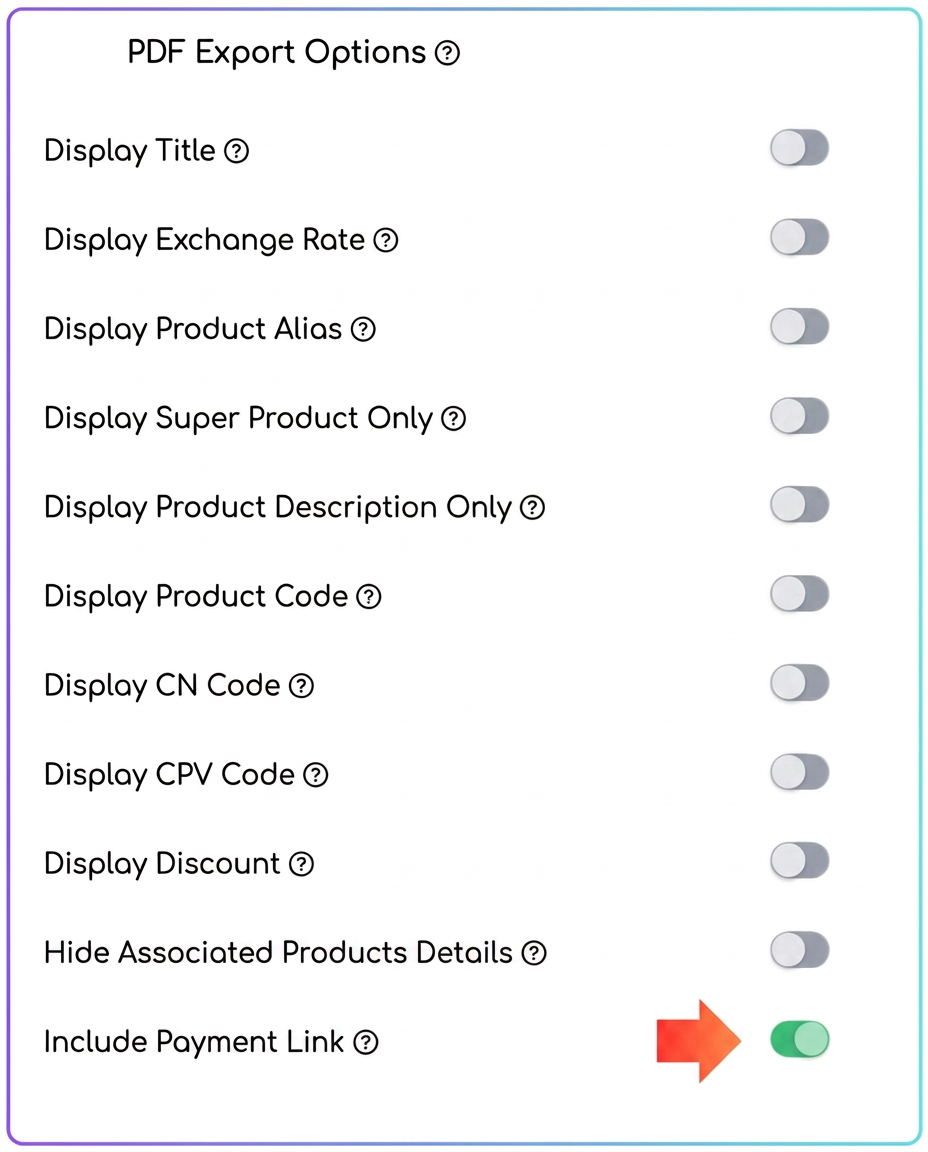
- Once the integration is configured, the "Include Payment Link" option (toggle) will appear in the Export PDF settings for invoices.
- Save changes
- How to use the functionality
Generate the PDF invoice
-
- Issue the invoice through iflows and send it either by direct export or via the "Send Email" button (the invoice will already contain the payment link).
"Pay by card" button
-
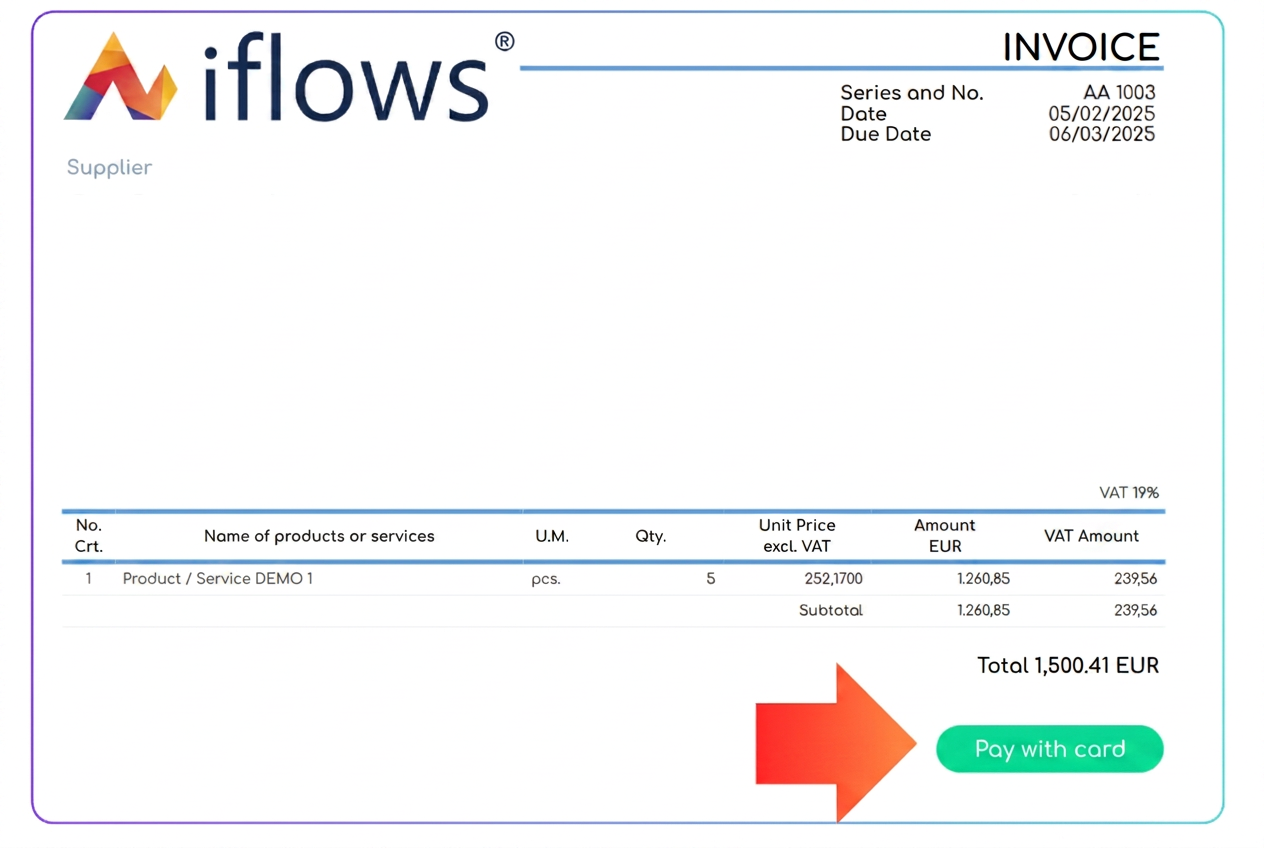
- In the PDF, under the subtotal, the "Pay by card" button appears.
- The customer clicks this button and is redirected to the NETOPIA secure payment page.
Default setting in the invoice template
- To generate the payment link in all issued PDF invoices, access .
- Enable "Include Payment Link" as a default option. Thus, every issued document will automatically contain the button for online payment.
- Optimization: Introduction of the "Comments" tab in Orders
This new tab allows for adding and managing comments directly at the order level, similar to the functionality already existing in Quotes and Opportunities. Thus, the team can track and collaborate more efficiently on each order, having a centralized history of discussions and necessary actions.
- Accessing the "Comments" tab
- Viewing the desired order
- Choose the order you wish to edit and press the "eye" symbol (order details) or click on the order number in the workflow (action which opens the same details window).
- Selecting the tab
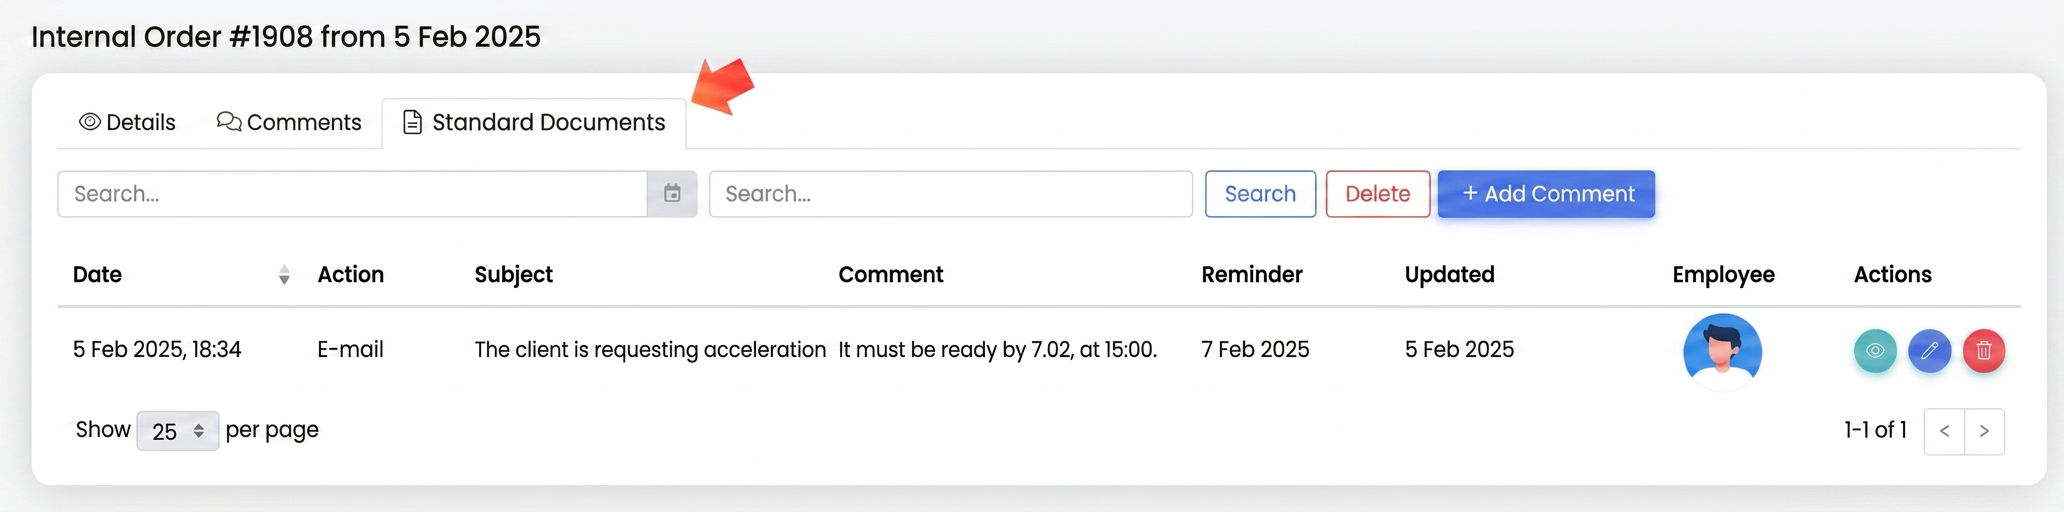
- In the order screen, you will see the "Comments" tab next to "Details" and "Standardized Documents".
In this tab, you can add and view new or existing comments. Each comment includes the following information:
- Functionality of the "Comments" section
- Date
- Action Type
- A field that classifies the nature of the comment (e.g., follow-up, clarification, phone contact, email, visit, internal finding, etc.). This option helps you organize and filter subsequent notes more easily.
- Subject
- Comment
- The main section with details about the required action, observations, clarifications, or other relevant mentions.
- Attached documents (optional)
- Possibility to upload additional files (e.g., specifications, signed confirmations, images, or files).
- Reminder (optional)
- Setting a notification for a later date, reminding team members that an action related to this comment is needed (e.g., contacting the client, checking stocks, etc.).
- Viewing and managing comments
- Chronological list
- Comments are listed in the order they were entered, along with the subject and date.
- Available actions
- Full view: Press the "eye" icon to review the full details of a comment.
- Edit: The pencil symbol allows you to modify previously entered information.
- Delete: The trash can icon.
- Search and filtering
- At the top of the section, you can use the search field (e.g., by subject) and any filters (e.g., action type) to quickly find the desired comments.
- Chronological list
- OPTIMIZATION: "Show exchange rate" with manual currency selection
The extension of the "Show exchange rate" option gives the user the ability to manually control the currencies displayed in PDF documents (for example, Invoices, Quotes, Orders). This functionality complements the previous behavior, where the exchange rate appeared exclusively if there were products in currencies different from the document's base currency. Below are the detailed steps for configuration and use:
- Accessing the option at the time of document generation
- Navigate to Export PDF Options when you intend to generate a document (Invoice, Proforma Invoice, Quote, Order).
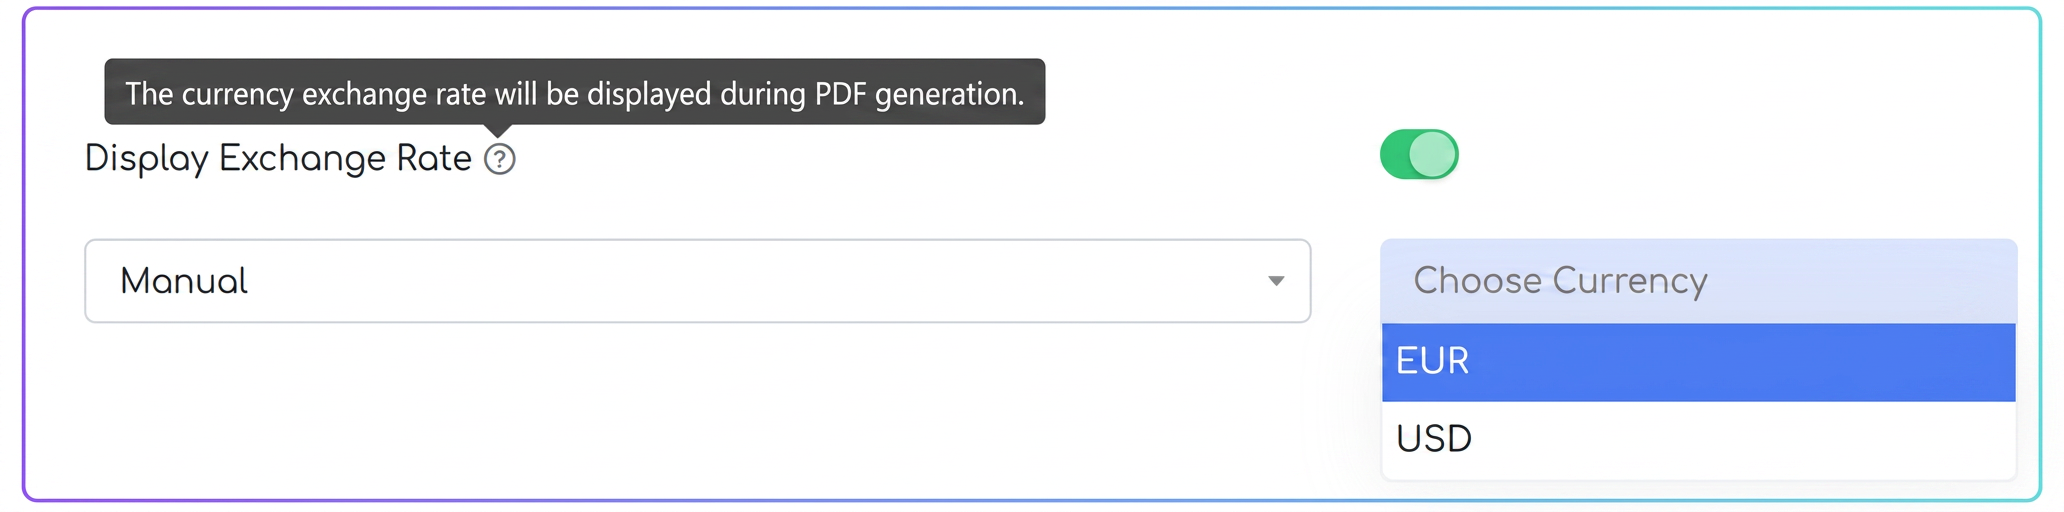
- Identify the "Show exchange rate" section and activate it via toggle.
After activating the toggle, two options for displaying the exchange rate will be shown:
- Choosing the selection type
- Automatic
- Follows the original logic: the system includes the exchange rate only if it detects currencies different from the main currency of the document.
- Manual
- Allows the explicit entry of EUR and/or USD currencies, regardless of the monetary context of the products.
- This offers complete control, even if the entire order is, for example, in EUR.
- Automatic
- Selecting currencies for display
- When choosing the Manual option, you have the possibility to explicitly add EUR and/or USD currencies.
- Saving and generating the PDF
- After specifying the method (Automatic/Manual) and the desired currencies, press Save.
- Generate the invoice, quote, or order in PDF format.
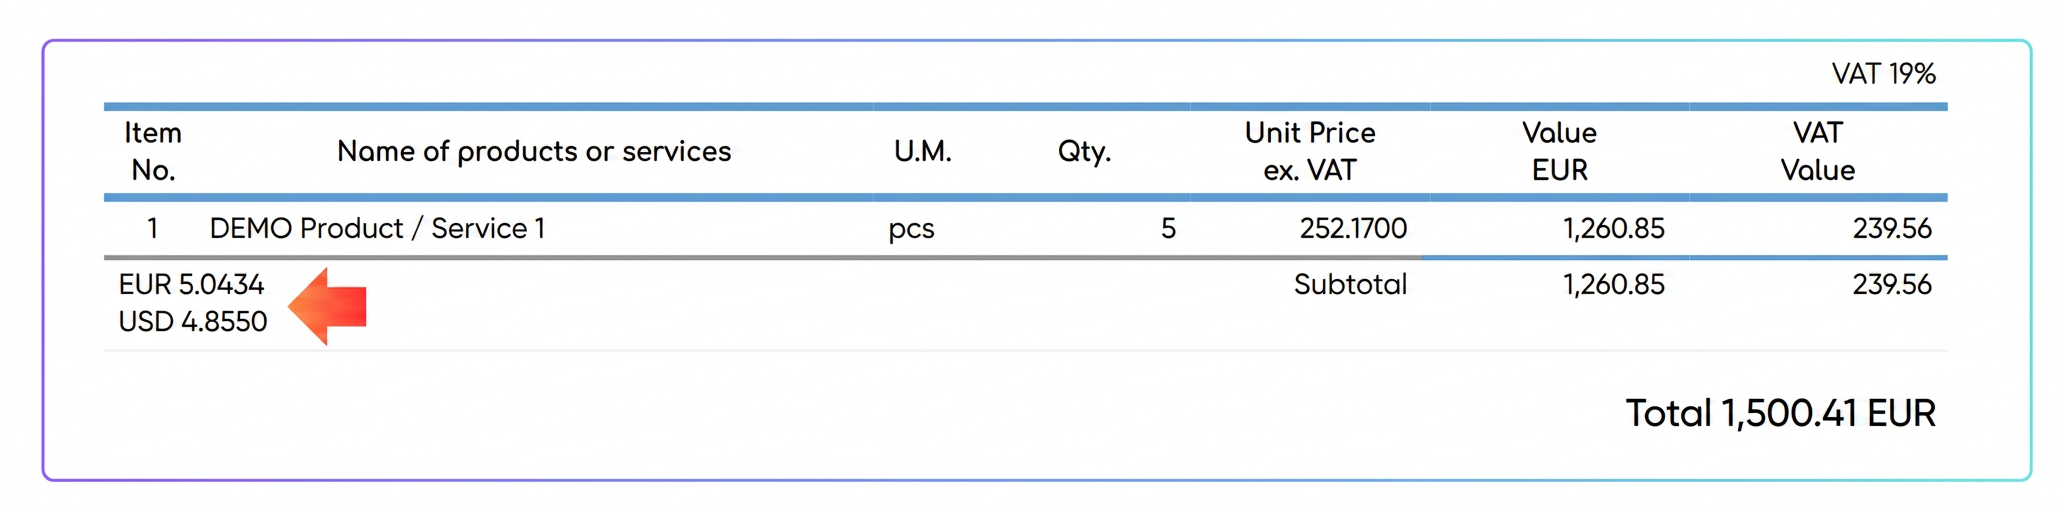
- If you selected Manual, the new exchange rate for EUR and/or USD will be included under the product lines.
- OPTIMIZATION: Preset VAT rate selection
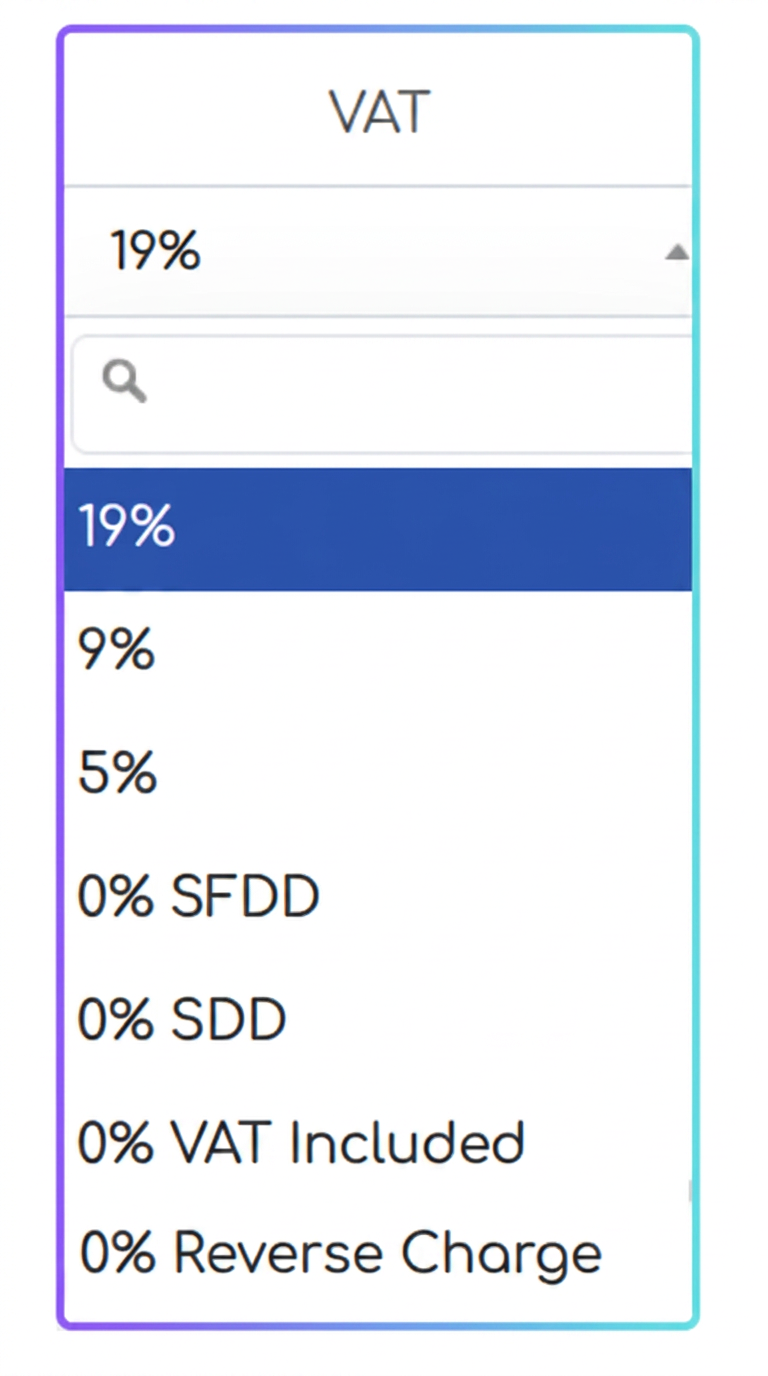
The new dropdown menu for choosing VAT rates facilitates the rapid entry of standardized values. Thus, at the time of configuring a document that requires VAT mention, users can select the desired rate from a predefined list.
Available VAT rates and their meaning
- 19%
- 9%
- 5%
- 0% – SFDD (Scutire cu Drept de Deducere / Exemption with Right of Deduction)
- 0% – SDD (Scutire fără Drept de Deducere / Exemption without Right of Deduction)
- 0% – VAT Included
- 0% – Reverse Charge