- NEW: "Product Acquisition Cost" Permission
The new "Product Acquisition Cost" permission provides complete control over user access to information such as the purchase cost of products, the source of the selling price, and the applied markup.
Acquisition cost information can be found in several sections of the system, such as:
- Product page
- Stocks section
- Purchases section
- Suppliers - Orders section
How does it work?
1. When the permission is enabled:
- If a user has the "Product Acquisition Cost" permission enabled, they will have full access to acquisition cost information in the sections they can access.
2. When the permission is disabled:
- If the "Product Acquisition Cost" permission is disabled, acquisition cost information becomes inaccessible, and financial details will be hidden. Here is what happens:
Product page
- The rows "Acquisition cost", "Selling price source", and "Markup" will be hidden.
- The user can view other product information (e.g., name, code, category) if they have the product viewing permission active.
Stocks section
- The columns "Stock MU Acquisition Cost", "Current stock value", "Work in progress stock value", and "Sales MU Acquisition Cost" will be hidden.
- Other stock information (e.g., quantities, locations) will remain visible if the user has the corresponding permission.
Purchases section
- The user will not be able to access this section.
Supplier Orders section
- The user will not be able to access this section.
Note: The user will also not be able to use the "Calculate cost" button to automatically obtain cost details during quote configuration.
Co-dependencies of the "Product Acquisition Cost" permission
The "Product Acquisition Cost" permission works in tandem with other associated permissions, and disabling it may require additional adjustments. These co-dependencies are:
- Product edit/add rights
- If the user has product edit/add rights, the "Product Acquisition Cost" permission will be automatically enabled.
- To disable the "Product Acquisition Cost" permission, you must first revoke product edit/add rights.
- Purchases section rights (view/edit/add/delete)
- If the user has rights in the Purchases section, they will automatically have access to acquisition costs.
- Disabling the "Product Acquisition Cost" permission requires revoking rights from the Purchases section.
- Supplier Orders section rights (view/edit/add/delete)
- If the user has rights in the Supplier Orders section, they will automatically have access to acquisition costs.
- Disabling the "Product Acquisition Cost" permission requires revoking rights from the Supplier Orders section.
Warning pop-up for co-dependencies
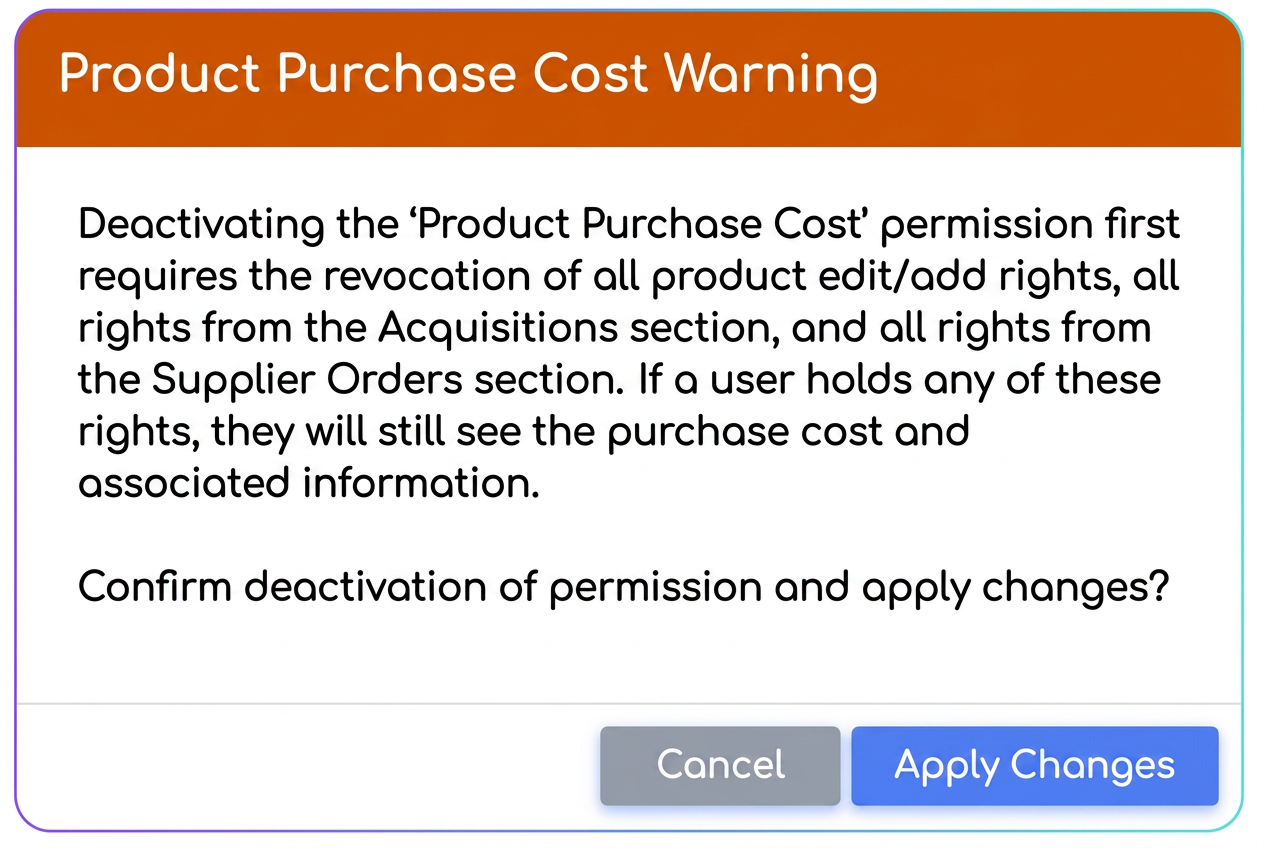
If you try to disable the "Product Acquisition Cost" permission without adjusting the co-dependent permissions (e.g., the user still has product editing or purchase rights), the system will display the following message:
"Disabling the 'Product Acquisition Cost' permission requires prior revocation of product edit/add rights, all rights in the Purchases section, and all rights in the Supplier Orders section. If a user holds any of these rights, they will see the acquisition cost and associated information anyway. Do you confirm disabling the permission and applying the changes?"
- [Apply Changes] – The system will automatically revoke the associated rights and disable the "Product Acquisition Cost" permission.
- [Cancel] – Returns to the previous configuration without disabling the permission.
How do you enable or disable the "Product Acquisition Cost" permission?
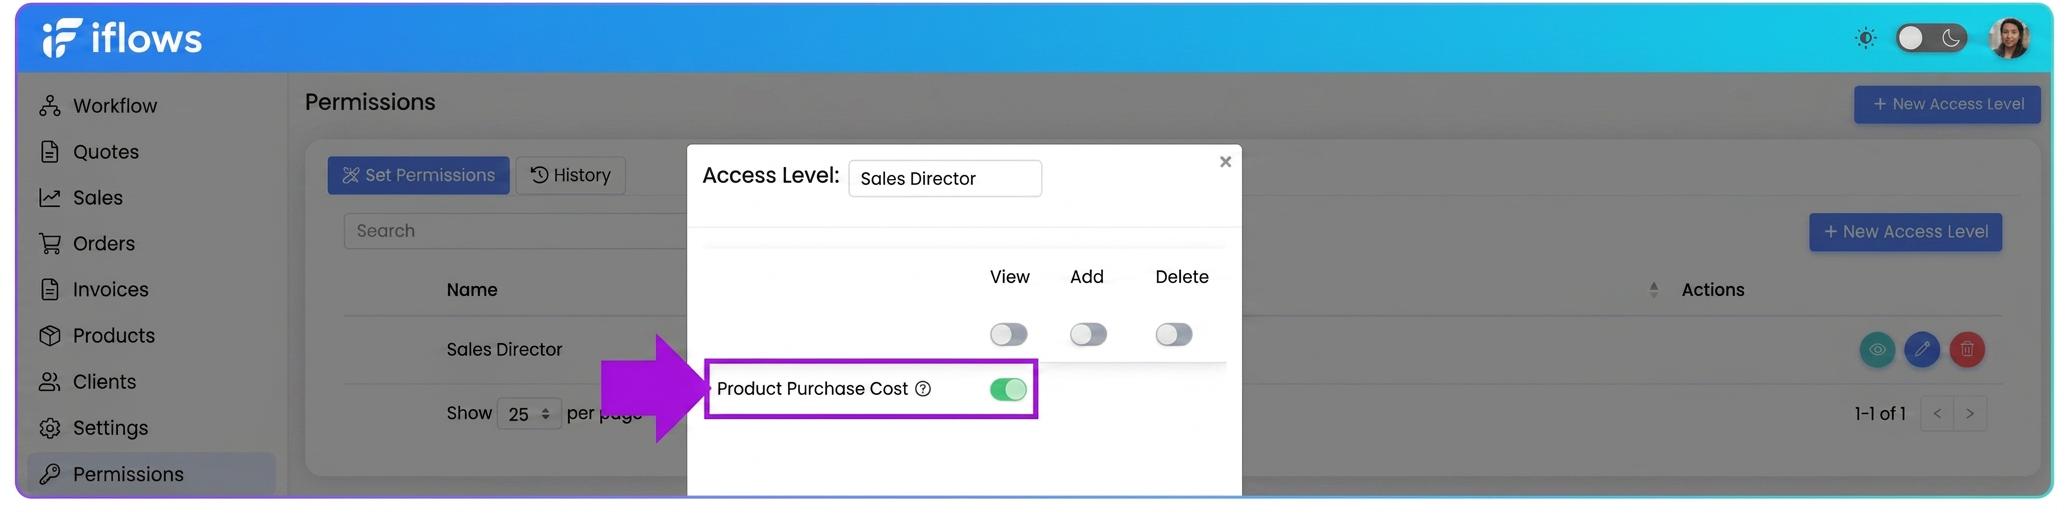
- Navigate to: .
- Choose an access level from the existing list or create a new access level.
- Look for the "Product Acquisition Cost" option in the permissions list and enable/disable the permission.
- Save changes to apply the settings.
- NEW: "Invoice Collection" Permission
The new "Invoice Collection" permission gives administrators full control over users' right to record a collection (payment received) on an invoice.
How does it work?
1. When the "Invoice Collection" permission is enabled:
- Users who have this permission enabled can record collections on invoices without any restrictions.
- The "Collection" button in the invoice interface is active and fully functional.
2. When the "Invoice Collection" permission is disabled:
- Users will be able to see the "Collection" button, but they will not be able to perform collections.
- If they try to record a collection, the system will display the following error message:
"You do not have permission to record a collection. Contact the administrator to request access."
How do you enable or disable the "Invoice Collection" permission?
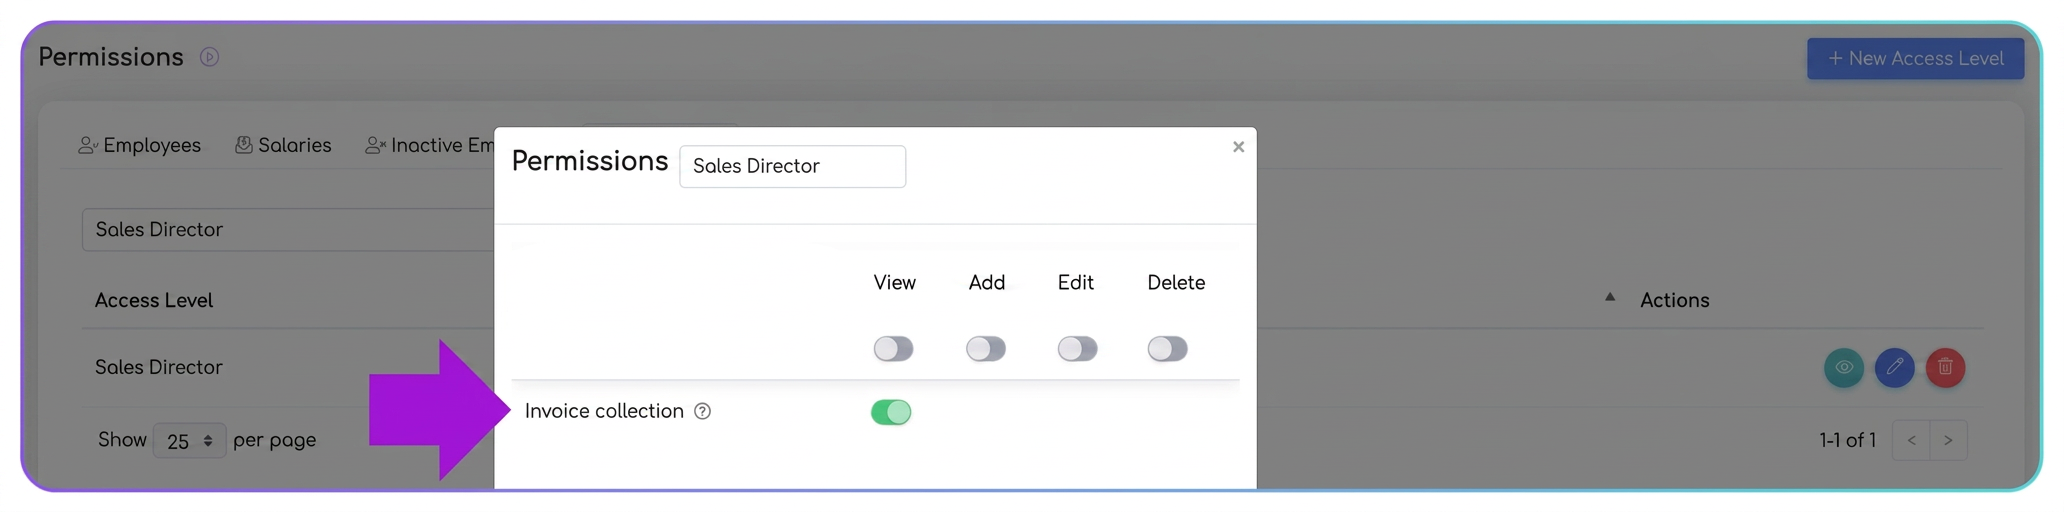
- Navigate to: .
- Choose an access level from the existing list or create a new access level.
- Look for the "Invoice Collection" option in the permissions list.
- Enable the permission if the user needs to record collections.
- Disable the permission if the user should not have access to this functionality.
- Save changes to apply the settings.
- Optimization: "Delivery Notes" Section - "Insert Product Images" Option
In the PDF Export Options section of the Avize (Delivery Notes) module, a new functionality has been introduced: "Insert Product Images". This allows the inclusion of product images in the generated PDF file, offering two distinct options: iflows Cloud and PDF File.
User Guide
1. Navigate to .
2. Create or edit a new delivery note.
3. Enable the "Insert Product Images" option:
- At the bottom of the page, under Export Options, you will find the "Insert Product Images" toggle.
- Enable this option.
4. Choose the insertion method: iflows Cloud or PDF File.
5. Save the changes.
6. Generate and distribute the PDF file:
- After saving, you can:
- Download the PDF file generated, with images included according to the chosen option.
- Send the document directly via email from the platform.
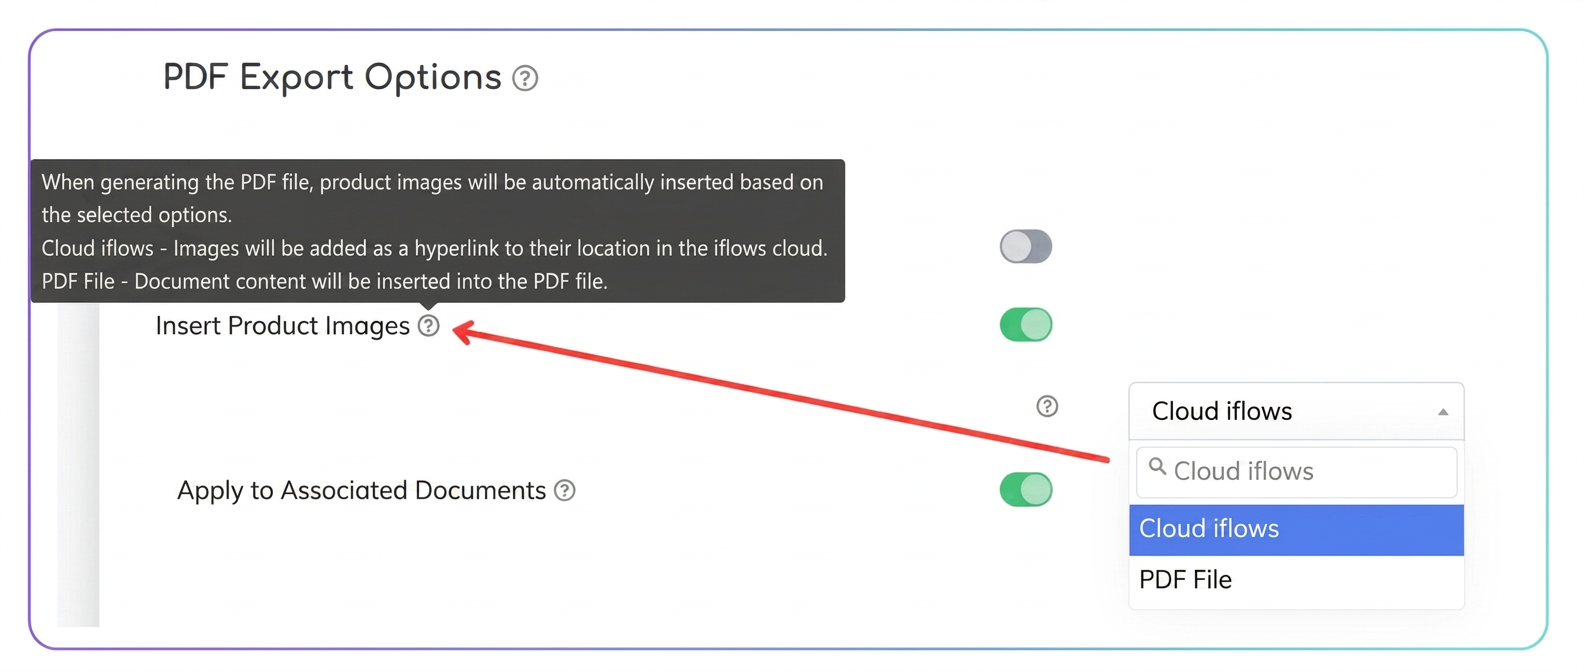
Users can select how product images are included in the PDF file by choosing one of the following variants:
iflows Cloud
- Product images are inserted as hyperlinks to their location in the iflows Cloud.
- If a product has multiple images, they will be available in a carousel format at the accessed link. This format provides the user with an interactive and compact visual experience.
- This option is ideal for keeping the PDF file size small while maintaining accessibility to all images.
PDF File
- Product images are inserted directly into the PDF file generated.
- This option allows for the configuration of image sizes within the file.
- Optimization: Displaying Bank Account Currency in Invoices
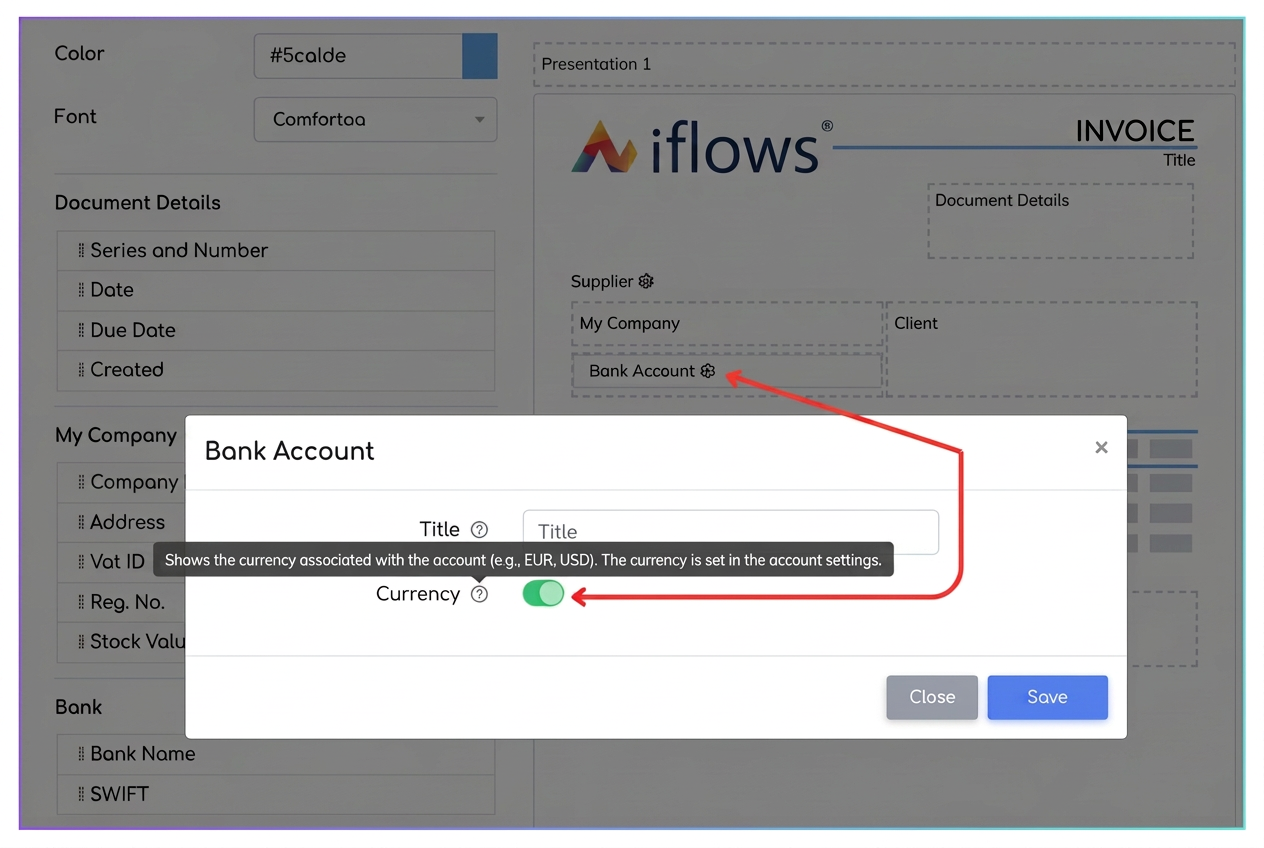
An option to display the currency associated with the bank account has been introduced. This is displayed before the IBAN in generated PDF documents.
What does this functionality do?
- The currency associated with the bank account (e.g., EUR, EUR) is automatically retrieved for each configured account.
- Displaying the currency before the IBAN helps quickly identify the currency of the account used in transactions.
- This functionality is ideal for companies managing multiple accounts in different currencies.
How to enable the option?
- Go to section: .
- Edit the invoice template: Select the desired template and insert the "Bank Account" variable into the template's text field.
- Configure currency display:
- A configuration gear (icon) will appear next to the "Bank Account" variable.
- Click on it to open the configuration window.
- Enable the "Currency" option:
- In the configuration window, you will see the "Currency" toggle.
- Enable this toggle to display the bank account currency before the IBAN.
- Resulting format:
- Accounts will be displayed in the format:
- EUR Account: [IBAN]
- EUR Account: [IBAN]
- Accounts will be displayed in the format:
- Save changes:
- Save the modified template to apply the new format.
- The bank account currency will be automatically displayed in generated PDF documents.
Note: The account currency will be retrieved from the Settings – Global – Accounts section.
- Optimization: "Hide Accept/Reject" Option in Quote Sending
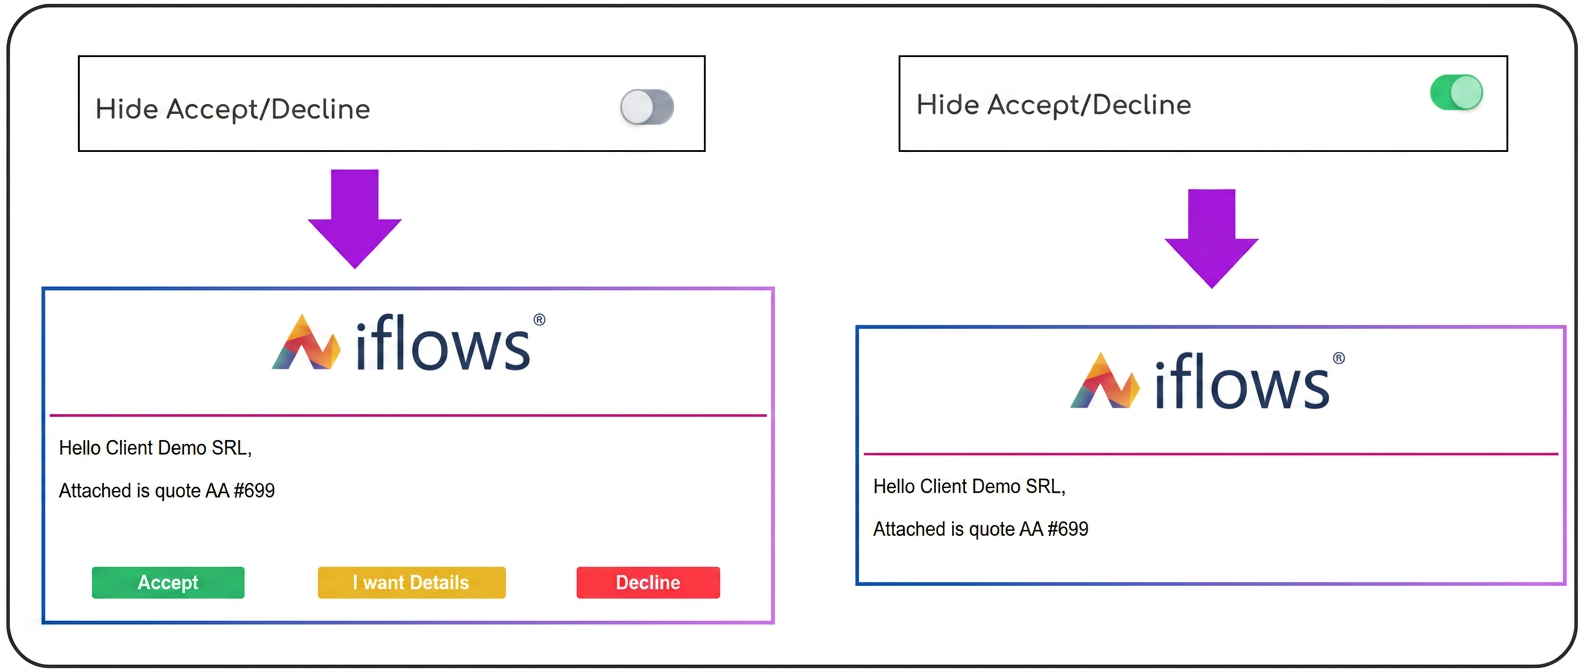
Within the process of sending quotes via email, a new option named "Hide Accept/Reject" has been introduced. This allows for the deactivation of interactive buttons (Accept, Reject, Request Details) in the sent email, providing the possibility to send the quote without interaction options for the client.
What does this functionality do?
- With the option disabled:
- The email will include the interactive buttons Accept, Reject, and Request Details, allowing the client to respond directly from the email.
- With the option enabled:
- The email will only contain the PDF file of the quote, removing the interactive buttons.
- This is ideal in scenarios where the quote is sent for informational purposes only, without requesting an immediate response.
How to use the "Hide Accept/Reject" option?
1. Access quote sending: Navigate to the quote you wish to send and click on the envelope symbol for email sending.
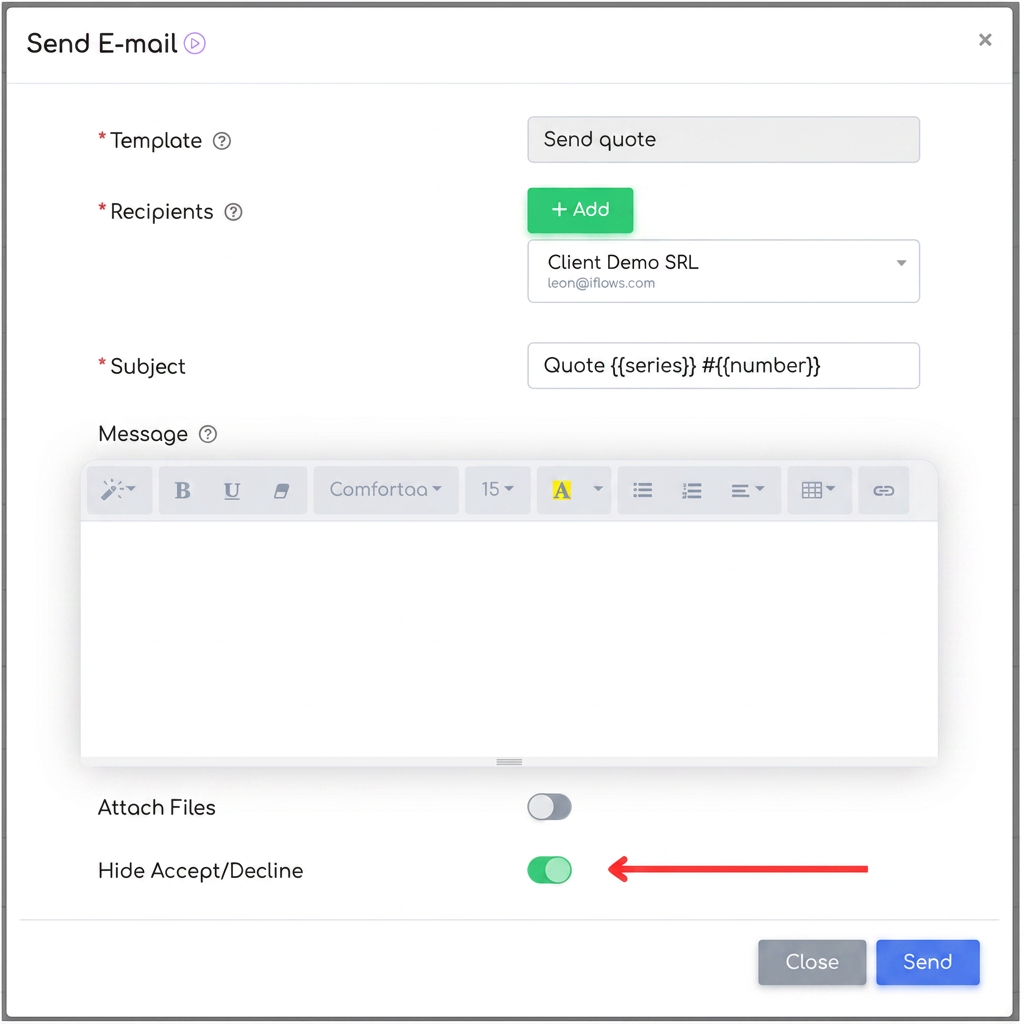
2. Fill in details: In the email sending pop-up, you will find the standard fields + a new option.
3. Enable the "Hide Accept/Reject" option:
- Find the new "Hide Accept/Reject" toggle located at the bottom of the pop-up.
- Enable it if you want to remove the interactive buttons from the email.
4. Send the email:
- After configuring the options, click "Send" to dispatch the quote.
- The client will receive an email with the quote's PDF attachment, without interactive buttons, if this option is enabled.
Note: If the "Hide Accept/Reject" option is enabled, the quote will no longer update automatically based on client actions, so the quote status will not be modified automatically in the platform (e.g., "Accepted" or "Rejected"). All status changes for the quote must be performed manually by the user, based on the response received from the client via other means (e.g., email, phone).
- Optimization: Improvements to the Leave Module: TYPE
The optimization allows for the classification of leave by type: Annual Leave, Medical Leave, or Unpaid Leave.
Step-by-step guide for using the functionality:
- Accessing the leave section:
- Navigate to the Financial > Leave section.
- Adding a leave entry:
- In the calendar, select the start date of the desired leave.
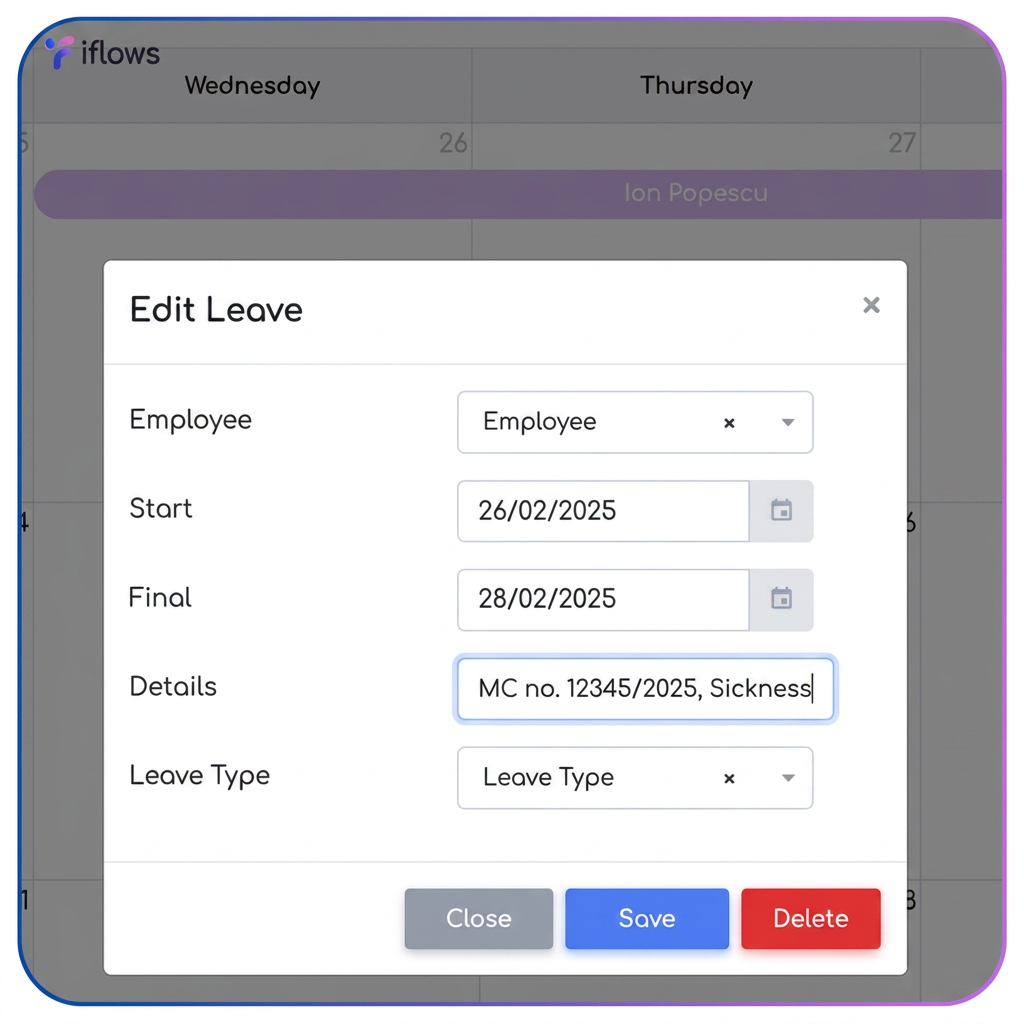
- In the "Add Leave" window, fill in the following fields:
- Employee: Select from the dropdown list.
- Start: Choose the start date of the leave.
- End: Choose the end date of the leave.
- Details: Add additional information (e.g., reason, medical certificate number).
- Leave Type: Select from the three options: Annual Leave, Medical Leave, or Unpaid Leave.
- Saving the leave:
- Click the "Save" button.
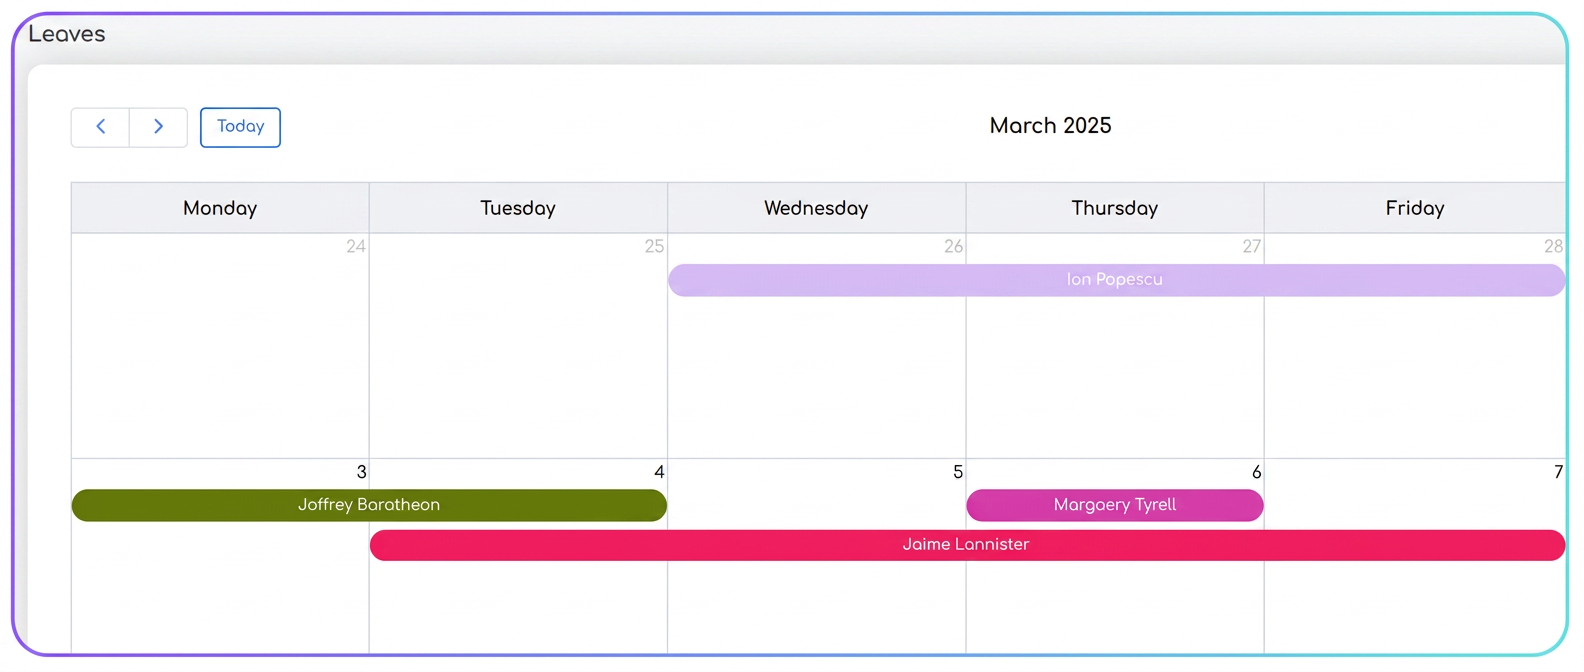
- The leave will be displayed on the calendar, marked with a colored band indicating the period and the employee's name.
- Data centralization:
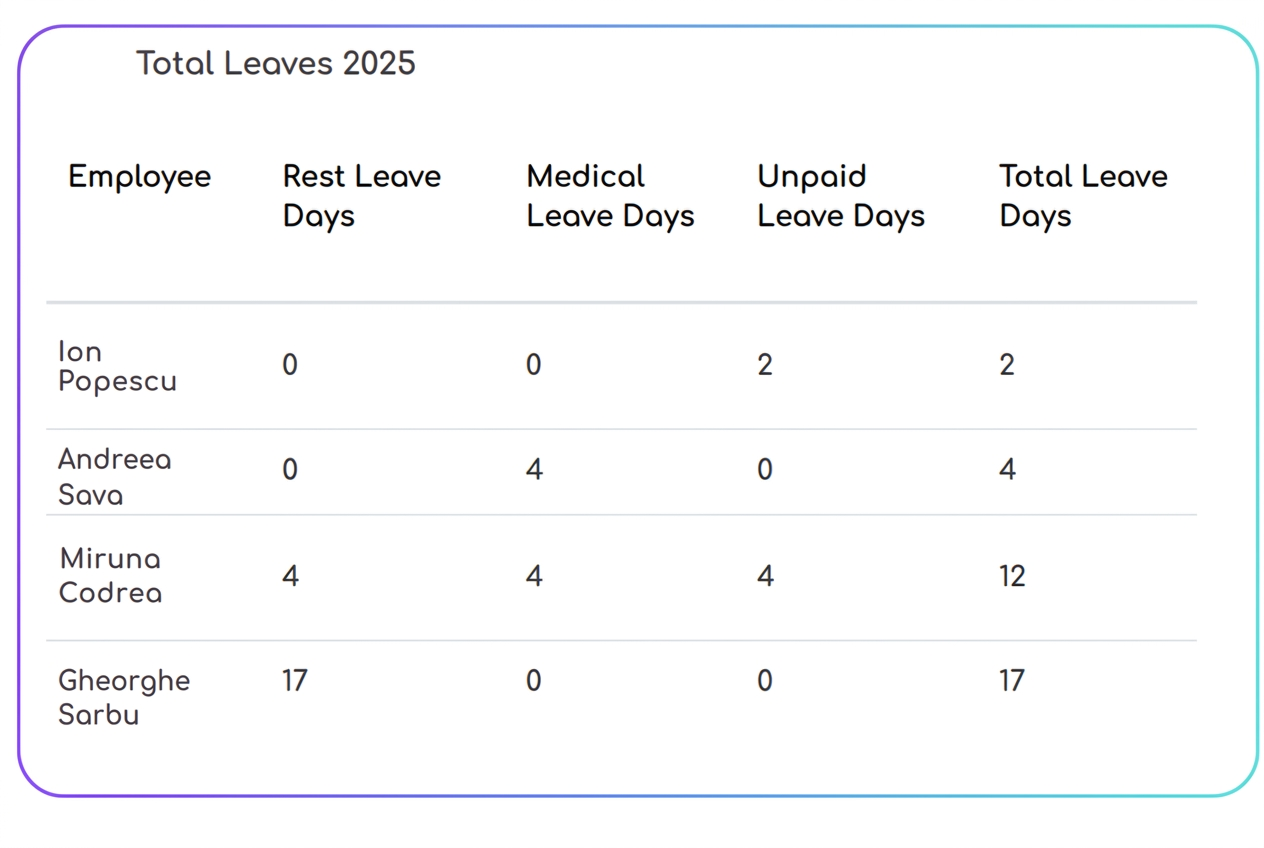
- Scroll down to the bottom of the page to see the "Total Leave" table.
- The table shows leave days classified as follows:
- Annual Leave Days
- Medical Leave Days
- Unpaid Leave Days
- Total Leave Days
- Data is automatically updated based on the information entered in the calendar.