
NEW: "Mandatory Instruction" Option
By setting an instruction as mandatory, you ensure that operators fulfill certain critical requirements before they can proceed to a specific action, such as a break or completing a stage. Thus, the risk of omitting important steps is eliminated.
Example: If an instruction such as "Working Time" is mandatory, users will not be able to complete the stage or move to the next one without filling in this information.
Step-by-step user guide:
- Access the workflow:
- From the main menu, navigate to .
- Select the workflow in which you want to configure the instructions.
- Select the stage and instruction:
- Within the desired stage, locate the instruction.
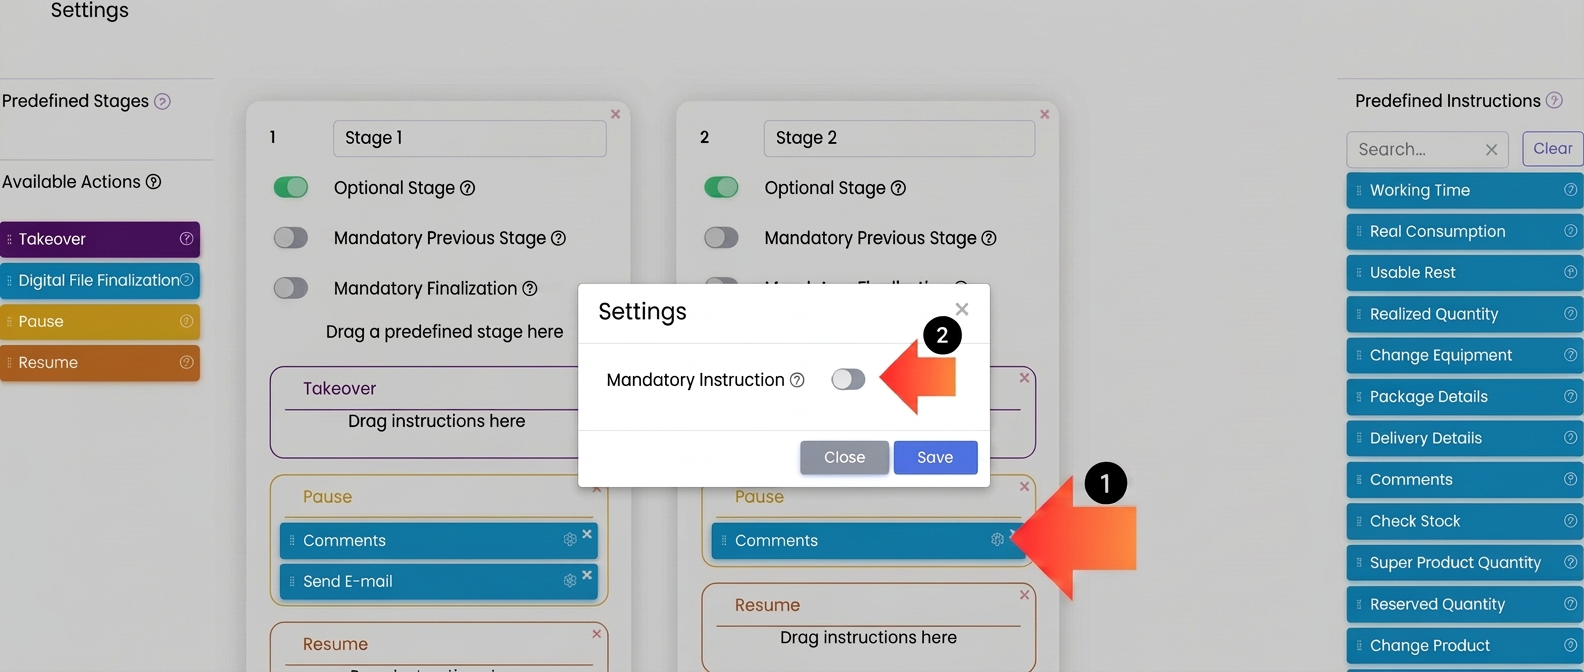
- Click on the settings gear icon to the right of the instruction.
- Enable the "Mandatory Instruction" option:
- In the window that appears, use the toggle to activate the Mandatory Instruction function.
- The toggle will turn ON, indicating that the instruction is now mandatory.
- Save changes:
- Click the Save button to apply the configurations.
NEW: New Product Fields: Height, Weight, and Automatic Volume Calculation
We are adding optional fields for Height and Weight in product configuration, providing the possibility of more detailed management of physical characteristics. These become useful for logistics, transport, or storage processes.
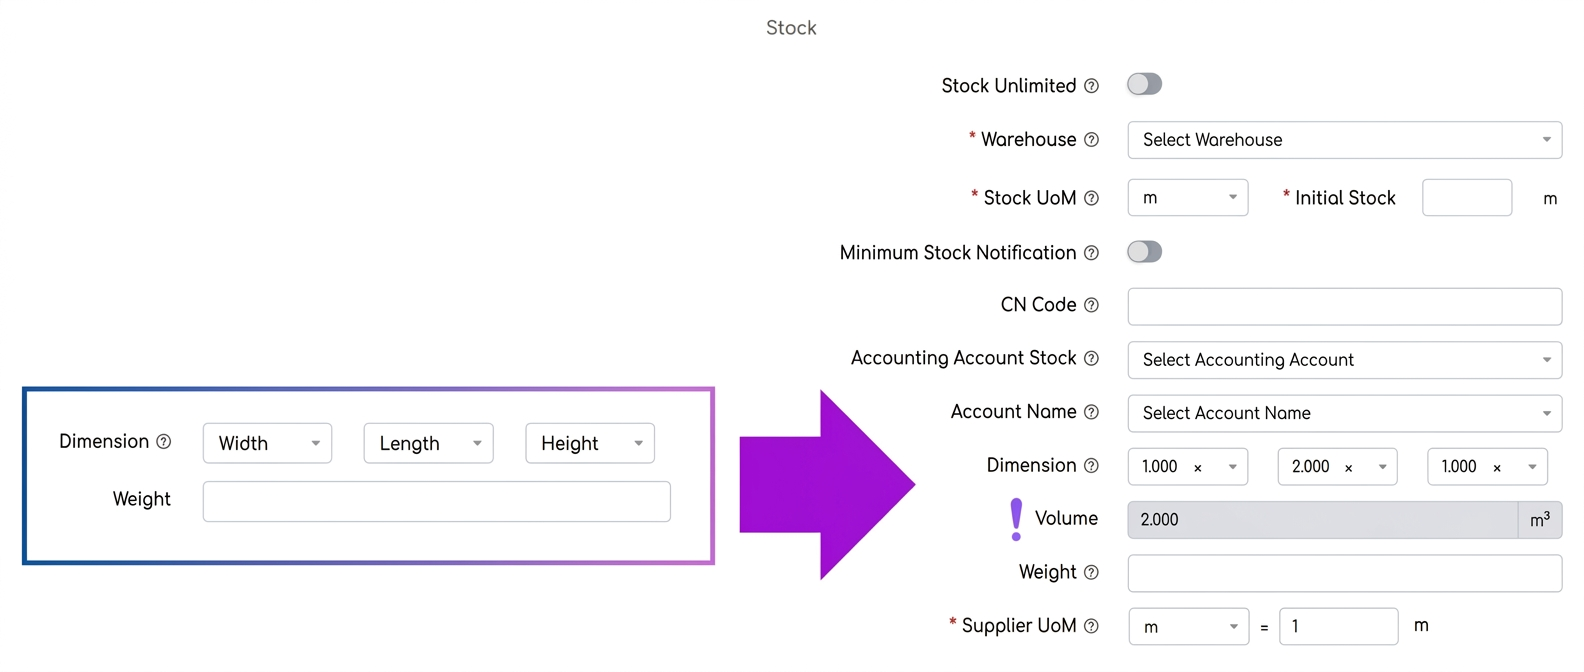
Note: If all dimensions are completed (Width, Length, Height), the system automatically calculates the Volume.
Step-by-step user guide:
- Access the product section:
- Navigate to and select an existing product or create a new one.
- Fill in the new fields if necessary:
- In the "Dimension" section, enter values for:
- Width
- Length
- Height (new optional field)
- If all three are completed, the Volume will be automatically calculated and a new row will appear.
- In the "Dimension" section, enter values for:
- Fill in the product weight, if necessary.
- Note: If you use the e-Transport functionality, the weight will be retrieved automatically.
Optimization: Changing Order Status to "Cancelled"
This functionality introduces the cancellation option for orders that have not been finalized. Instead of deleting an order completely, you can mark it as "Cancelled", which:
- Maintains a clear history of cancelled orders.
- Prevents data loss associated with an order, such as reports or consumption notes (bonuri de consum).
- Reflects changes correctly in the Reports: Orders section, where values for cancelled orders are automatically set to 0.
Step-by-step user guide:
- Open the order list:
- Navigate to .
- Identify the order that needs to be cancelled (ensure it is not finalized).
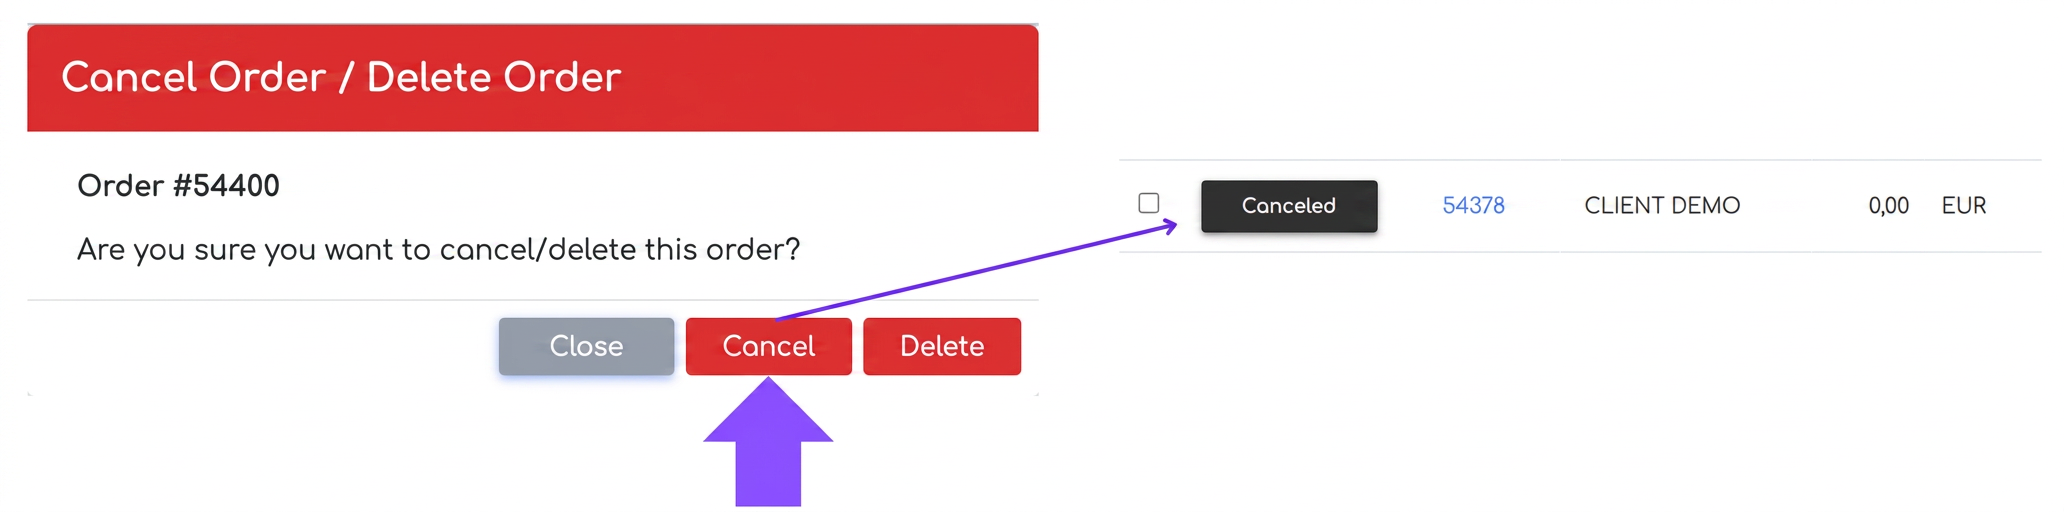
- Select the "Cancel" option:
- Click the Delete button next to the order.
- In the window that appears, choose the Cancel option.
- Confirm cancellation:
- After confirmation, the order will have the status "Cancelled", displayed in black in the order list.
- Impact of cancellation:
- The system automatically sets the total value and VAT of the order to 0.
- The change is reflected in , where cancelled orders will appear with 0 values.
- Managing consumption notes:
- If consumption notes were generated for the order, they remain active in the system.
- Manually delete the notes from the Consumption Notes section if necessary.
Important details about the feature:
- Availability: The "Cancel" option is accessible only for orders that have not been finalized.
- Data retention: Unlike complete deletion, cancelled orders remain in the system and can be identified by the "Cancelled" status.
- Correct reporting: Values of cancelled orders are automatically set to 0, eliminating confusion in financial reporting.
- Consumption notes: These are not automatically deleted and require manual action if removal is needed.
Optimization: Automatic Product Suggestions in e-Transport
The functionality allows selecting products from the catalog for e-Transport documents, offering an automatic suggestion system and automatic weight retrieval for products that have this information recorded.
Step-by-step user guide:
- Access the e-Transport document:
- Navigate to the Integrations → e-Transport section in the main menu.
- Create a new document or edit an existing one.
- Add a product line:
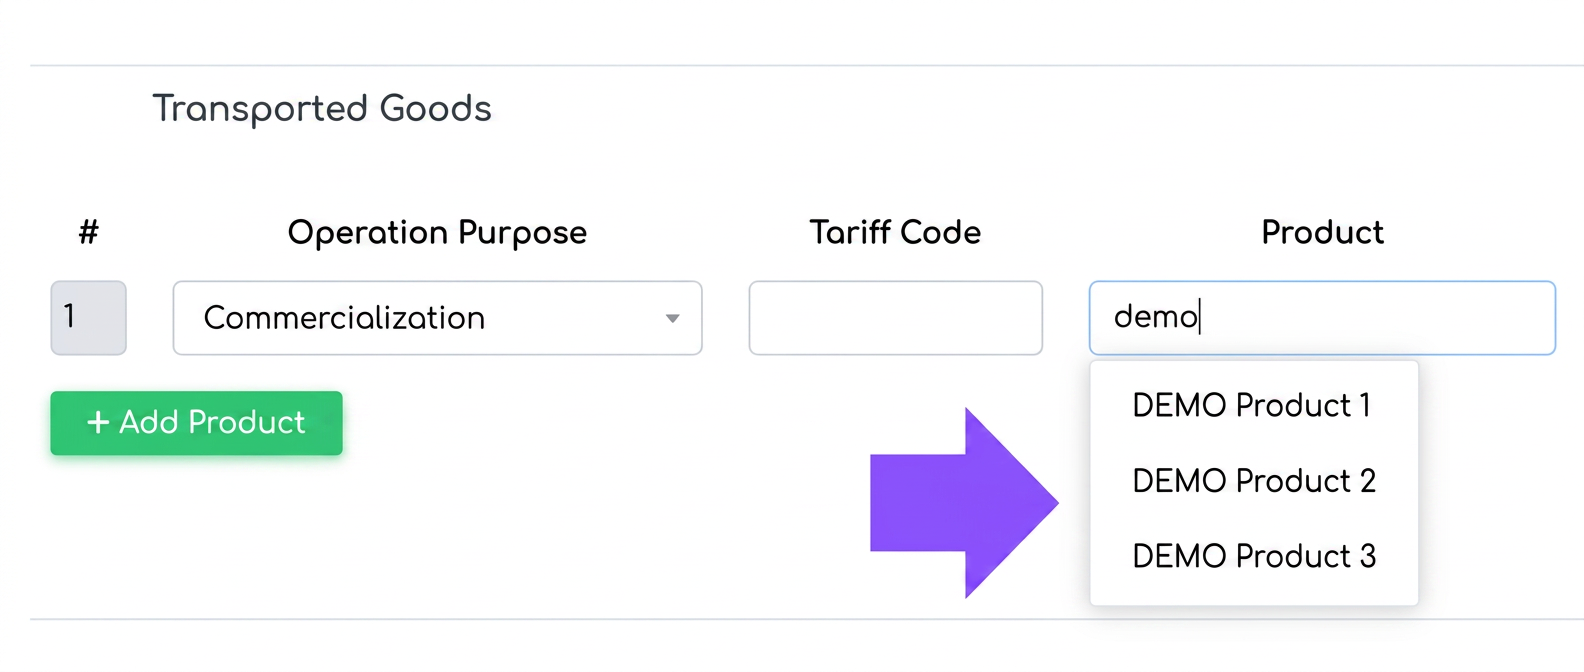
- Click on + Add Product in the "Transported Goods" section.
- Select the product from the catalog:
- In the "Product" field, start typing the first 2-3 letters of the product name.
- The system will display a list of relevant suggestions from the catalog.
- Select the desired product from the list.
- Weight retrieval (if available):
- If the selected product has a recorded weight, it will be automatically retrieved into the corresponding field in the e-Transport document.
- If the product does not have a recorded weight, the field will remain empty, and the weight can be filled in manually.
Optimization: Exchange Rate Display on Invoices
Allows displaying or hiding the exchange rate used on invoices and proformas generated in PDF format.
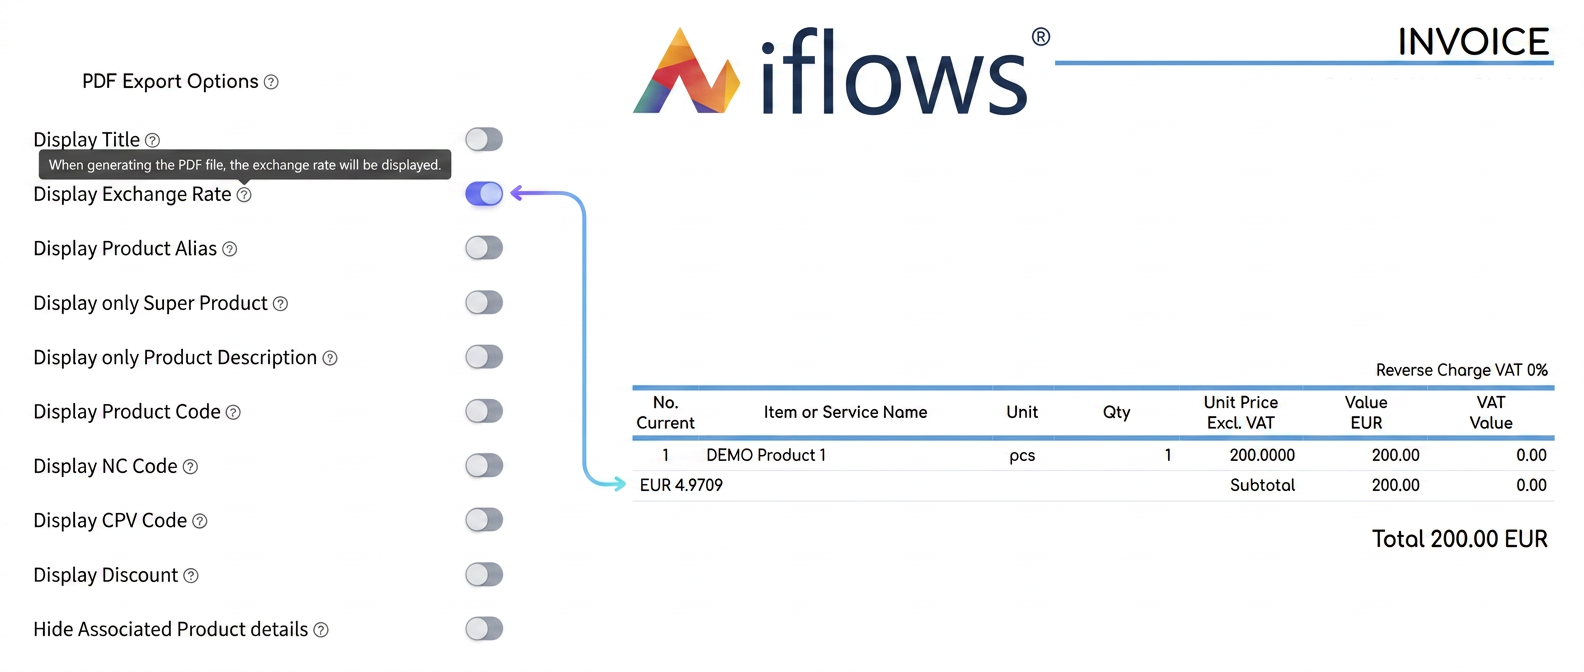
Step-by-step user guide:
Option 1: Configuration directly from the invoice
- Access the desired invoice:
- Navigate to and select the invoice you want to edit.
- Enable exchange rate display:
- Click on Edit Invoice.
- At the bottom, in the PDF Export Options section, check Show Exchange Rate.
- Save changes:
- Click Save and generate the PDF.
Option 2: Configuration from the template
- Access PDF templates:
- Go to and select the template used for invoices.
- Edit the template:
- In the PDF Export Options section, locate and check the Show Exchange Rate option.
- Save changes:
- Click Save Template.
- From now on, all invoices generated using this template will automatically display the exchange rate.
Note: If products are registered in the system in EUR, the exchange rate is not necessary and will not appear. This option is useful for users utilizing EUR/USD as the sales currency.
Optimization: CNP Becomes Optional on B2C Invoices: The 13-Zero Solution
Users can now issue invoices without requesting the CNP (Personal Identification Number), using a string of 13 zeros (0000000000000) in the CNP field, without generating errors or conflicts.
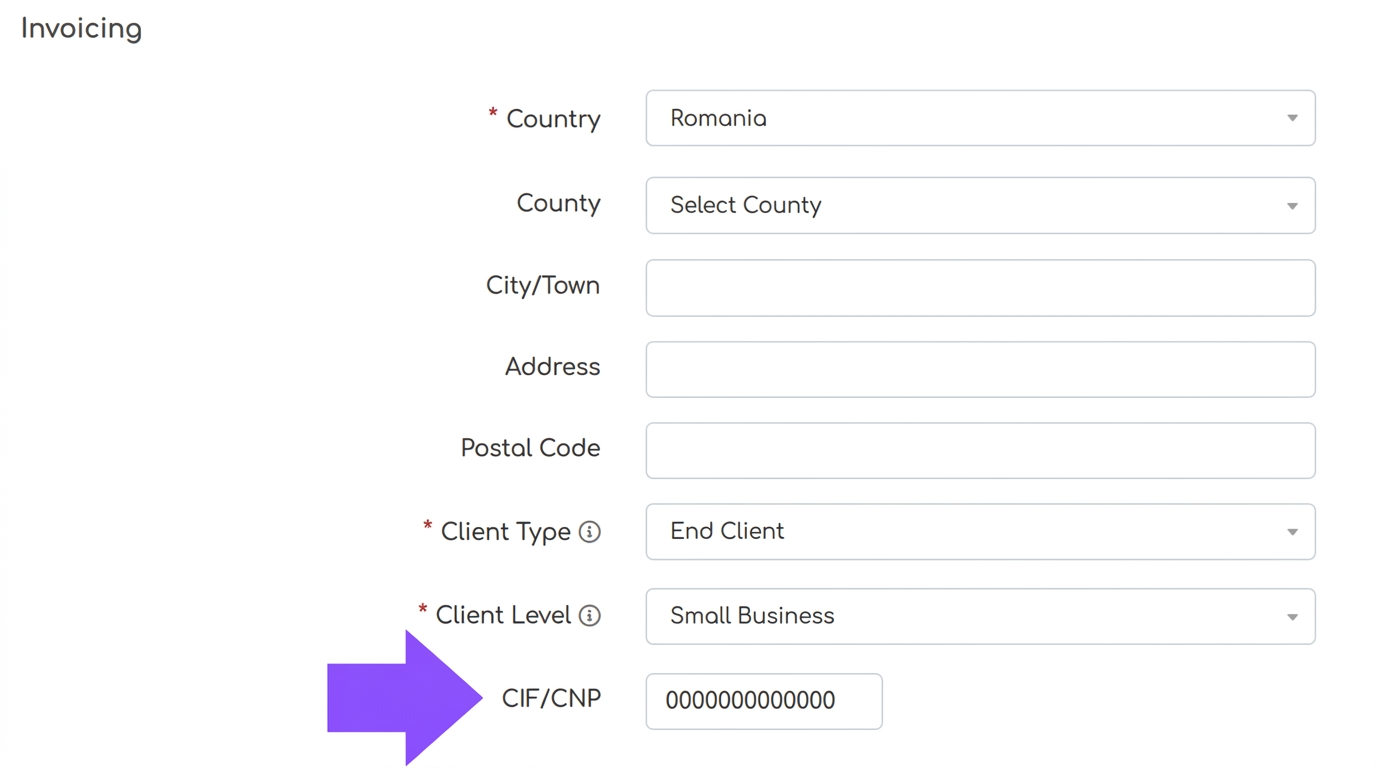
- The CNP is now optional for invoices issued to individuals, according to regulations.
- The string 0000000000000 can be used in the CNP field without generating errors or conflicts.
- The duplication restriction has been removed only for the string 0000000000000; other CIF/CNP values remain unique for each customer.