
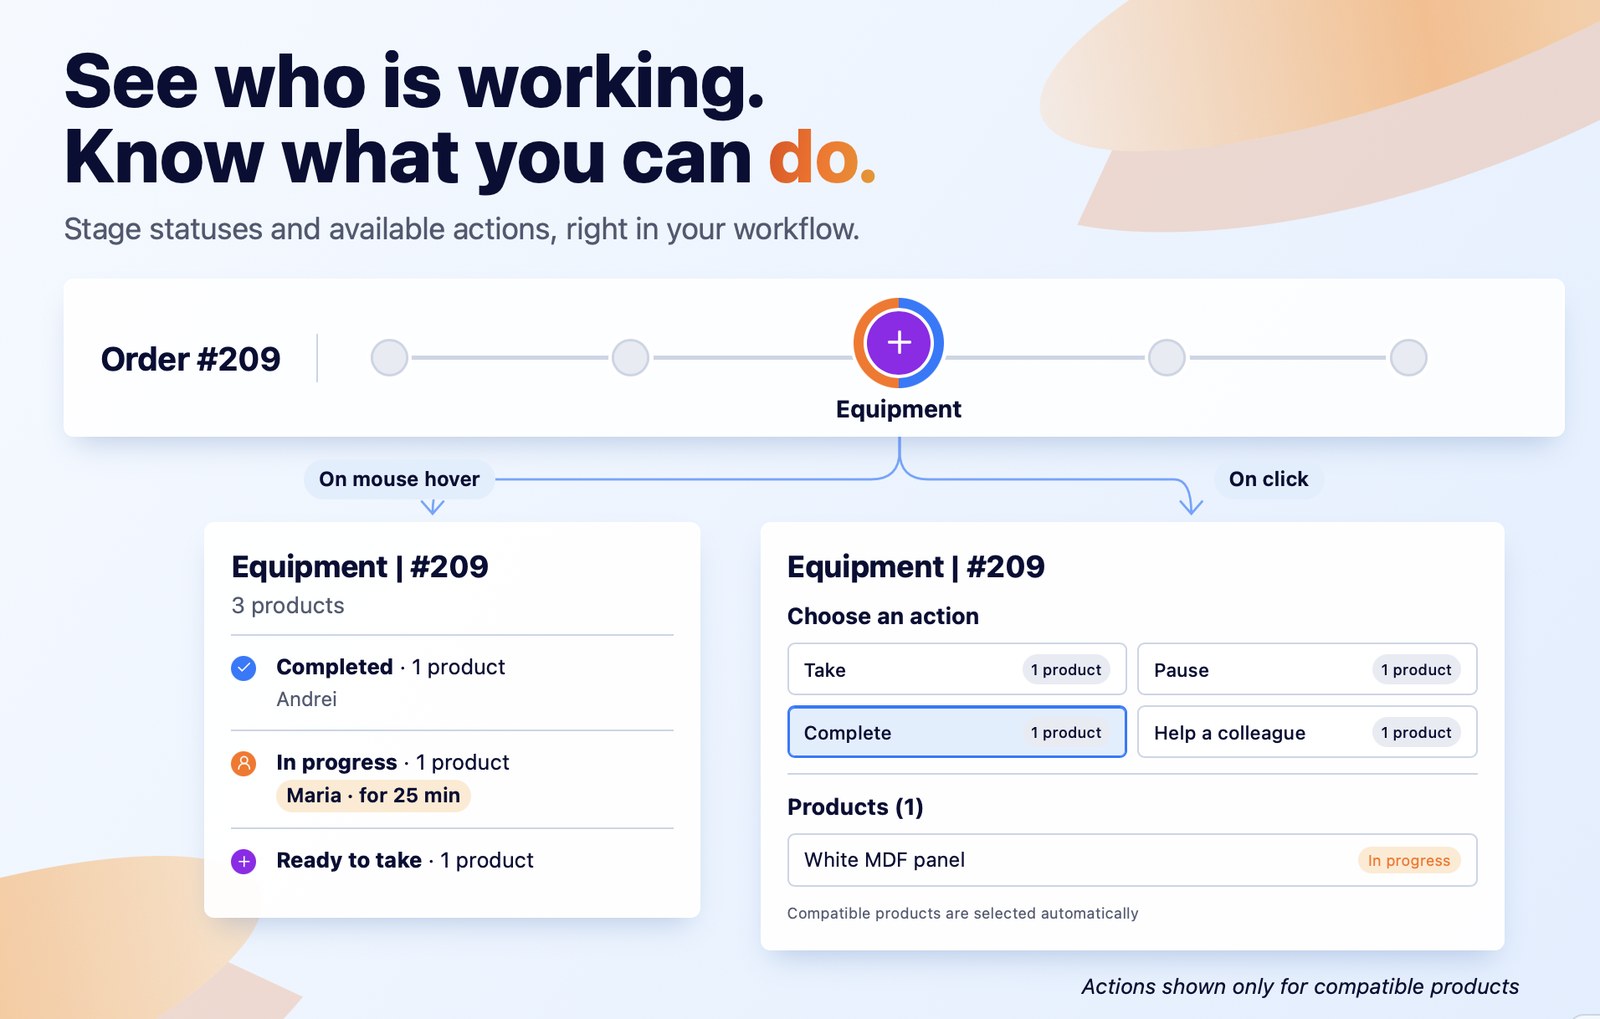
Until now, a stage circle in the Workflow had a single colour, even when the products of the order were at different stages. In addition, an action at stage level could not be performed when the products were in different statuses. Now a coloured ring around the circle also shows the other statuses of the products, and the action window filters the products automatically: for each action you see how many products it applies to.
Reminder: taking an order or a single product
In a Workflow stage, an order can be taken in two ways:
- With the button on the order row: all products of the order in that stage are taken at once.
- With the button on a product row, after you expand the order: only that product is taken. This way products can be taken one by one, one or two at a time, as the work is done in the workshop.
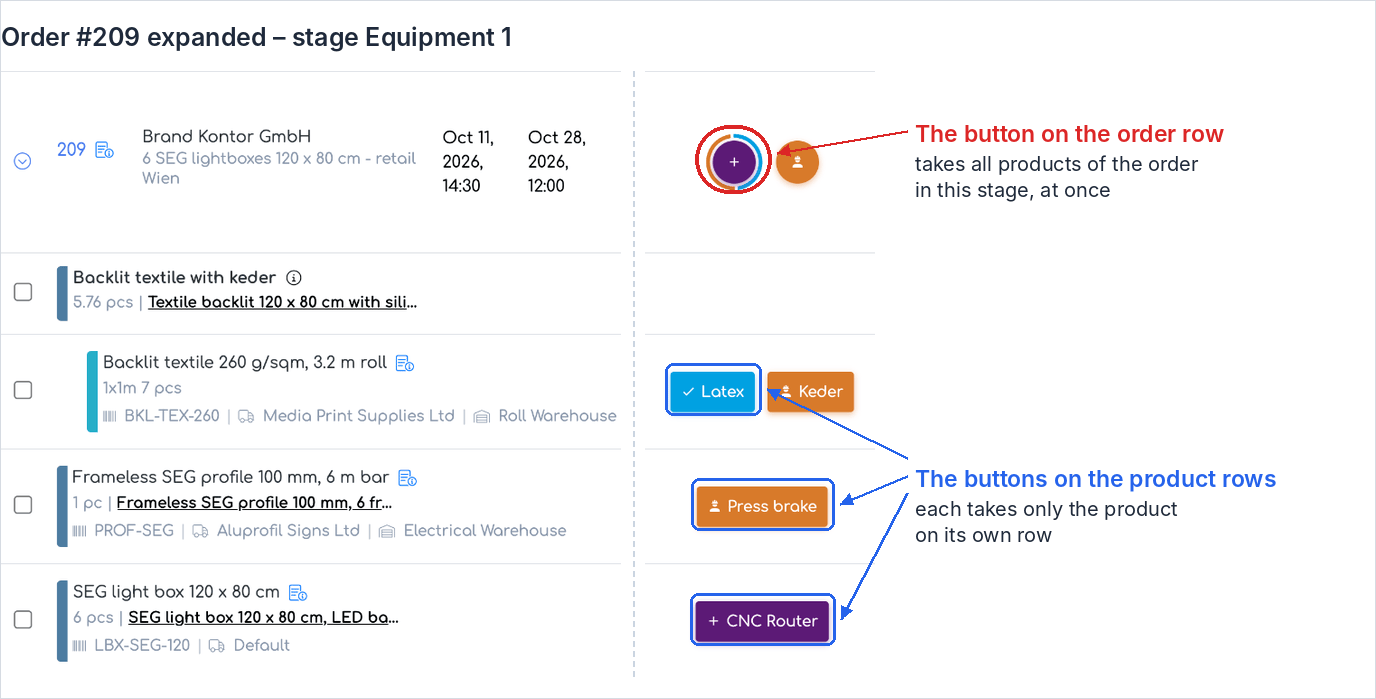
The button on the order row takes all products; the buttons on the product rows take only that product.
When products are taken one by one, they end up at different stages: one is already finished, another is in progress and another has not been taken yet. The stage circle and the action window have been improved for exactly these situations.
The result
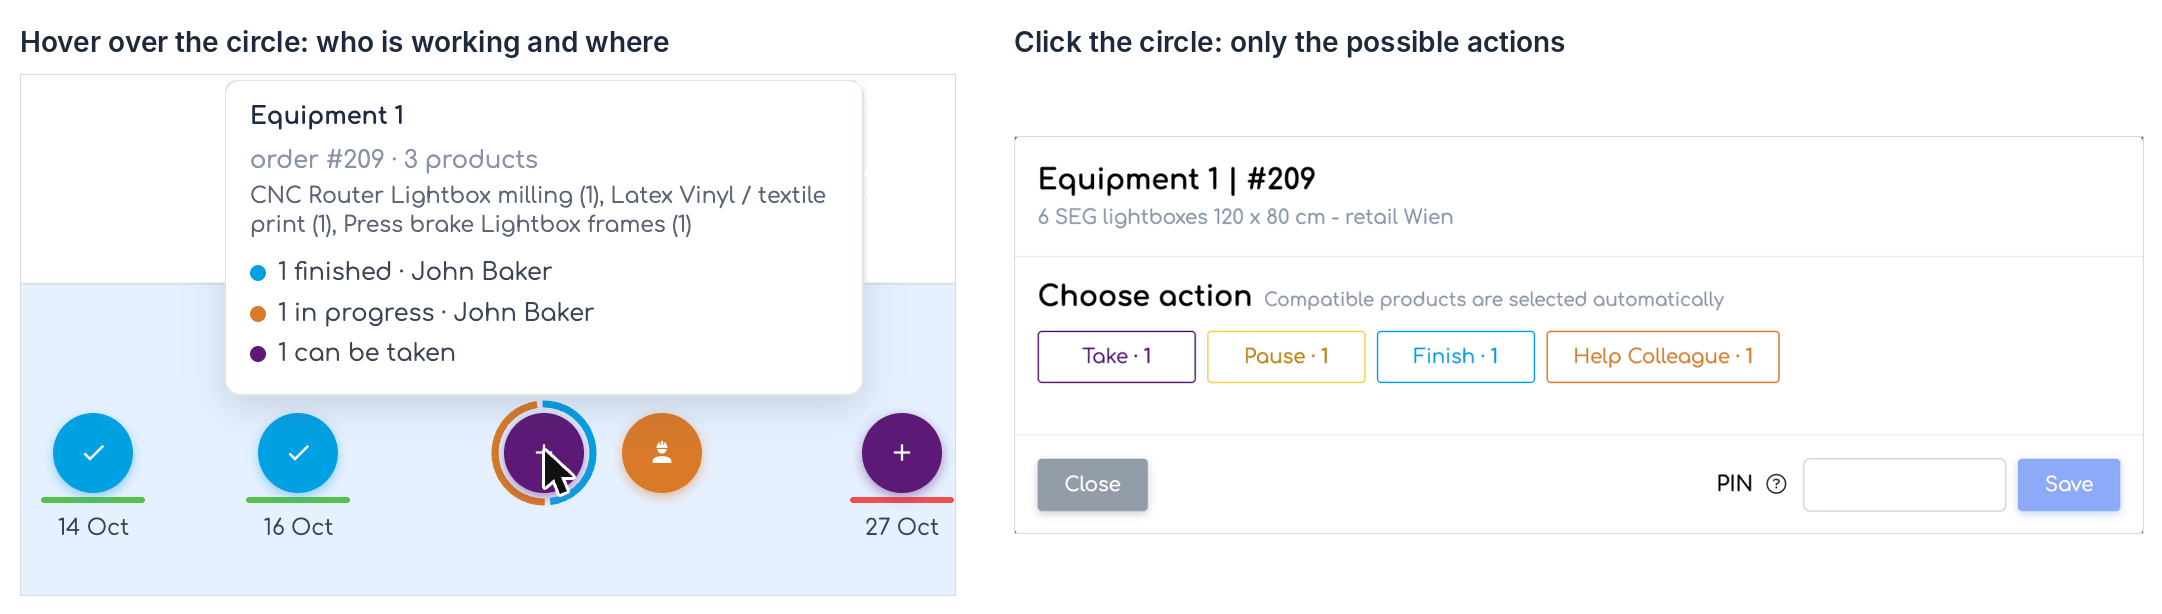
Left: the circle with its ring and the stage details on hover. Right: the action window, with the number of products for each action.
Basic principles
The image below shows order #209 expanded. On the order row is the circle of the Equipment 1 stage, and below it are the three products of the order, each with its own equipment button. On the right are the actions offered by the action window when you click the order circle.
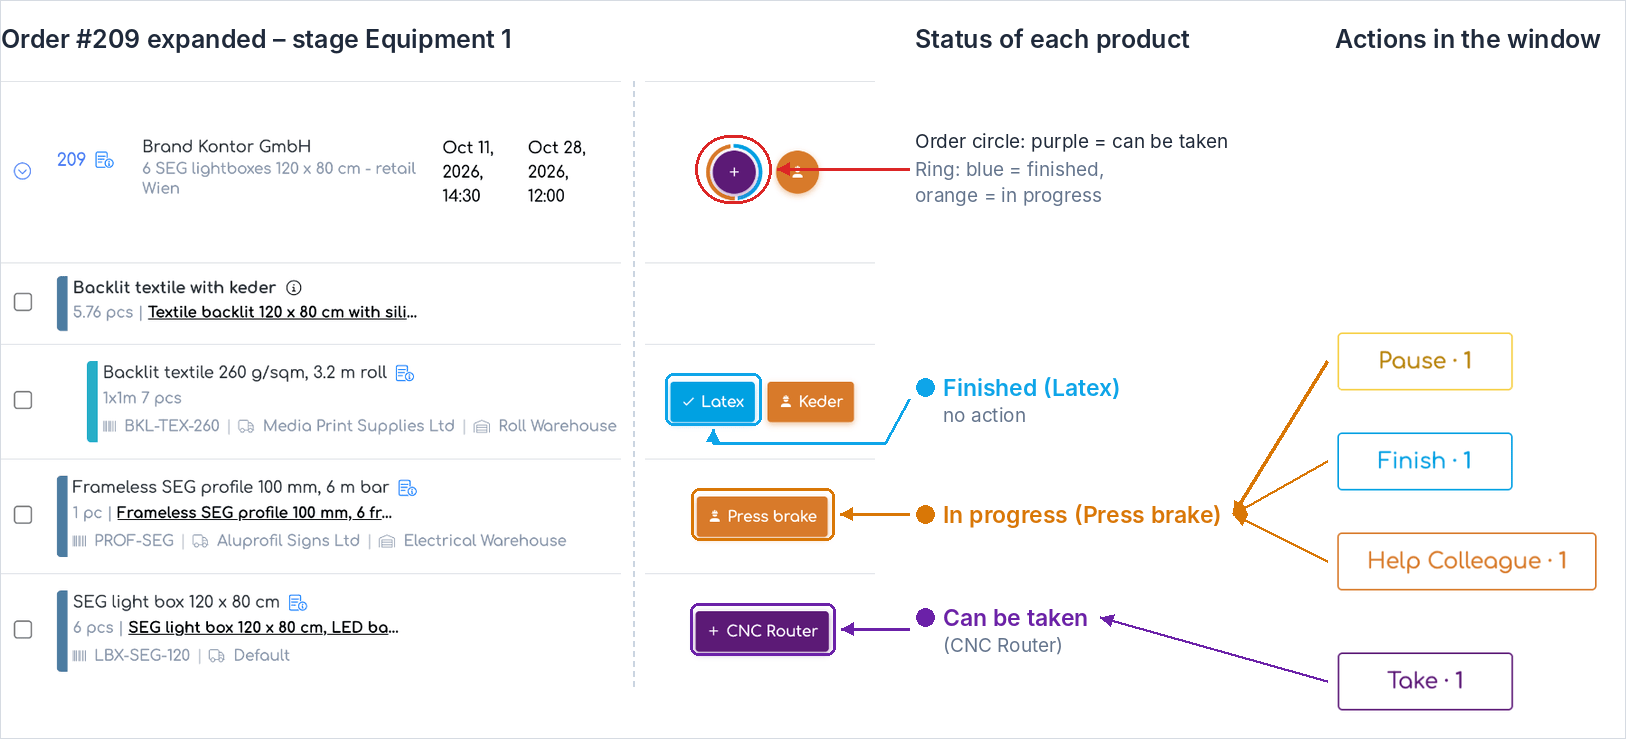
Order #209: one product finished, one in progress and one that can be taken. Each action applies only to the product in the matching status. (The Keder button belongs to the Equipment 2 stage.)
1. The ring around the circle shows the status of all products. The order circle is purple, meaning the stage “can be taken”, because one product, the SEG light box, has not been taken yet. The ring shows, however, that the other products have already been taken: the blue segment is the backlit textile, finished on Latex, and the orange segment is the frameless profile, in progress on the press brake.
2. You can act at stage level, even if the products are in different statuses. When you click the order circle, the system checks each product and offers only the actions that can be performed. The chosen action applies only to the matching products; the others remain unchanged.
3. The number next to each action shows how many products it applies to. Follow the arrows in the image:
- Take · 1 refers to the SEG light box, the only product that can be taken.
- Pause · 1, Finish · 1 and Help Colleague · 1 all refer to the frameless profile, the only product in progress. Only this product can be paused or finished.
- The backlit textile is already finished, so it does not appear under any action.
So the “1” next to Take and the “1” next to Finish do not refer to the same product: each number shows how many products are in the right status for that action.
Before you start
- The actions in the window are the ones configured on the stage in the workflow settings. An action that is not configured on the stage never appears in the window.
- Each product has its own status in each stage: can be taken, in progress, paused, finished or waiting for the previous stage. The action window is built from these statuses.
What the stage circle shows
On the order row, the circle of each stage shows the most relevant status among the products of the order, in this order: can be taken, in progress, paused, finished, waiting.

The statuses of a stage and the ring shown when products are in different statuses.
- When the products of the order are in different statuses, the circle gets a ring split into equal segments, one for each of the other statuses. For example, a purple circle shows that a product can be taken, while the ring shows that other products are in progress (orange) and finished (blue).
- The same ring also appears on the equipment buttons.
- Products for which the stage is disabled are not counted.
Stage details on hover
Step 1. Hover for about half a second over a stage circle on the order row. A window appears with the stage name, the order number and the number of products in the stage. Below them you see:
- The equipment, only for stages with equipment. Each entry has the form “Equipment Work profile (number of products)”, and entries are separated by commas. For example, “CNC Router Lightbox milling (1)” means: the CNC Router equipment, the Lightbox milling work profile, one product scheduled. At most three pieces of equipment are shown; the rest appear as “+N”.
- The statuses: how many products are in each status and the names of up to three people who are working or have worked on them.
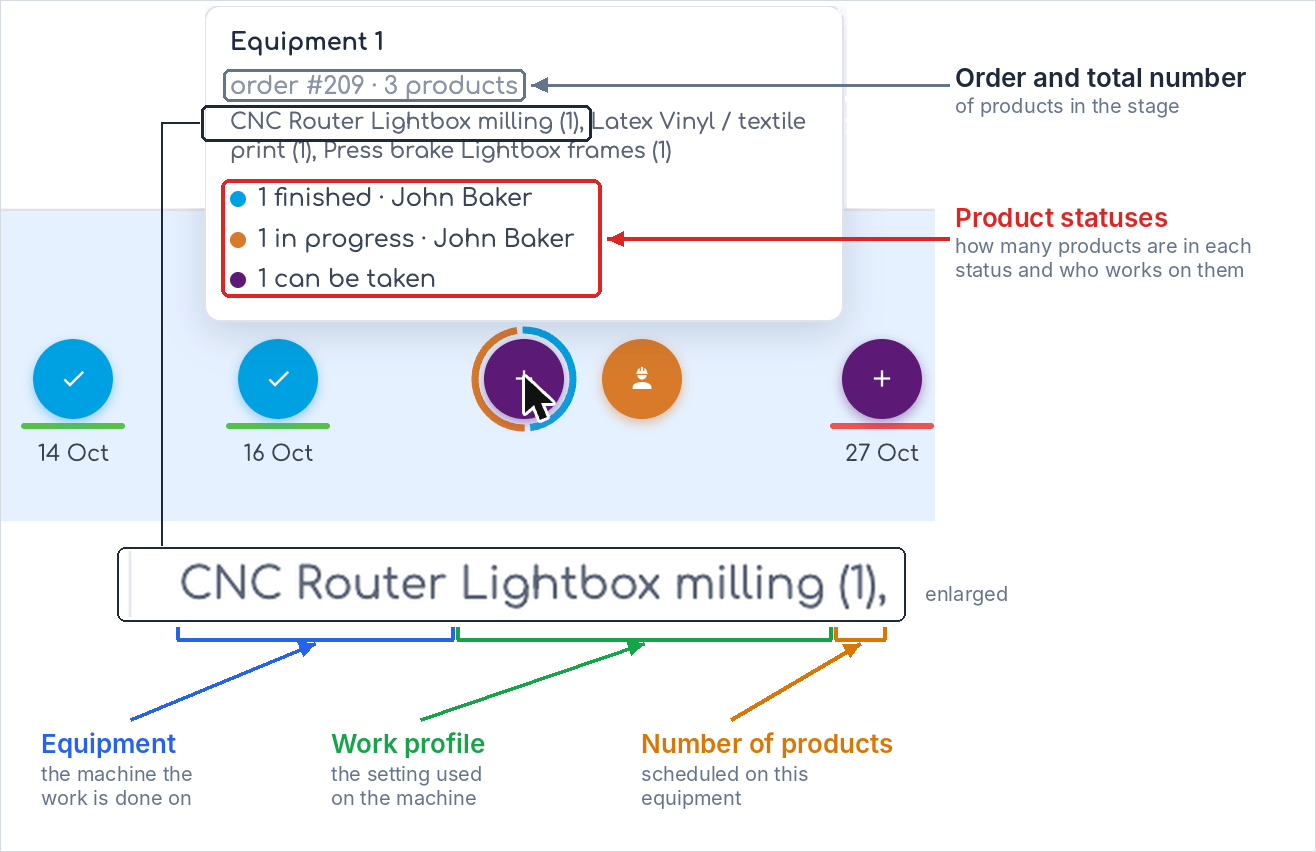
How to read the stage details: the order and number of products, the equipment (equipment, work profile, number of products) and the product statuses.
Step 2. To see each product, expand the order: click the arrow to the left of the order number (1). The products appear below the order row, each with its own circles and equipment buttons in the stage columns (2). Click the arrow again to collapse the order.
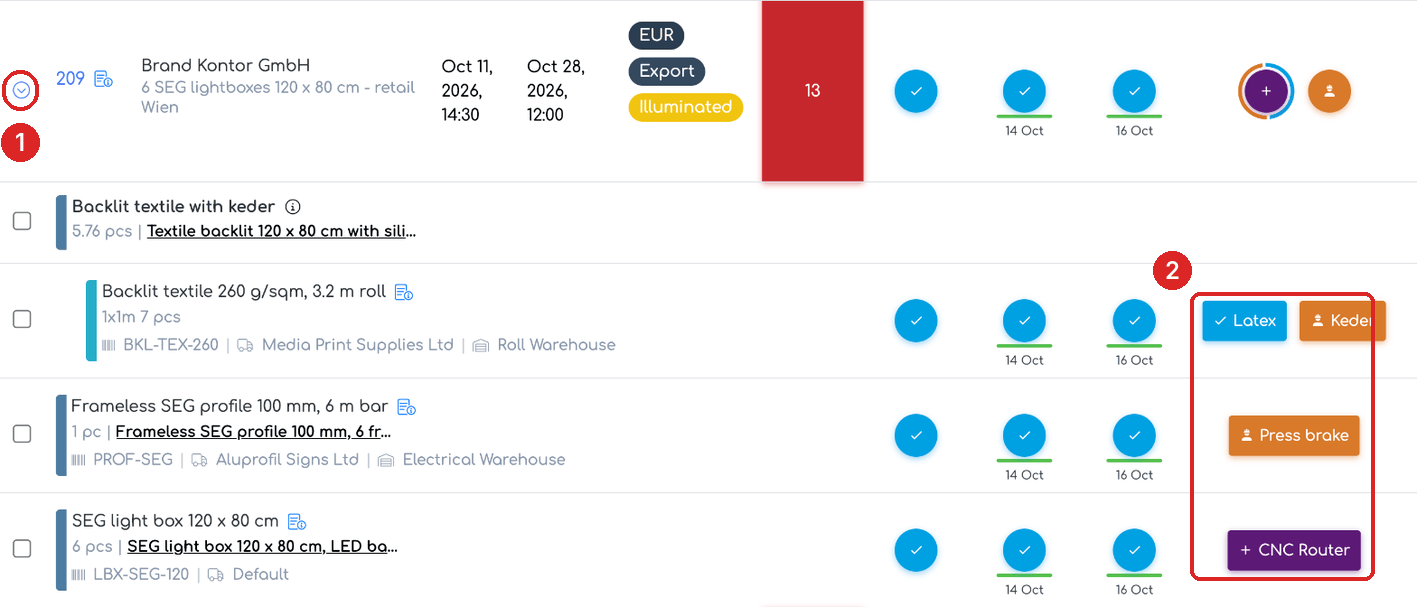
Order #209 expanded. In the Equipment 1 stage, the backlit textile is finished on Latex, the frameless profile is in progress on the press brake, and the SEG light box can be taken on the CNC Router.
Step 3. Hover over the circle or button of a product. The window shows the stage, the equipment and the status, the order number, the product and quantity, plus a status line, for example “paused by {name} · paused for 2d 3h”, “finished by {name} · 1h ago” or “can be taken”. When the product can be taken, is waiting or is paused, the assigned employees are also shown.
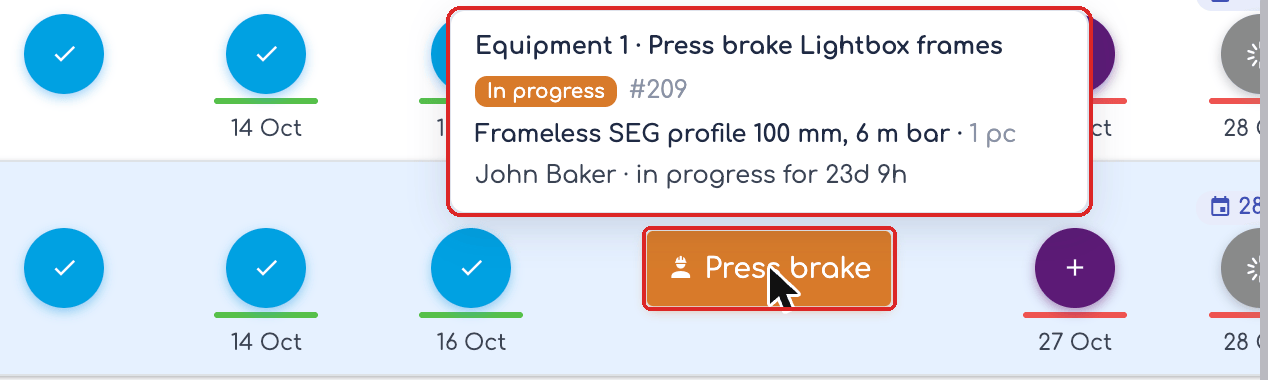
Details of the frameless profile: the press brake equipment, the “In progress” status, who is working and for how long.
Note: The details window is for information only and appears on computers, not on phones or tablets. In the client portal, the circle has a short message with the number of products in each status, for example “Finished - 2”.
The action window
The action window opens when you click a stage circle, whether or not the stage has been started. It takes into account the products you clicked:
- Click on the circle on the order row: all products of the order in that stage (or on that equipment).
- Click on the circle or button of a product in the expanded order: that product, together with the ticked products of the same order.
For each of these products, the window checks its status in the stage and offers only the matching actions:
- Can be taken → Take. If the stage has no Take action configured but has Finish, the product can be finished directly.
- In progress → Pause, Finish, Help Colleague and, if configured on the stage, Partial finish.
- Paused → Resume.
- Finished, waiting for the previous stage or with the stage disabled → no action.
What the numbers mean. The number next to each action shows how many of these products the action can apply to. A product in progress is counted under Pause, Finish and Help Colleague, because any of them can apply to it.
Step 4. Click the stage circle. The action window opens, titled “Stage | #order”. The Choose action section shows only the actions that can apply to at least one product. If no action is possible, the message “No action available” appears.
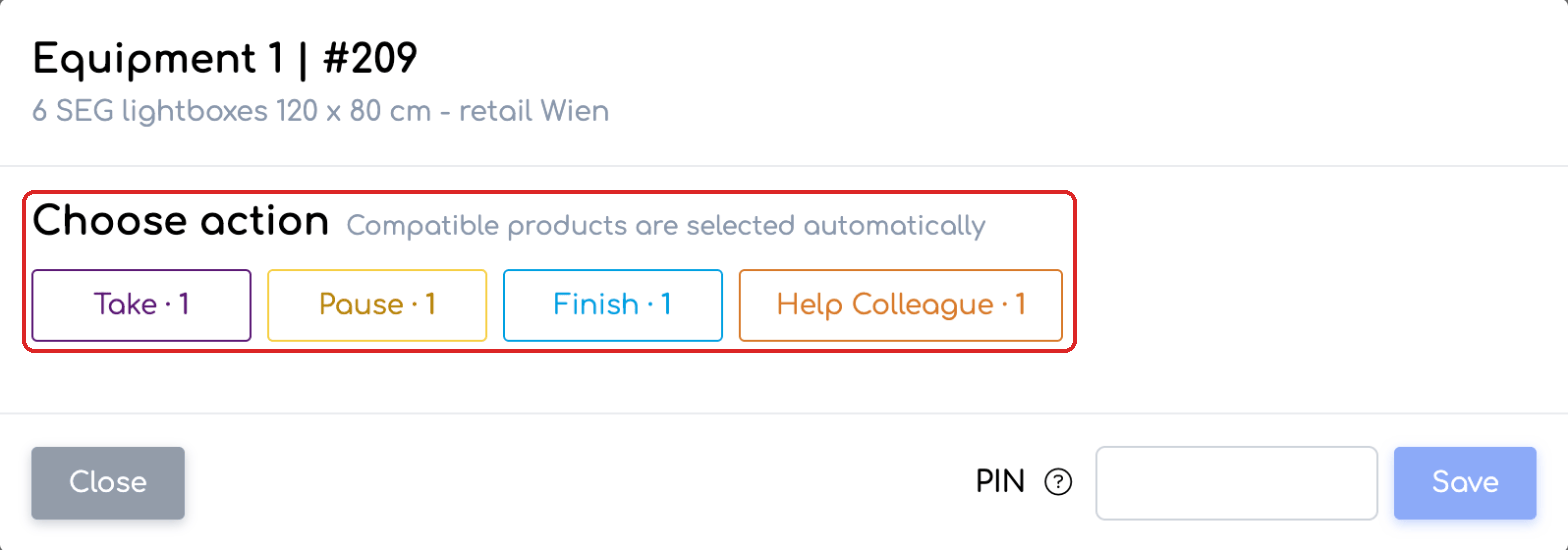
Order #209, stage Equipment 1: Take · 1 refers to the SEG light box (can be taken), while Pause · 1, Finish · 1 and Help Colleague · 1 refer to the frameless profile (in progress). The backlit textile is finished, so it does not appear under any action.
Step 5. Choose the action. The Products (N) section appears, with only the products the chosen action applies to; they are selected automatically. If the action has instructions to fill in, the Instructions section appears below it.
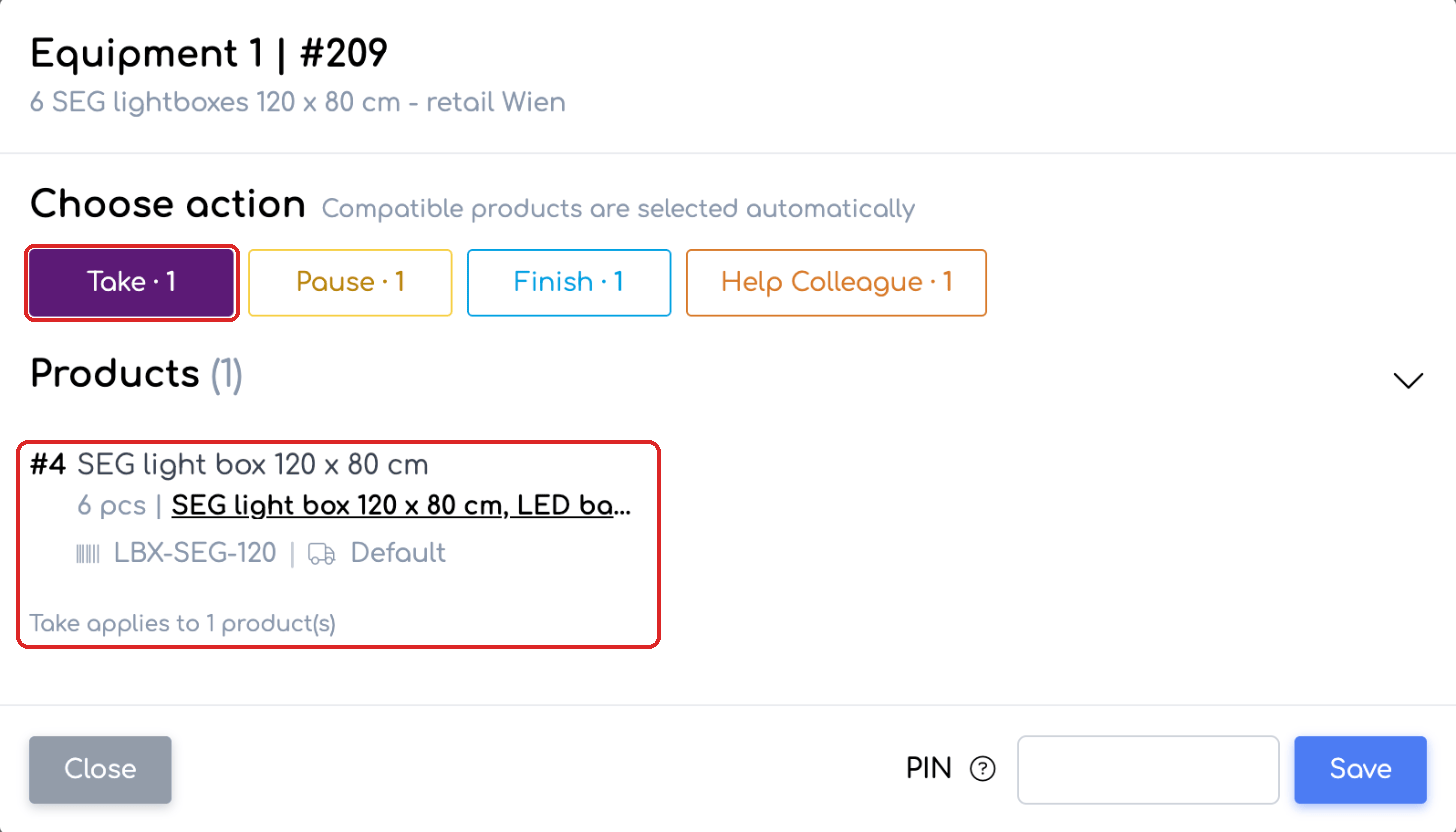
Take chosen: it applies only to the SEG light box, the only product that can be taken.
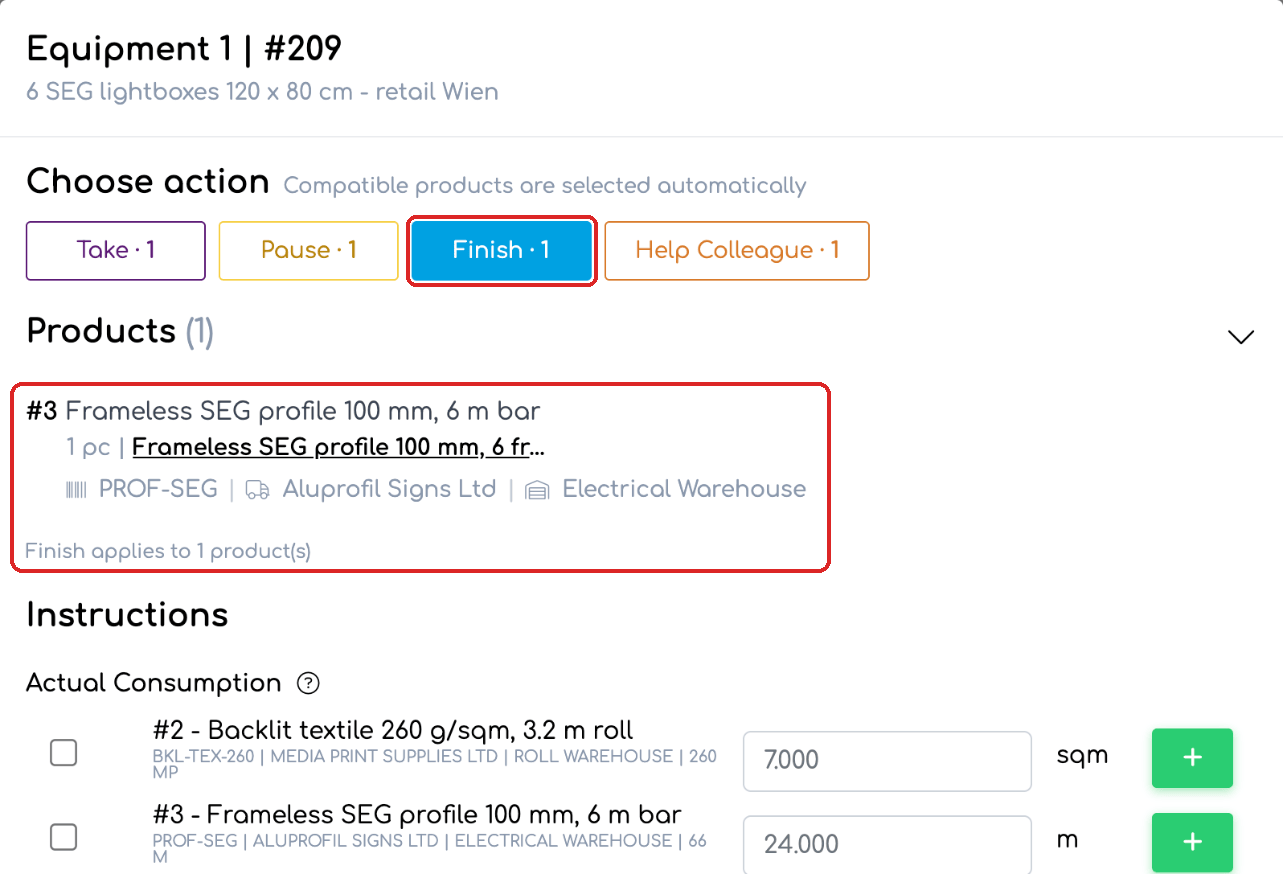
Finish chosen: it applies only to the frameless profile, the product in progress, and asks for the stage instructions.
Step 6. Fill in the instructions and, if asked, the PIN, then click Save. The button becomes active once you choose an action. Close exits without saving anything.
Superproducts: all components with one tick
Step 7. In the Orders tab, expand the order. The superproduct row now has the Select / deselect all components checkbox. One click ticks all the components of the superproduct at once; another click unticks them. Then click the circle or button of one of the components: the action window opens for all ticked components.
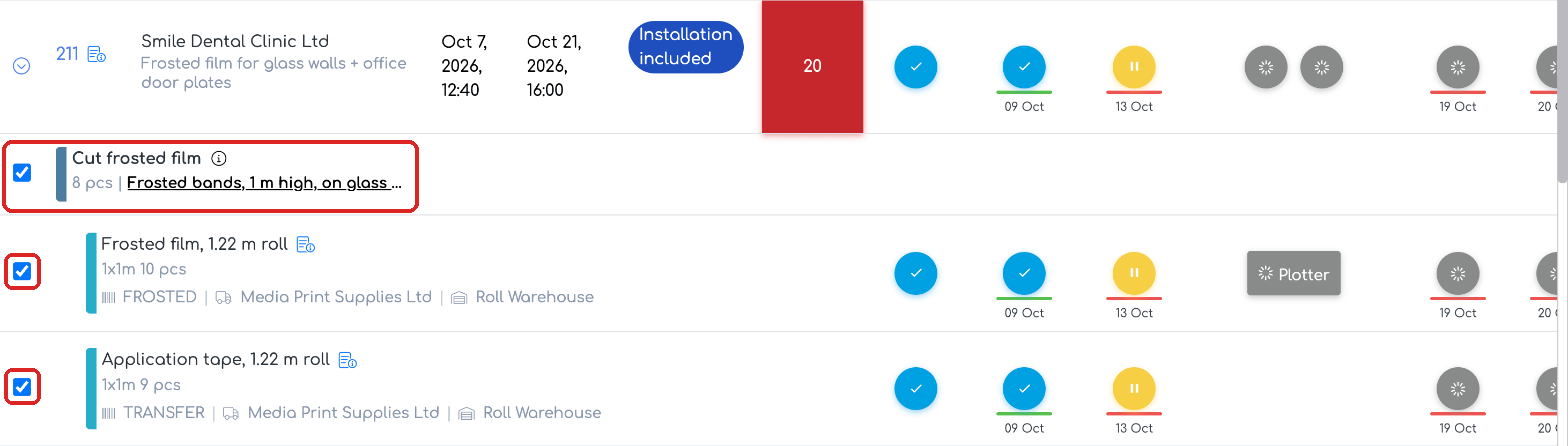
The checkbox on the superproduct row selects all its components.
Good to know
- If only one action is possible, it is chosen automatically, both on the order circle and on the product circle.
- On the order circle, when products are in different statuses, the chosen action applies only to the compatible products, without an error message. For example, Finish applies only to the products in progress, while those that can be taken remain unchanged.
- Help Colleague appears automatically on stages that have Finish configured. After you have helped a colleague, the action to finish the help also appears.
- If the stage has no action configured, the window shows a message to that effect; actions are added in the workflow settings.
Frequently asked questions
I clicked Finish on the order circle and not all products were finished. Why?
Finish applies only to products in progress. Products that can still be taken must be taken first and finished afterwards; products already finished do not change.
I see Finish · 1, but when I save I get the message “… is taken by …”. What does it mean?
A product taken by a colleague can be paused or finished only by that colleague. If the stage asks for a PIN, the action is recorded on the employee whose PIN you enter. To work on that product as well, use Help Colleague.
What does the Help Colleague action do?
It adds you to a product a colleague has in progress, without taking it over. When you finish your part, use the action that finishes the help, which appears in the action window.
What are the checkboxes next to the products for?
Tick the products you want to process together, then click the circle or button of one of them. The action window opens for the product you clicked and for all ticked products of the order. The checkbox on a superproduct ticks all its components at once. The circle on the order row always takes all products into account, whatever is ticked.