
Task Workflow
The task workflow is an internal organizational tool within a company, designed for managing administrative and operational activities. Unlike the workflow, which focuses on managing orders or projects directly associated with clients, the task workflow targets those activities that are not necessarily linked to a specific order. These tasks include internal activities and operations essential for the organization's daily functioning.
Creating a new task workflow
To set up a new task workflow, navigate to the Settings section and select Task Workflow. This is where we will establish the operating rules for that specific workflow.
Click on New Task Workflow. You have the option to use a predefined template or create a custom workflow tailored to the team's needs. Select a name for the workflow and then enable or disable the desired options:
- Estimated Time – allows setting an estimated duration for task completion.
- Reminder – adds a reminder at a set date.
- Deadline – allows establishing a deadline for completing the task.
- Progress Bar – displays task progress in the form of a visual bar, completed manually.
- Comments – allows adding comments to the task.
- Files – allows uploading and attaching relevant files.
- Public/Private – if the workflow is set to Public, it will be visible to all users in the team. If you disable this option, the workflow becomes Private. In this case, an additional field will appear where you can select the employees who will have access to that workflow. This functionality allows for restricted sharing, ensuring only selected members can view and interact with tasks in the private workflow.
Task sorting method in the workflow
You can choose the Sorting method for tasks in the workflow based on the following criteria: Creation Date, Deadline, or Priority, in ascending or descending order. This option helps you organize tasks according to the team's needs and quickly identify priority activities.
Adding stages to the task workflow
To structure the task workflow, we can add various stages that correspond to the steps necessary to complete the tasks. Click the + New Stage button. To assign a name to the stage, click in the text box and enter the desired name. This structuring allows for a clear and phased organization of the task workflow.
Saving and activating the task workflow
After saving the task workflow, it will appear in the list of available task workflows. To ensure the workflow is functional and ready for use, check that it is marked as Active. This guarantees that the workflow is available for immediate use within the team.
Selecting the active task workflow
To access the task workflow, navigate in the main menu to the Task Workflow section. If you have multiple active workflows, you will find a workflow selector in the top left in the form of a drop-down list. This selector allows you to choose the specific workflow you wish to view or edit.
Select the desired workflow to start managing tasks, having all previously configured functionalities and settings at your disposal. This flexibility allows for rapid adaptation to the team's organizational and monitoring needs.
How to add a task to the task workflow
To enter a new task into the workflow, click the New Task button on the right side of the screen. This will open a window where you must fill in the following essential information:
- Task Title – Enter a descriptive title that clearly reflects the activity to be performed.
- Task Description – Fill in a detailed description of the task to clarify all aspects necessary for its execution.
- Responsible – Select the person who will handle the task or be accountable for its completion. This functionality helps with efficient task distribution within the team.
- Order – If the task is associated with a specific order, you can select the order from the list. This option is useful for linking activities to already existing orders.
- Privacy – Choose whether the task will be Public (visible to the whole team) or Private (visible only to the creator and the responsible person).
- Priority – Select the priority level for the task: Low, Medium, High, or Critical. This indicator helps the team prioritize tasks based on urgency.
- Deadline – Enter the date by which the task must be completed for better time management.
- Estimated Time (in minutes) – Enter the estimated time required to complete the task.
- Reminder – Set a reminder by selecting the date and time you wish to receive a notification about the task.
- Employee Reminders – If the task requires collaboration, you can select employees to also receive reminders.
- Progress – Enter the current progress percentage of the task. This field will fill the progress bar, providing a clear picture of the completion status. Progress can be updated as the task advances.
- Labels – Add relevant labels.
- Documents – You have the option to upload documents directly to the task. To do this, either drag the files into the dedicated area or click Browse... to select files from your device.
Once you have saved the task, it will be visible in the Tasks column.
Advancing and monitoring a task
To advance the task from one stage to another, use the drag and drop function to move the task between workflow stages.
Activating time tracking – Once you have placed the task in a new stage, click the Play button to start time tracking. This publicly indicates that the task is in progress and is being actively worked on.
Pause – When you wish to stop working, click the Pause button to temporarily suspend time tracking.
While working on the task, depending on your settings, you have a series of symbols and options available that allow you to quickly modify or complete information: Reminder, Files, Comments, View, and Edit.
Organization and Visualization
To maintain efficient organization, there is a Collapse Task button in the right corner of each task. Once clicked, it will display only the task title and action buttons. This button is also available at the stage and global levels, allowing for collapsing or maximizing all tasks simultaneously.
Completing a task
Completing a task is done by moving it to the last stage, where the Start Task/Pause button will turn into Finish. After completion, the task can no longer be returned to another stage and will disappear from the workflow to avoid cluttering the stage. Completed tasks can only be viewed using the "Completed" filter (select "Yes").
Viewing detailed information
To view detailed information about a task, click the View Task button. Here you will find all information related to the task, including time worked and the stages it has passed through.
Deleting a task
In the right corner of each task is a Delete button. Use it to remove a task from the workflow if it is no longer necessary.
Service Module
The Service function, found in the Clients -> Service section, is intended for companies that provide maintenance, warranty, or repair services for various equipment, electronics, or other products. This functionality allows for management of sold equipment, interventions, and maintenance activities, providing a detailed record of service processes. Thus, companies can efficiently monitor their intervention history.
Service Templates
iflows provides service templates. These templates are predefined structures that help standardize the information that must be completed for each type of equipment. With their help, you can define exactly what details are necessary for each piece of equipment, ensuring all relevant fields are ready for completion when adding new equipment.
Steps for Configuring a New Template
1. Accessing the Service Templates Section
Navigate to Settings -> Clients and select the Service tab.
Click on + New Service Template to open the template editor.
This template will establish the structure of information needed for each piece of equipment managed in the service activity.
2. Assigning a Name to the Template
In the Template Name field, enter a representative name, such as "Printer", "CNC", or other names relevant to the managed equipment.
3. Adding Fields to the Template
Now, let's configure the necessary fields for the equipment.
- To add a field, you have two options:
- "+ Add Field" Button: Click this button to open the configuration window for a new field.
- Directly on the Line: If you start typing a field name that is not already in the list, you will see the "Add" option and can add the field on the spot without leaving the window.
- Field Configuration: In the field configuration window, fill in:
- Field Name: Enter the name of the field, for example, "Model" or "Serial Number".
- Field Type: Select the type of information:
- Text: for descriptions or names.
- Number: for numerical values (such as serial number).
- Select: to create lists of predefined options. For example:
- For a field named "Warranty Status", select the field type as Select, and add "Under Warranty" and "Out of Warranty" as options.
- Another use for Select would be validation, such as "Yes" or "No".
- Date: for fields requiring a specific date, such as "Purchase Date".
- Setting a Default Value (optional): If the equipment frequently uses a certain setting or detail, enter a predefined value for that field to save time during completion. For example, if a certain model is the most used, you can set this model as the default value.
- Setting the Field as Mandatory: If this field is essential for recording, enable the Mandatory toggle. Thus, users will not be able to save a piece of equipment without completing this field.
Repeat these steps for each field you need. In this way, you will create a complete structure that includes all relevant information for the equipment.
4. Finishing the Template
After adding all fields, save the template either with Save and Continue to make further adjustments, or with Save to finish and return to the template list.
Registering a New Equipment in Monitoring
After you have finished configuring a service template, you are ready to start registering the client equipment you wish to monitor.
- Navigate to the Clients -> Service Section.
- In the main menu, access Clients and select the Service option. Here you will find a list of all equipment already registered for monitoring.
- Adding New Equipment
- On the right side of the page, you will see the + Client Equipment button. Click this button to start registering a new piece of equipment.
- Completing Basic Equipment Details
- Select Template: In the Template field, choose the template you created earlier. This will automatically populate the specific fields for the type of equipment you are adding.
- Choose Client: In the Client field, select the client for whom this equipment is registered.
- Equipment Alias (optional): Provide an alternative name, a "nickname", that helps you identify it more easily, especially if the original name is too long.
- Labels (optional): Choose or add labels for organization.
- Completing Equipment-Specific Fields
- Depending on the chosen template, the initially configured fields will appear. Fill in each field individually, according to requirements. Examples of fields you might encounter:
- Head type: Enter the type of heads used (e.g., KM-1024A).
- Equipment SN: Add the equipment serial number (e.g., SN-12345).
- Software Version: Enter the installed software version (e.g., v2.0).
- Depending on the chosen template, the initially configured fields will appear. Fill in each field individually, according to requirements. Examples of fields you might encounter:
- Adding Additional Details
- Below the basic fields, you will find the Details section. Here you can enter additional information, descriptions, or technical specifications relevant to the equipment.
- Uploading Images
- If you want to attach relevant images for the equipment, use the Images section:
- These images are useful for documenting the equipment's condition or highlighting specific issues.
- If you want to attach relevant images for the equipment, use the Images section:
Managing Maintenances, Interventions, and Issues
- Maintenance:
- Click the + New Maintenance button.
- Fill in the maintenance date and activity details.
- Optionally, you can set notifications to receive alerts related to future maintenance.
- Interventions:
- Click + New Intervention to add a specific intervention (e.g., repairs or additional checks).
- Enter the intervention date and relevant details.
- Issues:
- To record an observed issue, click + New Issue.
- Fill in the issue description and, if applicable, add a note about its resolution.
Viewing Equipment
On the Service page, you will find the list of all added equipment, along with information such as:
- The Template used
- The Alias, if set
- The Client assigned to the equipment
- The Labels added
- Next maintenance date, if specified
Available Actions
Next to each piece of equipment, the following action buttons are available:
- View
- Edit
- Label
- Clone
- Delete
To modify a piece of equipment, click the Edit button. From here, you can add or delete maintenance, an intervention, or an issue and complete other information, such as additional details or images.
Permissions
If you or one of your colleagues do not see the Service section, it is possible you do not have the necessary permissions for access and modifications. To check this, go to Financial -> Employees and open the Permissions tab. In this section, look for the "service" line and ensure the corresponding permissions are activated for your role. This configuration is essential to allow you full access to equipment management functions, template creation, and intervention recording, so that you can use all features of the Service module without restrictions.
Description Field - Purchase Orders
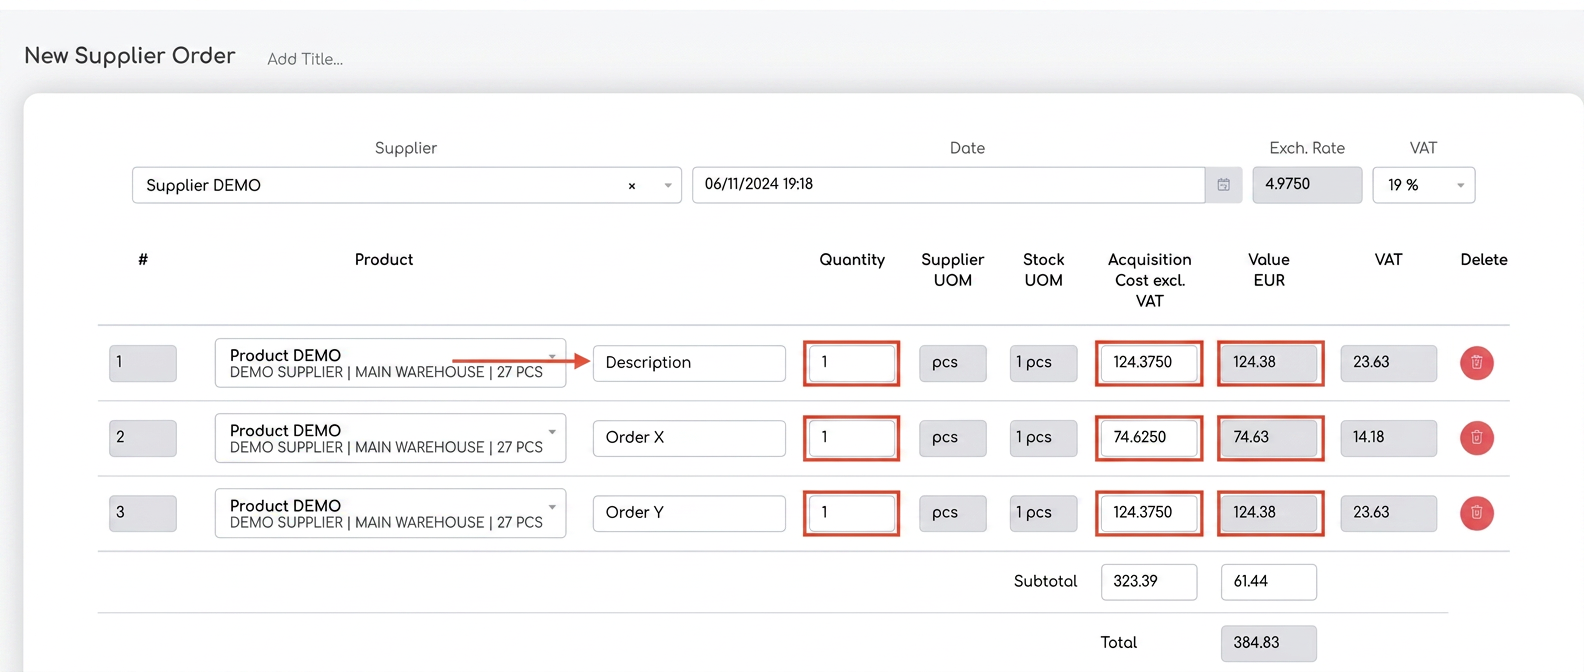
For purchase orders to suppliers, a new field called "Description" has been added to each product line. This field allows users to add additional information about products, providing flexibility in managing details within supplier orders.
Utility and Benefits
- Internal or External Visibility: If the PDF display button is not activated, the information in the "Description" field is visible only internally, during order viewing and editing.
- Control in Sent Documents: If the PDF display option is activated, the details in the "Description" field will appear both in the PDF export and in the email sent to the supplier.
Through this functionality, users can more precisely customize the information included in the sent documents while maintaining a detailed internal record of products and orders.
New Extensions for Attachments
We have expanded the file types that can be added to the platform for the Sales and Workflow sections. Now, users can upload additional formats, including CDR, AI, PSD, EPS, ZIP, and SVG, facilitating complete management and documentation of information in these processes.
If you have suggestions or ideas that could improve the iflows platform, we encourage you to send us feedback. We are dedicated to continuous improvement and assure you that all suggestions will be carefully evaluated.