1. Overview
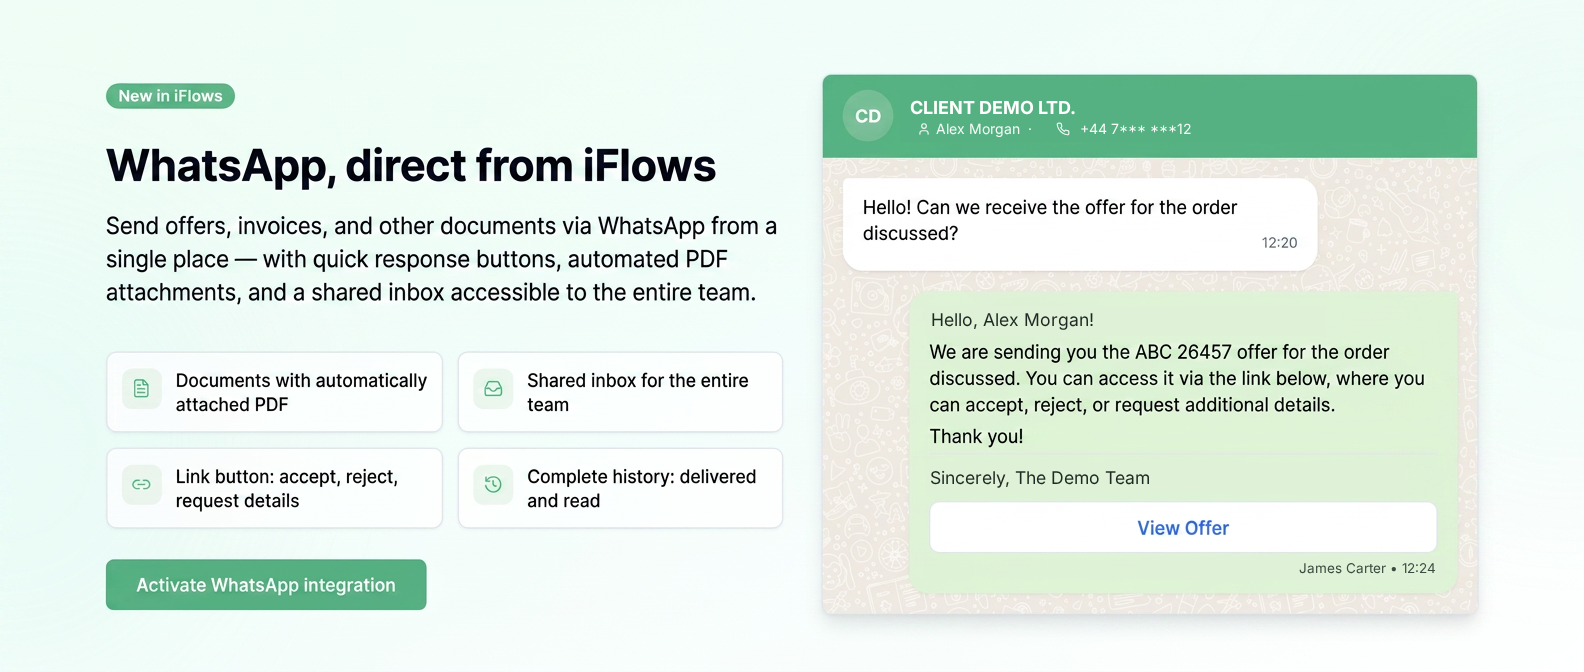
The WhatsApp integration connects iFlows to the company's WhatsApp Business number. Once connected, you can send documents and messages to customers (and suppliers) directly from the platform via WhatsApp, without leaving iFlows and without manually copying numbers or documents into the phone app.
Everything you send and receive is saved in iFlows: you have a complete conversation history, you can see who sent each message, when it was delivered, and when it was read, and messages received from customers arrive in a shared inbox, visible to all authorized users.
What you can do with the integration
- Send documents directly from the platform — quotes, orders, proformas, invoices, supplier orders, standardized documents, or unpaid invoice statements — with the PDF attached (or the acceptance/signing link) automatically, without downloading and sending it manually.
- Receive and reply from a shared inbox — all conversations arrive in one place, visible to all authorized users, so anyone in the company can take over and respond, not just the person holding the phone.
- Place a WhatsApp icon on your website — the customer who clicks is redirected to the company number, and their message goes directly into the iFlows inbox.
- Keep a complete history — everything you send and receive remains saved in iFlows: who sent each message, when it was delivered, and if it was read.
- Use predefined quick replies and automatically send a message upon order completion.
How it works: via API, not the classic app
Important to understand from the start: the integration uses the WhatsApp Business Platform (official Meta API), not the classic WhatsApp phone app or the desktop WhatsApp Business app. Essentially, the number "enters" iFlows and is managed from there.
Important note: The limitations described in this documentation are not imposed by iFlows, but by the WhatsApp Business Platform (Meta). iFlows integrates this channel and makes it available to you under the terms set by Meta, without being able to modify these rules. For official details and updates, consult the Meta documentation for the WhatsApp Business Platform.
The main consequence: the connected number can no longer be used in parallel in the regular WhatsApp mobile app. Once a number passes through the API, it no longer works in the classic phone app.
Therefore, choose the number carefully before connecting:
- use a dedicated company number that no one needs to use personally on their phone, or
- buy a new number specifically for this integration.
Important: Do not use the personal number of an employee who needs WhatsApp on their phone — they would lose it from the mobile app. However, it is recommended that this number be connected to a phone to allow for taking calls.
What is a template and why is it needed
The second limitation concerns how WhatsApp allows conversations to be initiated. Unlike classic WhatsApp, on WhatsApp Business you cannot contact a customer with a free-text message in your own words. Meta treats any message where you initiate the conversation as a potential advertisement and requires it to be pre-approved. Such a pre-approved message is called a template.
In practice, you define templates in advance for the situations you need — usually one for each type of document (quote, invoice, proforma, standardized document, etc.) and, possibly, a general template for regular customer contact. You send them to Meta for approval, and once approved, you can use them to open any conversation.
The 24-hour rule
The template is only necessary to initiate the discussion. From the moment the customer replies, a 24-hour window opens in which you can write freely, in your own words, any message — just like in a regular chat. The window refreshes with every new message received from the customer.
After the 24 hours expire (if the customer stops writing), you can no longer send free-text messages and must return to approved templates to resume contact.
In short: a template to open the door, free messaging for 24 hours after the customer replies.
Other WhatsApp Business rules
In addition to the template rule and the 24-hour window above, there is another limitation regarding the types of messages you can send:
- Limited message types — from iFlows you can send template-based messages, free-text messages, and files (images and documents). Audio messages, locations, contacts, or stickers can only be received, not sent.
Note: Delivery notes and receipts do not have a WhatsApp button — they are sent only by email. All other documents (quote, order, proforma, invoice, supplier order, standardized document) can be sent via WhatsApp.
Costs: WhatsApp Business is paid to Meta
WhatsApp Business Platform is not a free service. This cost is NOT paid to iFlows, but directly to Meta — iFlows is just the channel through which you send the messages.
From July 1, 2025, Meta charges per message — specifically, for each delivered template message — by category: Marketing, Utility, and Authentication. The rate varies depending on the category and the recipient's country, and Meta publishes official prices.
When it is free: messages you send as a reply after the customer has written to you first are not charged. Essentially, as long as the customer initiated the conversation and you are within the 24-hour window, the exchange of messages in the chat is free. However, template messages through which you initiate contact are paid.
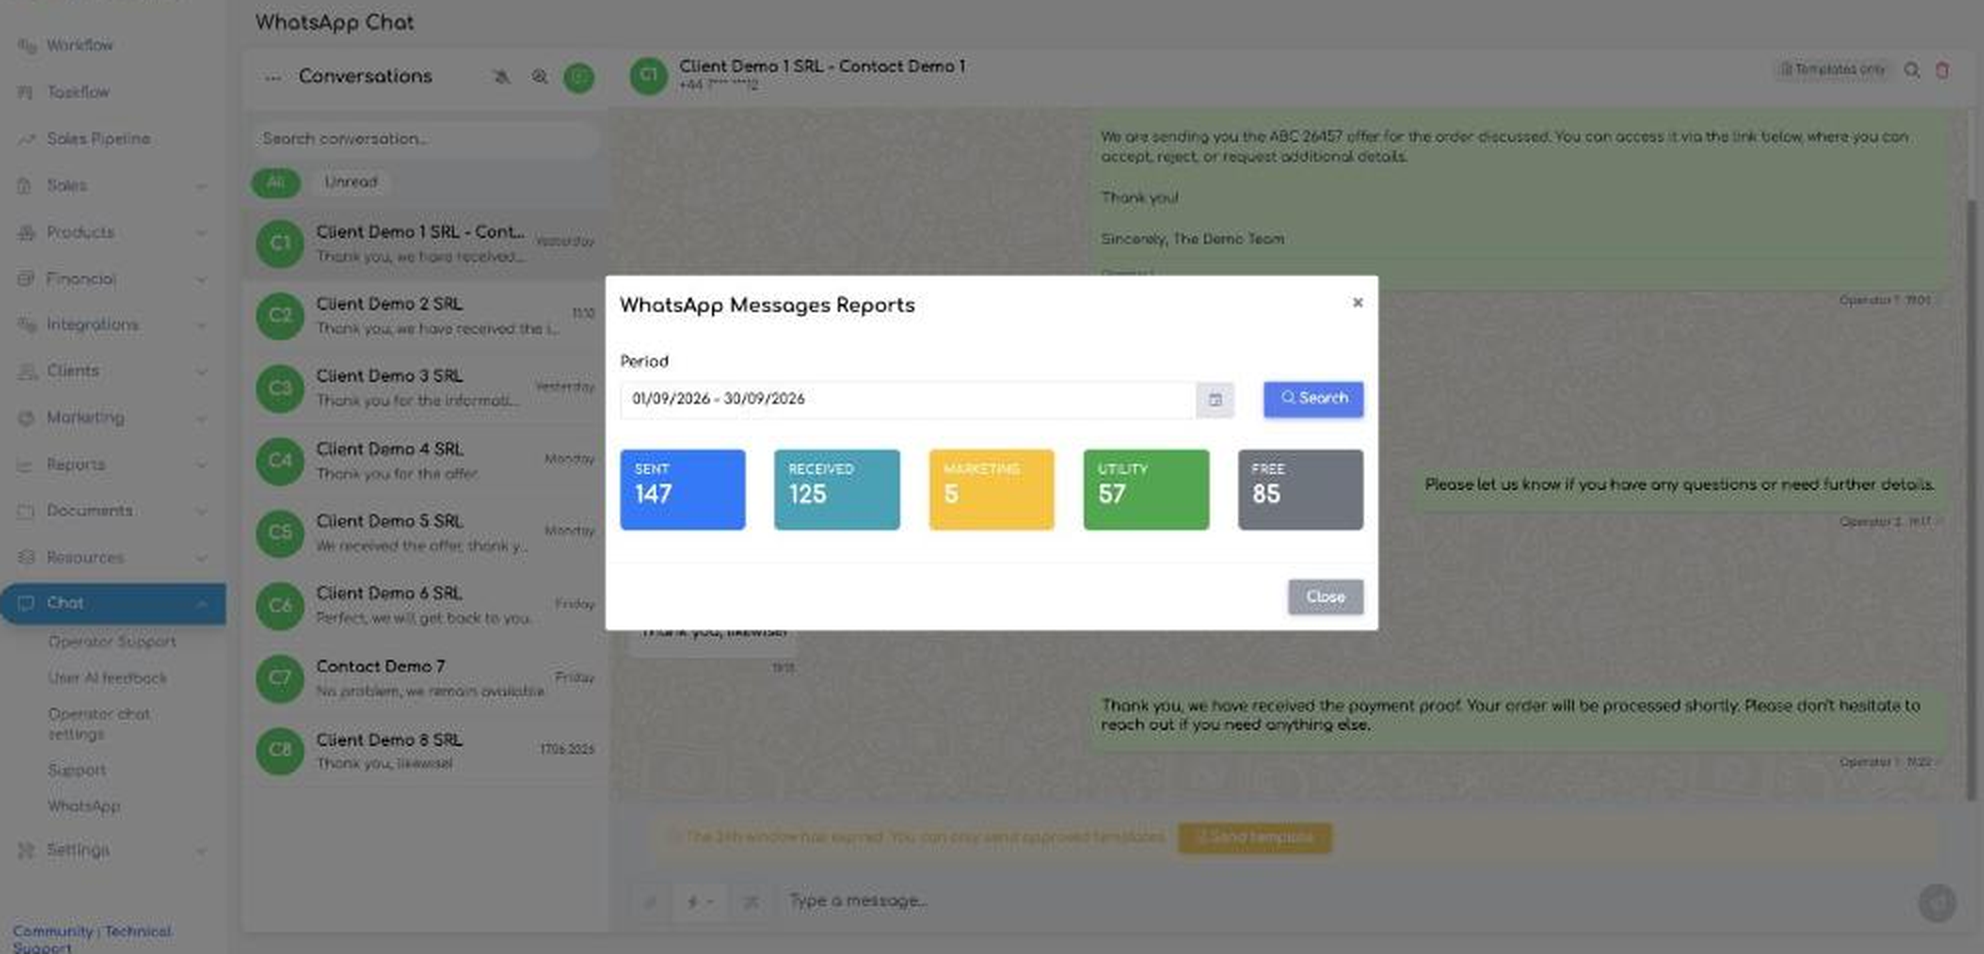
Tip: Statistics in the Reports section (Marketing / Utility / Free messages) help you track volume and estimate the monthly cost to Meta.
2. Activation and Integration Configuration
The integration is found in , on the WhatsApp card. Unlike other integrations, for WhatsApp you do not manually enter keys or tokens: the connection is made through an official Meta window, where you authenticate with your Meta Business account and select the WhatsApp Business account and phone number.
What you need before connecting
- Meta Business Account — a Facebook Business account with administrative access.
- WhatsApp Business Account — associated with that Meta account.
- Phone number — verified and added in WhatsApp Manager, which is not already used in another WhatsApp application.
Preparing the number in Meta (WhatsApp Manager)
Before connecting from iFlows, the number must exist and be verified in the company's Meta Business account. These steps are performed on the Meta website (business.facebook.com), not in iFlows. If the number is already configured in WhatsApp Manager, you can proceed directly to the connection steps below.
- Access business.facebook.com and log in with the account that manages the business. The Business info page opens.
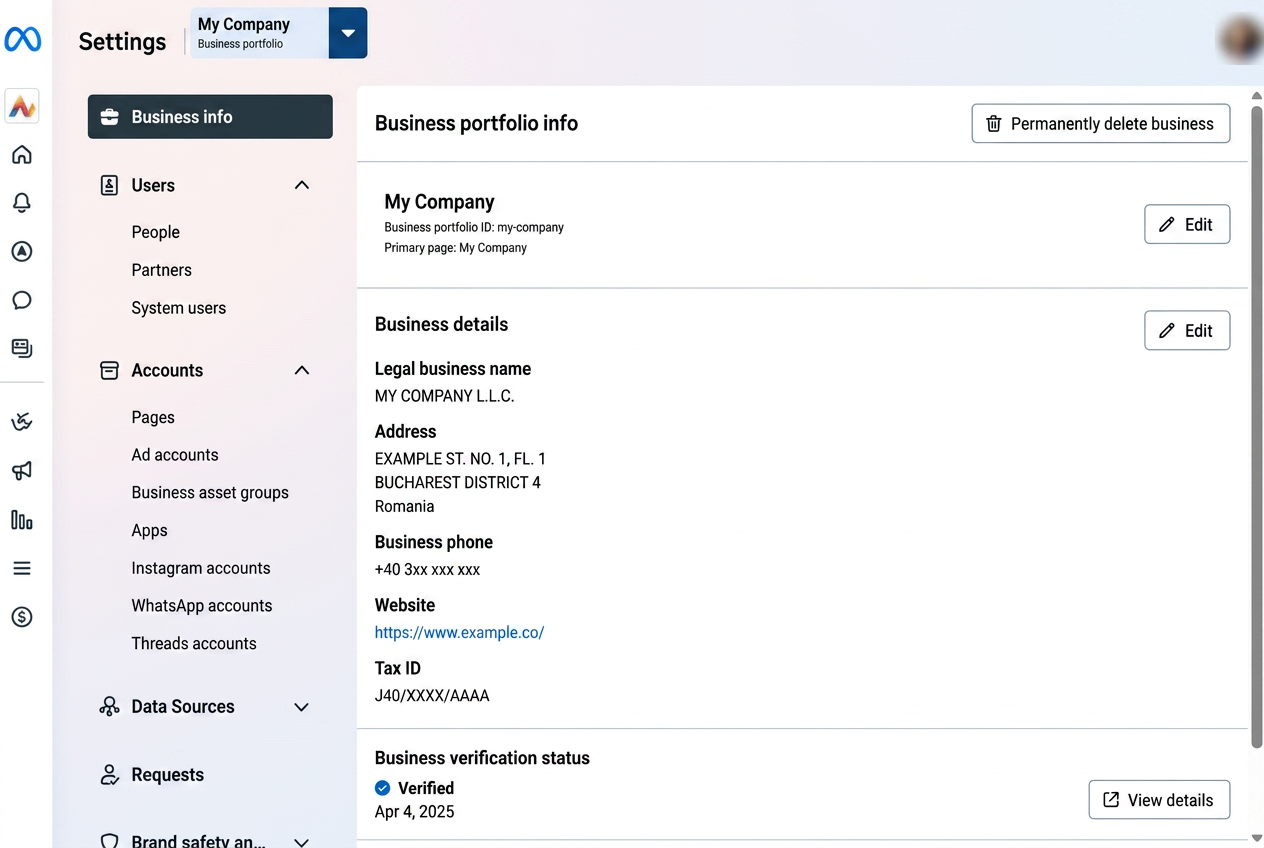
- Open the company's WhatsApp Business account to see its details.
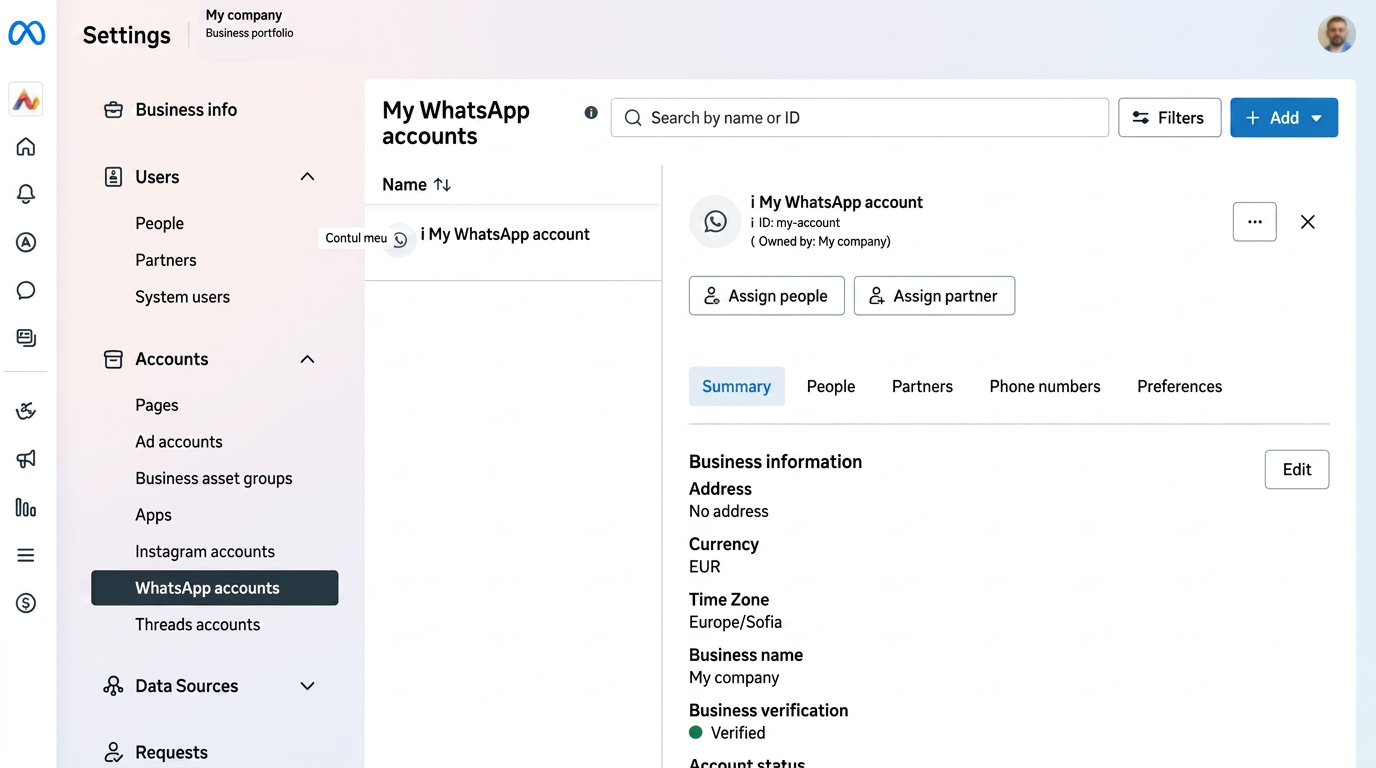
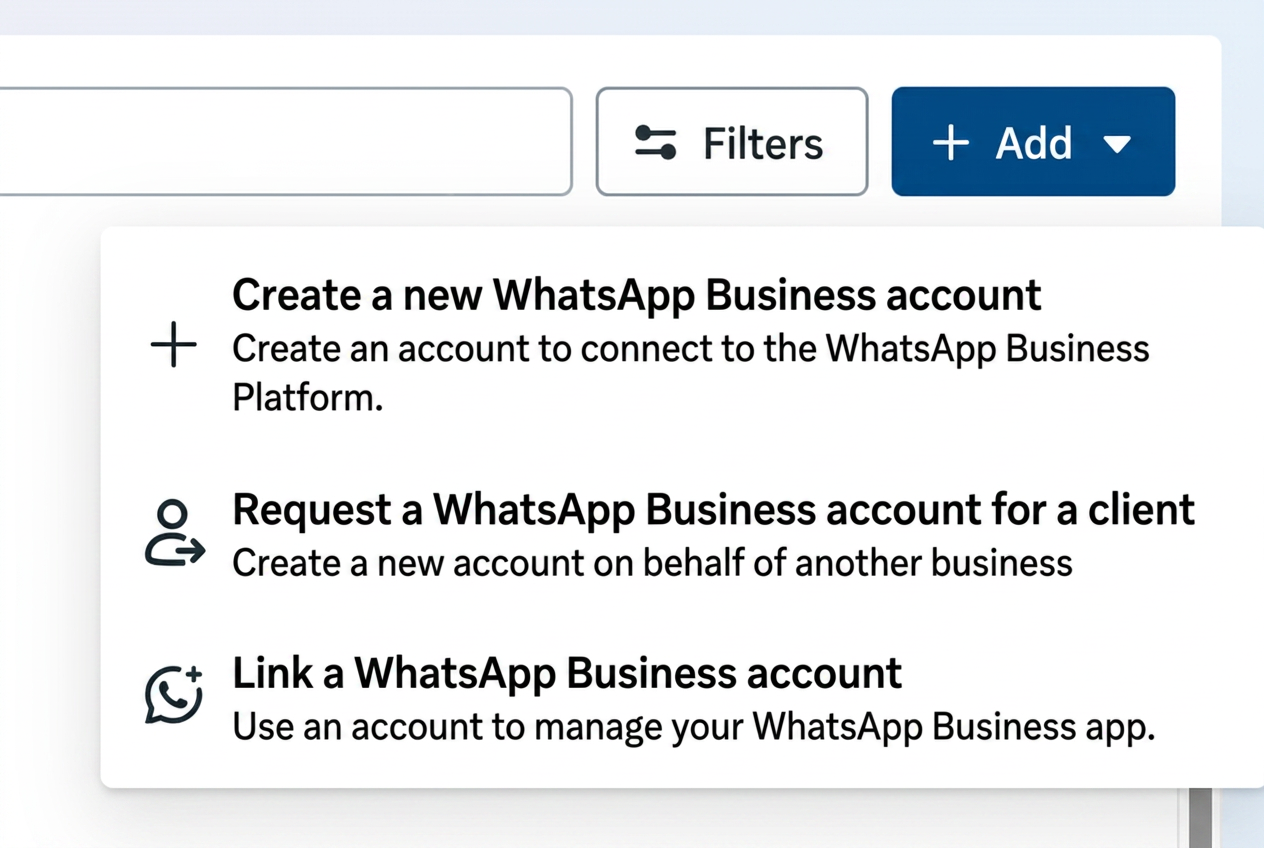
- If you don't have a WhatsApp Business account yet, press the "+ Add" button and choose the appropriate option — usually "Create a new WhatsApp Business account" or "Link a WhatsApp Business account".
- Open the "Phone numbers" tab and verify the number: it must appear with the status "Verified" (or "Connected" if it's already linked to iFlows). If the number is missing, press "Add phone number" and complete the verification via SMS or call.
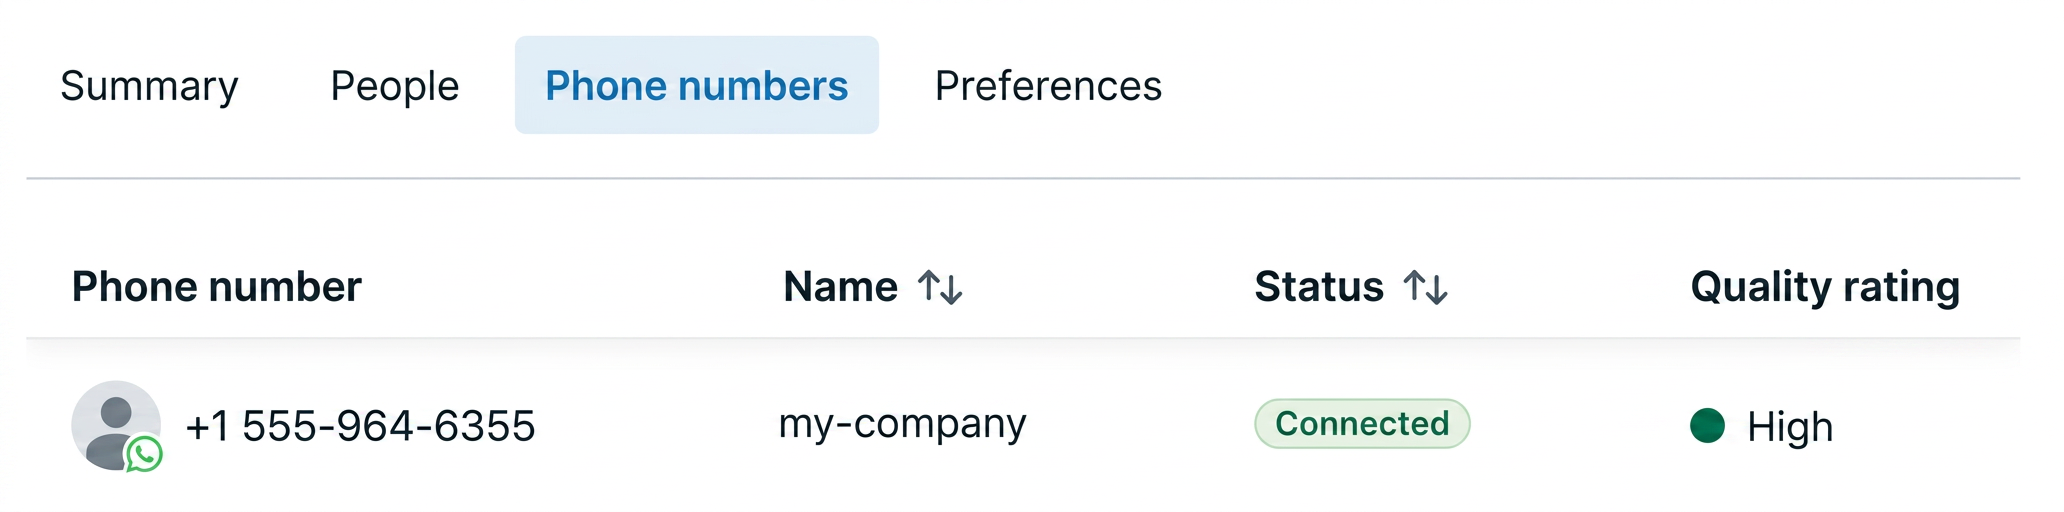
Important: The number used here must not be connected in parallel to the classic WhatsApp app on the phone. If it is used elsewhere, disconnect it from there first.
Connection steps
- , press the connection button on the WhatsApp card.
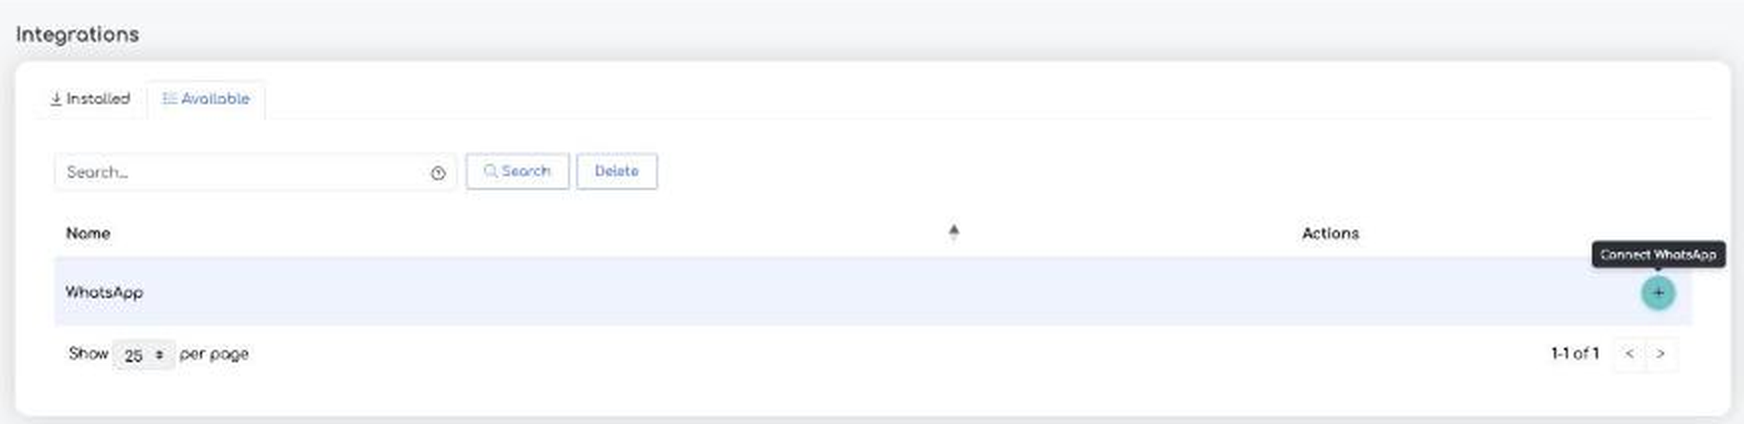
- The Meta connection window opens; press "Open Meta login".
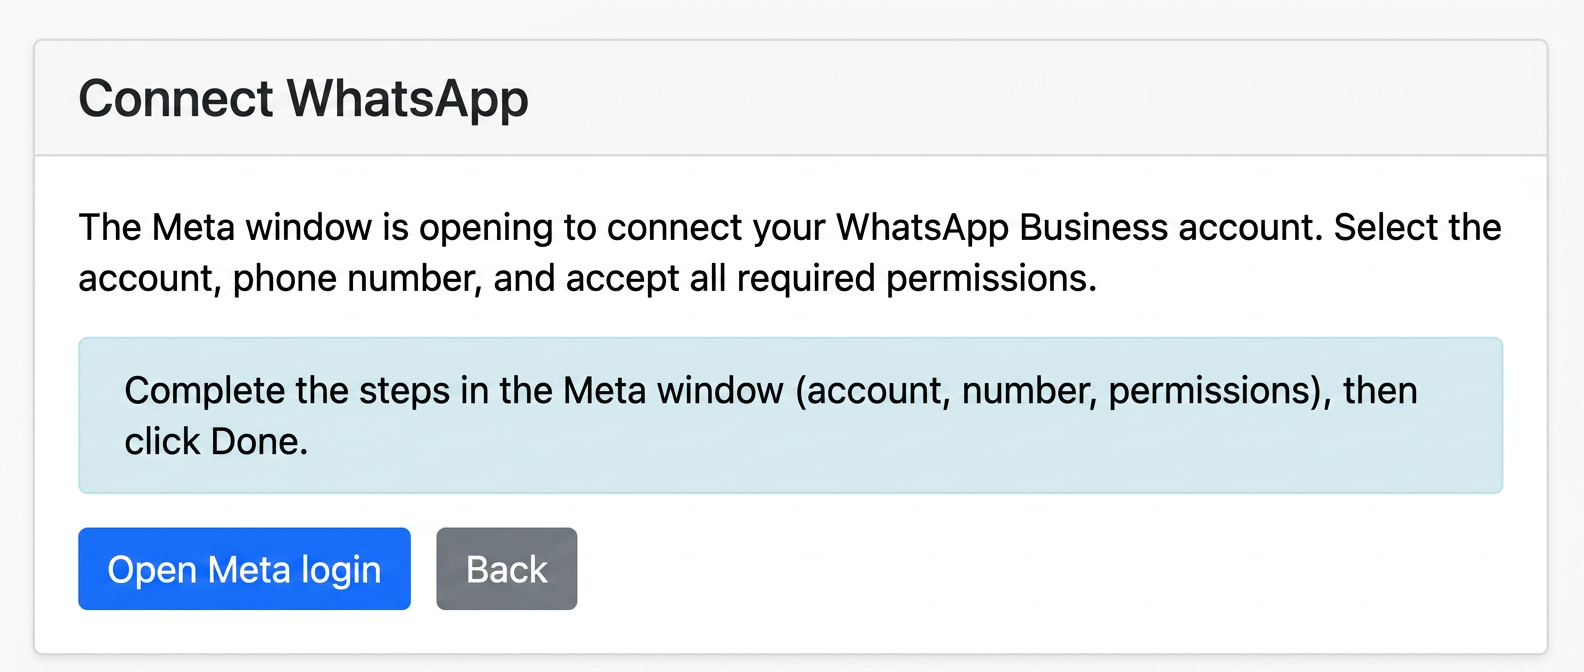
- In the Meta window: select the WhatsApp Business account, select the phone number, and accept all required permissions.
- Complete the steps in the Meta window.
- If the number has a 2-step verification PIN set, the platform will ask for that PIN (6 digits).
- Finally, iFlows confirms the connection and returns you to the integrations page.
During the connection, the platform automatically configures message receiving, synchronizes existing templates from the Meta account, and creates a set of predefined templates.
Important: Pop-ups must be allowed in the browser. If the Meta window does not open, the platform will ask you to allow pop-ups and try again.
Verifying functionality
After connecting, WhatsApp appears in My Integrations with the connected number and expiration date; (the inbox) appears in the menu, along with the green WhatsApp icon in the top bar. The easiest test is to open a document and send it to your own number using an approved template; if the message arrives and appears in the chat with a delivery checkmark, the integration is working. There is no separate sandbox mode — the integration works directly with the real account.
Access token and reconnection
The connection with Meta is valid for approximately 60 days. When the token is about to expire, a warning message with a reconnection button appears on WhatsApp pages; when it has expired, a red message appears, and message sending no longer works until reconnection.
Important: While the token is expired, no messages can be sent at all until reconnection. Reconnection is done from the warning messages or from My Integrations and involves the same Meta steps as the first connection.
Deleting the integration
From My Integrations, the delete button removes the integration, after a prior confirmation. After deletion, the WhatsApp buttons and inbox disappear from the platform. These actions are only visible to users with appropriate rights.
3. WhatsApp Templates
A template is a predefined message, approved by Meta, that you can send to any customer at any time. Templates are mandatory because WhatsApp rules only allow initiating a conversation (or sending outside the 24-hour window) through approved templates. They can contain variables that are automatically filled with customer and document data upon sending.
Where they are managed
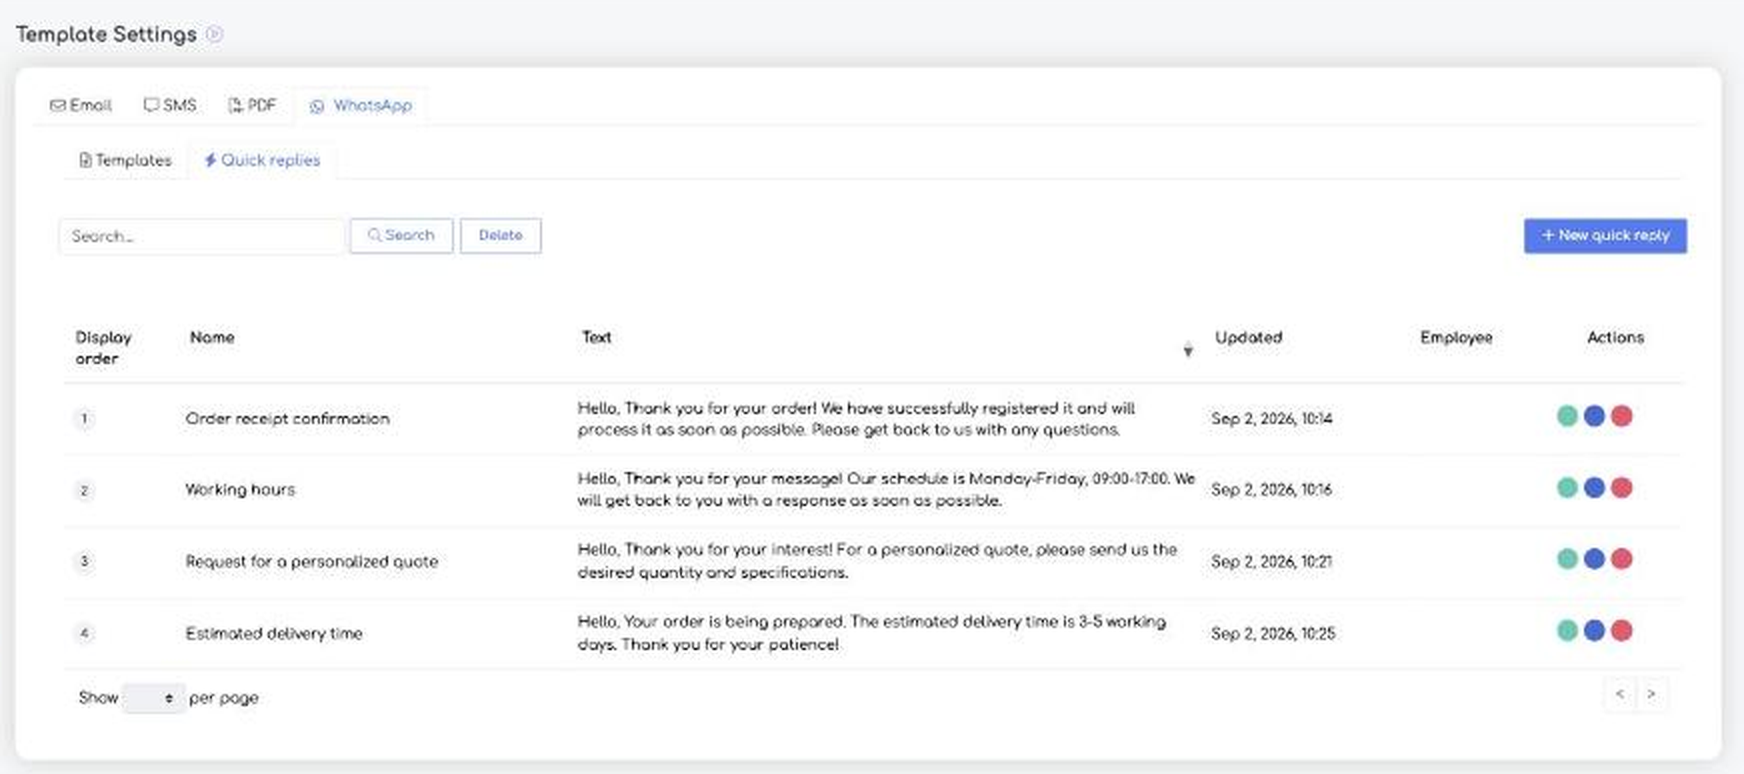
WhatsApp templates are managed from ("Template Settings" page). This is a common page for all types of templates in the platform, organized into four tabs: E-mail, SMS, PDF, and WhatsApp. WhatsApp templates are therefore the WhatsApp tab in this page, not a separate page. The WhatsApp tab itself has two sub-sections: Templates (WhatsApp templates) and Quick replies. The list allows searching by name and filtering by status, category, and type.
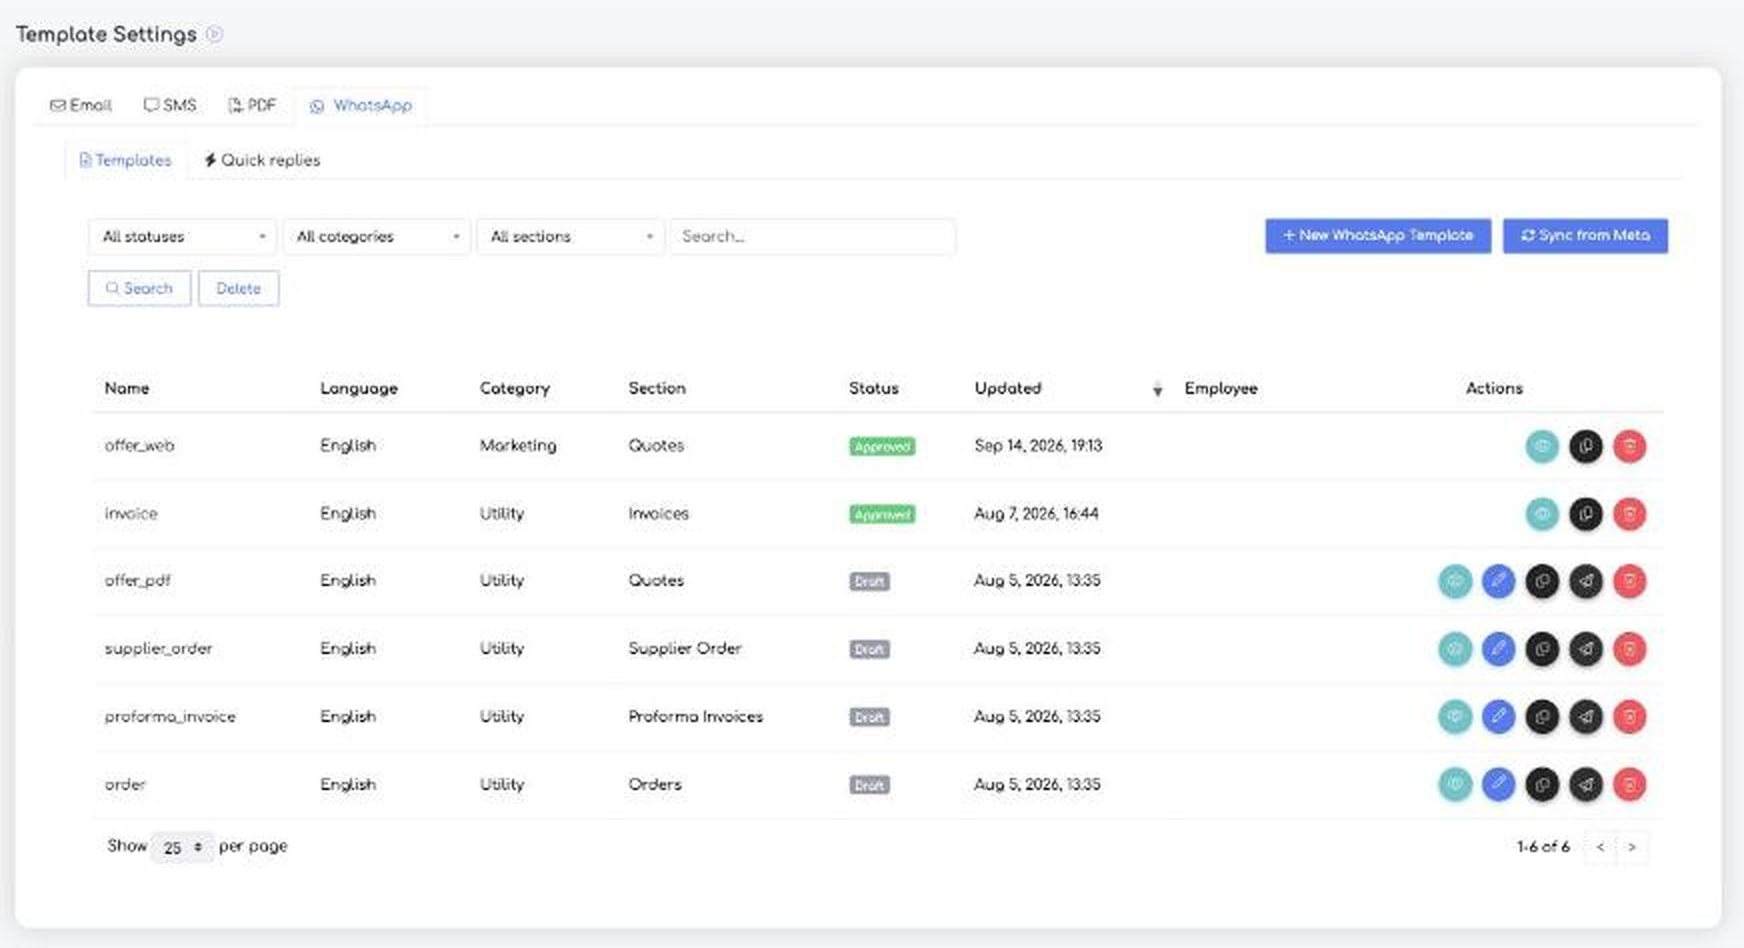
Important: The green icon in the corner of the conversation list (from ) does not open the template page, but the "Start Conversation" dialog (to start a new conversation). Templates are accessed from , as described above.
Template fields
- Name — the internal name; automatically converted to lowercase with underscores, per Meta rules.
- Language — the language of the template.
- Category — Utility (transactional messages) or Marketing (promotional). The category affects Meta's pricing.
- Type (section) — the place in the platform where it is used: General, Quotes, Orders, Proforma Invoices, Invoices, Supplier Order, Standardized Document.
Important: The template type is chosen at creation and cannot be changed after saving. If you need a different type, create a new template.
- Header Format — No Header, Text (max 60 characters, single variable), or Document (includes a PDF in the header).
- Document Source (for Document header) — Platform Document (PDF is automatically generated upon sending from the selected document) or Personal Document (a fixed PDF, manually uploaded, always sent the same).
- Content — the text of the message (max 1024 characters).
Important: The content can contain variables, but cannot start or end with a variable — this is a Meta rule, otherwise the template is not accepted. For example, a message starting directly with the customer's name will be rejected; precede the variable with fixed text — "Hello, {{name}}!" instead of "{{name}}, ...".
- Footer — optional text under the message (max 60 characters); does not accept variables.
- Buttons — buttons attached to the message (see below).
Document Source: Platform Document vs Personal Document
When the header is of Document type, you choose where the attached PDF comes from. The two options are fundamentally different:
- Platform Document — the PDF is automatically generated upon sending, from the currently selected document. Thus, each customer receives their own PDF (e.g., their invoice, with their data). This is the option used for templates linked to a document.
- Personal Document — always sends the same fixed PDF, manually uploaded once (e.g., a brochure or price list). Choosing this option reveals the "PDF Document" upload field, with a 5MB limit.
Example: for an invoice template use Platform Document, so each customer receives their own invoice. For an identical catalog sent to everyone, use Personal Document.
The template form offers three buttons: Save, Save and Continue, and Preview. The "Preview" button shows how the message will look (including header and buttons) before saving and sending it to Meta — useful for catching mistakes early, especially Meta rule violations (e.g., a message starting with a variable).
Variables
Variables are automatically filled upon sending with real data. Fields are available for the customer (name, phone, email, address, CIF/CNP (Tax ID/Personal ID), outstanding balance), contact person, company data, bank, the employee sending, and fields specific to each document type (series and number, date, due date, total, AWB, links, etc.). In the form, variables are grouped by category (Customer, Contact, Company, and document-specific) and have a search box; the ones displayed depend on the chosen template type, so you only use appropriate fields.
Important: Choose the correct section (type) first, as it determines which variables you can use — and the type cannot be changed after saving. If you choose the wrong type, you lose access to document-specific variables (series and number, due date, total, AWB, links, etc.) and must create a new template.
Template buttons
Buttons can appear under the message: URL (opens a web address, max 2), Phone (calls a number, max 1), and Quick Reply (max 3), for a total of max 3 buttons per template. The text for each button is limited to 20 characters.
Smart buttons (Accept and Request details for quotes; Signing for standardized documents) are different from a regular URL button: their link is not fixed, but is generated automatically for each individual sending. Thus, each recipient receives a unique link that takes them directly to their quote acceptance or document signing page. These buttons only appear for quotes and standardized documents.
Approval process
A new template receives the status Pending (local) and can be fully edited. After being sent to Meta, it remains Pending but can no longer be edited or deleted until Meta approves or rejects it. Meta evaluates it, and the status becomes Approved (can be used) or Rejected (reason appears; you can clone and correct it). Only Approved templates appear in selection lists for sending.
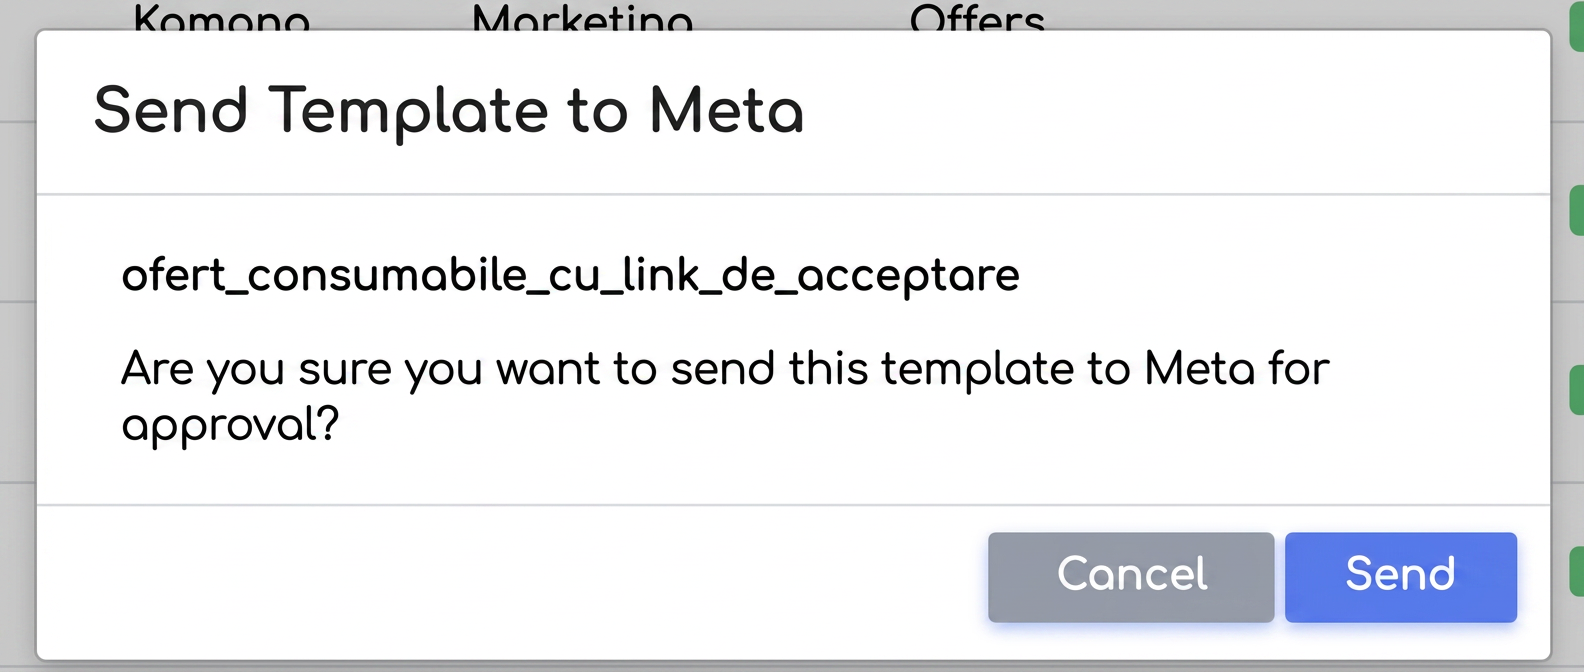
Editing, cloning, and deleting
What you can do with a template depends on its status. Note: "Pending" means two different things — a local template, not yet sent to Meta (fully editable), and one already sent to Meta, awaiting a decision (locked). The table below shows what is allowed in each state:
| Template status | What is permitted |
| Pending (local, unsent) | Can be fully edited or deleted. It has not yet been sent to Meta. |
| Pending (sent to Meta) | Cannot be edited or deleted until Meta approves or rejects it. |
| Approved | No longer has an edit button (only view, clone, and delete). Only variable mapping can be modified; the approved content remains unchanged, as required by Meta. |
| Rejected | The rejection reason appears; you can clone the template, correct the copy, and resubmit to Meta. |
Important: An approved template no longer has an edit pencil, because Meta approved specific content. To change it, use cloning: press Clone → the copy gets Pending (local) status → modify the copy → resubmit to Meta for approval. Once approved, use the new template.
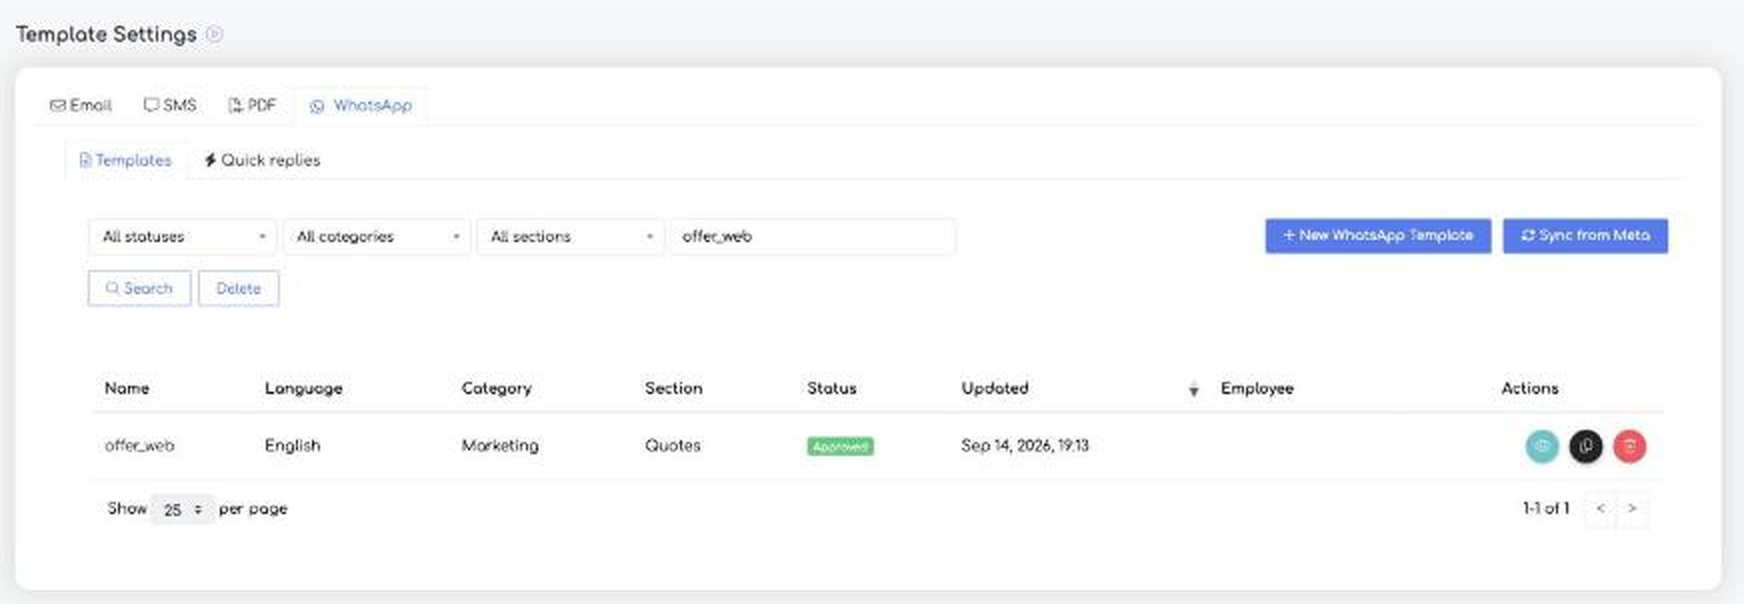
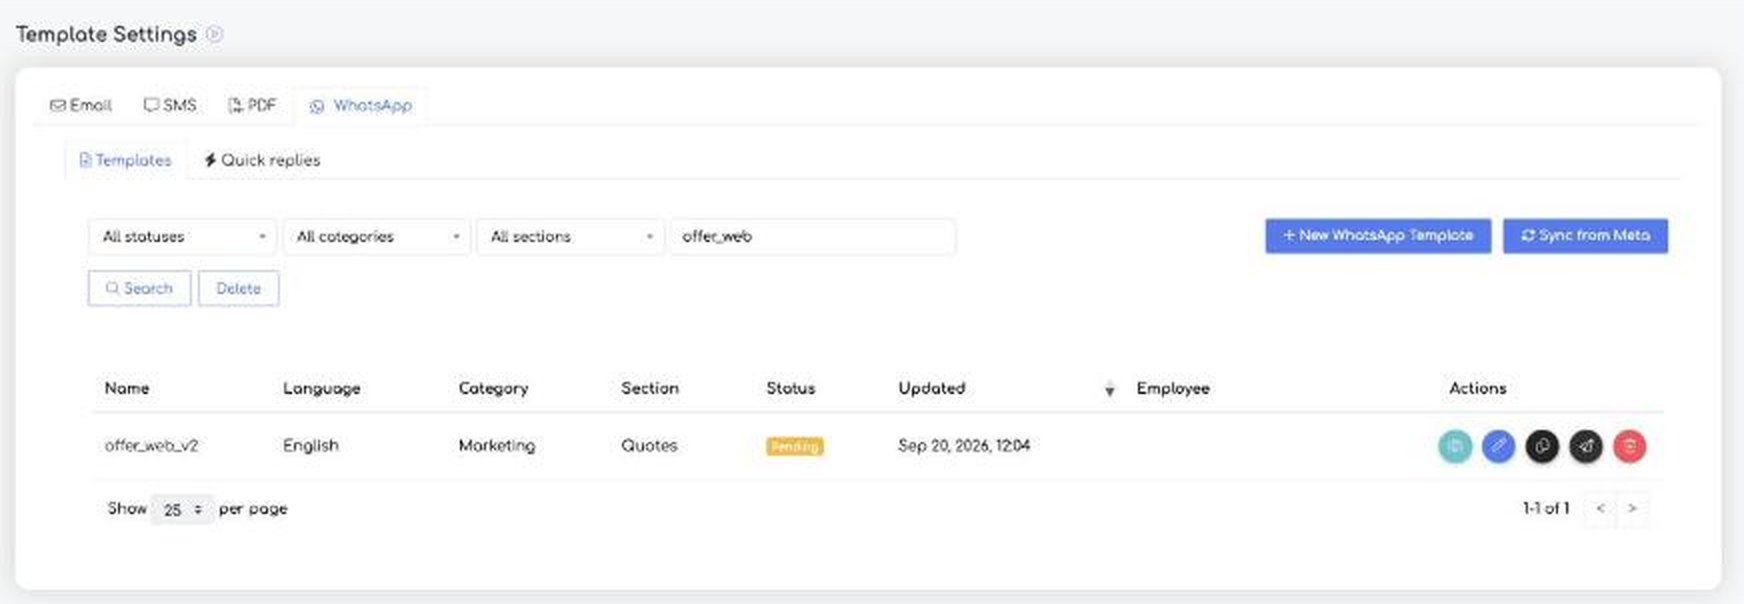
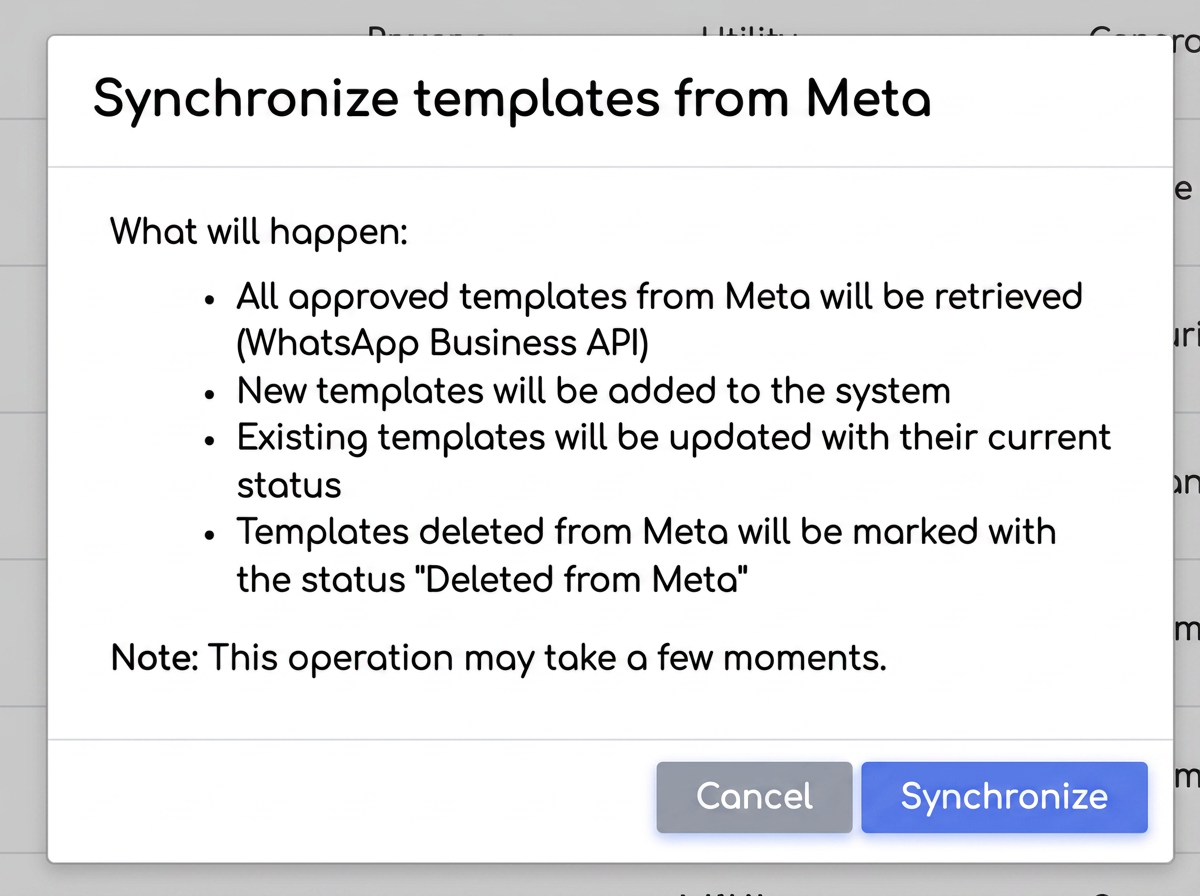
Deleting a template sent to Meta attempts to remove it from there as well. From the list, there is also a "Sync from Meta" button, which opens the "Synchronize templates from Meta" dialog and brings updated templates and statuses from the Meta account into iFlows.
Predefined templates
Upon connection, the platform automatically creates a set of ready-to-use templates (with Pending status) for: order, order completion (with AWB), invoice, proforma invoice, supplier order, PDF quote, web quote (with Accept / Request details buttons), PDF standardized document, web standardized document (with Sign button), and unpaid invoice statement.
Important: Even predefined templates must be sent to Meta and approved before they can be effectively used.
Creating a WhatsApp template — step by step
A new template is created from the templates page and goes through a process of completion, local saving, and submission to Meta for approval. The steps below cover the entire flow, from opening the form to sending for approval.
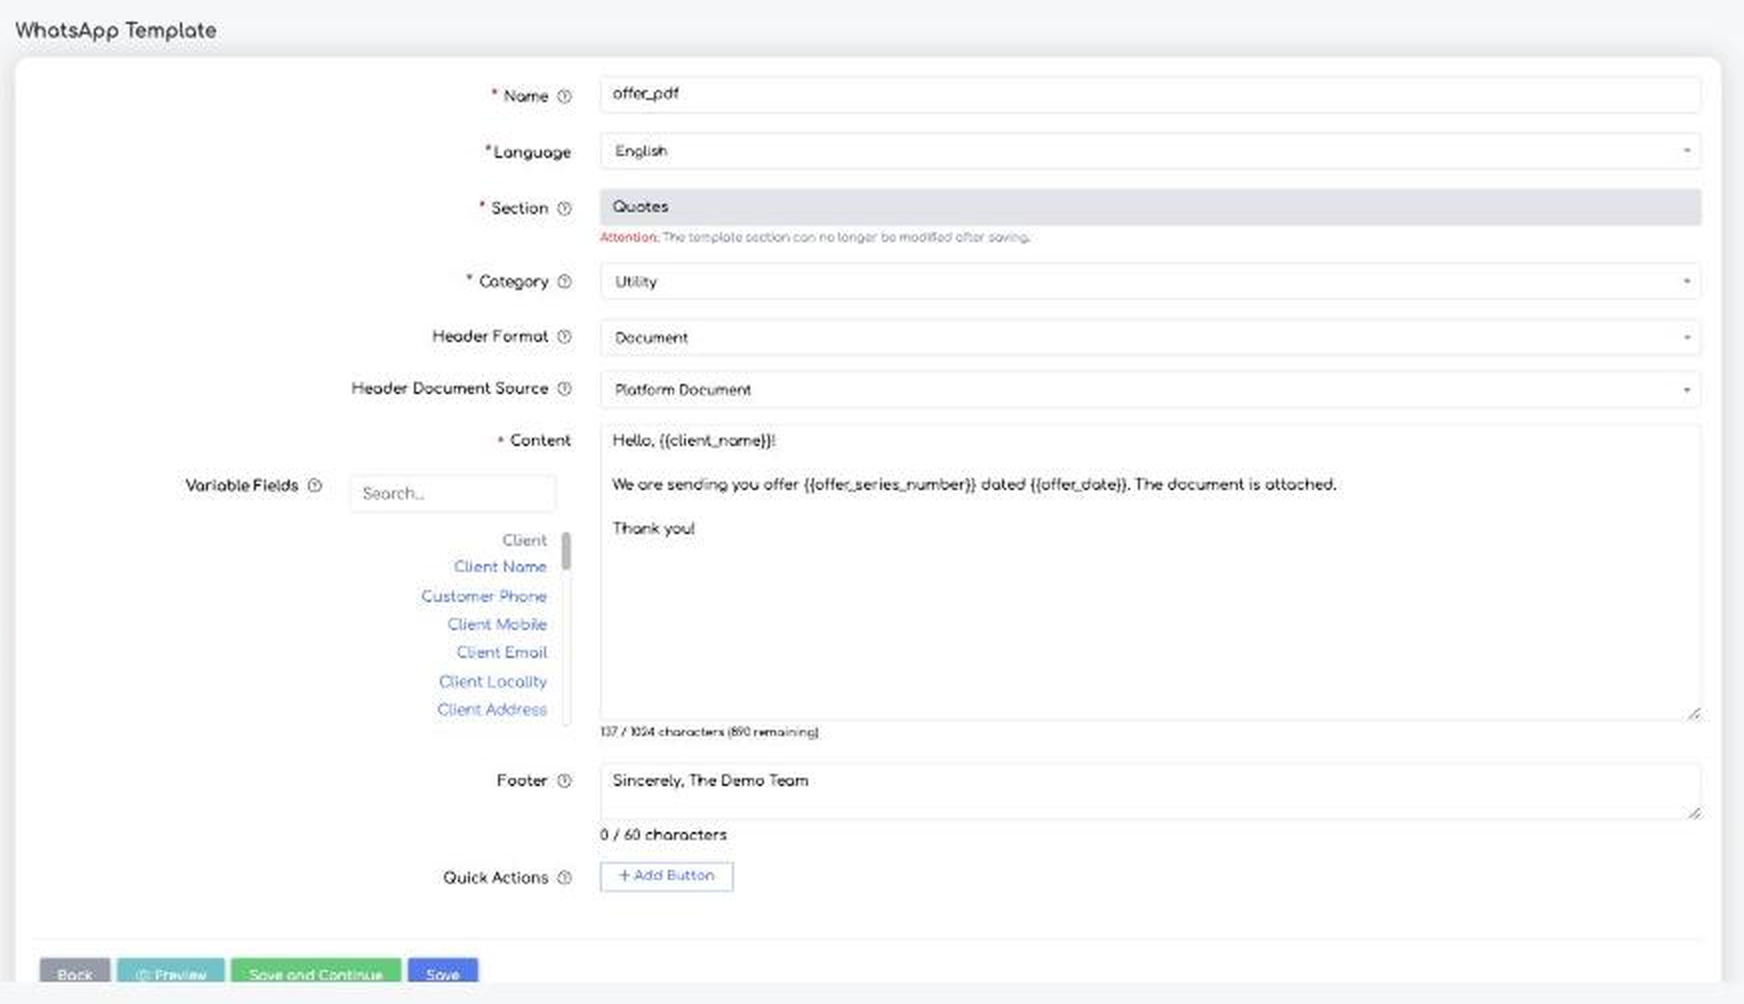
- , open the WhatsApp tab, then the Templates sub-section, and press the "New WhatsApp Template" button.
- Enter the Name — the internal name of the template. It is automatically converted to lowercase with underscores, per Meta rules (e.g., "Send Quote" becomes send_quote).
- Choose the Section (document type): General, Quotes, Orders, Proforma Invoices, Invoices, Supplier Order, or Standardized Document. The section determines where the template will appear in the platform and what specific variables will be available.
Important: Choose the correct Section from the start. It cannot be changed after saving and determines which document variables you can use (series and number, due date, AWB, links, etc.). If you later need a different type, you must create a new template.
- Set the template Language and Category: Utility (transactional messages) or Marketing (promotional messages). The category affects Meta's pricing.
- Choose the Header Format: No Header, Text (max 60 characters, single variable), or Document (includes a PDF in the header).
- If you chose a Document type header, the Header Document Source field appears, where you choose between:
- Platform Document — the PDF is automatically generated upon sending from the selected document (each recipient receives their own document).
- Personal Document — a fixed PDF, which you manually upload in the appearing "PDF Document" field and which is always sent the same way (max 5MB).
- Write the message Content (max 1024 characters). Insert variables by clicking fields in the Variable Fields list on the left (you can search for them in the search box); they are automatically filled upon sending with real customer and document data.
Important: The content can contain variables, but cannot start or end with a variable — this is a Meta rule, otherwise the template is not accepted. For example, instead of starting the message directly with the customer's name, precede it with fixed text like "Hello,".
- Optionally, add a Footer (max 60 characters) — a short text under the message. The footer does not accept variables.
- Optionally, add Buttons from "Add Button" (Quick Actions). For each button choose the Type (Quick Reply, Phone, or URL) and write the button text (max 20 characters). You can have a maximum of 3 buttons in total, of which a maximum of 2 URL type and 1 Phone type. For quotes and standardized documents, there are also smart buttons with dynamic links (Accept, Request details, Sign), automatically personalized for each sending.
- Press "Preview" to check how the completed message will look before saving. This helps you catch potential problems early (e.g., message starting or ending with a variable).
- Press "Save" (or "Save and Continue"). The template receives the status Pending (local) and can be fully edited, as it has not yet been sent to Meta.
- When the template is ready, send it to Meta for approval. From that moment it remains Pending but can no longer be edited or deleted until Meta approves or rejects it.
- After Meta's evaluation, the status becomes Approved (can be used for sending) or Rejected (reason appears; you can clone the template, correct the copy, and resubmit).
Important: Only Approved templates appear in the selection lists when sending documents. To change the content of an already approved template, you clone it (the copy receives Pending status), modify the copy, and resubmit it to Meta — approved content can no longer be modified directly, only the variable mapping.
4. Sending Documents via WhatsApp
The WhatsApp send button only appears if the integration is connected and you have the right to view WhatsApp messages. You can find it on:
- Quotes, Orders, Proforma Invoices, Invoices — in the document page ("Send WhatsApp" option) and in the document list.
- Supplier Orders — same, but the recipient is the supplier.
- Standardized documents — in lists and in the standardized document generator.
- Customer profile — "Send Statement on WhatsApp" button (unpaid invoices statement).
- WhatsApp Chat — "New Conversation" button (initiation with a manually chosen customer).
- Courier configuration — an Orders type WhatsApp template can be associated with a courier for automatic sending upon order completion.
The sending process
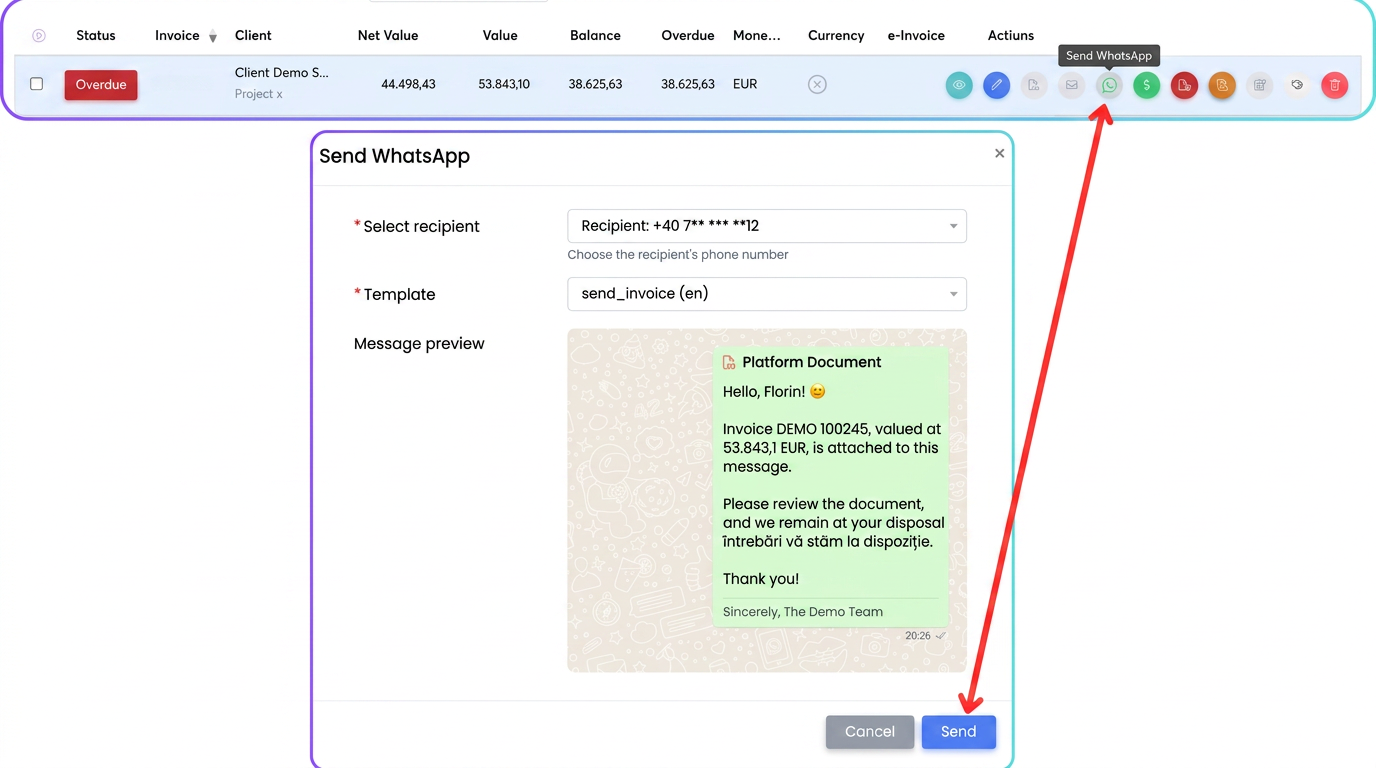
- Press the "Send WhatsApp" button on the document. The sending window opens.
- Select the recipient (phone number). The list contains the customer's primary mobile, their other numbers, and contact persons' numbers. The first valid number is pre-selected.
- Select the template. Only approved templates suitable for the document type appear; if there is only one, it is selected automatically.
- Check the preview — the message completed with real data, exactly as it will be received, including the attached PDF if the template has a Document header.
- Press Send. For templates with Platform Document, the PDF is generated at that moment and attached automatically.
Important: From a document button, sending is always based on an approved template — free-text messages cannot be sent. Free messages can only be sent from the chat, within the 24-hour window.
Important: Each sending has only one recipient; there is no bulk sending. For multiple people, repeat the process. If neither the customer nor the contact persons have a valid number, the window displays an error and a link to the customer profile to complete the number.
5. Inbox and Incoming Conversations
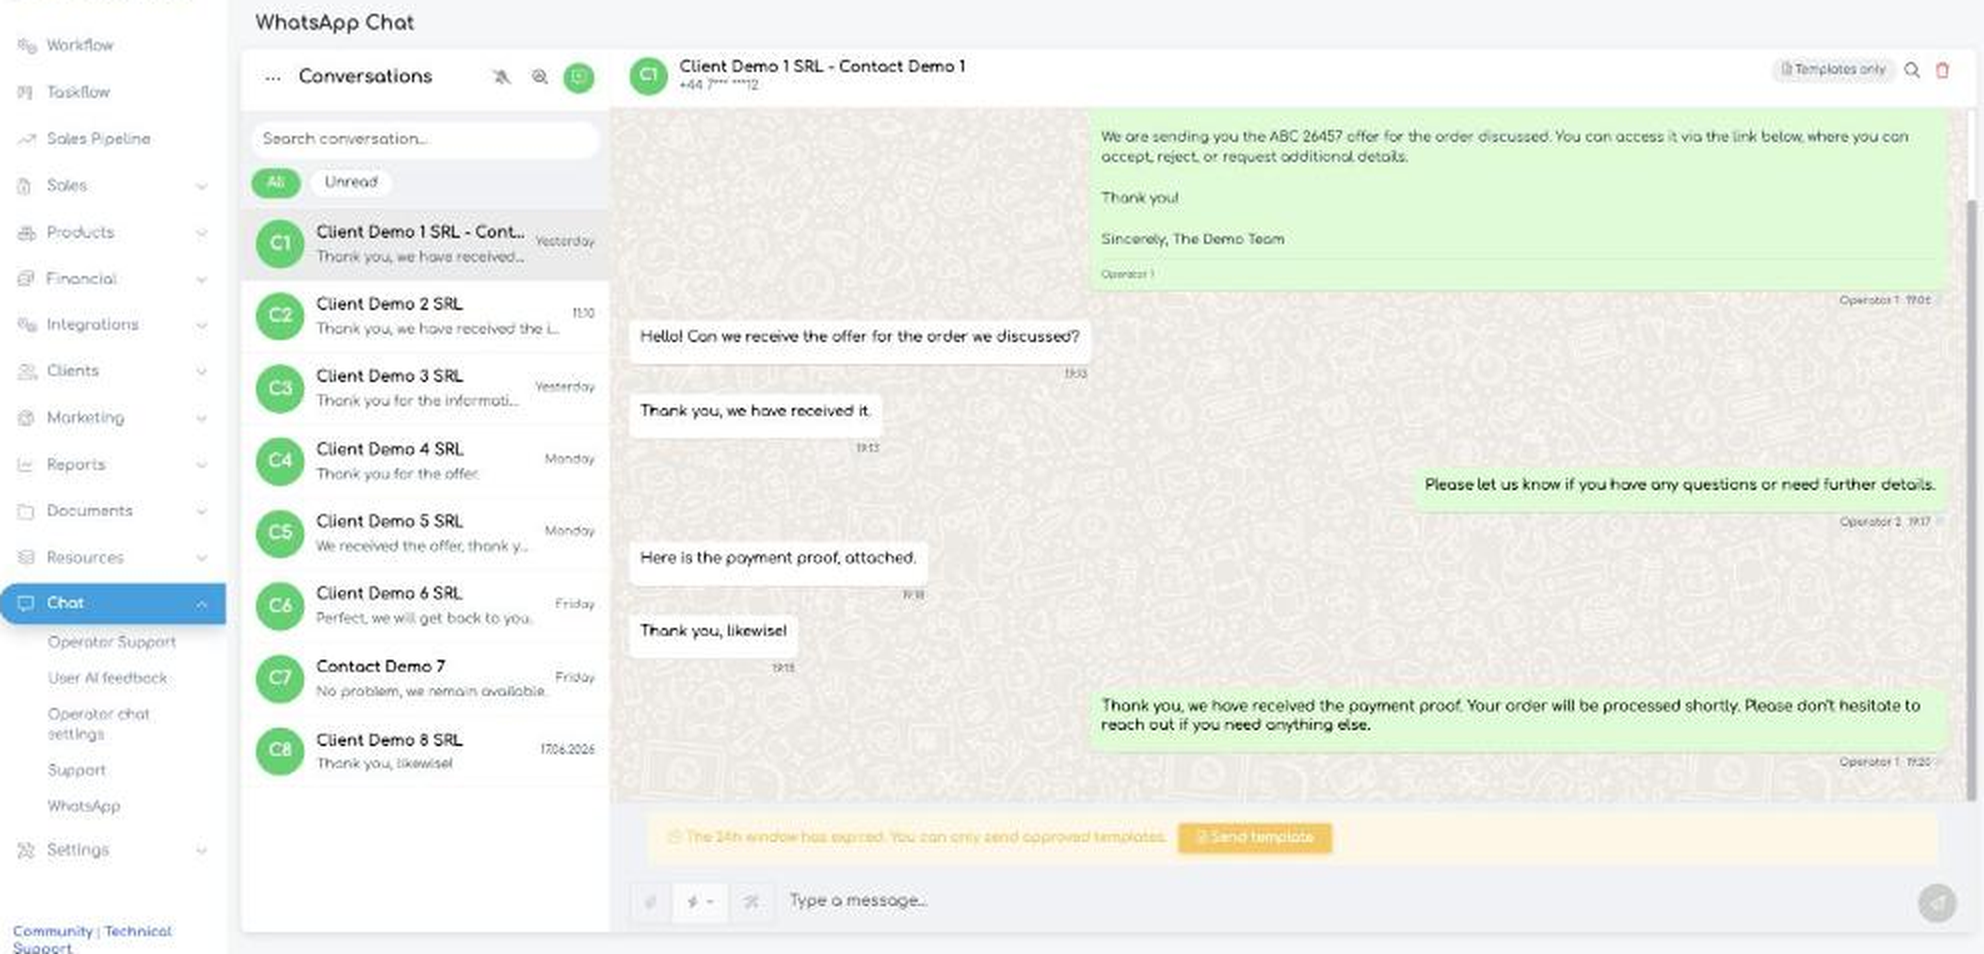
Incoming messages from customers arrive in the shared WhatsApp inbox, accessible from the conversation list (with customer name, last message preview, time, and unread counter), search and All / Unread filters, plus the conversation area with complete history, day separators, customer reactions, and delivery/read statuses.
Actions on the conversation list
At the top of the conversation list, the "..." menu offers two actions: "Read all" (marks all conversations as read) and "Select conversations" (starts multiple selection mode).
In selection mode, each conversation gets a checkbox, a counter ("X selected") and a "Done" button appear at the top to exit the mode, and a "Read" button appears at the bottom to mark all checked conversations as read.
Deleting a conversation
At the head of an open conversation there is a red trash can icon that deletes that conversation. This action is only available to users with "Delete messages" permission.
Replying to the customer and the 24-hour window
In the conversation area, an indicator shows the state of the 24-hour window, which determines what you can send:
| Window state | What you can send |
| Active (green) | Free text, files, and quick replies. A timer shows the time remaining from the 24 hours. |
| Awaiting response | Template only — the customer has not written to you yet. |
| Expired | Template only; text field is disabled. The 24-hour window has expired (the customer has not written during this interval). |
To remember: if a customer has never written to you, the first initiation can ONLY be done with an approved template.
Quick replies
Quick replies are short predefined texts that you quickly insert when replying in chat (they can contain variables filled automatically). They are managed in , , with a name, text (max 1024 characters), and display order. In chat, you access them with the lightning bolt button in the writing area.
WhatsApp icon in the top bar
A green WhatsApp icon appears in the top bar (visible only if the integration is connected and you have permission to view messages), with a badge showing the number of unread messages. Clicking it opens a panel with recent conversations (unread ones first) and a "View complete history" button that opens the chat page. It functions as a quick inbox.
6. Tracking Sent Messages
After sending, a line appears in the document's communication history showing who sent it, to whom, when, and if it was read. In the customer profile, the a table with document sendings via WhatsApp to that customer (status, document, template, recipient, sent by, date).
Important: The table in the customer profile only includes document sendings, not free-text chat replies (these are visible in the conversation).
Message status
- Sent — one gray checkmark.
- Delivered — two gray checkmarks.
- Read — two blue checkmarks.
- Failed — a red error icon; hover to see the message and error code. A failed message moves to the top of the conversation and is not resent automatically — resending is done manually.
Conversations are automatically linked to the customer based on phone number: when you send or receive a message from a number belonging to a customer or their contact person, the conversation appears with their name in the inbox and in the profile.
7. WhatsApp Notifications
When a new message arrives from a customer, the platform generates an internal notification, and the unread counter increases on the top bar icon and in the conversation list. In addition to the internal notification, if activated from the chat, there is an audible alert (the bell button at the head of the list) and browser desktop notifications.
When you open the conversation, messages are automatically marked as read and the counter updates. WhatsApp notifications can be activated or deactivated per user in the notification preferences.
8. Permissions
The integration has dedicated permissions, granted by category. Administrators have full access by default.
- On integration — add (connect), modify (reconnect), and delete — usually administrator operations.
- On templates and quick replies — view, add, modify, delete.
- On messages — "View WhatsApp messages" is the key permission — it gives access to the inbox, the top bar icon, document send buttons, and effective sending. "Delete messages" allows deleting conversations.
Without WhatsApp permissions, the user does not see the inbox, the icon, or the send buttons. With view messages permission, they can see the inbox, send templates, and reply in chat. With full permissions, they can additionally configure the integration and manage templates and quick replies.
9. Reports and Statistics
On the chat page, the reports button (magnifying glass icon at the head of the conversation list, next to the bell) opens a window with statistics for a chosen period: messages sent, received, Marketing, Utility, and Free (number of messages for each category). In the platform's Reports menu there is also a dedicated WhatsApp entry on instances that have this area activated. Statistics help track communication volume and estimate costs to Meta.