
1. What it is and how it helps
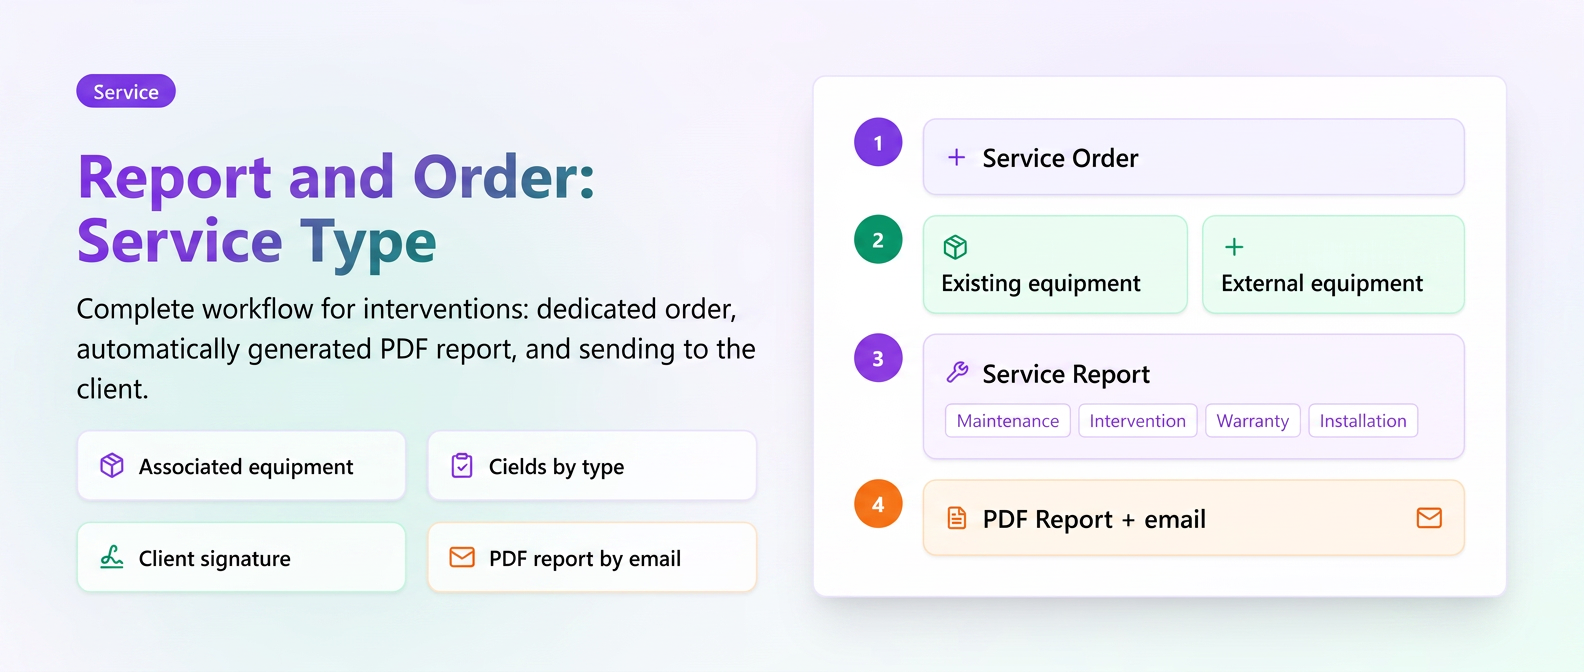
The Service Report and Order function allows for the complete management of service interventions on customer equipment, directly from iFlows. It brings together in a single workflow:
- order creation — a new type of order (Service Order) linked to specific customer equipment;
- intervention documentation — filling in technical fields (reported fault, identified fault, operations performed, replaced parts, etc.) in a dedicated workflow stage;
- report generation — a professional document automatically created upon completion with intervention details;
- transmission to customer — sending the report via email using a predefined template, directly from the interface.
All information automatically synchronizes with the equipment file in the Service module, so that the intervention history for each piece of equipment remains complete and easy to consult.
Note: This documentation covers only the Service Order functionality, the Service Report instruction, and the generated report. For details about the Service module as a whole (configuring equipment templates, managing customer files, field library, etc.), consult the dedicated documentation: Service Module.
2. End-to-end flow
In short, from receiving the request to sending the report, the stages are:
- A Service Order is created and customer equipment is associated.
- The order moves through the standard workflow. At the configured stage, the technician completes the Service Report instruction (type of intervention, faults, operations, parts, etc.).
- Upon completion, the Intervention Report is automatically generated, available in both the order and on the equipment file.
- The report is sent to the customer via email with the Service Report template, directly from the intervention list.
Before using the function for the first time, some initial (one-time) configurations are required. They are detailed in the next section.
3. Initial configurations (one-time)
These settings are made once, before the team uses the function. There are three distinct configurations: the email template, the Service Report instruction in the flow, and the custom report fields.
3.1. Adding the Service Report instruction to the flow
The Service Report instruction is the component in the flow that collects intervention information. It is dragged from the Predefined Instructions into the appropriate stage of the workflow (usually an Installation / Intervention / Handover Protocol stage).
Steps:
- Go to and open the flow where you want to add the report.
- Identify the appropriate stage in the flow.
- From the Predefined Instructions panel (right side), drag the Service Report instruction into the desired stage.
- Click on the configuration icon (gear) on the instruction to set its fields.
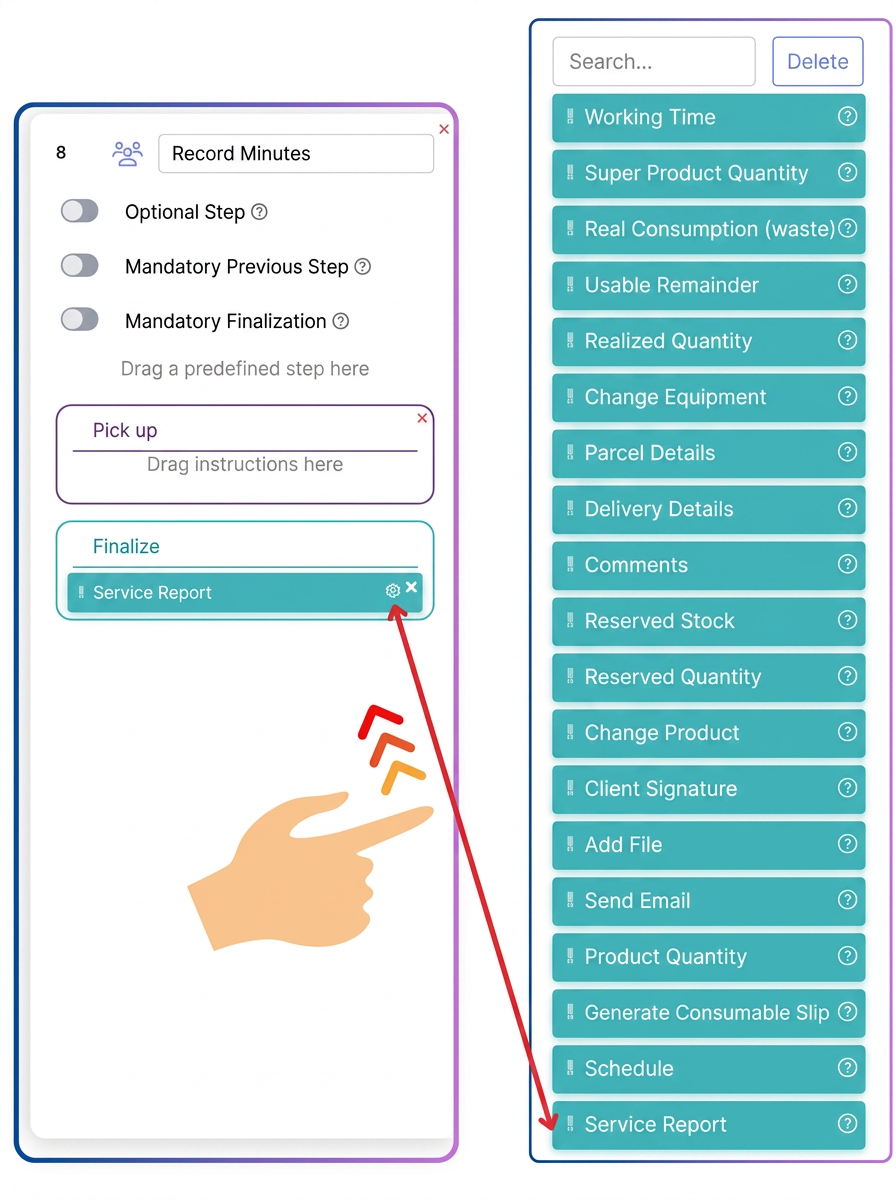
Dragging the Service Report instruction into a flow stage.
3.2. Configuring report fields
After adding the instruction to the flow, accepted intervention types, optional components, and custom fields to be filled during execution are configured.
Intervention types
One or more of the four categories can be activated:
- Maintenance
- Intervention
- Warranty Intervention
- Installation
Optional components
Each instruction can include or exclude:
- Display associated technicians — lists the technicians involved in the report;
- Working time — duration of the intervention;
- Add file — attachments (photos, documents);
- Customer Signature — digital signature on screen;
- Recommended future intervention — automatic scheduling of a subsequent intervention;
- Include order in report — displays order products (with a separate option for value).
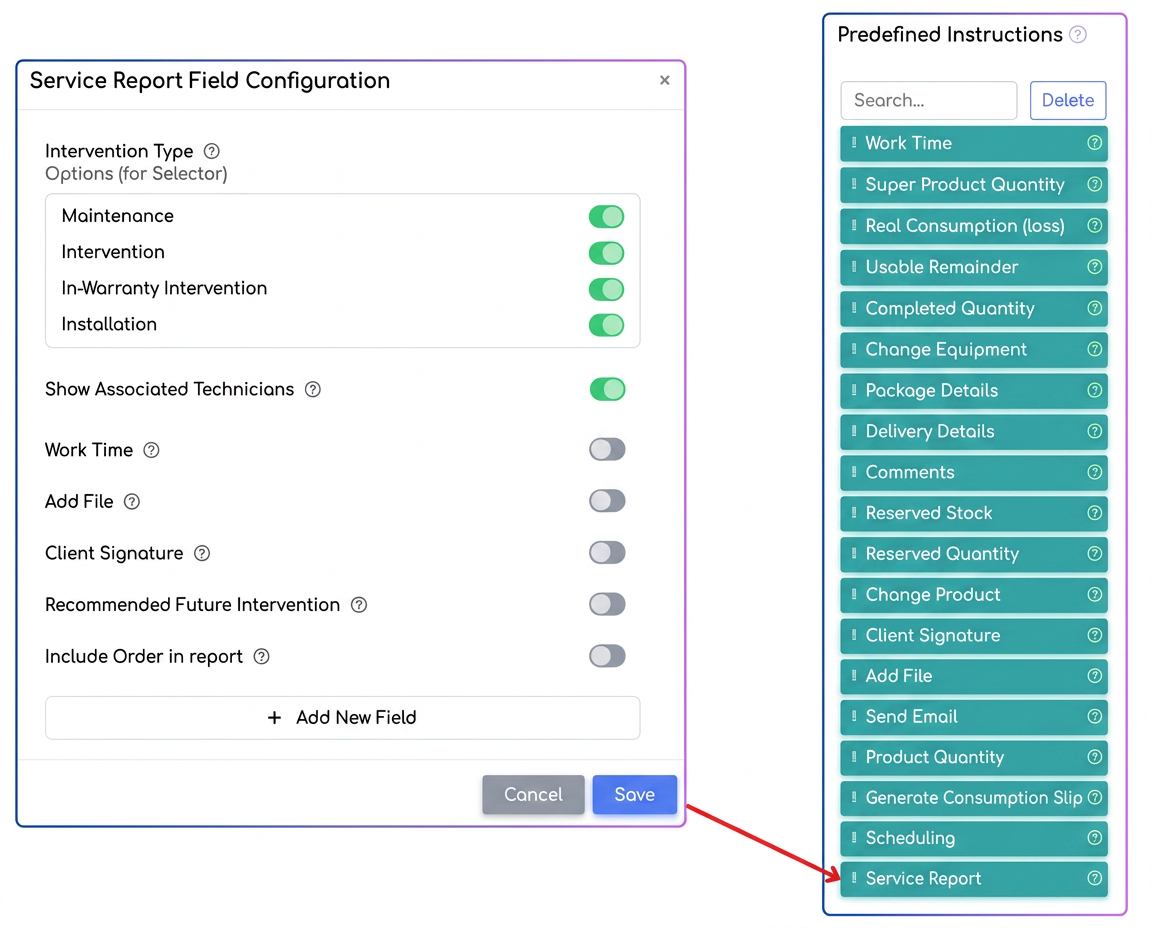
Field configuration window (default options).
Custom fields
From the Add New Field button, additional fields specific to the company's activity can be defined. For each field, you set:
- Field name (e.g.: Reported Fault, Operations performed, Replaced parts / consumables);
- Intervention type for which the field is displayed — a field can be visible only for certain types (e.g.: Proper power supply appears only for Installation).
During execution, if the technician changes the intervention type, fields that do not apply to the chosen type automatically disappear from the form, without losing values already entered.
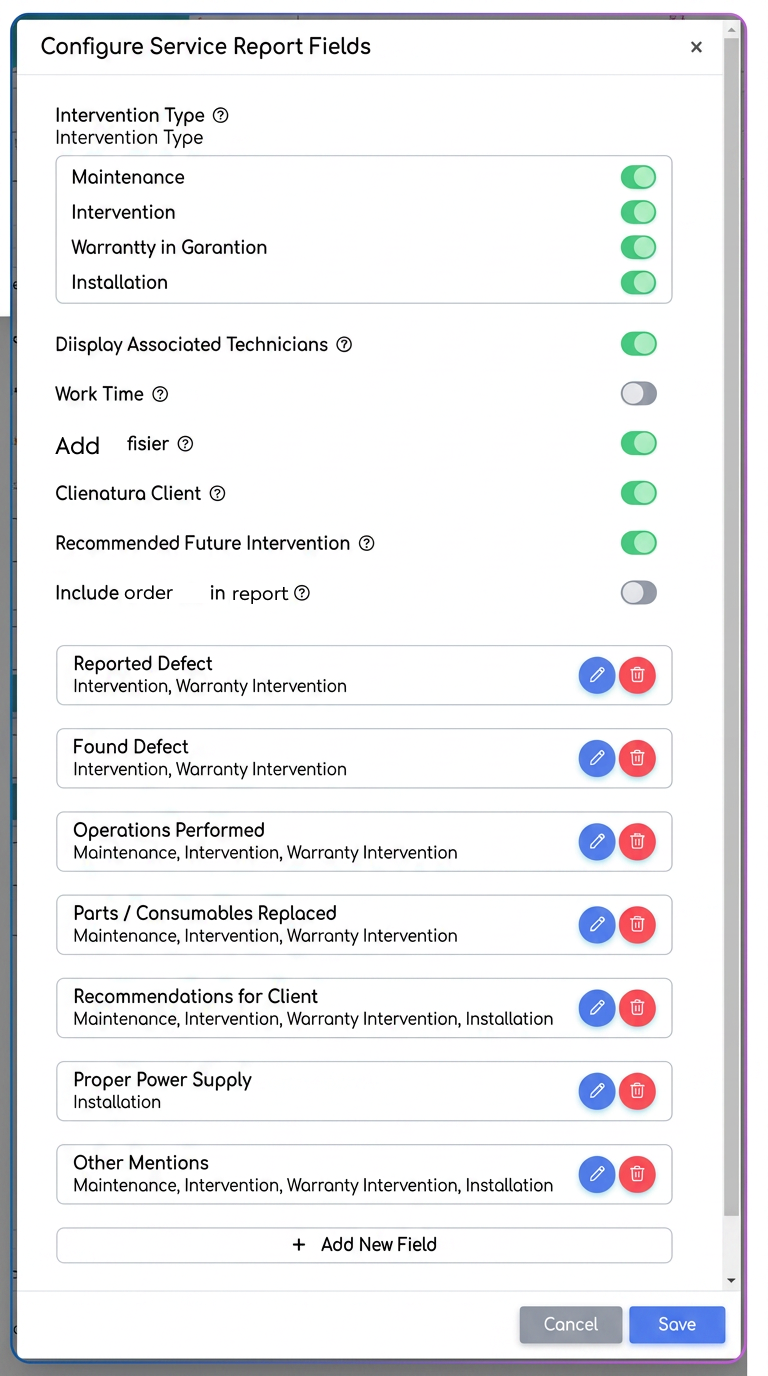
Added custom fields, with filtering by intervention type.
3.3. Configuring the Service Report email template
The Service Report email template is used when sending the report to the customer. It is configured in the Email Templates area, under the Service Report section.
Mandatory fields:
- Subject — can include variables (e.g.: {{service_name}}, which is the equipment alias);
- Sender Name and Sender Email — usually company variables ({{company_name}}, {{company_email}});
- Bcc — addresses that receive a blind copy (can be the team's internal address);
- Message — the body of the email, with variables such as {{service_name}}, {{informatii}}, {{company_name}}.
Recommendations:
- Enable Editable text on sending — allows quick adjustments to the message at the time of sending.
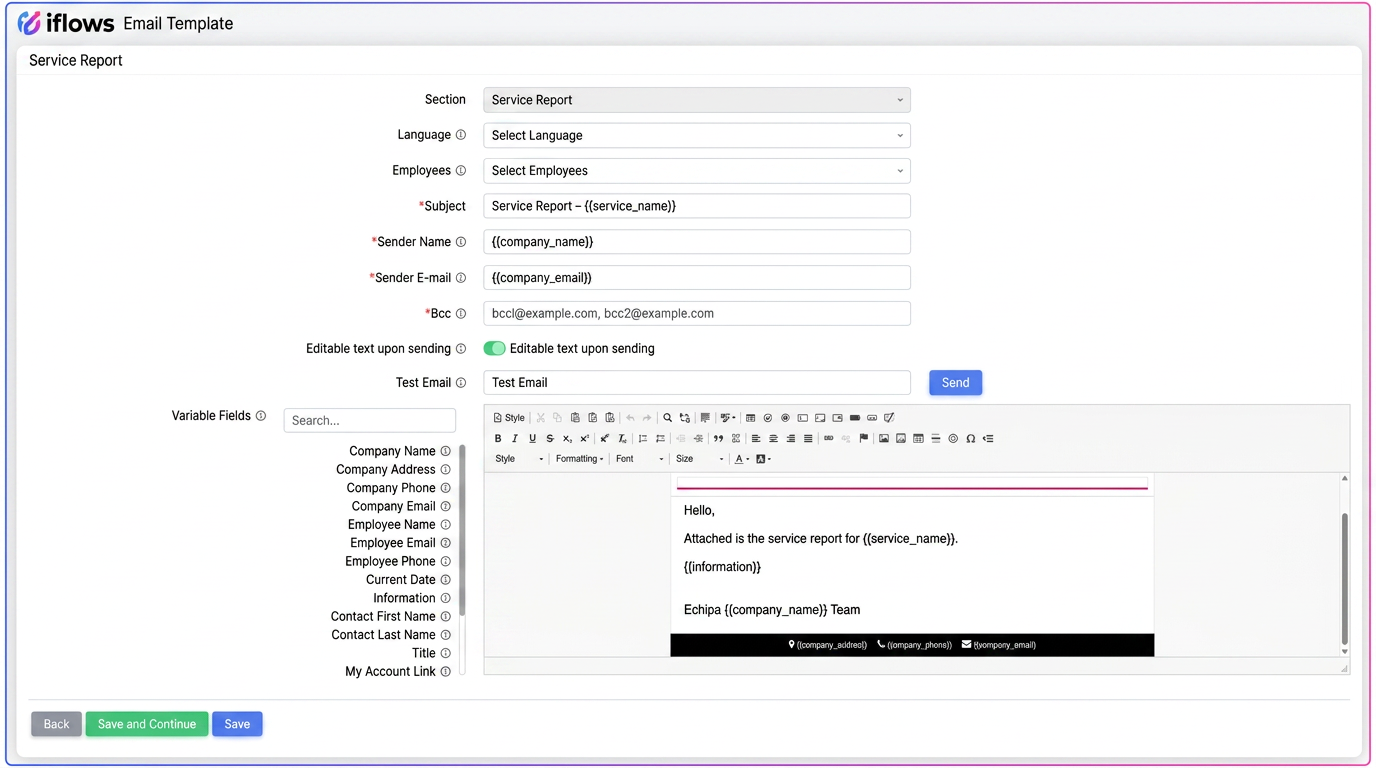
Configuring the Service Report email template (Settings – Templates – e-Mail – Predefined – Service)
4. Creating the service order
The Service Order is the starting point of the flow. It is created from the Orders menu, like any other order, with the difference that the Service Order type is selected and an equipment association is mandatory.
4.1. Selecting the Service Order type
- Go to Orders → + New Order.
- Select the customer.
- Choose the applicable workflow (the one containing the Service Report instruction configured in 3.2).
- In the Order Type field, select Service Order.
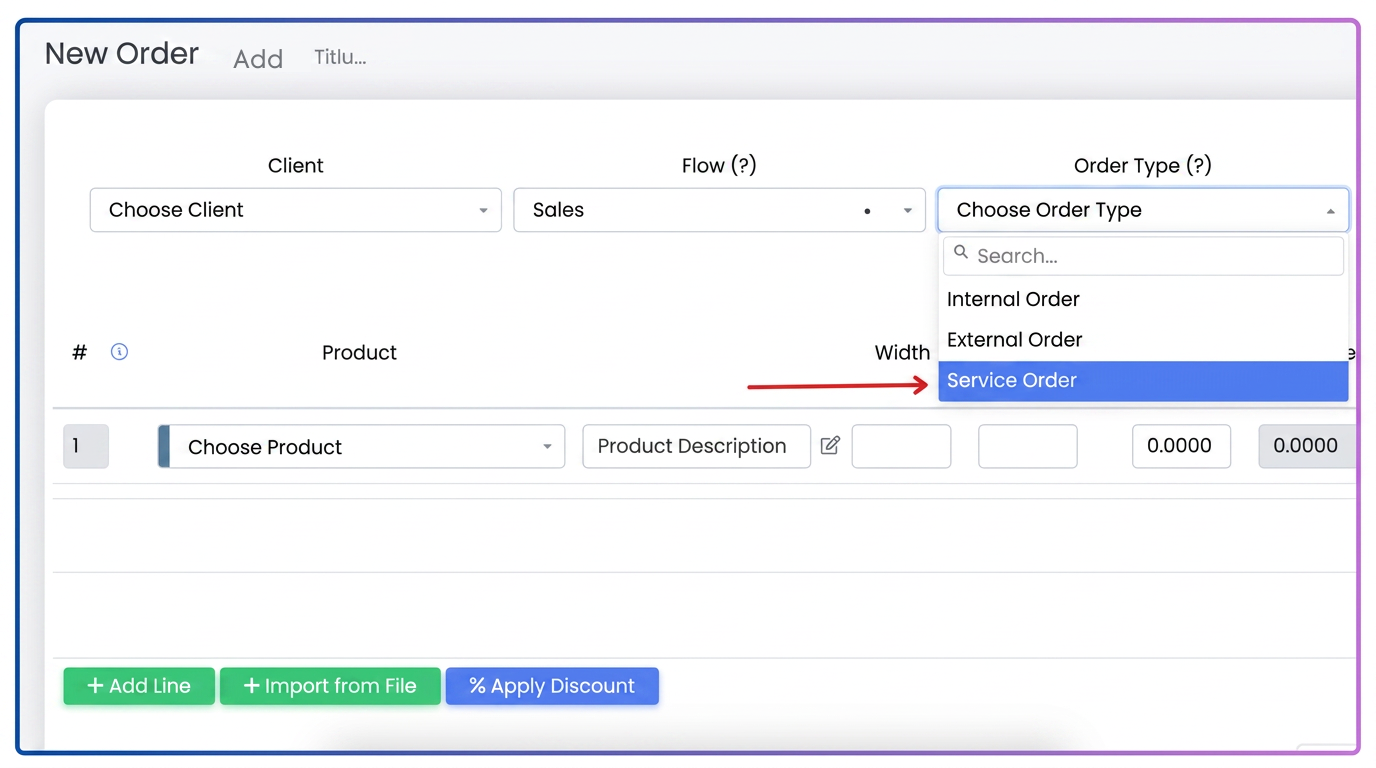
Selecting the Service Order type in the new order form.
4.2. Associating equipment
After selecting the Service Order type, the system automatically opens the Associate Equipment window. There are two options:
- Existing equipment — to select equipment already registered in the Service module for that customer;
- External equipment — for cases where the equipment was not sold by the company or is not registered in the Service module. The order is saved with the mention External Equipment, without being linked to an equipment file.
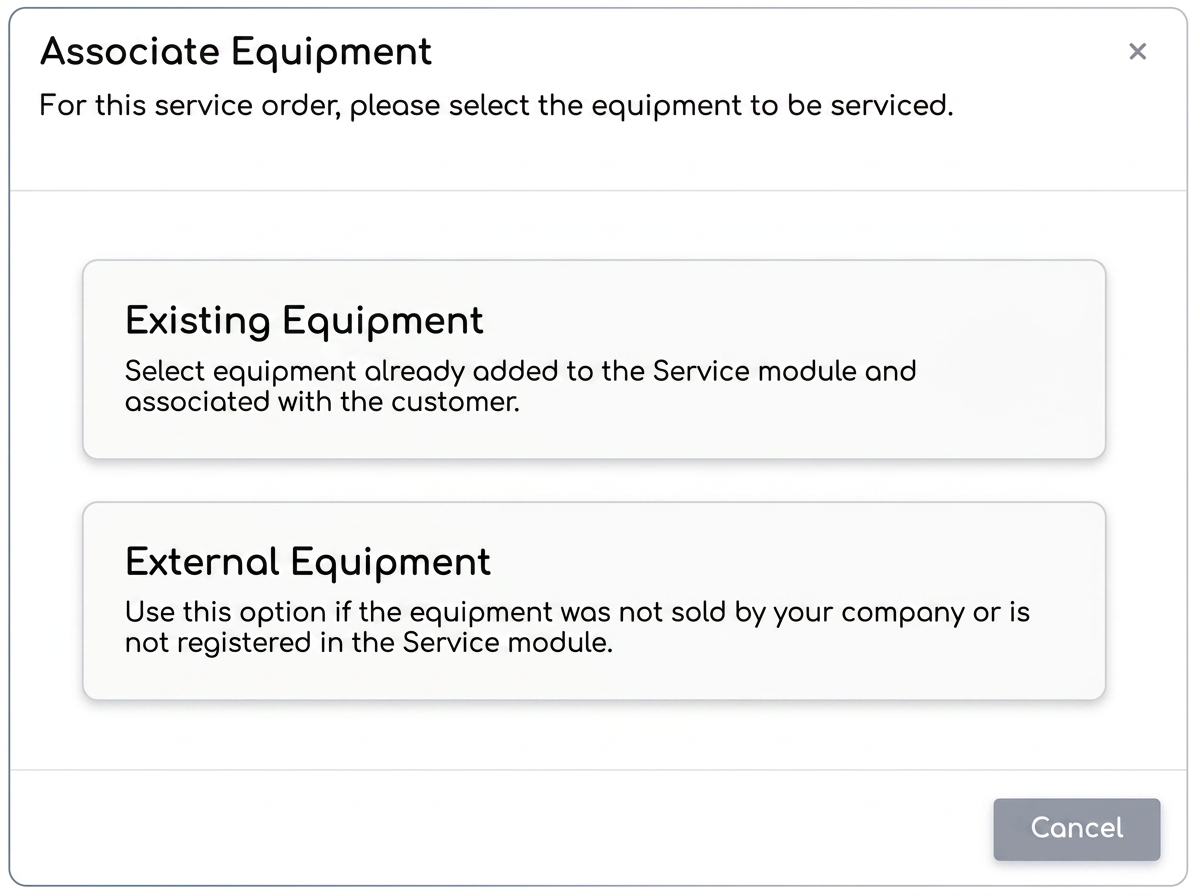
Equipment association window.
For Existing Equipment
The customer's equipment list appears. Select the appropriate equipment and press Select.
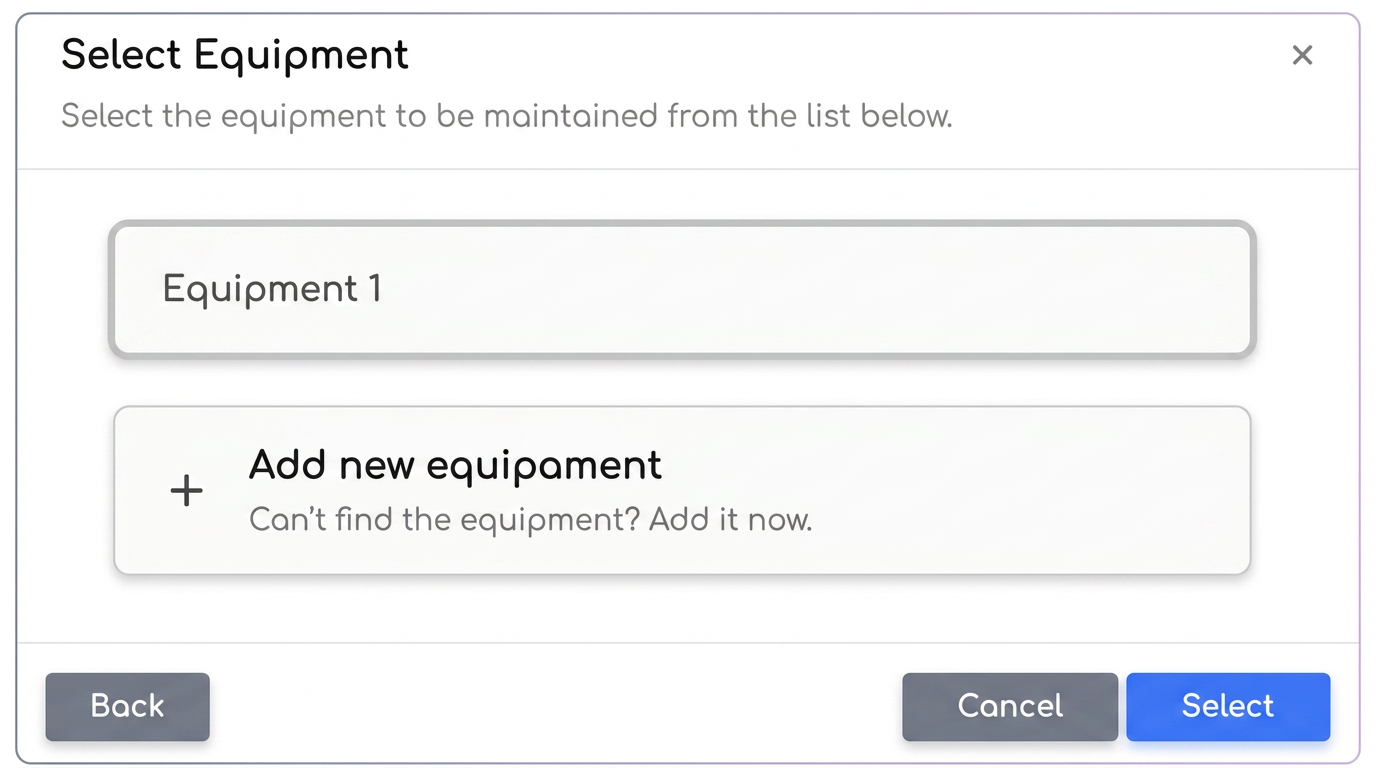
List of customer's existing equipment.
If the equipment does not appear in the list, you can add it on the spot without leaving the order form, using the Add new equipment option.
When adding new equipment, you fill in:
- Customer Equipment Alias (optional) — a custom name for easy identification;
- Template (mandatory) — selection of the equipment template. After selection, the custom fields defined in the template appear.
After Save, the new equipment is automatically registered in the Service module and associated with the order.
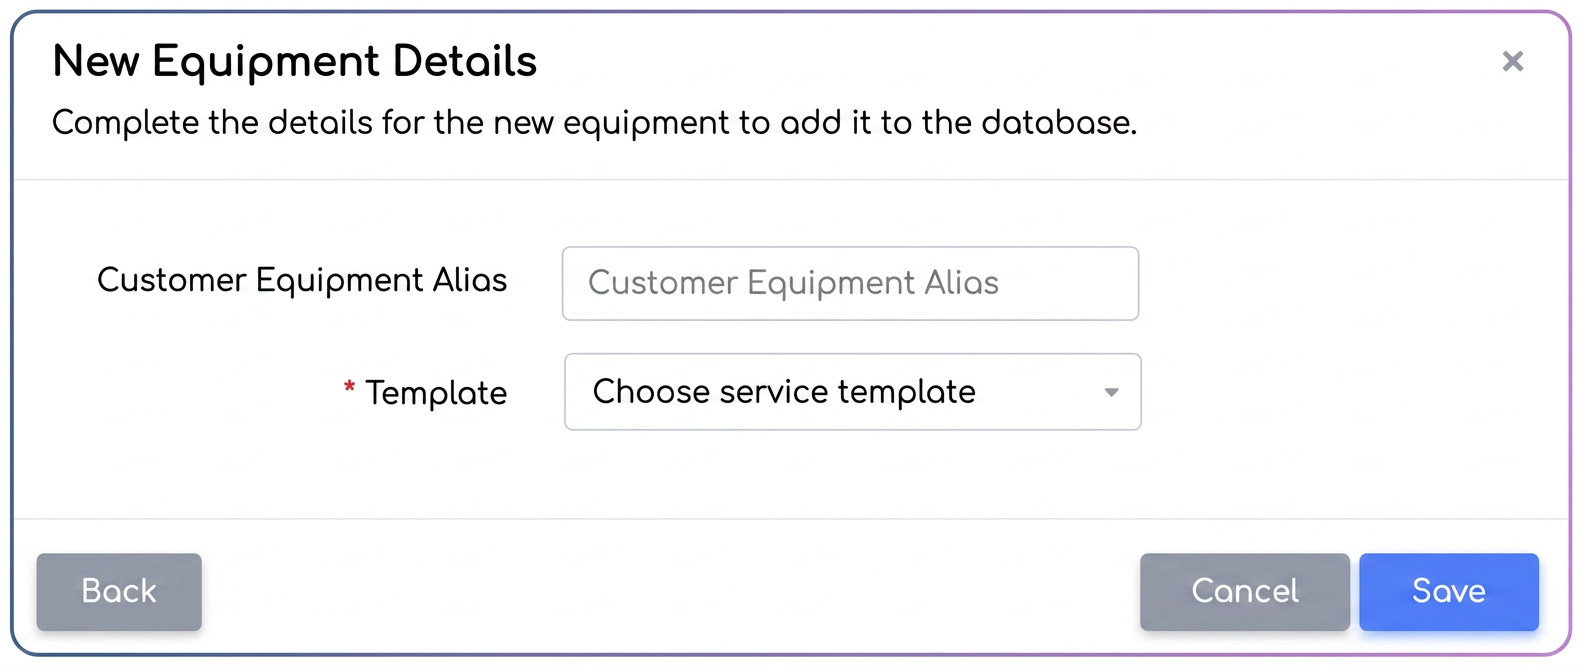
Adding new equipment directly from the order workflow.
4.3. Order header with associated equipment
After saving, the order appears with the equipment visible in the header, as a direct link to the equipment file in the Service module. Clicking on the equipment name opens the file where the recorded intervention will later be visible.
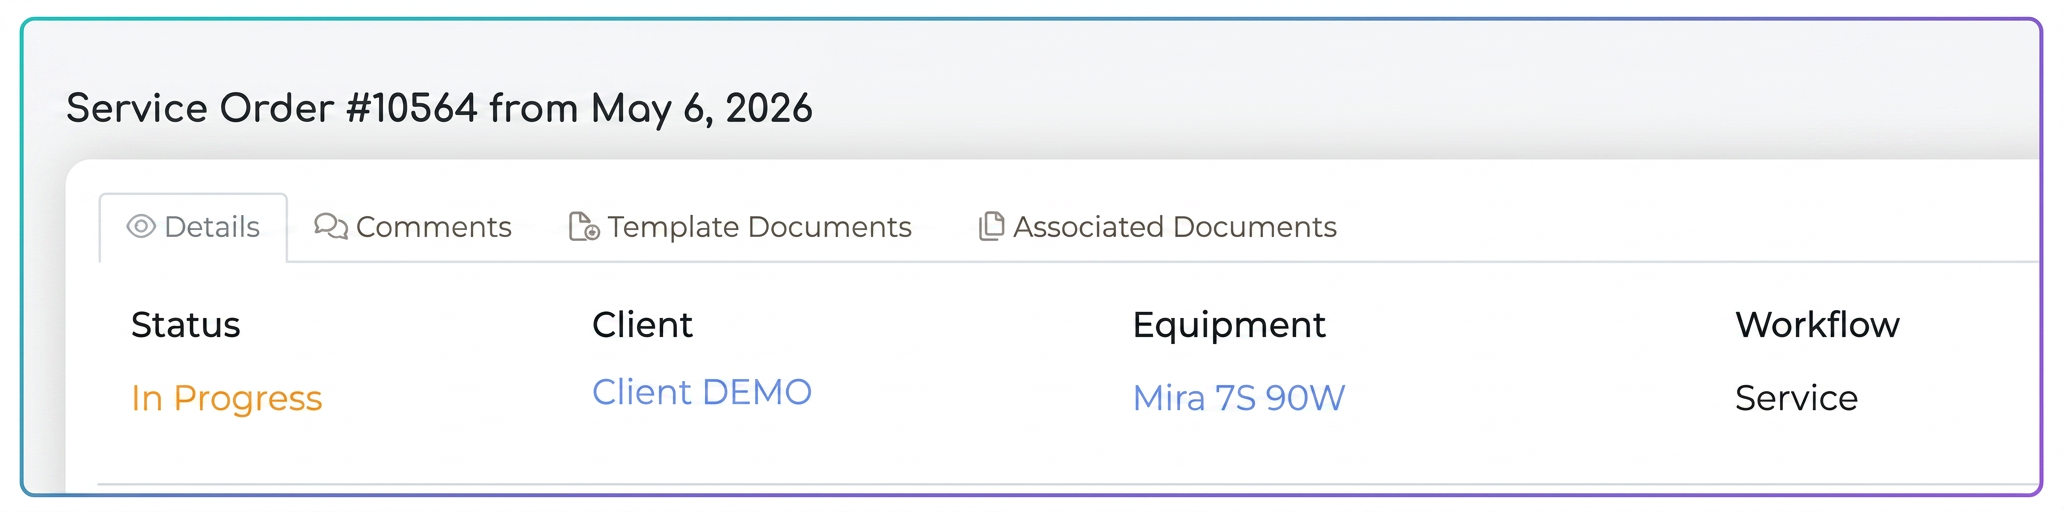
Service order header with the equipment displayed as a link.
5. Completing the intervention report
As the order moves through the flow, it reaches the stage containing the Service Report instruction. Here the technician opens the instruction and fills in the intervention data.
5.1. Filling in fields
During execution, the technician:
- Selects the Intervention Type (Maintenance, Intervention, Warranty Intervention, or Installation). Depending on the chosen type, relevant fields are automatically displayed.
- Completes custom fields (Reported Fault, Identified Fault, Operations performed, etc.).
- Ticks, if applicable, Recommended future intervention and fills in the type and date (date cannot be in the past).
- Attaches files (photos, documents) if enabled.
- Collects the customer's signature on the screen (if enabled).
- Saves — information is written simultaneously to the order and the equipment file.
Automatic validations: Intervention type is mandatory. If Recommended future intervention is ticked, the future intervention type and date become mandatory, and the date cannot be in the past.
5.2. Viewing interventions on the equipment file
After saving, the intervention automatically appears on the equipment file in , in the section corresponding to the chosen type (Maintenance, Interventions, Warranty Interventions, or Installations). The list displays the date, full details, associated technicians, working time, source order, value, alert for future intervention, and attached files.

List of interventions on the equipment file.
5.3. Editing a previously saved intervention
The report remains editable even after completion. From the intervention list, use the Edit button, which opens a window where you can adjust:
- display of technicians, working time, and signature;
- inclusion of the order in the report (with the sub-option to display the value);
- attached files;
- recommended future intervention (type and date);
- custom field values (faults, operations, parts, recommendations, etc.).
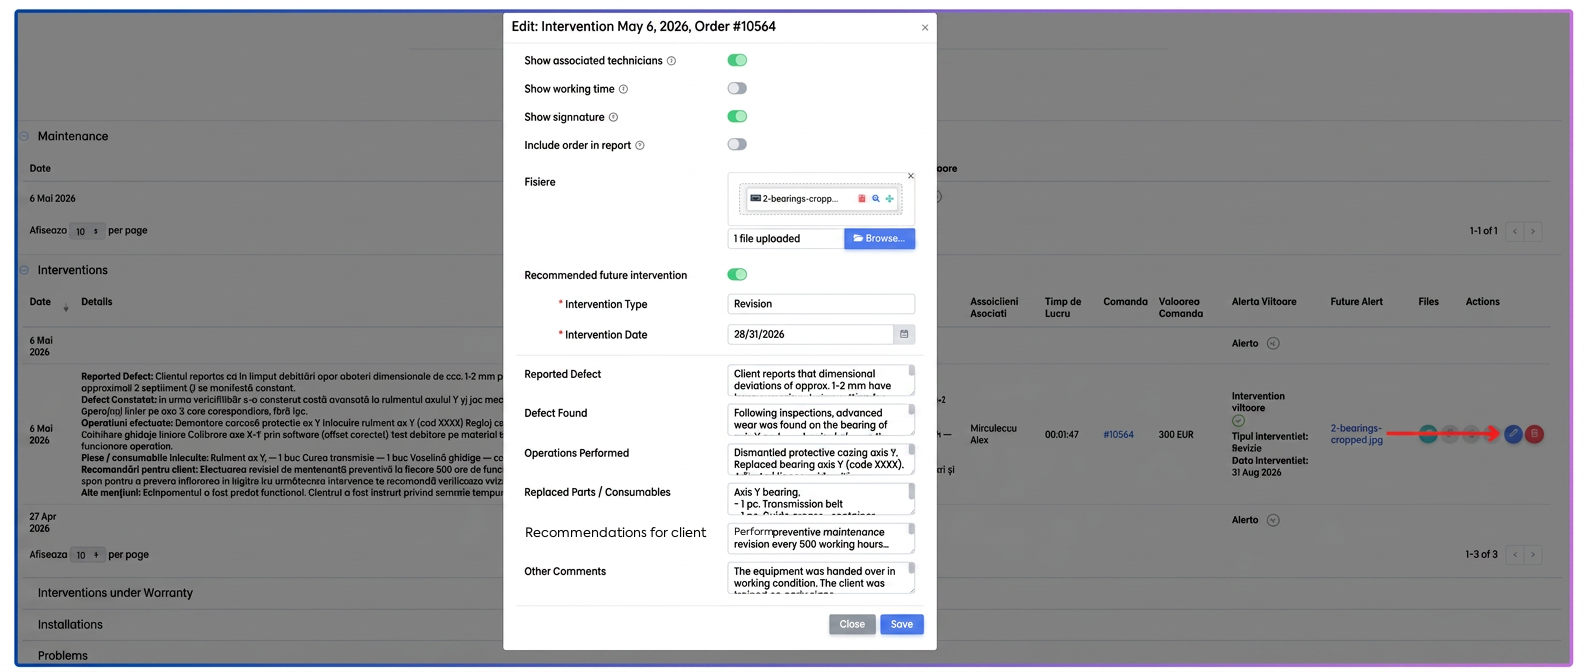
Editing window for a previously saved intervention.
6. Sending the report to the customer
After completing the Service Report instruction, the report is instantly available. On the row of each intervention in the list, there is a set of action buttons.
6.1. Actions available on the report
- View — opens the report in the browser, without downloading;
- Print — version optimized for printing;
- Download — generates a PDF for local saving;
- Send email — opens the sending window with the Service Report template preloaded;
- Edit — modifies report settings and content (see 5.3);
- Delete — requires special permission.
6.2. Sending via email
The recommended way to transmit the report to the customer is the Send email button. A window opens with:
- Template — Service Report preselected (defined in 3.1);
- Recipients — can be added manually or chosen from the customer's contacts;
- Subject — taken from the template, editable;
- Message — email body with the report automatically attached as PDF, editable if the template has Editable text on sending enabled;
- Attach Files — optional, for additional attachments.
After pressing the Send button, the email is sent to the recipient with the report attached as PDF, and the blind copy (Bcc) reaches the addresses configured in the template.
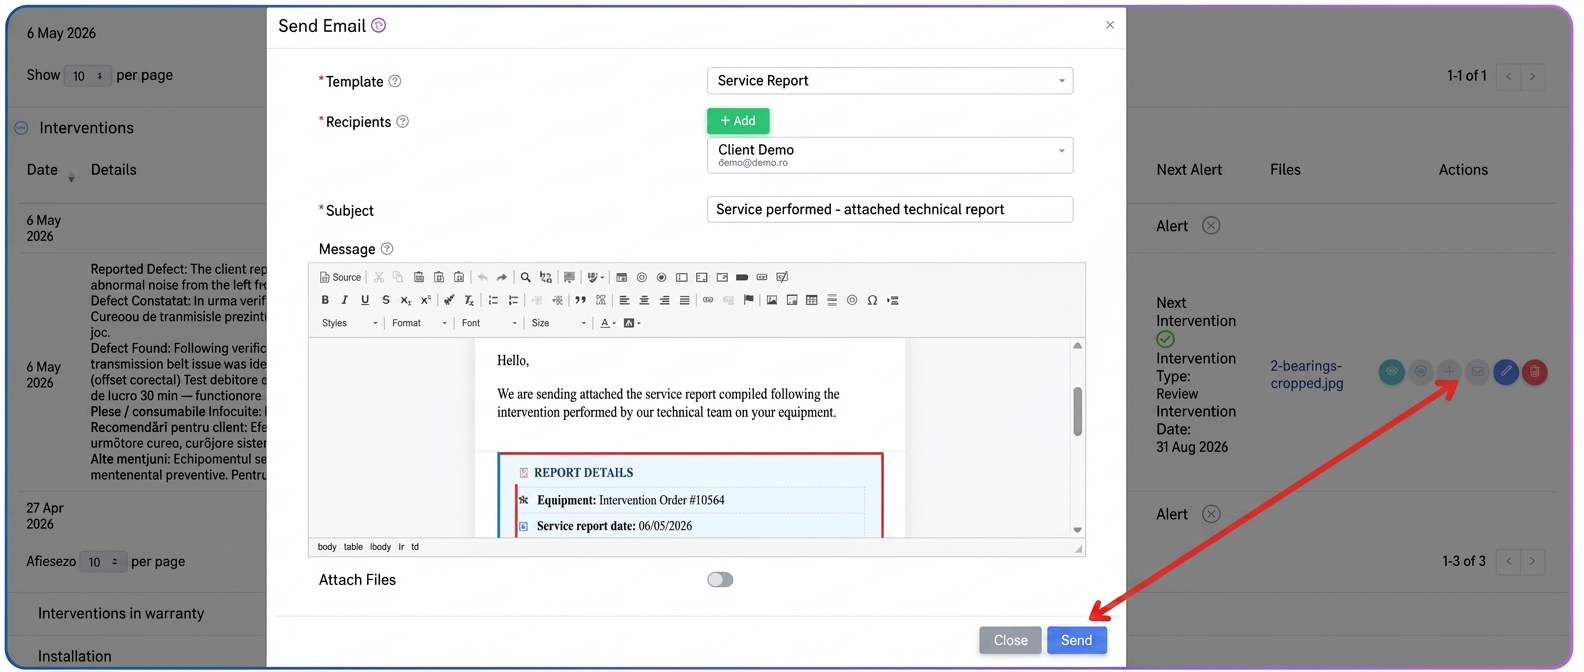
Email sending window for the report.
6.3. Content of the generated report
The automatically generated Intervention Report contains:
- provider company and customer data;
- equipment details (alias, type, model);
- intervention type and date;
- values of the completed custom fields;
- recommended future intervention (if any);
- involved technicians (optional);
- working time (optional);
- customer signature and signee name (optional);
- list of products from the order (optional);
- attached files (integrated images, documents as links).
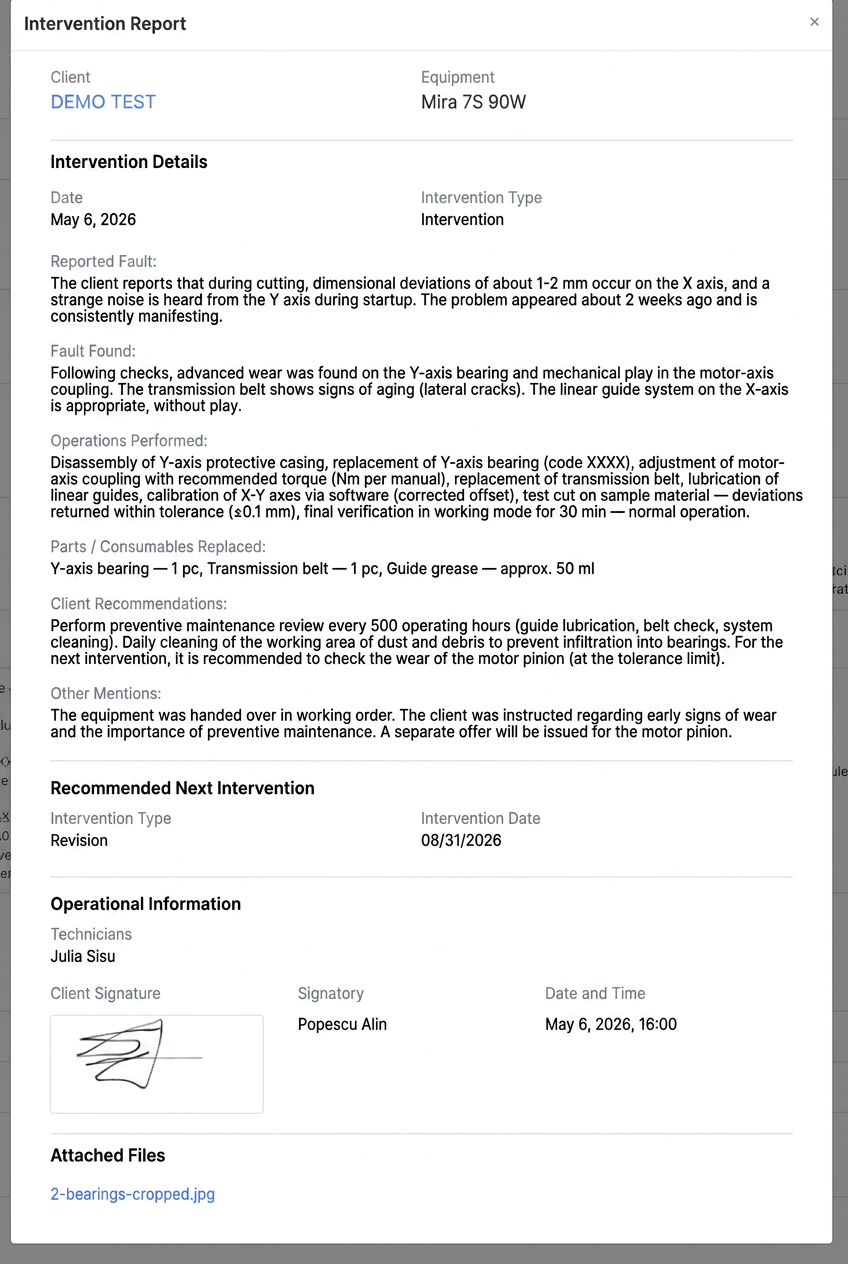
Viewing the generated intervention report.
7. Practical example — complete flow
A customer reports abnormal noise from technological equipment under warranty. The operator:
- Creates a Service Order for that customer, selects the Service Order type, and associates the existing equipment.
- The order enters the flow. At the Handover Protocol stage, the technician opens the Service Report instruction, chooses the Intervention type and fills in: reported fault, identified fault, operations performed, replaced parts, recommendations. Ticks recommended future intervention — Revision in 4 months. Attaches a photo of the worn component. Collects the customer's signature.
- Upon saving, the report is generated automatically. It appears both in the order and on the equipment file in the Interventions section.
- The operator opens the report with View for checking, then presses Send email. The Service Report template is preselected, the recipient (customer) is automatically filled in.
- The customer receives the report in PDF. The internal team receives the Bcc copy. On the scheduled date, the system issues an alert for the Revision intervention.